【QT】重写QAbstractLIstModel,使用ListView来显示多列数据
qt提供了几个视图来进行信息的列表显示,QListView可以用来显示继承QStractListModel的字符串列表中的字符串,默认的模型里面只包含一列的内容:
这里以qml为例子,先新建一个qml的项目,示例代码如下:
先创建一个列表的只读模型,以QAbstractListModel为基类,最基础的只用实现两个函数即可:rowCount()和
data(),一个用来返回模型的行数,一个用来返回指定的模型索引的数据项:
	//返回模型的行数
    int rowCount(const QModelIndex &parent = QModelIndex()) const;
    //返回指定模型索引的数据项
    QVariant data(const QModelIndex &index, int role) const;
使用一个QStringList列表来作为内部的数据源:
QStringList m_strValue;
现在来开始实现这两个函数:这两个函数的实现是比较简单的
int MyListModel::rowCount(const QModelIndex &parent) const
{
    Q_UNUSED(parent);
    return m_strValue.count();
}

QVariant MyListModel::data(const QModelIndex &index, int role) const
{
    if(!index.isValid())
        return QVariant();

    if(role == Qt::DisplayRole)
        return m_strValue.at(index.row());
    return QVariant();
}
再建立一个设置改列表值的函数,因为后面要将测试的model注册到qml中去,所以不方便再构造函数中将QStringList的值设置下去,所以这里添加一个setDataModel()函数,函数的定义如下:
void MyListModel::setDataModel(const QStringList &var)
{
    if(var.isEmpty())
        return ;
    m_strValue = var;
}
到这里对MyListModel的类的完善已经差不多了,接下来新增一个测试的类来添加数据到列表中去:
这里直接给出,两个文件如下:
testlistmodel.h
#ifndef TESTLISTMODEL_H
#define TESTLISTMODEL_H
#include testlistmodel.cpp
#include "testlistmodel.h"

TestListModel::TestListModel(QObject *parent) : QObject(parent)
{
    QStringList list;

    for(int i = 0; i < 30; i++)
    {
        list << QString("第%1个").arg(i);
    }

    m_model.setDataModel(list);
}
最后再main.cpp中将model注册到qml中:
#include 接下来在qml中使用ListView组件,并指定使用的model就可以了。
main.qml如下:
import QtQuick 2.12
import QtQuick.Window 2.12

Window {
    visible: true
    width: 640
    height: 480
    title: qsTr("Hello World")


    ListView {
        anchors.fill: parent;
        model:testModel;
        delegate: Text {
            id: tt
            height:30;
            text: display;//Qt::DisplayRole提供一个角色名display
        }
    }
}
运行结果如下:

这就是一个列表显示,根据在c++中提供的数据注册到qml中来显示的,动图这里就不展示了。
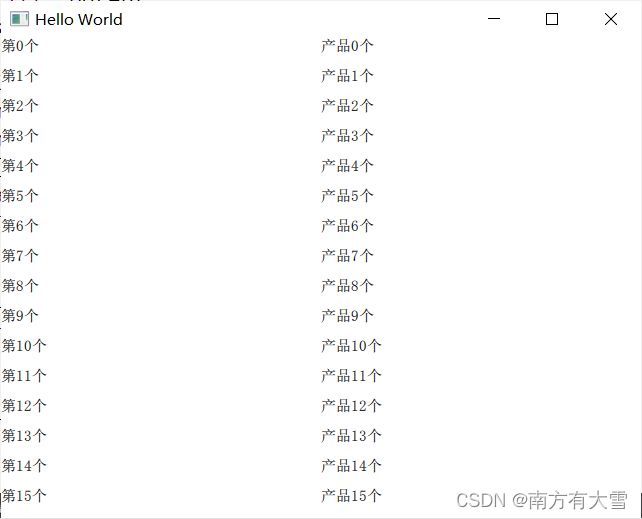
可以看到这里显示的是一列的内容,如果要使用ListView来显示多列的内容,应该如何去设计model呢?这里就需要去修改数据类型,也就是不能继续用QStringList作为存储数据的了,需要重新设计一个数据类型可以去报存多个数据:这里选取的数据类型如下:
QMap<int, QMap<int,QVariant>> tmp; //使用QMap来存存放数据,内嵌一个QMap来存放每一行的各个列的数据
//内嵌的QMap也可单独设计一个类来实现,只不过在后续的其他方面也需要做不同的修改,这里先不说
定义一个这样的容器来做数据的存放,还要在原有的基础上添加几个函数,也要重写roleNames()函数,如下:
再新增一个变量,用来存放角色role:
QHash<int, QByteArray> m_roleName();
后面直接放上修改后的文件,改的内容比较多,直接在代码中标注出来:
mylistmodel.h
#ifndef MYLISTMODEL_H
#define MYLISTMODEL_H
#include mylistmodel.cpp
#include "mylistmodel.h"

MyListModel::MyListModel(QObject* parent) : QAbstractListModel(parent)
{

}

int MyListModel::rowCount(const QModelIndex &parent) const
{
    Q_UNUSED(parent);
    return m_map.count();//改为m_map
}

QVariant MyListModel::data(const QModelIndex &index, int role) const
{
    if(!index.isValid())
        return QVariant();

    if(index.row() >= m_map.size())
        return QVariant();

    if(role >= Qt::UserRole) //使用QT提供的自定义的角色的值,累加
    {
        QMap<int, QVariant> var = m_map.value(index.row());
        return var.value(role);
    }
    return QVariant();
}

void MyListModel::setDataModel(const QMap<int, QMap<int, QVariant>> &var)
{
    if(var.isEmpty())
        return ;
    m_map = var;
}

int MyListModel::columnCount(const QModelIndex &parent) const
{
    Q_UNUSED(parent);
    return m_roleName.count();
}

QHash<int, QByteArray> MyListModel::roleNames() const
{
    return m_roleName;
}

void MyListModel::insertRoleName(const int role, const QByteArray name)
{
    m_roleName.insert(role, name);
}
testlistmodel.cpp
#include "testlistmodel.h"

TestListModel::TestListModel(QObject *parent) : QObject(parent)
{
    QMap<int, QMap<int, QVariant>> var;

    for(int i = 0; i < 30; i++)
    {
        QMap<int,QVariant> map;

        map.insert(Qt::UserRole,QString("第%1个").arg(i));
        map.insert(Qt::UserRole+1,QString("产品%1个").arg(i));

        var.insert(i,map);

    }

    m_model.setDataModel(var);

    //添加角色
    m_model.insertRoleName(Qt::UserRole,"Column_One");
    m_model.insertRoleName(Qt::UserRole+1,"Column_Two");

}
main.qml
import QtQuick 2.12
import QtQuick.Window 2.12

Window {
    visible: true
    width: 640
    height: 480
    title: qsTr("Hello World")


    ListView {
        anchors.fill: parent;
        model:testModel;
        delegate: Item {
            id: it;
            height:30;
            width:parent.width;
            Row {
                anchors.fill: parent;
                Text{
                    width:parent.width/2;
                    text: Column_One;
                }
                Text {
                    width:parent.width/2;
                    text: Column_Two;
                }
            }
        }
    }

}
