如何让Arduino运行FreeRTOS实时操作系统
在本文中,您将学习如何使用带Arduino的Freertos操作系统来执行特定的任务。实时操作系统又称RTOS,是一种旨在满足实时应用要求的操作系统。它能够处理输入的数据,通常不需要缓冲延迟。RTOS是调用预定义函数的组合。实时操作系统中的关键因素是最小的中断延迟和最小的线程切换延迟。实时操作系统的价值更多地体现在它对给定时间段内完成任务的响应速度和可预测性。
有三种 RTOS 实时操作系统:
Examples of RTOS:
Why RTOS are required:
当我们编写好的嵌入式软件时,我们不需要RTOS,但是当它的复杂性和大小增加时,RTOS总是有益的,原因如下:
这些是RTOS的优点,但也有一些缺点,如下所示;
该项目中使用的操作系统是FreeRTOS。 FreeRTOS由Real Time Engineers Ltd.开发.FreeRTOS是一种流行的实时操作系统内核。 FreeRTOS是开源的。 它用于嵌入在所述35微控制器中的嵌入式设备。 它主要用C语言编写,但有些函数是用汇编语言编写的。 还有在线提供的SafeRTOS和OpenRTOS,与FreeRTOS类似。
使用Arduino进行任务切换:
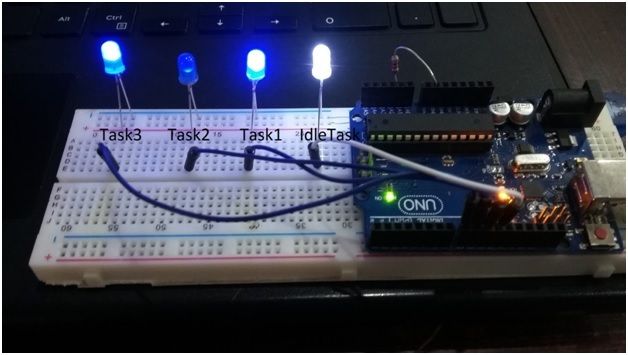
在这个项目中,3 Led表示三个任务,一个Led表示空闲状态。 三个任务分别是Task1,Task2和Task3。
安装FreeRTOS库:
https://github.com/feilipu/Arduino_FreeRTOS_Library
代码:
#include
void setup()
{
// 初始化串口波特率
Serial.begin(9600);
Serial.println(F("In Setup function"));
// 3个led灯 任务,1个led空闲任务
pinMode(8,OUTPUT);
pinMode(9,OUTPUT);
pinMode(10,OUTPUT);
pinMode(11,OUTPUT);
// 任务执行函数名 任务名字 栈大小 NULL 优先权 NULL
xTaskCreate(MyTask1, "Task1", 100, NULL, 1, NULL); // 三个任务,标签为"Task1"~"Task3" ,优先权分别为1~3
xTaskCreate(MyTask2, "Task2", 100, NULL, 2, NULL);
xTaskCreate(MyTask3, "Task3", 100, NULL, 3, NULL);
xTaskCreate(MyIdleTask, "IdleTask", 100, NULL, 0, NULL);}// 第四个,空闲任务,最低优先级0级
void loop()
{
// 无
}
// 任务1 Task1====
static void MyTask1(void* pvParameters)
{
while(1) // for (;;) //这个更好
{
digitalWrite(8,HIGH); // 8号管脚灯亮
digitalWrite(9,LOW);
digitalWrite(10,LOW);
digitalWrite(11,LOW);
Serial.println(F("Task1"));
vTaskDelay(100/portTICK_PERIOD_MS);// 延时 0.1秒
}
}
// 任务2====
static void MyTask2(void* pvParameters)
{
while(1)
{
digitalWrite(8,LOW);
digitalWrite(9,HIGH); // 9号管脚灯亮
digitalWrite(10,LOW);
digitalWrite(11,LOW);
Serial.println(F("Task2"));
vTaskDelay(110/portTICK_PERIOD_MS);// 延时
}
}
// 任务3=====
static void MyTask3(void* pvParameters)
{
while(1)
{
digitalWrite(8,LOW);
digitalWrite(9,LOW);
digitalWrite(10,HIGH);// 10号管脚灯亮
digitalWrite(11,LOW);
Serial.println(F("Task3"));
vTaskDelay(120/portTICK_PERIOD_MS);// 延时
}
}
// 空闲任务,无任务时,就执行该空闲时期任务
static void MyIdleTask(void* pvParameters)
{
while(1)
{
digitalWrite(8,LOW);
digitalWrite(9,LOW);
digitalWrite(10,LOW);
digitalWrite(11,HIGH); // 11号管脚灯亮
Serial.println(F("Idle state"));
delay(50);// 延时
}
}
每个任务有不同的优先级以及延时时间
Implementation:
link: http://microcontrollerslab.com/use-freertos-arduino/
// 实验中包含五个实时任务:
#include
#include // Semaphores 信号量
#define Button 8
#define LED_Extern 9
#define Buzzer 12
#define LED_Buildin 13
#define Light_Sensor A0
#define TH_Sensor A3
#define Rotation A5
// 用来确保串口互斥访问的信号量及其使用:
// Declare a mutex Semaphore Handle which we will use to manage the Serial Port.
// It will be used to ensure only one Task is accessing this resource at any time.
SemaphoreHandle_t xSerialSemaphore;// 确保同一时间仅有一个任务获取相同的资源
// 定义5个任务函数
void TaskBuzzerAlarm( void *pvParameters ); //按钮控制蜂鸣器
void TaskLEDControl( void *pvParameters ); //旋位器控制LED灯
void TaskLEDBlink( void *pvParameters ); //板载LED灯闪烁
void TaskLightMonitor( void *pvParameters );//监控亮度
void TaskTHMonitor( void *pvParameters ); //温湿度传感器监控温湿度
void setup() {
// put your setup code here, to run once:
pinMode(Button,INPUT);// 按键
pinMode(LED_Extern,OUTPUT);// 板外LED
pinMode(Buzzer,OUTPUT);// 蜂鸣器
pinMode(LED_Buildin,OUTPUT);// 板载LED
pinMode(Light_Sensor,INPUT);// 光线传感器
pinMode(TH_Sensor,INPUT); // 温湿度传感器
pinMode(Rotation,INPUT); // 旋位器
// 串口
Serial.begin(9600);
while (!Serial) {
; // 等待串口连接
}
// 创建串口信号量
if ( xSerialSemaphore == NULL ) // Check to confirm that the Serial Semaphore has not already been created.
{
xSerialSemaphore = xSemaphoreCreateMutex(); // Create a mutex semaphore we will use to manage the Serial Port
if ( ( xSerialSemaphore ) != NULL )
xSemaphoreGive( ( xSerialSemaphore ) ); // Make the Serial Port available for use, by "Giving" the Semaphore.
}
// 创建 5 个任务
xTaskCreate(
TaskBuzzerAlarm // 任务执行函数
, (const portCHAR *)"BuzzerAlarm" // 任务名
, 128 // 栈大小
, NULL
, 3 // 优先级,越大优先级越高
, NULL );
xTaskCreate(
TaskLEDControl
, (const portCHAR *) "LEDControl"
, 128 // Stack size
, NULL
, 2 // Priority
, NULL );
xTaskCreate(
TaskLEDBlink
, (const portCHAR *) "LEDBlink"
, 128 // Stack size
, NULL
, 0 // Priority
, NULL );
xTaskCreate(
TaskLightMonitor
, (const portCHAR *) "LightMonitor"
, 128 // Stack size
, NULL
, 1 // Priority
, NULL );
xTaskCreate(
TaskTHMonitor
, (const portCHAR *) "THMonitor"
, 128 // Stack size
, NULL
, 1 // Priority
, NULL );
// Now the task scheduler, which takes over control of scheduling individual tasks, is automatically started.
}
void loop() {
// put your main code here, to run repeatedly:
// Empty. Things are done in Tasks.
}
// 5个任务函数====================
void TaskBuzzerAlarm( void *pvParameters __attribute__((unused)) ) // This is a Task.
{
/*
DigitalRead
Reads a digital input on pin 8 that has a pushbutton attached to it, prints the result to the serial monitor
*/
for (;;) // A Task shall never return or exit.
{
// read the input pin:
int buttonState = digitalRead(Button);
if(buttonState==LOW){
digitalWrite(Buzzer,LOW);
}
else{
digitalWrite(Buzzer,HIGH);
}
vTaskDelay( 500 / portTICK_PERIOD_MS ); // half second delay in between reads for stability
}
}
void TaskLEDControl(void *pvParameters) // This is a task.
{
(void) pvParameters;
/*
LED Controlled By Rotation Sensor
*/
for (;;) // A Task shall never return or exit.
{
int rota=analogRead(Rotation);
analogWrite(LED_Extern,map(rota,0,1023,0,255));
vTaskDelay( 500 / portTICK_PERIOD_MS ); // wait for half second
}
}
void TaskLEDBlink(void *pvParameters) // This is a task.
{
(void) pvParameters;
/*
Blink
Turns on an LED on for one second, then off for one second, repeatedly.
*/
for (;;) // A Task shall never return or exit.
{
digitalWrite(LED_Buildin, HIGH); // turn the LED on (HIGH is the voltage level)
vTaskDelay( 1000 / portTICK_PERIOD_MS ); // wait for one second
digitalWrite(LED_Buildin, LOW); // turn the LED off by making the voltage LOW
vTaskDelay( 1000 / portTICK_PERIOD_MS ); // wait for one second
}
}
void TaskLightMonitor( void *pvParameters __attribute__((unused)) ) // This is a Task.
{
/*
AnalogRead
Reads a analog input on pin A0 that has a Light Sensor attached to it, prints the result to the serial monitor
*/
for (;;) // A Task shall never return or exit.
{
// read the input pin:
int LightValue = analogRead(Light_Sensor);
// See if we can obtain or "Take" the Serial Semaphore.
// If the semaphore is not available, wait 5 ticks of the Scheduler to see if it becomes free.
if ( xSemaphoreTake( xSerialSemaphore, ( TickType_t ) 5 ) == pdTRUE )
{
// We were able to obtain or "Take" the semaphore and can now access the shared resource.
// We want to have the Serial Port for us alone, as it takes some time to print,
// so we don't want it getting stolen during the middle of a conversion.
// print out the value of the light sensor:
Serial.print("Light Sensor(0~1023):");
Serial.println(LightValue);
xSemaphoreGive( xSerialSemaphore ); // Now free or "Give" the Serial Port for others.
}
vTaskDelay( 5000 / portTICK_PERIOD_MS ); // 5 second delay in between reads for stability
}
}
void TaskTHMonitor( void *pvParameters __attribute__((unused)) ) // This is a Task.
{
/*
AnalogRead
Reads a analog input on pin A0 that has a Temporature&Humidity Sensor attached to it, prints the result to the serial monitor
*/
for (;;) // A Task shall never return or exit.
{
// read the input pin:
int THValue = analogRead(TH_Sensor);
// See if we can obtain or "Take" the Serial Semaphore.
// If the semaphore is not available, wait 5 ticks of the Scheduler to see if it becomes free.
if ( xSemaphoreTake( xSerialSemaphore, ( TickType_t ) 5 ) == pdTRUE )
{
// We were able to obtain or "Take" the semaphore and can now access the shared resource.
// We want to have the Serial Port for us alone, as it takes some time to print,
// so we don't want it getting stolen during the middle of a conversion.
// print out the value of the THlk liyhb kmyhh kmmi sensor:
Serial.print("Temporature&Humidity Sensor(0~1023):");
Serial.println(THValue);
xSemaphoreGive( xSerialSemaphore ); // Now free or "Give" the Serial Port for others.
}
vTaskDelay( 5000 / portTICK_PERIOD_MS ); // 5 second delay in between reads for stability
}
}