极简Mybatis干货:从零开始(持续更新改进)
距离初次学习Mybatis已是许久之前,趁着这段时间没有实习与课程较少,再次复习一下Mybatis并记录一下。(全程无废话)
-----------------------------------------分割线----------------------------------------------
Mybatis概述:
mybatis对JDBC API进行了封装,使得操作更加便捷简单。
ORM思想:Object Relational Mapping 对象关系映射。
就是把数据库表和实体类及实体类的属性对应起来,让我们可以操作实体类就实现操作数据库表。
Mybatis环境搭建
对于环境的搭建,首先我们需要先建立一个Maven项目:


先取名,然后直接finish。
在pom.xml文件中引入相关依赖:

第一个Mybatis程序的创建与操作
mybatis框架前期工作主要是对环境的搭建和配置。
创建数据库实体类和该数据的操作接口

我们先在数据库建立起这样一张表。

然后在项目里面的建立两个包,一个为entity实体类包,记得前面我们说到的ORM思想吗,这个类就是用来对应数据库中的那个类的。其中Student代码为:
package entity;

import java.util.Date;

public class Student {

    private Integer id;
    private String name;
    private Date birthday;
    private String sex;

    public Integer getId() {
        return id;
    }

    public void setId(Integer id) {
        this.id = id;
    }

    public String getStudentName() {
        return name;
    }

    public void setStudentName(String name) {
        this.name = name;
    }

    public Date getBirthday() {
        return birthday;
    }

    public void setBirthday(Date birthday) {
        this.birthday = birthday;
    }

    public String getSex() {
        return sex;
    }

    public void setSex(String sex) {
        this.sex = sex;
    }

    @Override
    public String toString() {
        return "Student{" +
                "id=" + id +
                ", studentName='" + name + '\'' +
                ", birthday=" + birthday +
                ", sex='" + sex + '\'' +
                '}';
    }
}
一个为dao包,这个包里面用来建立关于entity包类中的操作接口,例如我们可以在里面定义各种方法来操作数据库中相关entity的类。其中里面这个StudentDao的代码为:
package dao;

import entity.Student;

import java.util.List;

/**
 * @author github zhanxiongjun
 *
 */
public interface StudentDao {

    /**
     * 查询所有学生的操作
     * @return
     */
    List<Student> findAll();
}
mybatis主文件配置与mapper文件配置

其中mybatis-config.xml为主配置文件,其中配置了数据池连接和映射mapper包下的文件。
<?xml version="1.0" encoding="UTF-8"?>
<!DOCTYPE configuration
        PUBLIC "-//mybatis.org//DTD Config 3.0//EN"
        "http://mybatis.org/dtd/mybatis-3-config.dtd">
<!--这个文件是mybatis的主配置文件-->
<configuration>
    <!--配置环境-->
    <environments default="mysql">
        <!--配置mysql的环境-->
        <environment id="mysql">
            <!--配置事务的类型-->
            <transactionManager type="JDBC"></transactionManager>
            <!--配置数据源(也是连接池),这里我们选用POOLED-->
            <dataSource type="POOLED">
                <!--配置连接数据库信息-->
                <property name="driver" value="com.mysql.jdbc.Driver"/>
                <property name="url" value="jdbc:mysql://localhost:3306/mybatis"/>
                <property name="username" value="root"/>
                <property name="password" value="123456"/>
            </dataSource>

        </environment>
    </environments>

    <!--指定mybatis的映射配置文件位置,即mapper包下的配置文件-->
    <mappers>
        <mapper resource="mapper/StudentDao.xml"/>
    </mappers>
</configuration>
mapper包下的文件为具体每个类的具体操作:
<?xml version="1.0" encoding="UTF-8" ?>
<!DOCTYPE mapper
        PUBLIC "-//ibatis.apache.org//DTD Mapper 3.0//EN"
        "http://mybatis.org/dtd/mybatis-3-mapper.dtd">
<mapper namespace="dao.StudentDao">
    <!--这里namespace要写的是想要操作的类的dao包下的全限定类名-->
    <!--下面是配置查询的-->
    <!--这里的id要写StudentDao里面的方法-->
    <!--这里的resultType为得到结果集返回的类型-->
    <select id="findAll" resultType="entity.Student">
        select * from student;
    </select>

</mapper>
log4j.properties为日志配置文件:
# Set root category priority to INFO and its only appender to CONSOLE.
#log4j.rootCategory=INFO, CONSOLE            debug   info   warn error fatal
log4j.rootCategory=debug, CONSOLE, LOGFILE

# Set the enterprise logger category to FATAL and its only appender to CONSOLE.
log4j.logger.org.apache.axis.enterprise=FATAL, CONSOLE

# CONSOLE is set to be a ConsoleAppender using a PatternLayout.
log4j.appender.CONSOLE=org.apache.log4j.ConsoleAppender
log4j.appender.CONSOLE.layout=org.apache.log4j.PatternLayout
log4j.appender.CONSOLE.layout.ConversionPattern=%d{ISO8601} %-6r [%15.15t] %-5p %30.30c %x - %m\n

# LOGFILE is set to be a File appender using a PatternLayout.
log4j.appender.LOGFILE=org.apache.log4j.FileAppender
log4j.appender.LOGFILE.File=D:\\Aisi\\axis.log
log4j.appender.LOGFILE.Append=true
log4j.appender.LOGFILE.layout=org.apache.log4j.PatternLayout
log4j.appender.LOGFILE.layout.ConversionPattern=%d{ISO8601} %-6r [%15.15t] %-5p %30.30c %x - %m\n
注意日志文件保存位置要跟你系统的匹配。
对第一个mybatis进行测试与流程讲解

test包下主要是对我们前面所做的工作进行检验:
package Dao;


import dao.StudentDao;
import entity.Student;
import org.apache.ibatis.io.Resources;
import org.apache.ibatis.session.SqlSession;
import org.apache.ibatis.session.SqlSessionFactory;
import org.apache.ibatis.session.SqlSessionFactoryBuilder;

import java.io.IOException;
import java.io.InputStream;
import java.util.List;

public class StudentDaoTest {
    public static void main(String[] args) throws IOException {
        // 了解mybatis的整体工作流程
        // 1,读取配置文件
        InputStream inputStream = Resources.getResourceAsStream("mybatis-config.xml");
        // 2,创建SqlSessionFactory工厂
        SqlSessionFactoryBuilder builder = new SqlSessionFactoryBuilder();
        SqlSessionFactory factory = builder.build(inputStream);
        // 3,使用工厂生产SqlSession对象
        SqlSession session = factory.openSession();
        // 4,使用SqlSession创建Dao接口的代理对象
        StudentDao studentDao = session.getMapper(StudentDao.class);
        // 5,使用代理对象执行方法
        List<Student> studentList = studentDao.findAll();
        for (Student student:studentList) {
            System.out.println(student);
        }
        // 6,释放资源
        session.close();
        inputStream.close();

    }
}
上面所展示的是mybatis工作的整个流程,其中涉及到多种设计模式,这里不进行赘述,这里其实是我们了解mybatis底层的重点,留到后面再来探讨。
执行完之后的结果为:

第一个mybatis程序结束。
使用注解进行mybatis程序开发
我们前面使用的都是基于配置文件的,接下来讲一下基于注解的配置。
注解与前面的最大不同是不用mapper包下的文件,然后要修改StudentDao这个类和mybatis主文件。

StudentDao改为:

mybatis主配置文件修改这里:

运行同样能够成功运行。
自定义Dao实现类
前面两个我们通过配置文件和注解的方式进行数据库相关操作,接下来我们通过自己实现dao的接口来实现操作数据库。
前面我们了解了mybatis的整体工作流程为:
// 了解mybatis的整体工作流程
        // 1,读取配置文件
        InputStream inputStream = Resources.getResourceAsStream("mybatis-config.xml");
        // 2,创建SqlSessionFactory工厂
        SqlSessionFactoryBuilder builder = new SqlSessionFactoryBuilder();
        SqlSessionFactory factory = builder.build(inputStream);
        // 3,使用工厂生产SqlSession对象
        SqlSession session = factory.openSession();
        // 4,使用SqlSession创建Dao接口的代理对象
        StudentDao studentDao = session.getMapper(StudentDao.class);
        // 5,使用代理对象执行方法
        List<Student> studentList = studentDao.findAll();
        for (Student student:studentList) {
            System.out.println(student);
        }
        // 6,释放资源
        session.close();
        inputStream.close();
在第3、4步这里为使用SqlSession创建得到Dao接口的代理对象,既然我们要自己实现,则必须实现StudentDao这个类。

最后我们可以直接通过实例化StudentDao,来得到我们想要的结果,这个时候上面的六个步骤会变为如下:
// 了解mybatis的整体工作流程
        // 1,读取配置文件
        InputStream inputStream = Resources.getResourceAsStream("mybatis-config.xml");
        // 2,创建SqlSessionFactory工厂
        SqlSessionFactoryBuilder builder = new SqlSessionFactoryBuilder();
        SqlSessionFactory factory = builder.build(inputStream);
        // 3,使用工厂生产dao对象
        StudentDao studentDao = new StudentDaoImpl(factory);

        // 5,使用代理对象执行方法
        List<Student> studentList = studentDao.findAll();
        for (Student student:studentList) {
            System.out.println(student);
        }
        // 6,释放资源
        inputStream.close();
注意:这里的所有相关文件修改都是依照配置文件来修改的,而不是根据注解来修改的。
自己实现完成。
分析mybatis流程中的设计模式
		// 1,读取配置文件
        InputStream inputStream = Resources.getResourceAsStream("mybatis-config.xml");
这里是读取配置文件,一般我们有两种方式:
1、使用类加载器,他只能读取类路径下的配置文件
2、使用ServletContext对象的getRealPath,他能得到这个工程的路径。
		// 2,创建SqlSessionFactory工厂
        SqlSessionFactoryBuilder builder = new SqlSessionFactoryBuilder();
        SqlSessionFactory factory = builder.build(inputStream);
这里使用了构建者模式,inputStream就相当于我们的钱,然后SqlSessionFactoryBuilder就像是一个包工队,我们要建房子,直接把这个钱(即inputStream)丢给这个包工队,然后这个包工队通过建造(即build)来建成这个房子(即工厂factory)。此为构建者模式。把创建对象的细节给封闭起来,使得我们不用面对繁琐的过程。
		// 3,使用工厂生产SqlSession对象
        SqlSession session = factory.openSession();
这里使用了工厂模式,我我们通过工厂(factory)来生产,工厂模式里面实质是new出来一个实例,但是我们这里把他封装起来了,实现了类解耦。让我们的代码更加健壮。
		// 4,使用SqlSession创建Dao接口的代理对象
        StudentDao studentDao = session.getMapper(StudentDao.class);
这个使用了代理模式(代理可分为多种),我们通过这个代理能够在不写Dao实现类的情况下来操作数据库。代理模式能够在不修改源码的情况下对已有方法进行增强。
自定义Mybatis的分析
这里涉及到原理部分有点吃力,留到下次探讨。
mybatis中CURD操作
在上面我们使用的操作中,配置文件的操作是我们最经常使用的,所有一下操作都是基于配置文件的操作。
保存操作
对于保存最主要是mapper包的配置文件的编写,如下:
<!--保存用户-->
    <!--parameterType为saveStudent方法的参数-->
    <!--这里要注意,values后面要用#和{},然后里面的值要跟实体类(即entity)的字段名一样-->
    <insert id="saveStudent" parameterType="entity.Student">
        insert into student(name, birthday, sex) values(#{name}, #{birthday}, #{sex});
    </insert>
进行测试:

结果输出为1。

更新操作
 <!--更新操作-->
    <!--这个也没什么好说的了-->
    <update id="updateStudent" parameterType="entity.Student">
        update student set name=#{name}, birthday=#{birthday}, sex=#{sex}
        where id=#{id};
    </update>
测试:


删除操作
    <!--要注意,在这里paramterType可以写int、Integer等等-->
    <!--而且这里的#{id}里面的id是可以任意取的,因为只有一个参数-->
    <delete id="deleteStudent" parameterType="int">
        delete from student where id=#{id};
    </delete>
其他的略过。其实跟上面是一样的。
模糊查询操作
 <!--通过名字模糊查询-->
    <!--这里的#{name}没有模糊查询,所以我们在test单元中,需要加上百分号来进行模糊-->
    <select id="findByName" parameterType="string" resultType="entity.Student">
        select * from student where name like #{name};
        <!--同时这里也支持这样模糊查询:
        select * from student where name like '%${value}%';
        而且这里的value是固定的,不能改变
        但是这个方法开发不常用,了解一下就好
        -->
    </select>
测试单元如下:
 @Test
    public void testFindByName() throws IOException {

        List<Student> studentList = studentDao.findByName("%林%");
        for (Student student:studentList) {
            System.out.println(student);
        }

    }
这里我们的省略上面已经有提到过了,所以这里不再赘述。
输出为:

查询总行数操作
 	<!--返回总行数-->
    <select id="findTotal" resultType="int">
        select count(id) from student;
    </select>
获取保存数据的Id
新增用户后可以返回新增用户的id值。
<!--保存用户-->
    <!--parameterType为saveStudent方法的参数-->
    <!--这里要注意,values后面要用#和{},然后里面的值要跟实体类(即entity)的字段名一样-->
    <!--这里在执行保存后,会返回id值到Student这个参数上-->
    <insert id="saveStudent" parameterType="entity.Student">
        <selectKey keyProperty="id" keyColumn="id" resultType="int" order="AFTER">
            select last_insert_id();
        </selectKey>
        insert into student(name, birthday, sex) values(#{name}, #{birthday}, #{sex});
    </insert>
得到id值需要添加上面标签。
Mybatis传入参数深入
从上面的学习中,我们了解到传入类型parameterType可以有很多种。接下来我们讨论的是当参数里面含有对象时的情况。
1、新建一个实体类Condition

在StudentDao中新增如下方法:

在mapper包下关于该方法的具体写法
 <!--通过Condition参数进行相关条件判断得到List<Student>-->
    <!--这里要注意一下#{student.name}的写法-->
    <select id="conditionQuery" parameterType="entity.Condition" resultType="entity.Student">
        select * from student where name like #{student.name};
    </select>
测试该方法:

输出为:

Mybatis返回值深入
从数据库中查询的数据一般会封装到我们的实体类中,一般我们要求实体类的变量名应该与数据库中的各项列名保持一致。但是当我们对应不上的情况又该怎么处理。
现在我把Student里面的变量改成如下:

现在数据库的列名如下:


最后得到如下结果:

解决这种问题有以下两种方法:
1、在mapper包下的文件中,里面的SQL语句可以使用起别名的方式来解决。
我们可以把上面sql语句改为:
<select id="findAll" resultType="entity.Student">
        select id as Stuid, name as Stuname, birthday as Stubirthday, sex as Stusex from student;
    </select>
再进行测试得到:

2、通过配置来解决
使用这种办法我们不需要修改sql语句。我们可以再mapper包下的文件进行如下配置:
 <!--配置查询结果的列名和实体类的属性名的对应关系-->
 <!--下面property代表实体类,column代表的是数据库的列-->
    <resultMap id="studentMap" type="entity.Student">
        <!--主键字段的对应-->
        <id property="Stuid" column="id"></id>
        <!--非主键字段对应-->
        <result property="Stuname" column="name"></result>
        <result property="Stubirthday" column="birthday"></result>
        <result property="Stusex" column="sex"></result>
    </resultMap>
同时还需将每个操作的resultType改写为resultMap,并且resultMap的值为上面的id值。即为:

这两种方法都有自己实际的特点,追求效率我们采用第一种,追求方便我们采用第二种。
properties属性和typeAliases配置别名
<!--properties标签-->
    <!--配置properties
    可以在标签内部配置连接数据库的信息,也可以通过属性引用外部配置文件信息
    resource属性:用于指定配置文件的位置,是按照类路径的写法,并且必须存在与类路径下
    -->
    <properties resource="jdbc.properties">

    </properties>
然后数据库四个信息则可以改写成如下:

typeAliases可以用来对entity的类配置一个其他名字,如:
    <typeAliases>
        <!--这里可以用student代替entity.Student-->
        <typeAlias type="entity.Student" alias="student"></typeAlias>
    </typeAliases>
Mybatis中的连接池分类
我们来看一下我们在连接池中的文件配置:

这里的type属性可以有三个:
1、UNPOOLED:不使用连接池的数据源
2、POOLED:使用连接池的数据源
3、JNDI:使用JNDI实现的数据源
Mybatis动态SQL语句
我们在开发过程中会遇到许多判断条件,这个时候前面的的写法就不够我们使用,于是我们需要增加动态标签来描述。
if标签
来个具体实例:
方法接口如下:


测试:

输出为:

where标签
在上面的例子中,我们是可以把where改成where标签的,这样就可以去掉1=1了。如下:

运行同样能够生效。
foreach标签
我们在开发过程中有时候需要用到如下语句:
select * from student where id in (1, 2, 3);
这是我们可以使用foreach标签来遍历这个集合。

接下来时接口方法:

接下来时sql语句:
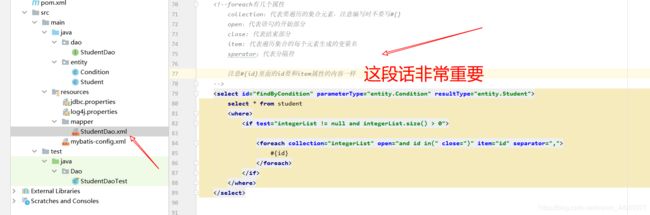
测试输出

Mybatis的多表查询
开发中我们更常遇到的是多个表连接进行查询。两个表的关系通常为1:1、1:n、n:n。
一对一
对于一对一的情况,比如每个银行账号只能对一个主人。
1、建立银行账号表:

2、建立Java实体类和DAO接口:


3、在mapper包下的文件BankNumDdao.xml写:


4、测试输出:


一对多
一个学生是可以有多个银行卡账户的。
1、实体类和接口的建立


2、xml文件:

3、测试输出:


多对多
Mybatis加载
mybatis加载分为延迟加载和立即加载两个。
延迟加载:在真正使用时才查询,按需加载。一般用于一对多和多对多。
立即加载:不管用不用,只要一调用方法就马上发起查询。一般用于多对一和一对一。
--------------------------------未完待续------------------------------------------------------