记录Paint部分常用的方法
Paint部分常用的方法
- 1、实例化之后Paint的基本配置
- 2、shader 和 ShadowLayer
- 3、pathEffect
- 4、maskFilter
- 5、colorFilter
- 6、xfermode
1、实例化之后Paint的基本配置
- Paint.Align
Align指定drawText如何将其文本相对于[x,y]坐标进行对齐。默认为LEFT - Paint.Cap
Cap指定了笔画线和路径的开始和结束的处理方法 [BUTT(笔画以路径结束,并且不超出路径),ROUND(笔画凸出成半圆形,圆心在路径的末端),SQUARE(笔画突出为一个正方形,中心位于路径的末端)] - Paint.FontMetrics
类,它描述给定文本大小下字体的各种指标。记住,Y值向下增大,所以这些值是正的,而距离向上的值是负的。这个类由getFontMetrics()返回。 - Paint.Join
连接指定了线条和曲线段在描边路径上连接的处理。默认为MITER。 - Paint.Style
样式指定所绘制的原语是填充的、描边的,还是两者都有(用相同的颜色)。默认为FILL - isAntiAlias抗锯齿
- isDither防抖动
- color画笔的颜色
- strokeWidth画笔的宽
这里省略其他配置…
2、shader 和 ShadowLayer
简单列子实现效果

列1
    private fun jcPaint(canvas: Canvas?) {
        Paint().apply {
            setShadowLayer(12f, 5f, 5f, Color.RED)
            isLinearText = true
            val array = IntArray(2)
            array[0] = Color.YELLOW
            array[1] = Color.BLUE


            /*实现线性颜色效果*/
            shader = LinearGradient(
                0f,
                0f,
                100f,
                100f,
                array,
                null,
                Shader.TileMode.MIRROR)


            color = Color.RED
            strokeWidth = 10f
            style = Paint.Style.STROKE
            strokeCap = Paint.Cap.BUTT
            strokeJoin = Paint.Join.ROUND //连接处的处理
            canvas?.drawRect(Rect(10, 10, 400, 400), this)

            val text1 = "style - Paint.Style.STROKE"
            val text2 = "Cap - Paint.Cap.BUTT"
            val text3 = "Join连接处使用圆角 - Paint.Join.ROUNDJoin"
            strokeWidth = 2f
            textSize = 30f
            color = Color.BLUE
            style = Paint.Style.FILL_AND_STROKE
            Paint.ANTI_ALIAS_FLAG


            /**
             * 绘制阴影
             */
            this.setShadowLayer(2f, 0f, 5f, Color.BLUE)
            canvas?.drawText(text1, 20f, 200f, this)

            val tW = this.measureText(text1)
            Log.v("[measureText]", "tw = $tW")


            canvas?.drawText(text2, 20f, 300f, this)
            canvas?.drawText(text3, 20f, 400f, this)
        }
    }
列2
    private fun shader(canvas: Canvas?) {
        /**
         *  围棋子  黑色棋子
         */
        Paint(Paint.ANTI_ALIAS_FLAG)
            .apply {
                color = Color.RED
                strokeWidth = 10f
                style = Paint.Style.FILL
                strokeCap = Paint.Cap.BUTT //结尾处
                strokeJoin = Paint.Join.ROUND //连接处的处理

                val top = 600f
                val left = 30f
                val radius = 100f

                shader = RadialGradient(
                    left + radius, top ,
                    radius+radius*1/4,
                    IntArray(2).apply {
                        this[0] = Color.WHITE
                        this[1] = Color.BLACK
                    },
                    null,
                    Shader.TileMode.CLAMP
                )

                /**
                 * 添加阴影
                 */
                setShadowLayer(6f, 6f, 6f, Color.parseColor("#AACCCCCC"))
                canvas?.drawCircle(left + radius, top, radius, this)


                shader = SweepGradient(0F,0f, listOf(Color.YELLOW,Color.RED).toIntArray(),
                    null)
                canvas?.drawCircle(left + radius * 3, top, radius, this)
//
//
                /**
                 * 实现线性颜色效果
                 */
                shader = LinearGradient(
                    0f,
                    0f,
                    100f,
                    100f,
                    listOf(Color.GREEN,Color.BLUE).toIntArray(),
                    null,
                    Shader.TileMode.MIRROR)
                canvas?.drawCircle(left + radius * 5, top, radius, this)


                val b = BitmapFactory.decodeResource(context.resources,R.mipmap.aa)
                shader = BitmapShader(b,Shader.TileMode.MIRROR,Shader.TileMode.MIRROR)
                canvas?.drawCircle(left + radius * 7, top, radius, this)
            }
    }
3、pathEffect
1、DiscretePathEffect() 将路径切成segmentLength的行,随机偏离原路径。
2、SumPathEffect() 构造一个PathEffect,其效果是按顺序应用两个效果。(例如,第一个(路径)+第二个(路径))
3、DashPathEffect() interval数组必须包含偶数个条目(>=2),偶数索引指定“开”间隔,奇数索引指定“关”间隔。Phase是interval数组的偏移量(对所有interval的和取mod)。interval数组控制破折号的长度。油漆的strokeWidth控制了破折号的厚度。注意:这个patheeffect只影响画风设置为STROKE或FILL_AND_STROKE的绘图。如果绘图是用style == FILL完成的,它将被忽略。
参数1:间隔-开和关距离的数组
参数2:相位偏移到间隔数组中
4、CornerPathEffect()通过将线段之间的任何锐角替换为指定半径的圆角,转换所绘制的几何图形(STROKE或FILL样式)。
参数:半径-线段之间的圆角。
5、ComposePathEffect() 构造一个PathEffect,其效果是首先应用内部效果和外部PathEffect(例如outer(inner(path)))。
6、PathDashPathEffect()用指定的形状对所绘制的路径进行冲压。这只适用于当油漆样式为STROKE或STROKE_AND_FILL时的绘图。如果油漆的样式是FILL,那么这个效果将被忽略。油漆的描边宽度不会影响结果。
效果:
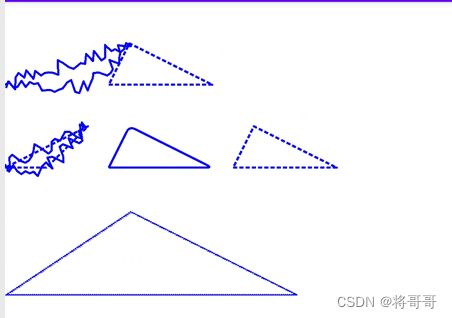
    private fun pathEffect(canvas: Canvas?) {
        Paint().apply {

            color = Color.BLUE
            strokeWidth = 5f
            strokeJoin = Paint.Join.ROUND
            style = Paint.Style.STROKE


            pathEffect = DiscretePathEffect(10f,20f)
            canvas?.drawPath(Path().apply {
                moveTo(0f,200f)
                lineTo(300f,100f)
                lineTo(200f,200f)
                lineTo(0f,200f)
            },this)


            pathEffect =  DashPathEffect(FloatArray(2).apply {
                this[0] = 10f
                this[1] = 5f },10f)
            canvas?.drawPath(Path().apply {
                moveTo(250f,200f)
                lineTo(300f,100f)
                lineTo(500f,200f)
                lineTo(250f,200f)
            },this)


            pathEffect = SumPathEffect( DiscretePathEffect(10f,20f),DashPathEffect(FloatArray(2).apply {
                this[0] = 10f
                this[1] = 5f },10f))
            canvas?.drawPath(Path().apply {
                moveTo(0F,400f)
                lineTo(200f,300f)
                lineTo(100f,400f)
                lineTo(0F,400f)
            },this)


            pathEffect = CornerPathEffect(15f)
            canvas?.drawPath(Path().apply {
                moveTo(250f,400f)
                lineTo(300f,300f)
                lineTo(500f,400f)
                lineTo(250f,400f)
            },this)


            pathEffect = ComposePathEffect( DiscretePathEffect(10f,20f),DashPathEffect(FloatArray(2).apply {
                this[0] = 10f
                this[1] = 5f },10f))
            canvas?.drawPath(Path().apply {
                moveTo(550f,400f)
                lineTo(600f,300f)
                lineTo(800f,400f)
                lineTo(550f,400f)
            },this)


            pathEffect = PathDashPathEffect( Path().apply {
                moveTo(0f,8f)
                lineTo(3f,4f)
                lineTo(8f,8f)
                lineTo(0f,8f)
            },5f,10f,PathDashPathEffect.Style.TRANSLATE)

            canvas?.drawPath(Path().apply {
                moveTo(0f,700f)
                lineTo(300f,500f)
                lineTo(700f,700f)
                lineTo(0f,700f)
            },this)
        }
    }
4、maskFilter
1、BlurMaskFilter
这需要一个蒙版,并通过指定的半径模糊其边缘。是否包含原始蒙版,以及模糊是在原始蒙版的边界外、内还是跨界,都由blur enum控制。
2、EmbossMaskFilter
创建一个浮雕蒙版过滤器
已经被弃用 这个子类不受支持,不应该被实例化。
  private fun maskFilter(canvas: Canvas?) {
        Paint().apply {
            color = Color.RED

            maskFilter = BlurMaskFilter(20F,BlurMaskFilter.Blur.SOLID)
            val b0 = BitmapFactory.decodeResource(context.resources, R.mipmap.aa)
            canvas?.drawBitmap(b0,30f,800f,this)


            maskFilter = EmbossMaskFilter(listOf(30f,30f,30f).toFloatArray(),
                0.2F,
                60F,
                10F)

            val b = BitmapFactory.decodeResource(context.resources, R.mipmap.aa)
            canvas?.drawBitmap(b,30f,800f+b0.height,this)
        }
    }
5、colorFilter
ColorFilter主要用来处理颜色,这里将讲解它的三个子类,ColorMatrixColorFilter,
LightingColorFilter以及PorterDuffColorFilter。
1、ColorMatrixColorFilte 是一种通过4x5颜色矩阵转换颜色的颜色过滤器。这个滤镜可以用来改变像素的饱和度,从YUV转换为RGB等。
参见:ColorMatrix
RGB和Alpha的终值计算方法如下: Red通道终值= a[0] * srcR + a[1] * srcG + a[2] * srcB +
a[3] * srcA + a[4] Green通道终值= a[5] * srcR + a[6] * srcG + a[7] * srcB
- a[8] * srcA + a[9] Blue通道终值= a[10] * srcR + a[11] * srcG + a[12] * srcB + a[13] * srcA + a[14] Alpha通道终值= a[15]*srcR+a[16]*srcG + a[17] *
srcB + a[18] * srcA + a[19]备注: srcR为原图Red通道值,srcG为原图Green通道值,srcB为原图Blue通道值,srcA为原图Alpha通道值。
每个通道的源值和终值都在0到255的范围内。即使计算结果大于255或小于0,值都将被限制在0到255的范围内。
2、LightingColorFilter是一个颜色滤镜,可以用来模拟简单的照明效果。LightingColorFilter由两个参数定义,一个用于将源颜色相乘(称为colorMultiply),另一个用于向源颜色添加(称为colorAdd)。alpha通道不受此颜色滤镜的影响。给定一个源颜色RGB,得到的R’ g ’ b '颜色计算如下:
R’ = R * colorMultiply.R + colorAdd.R
G’ = G * colorMultiply.G + colorAdd.G
B’ = B * colorMultiply.B + colorAdd.B
效果:
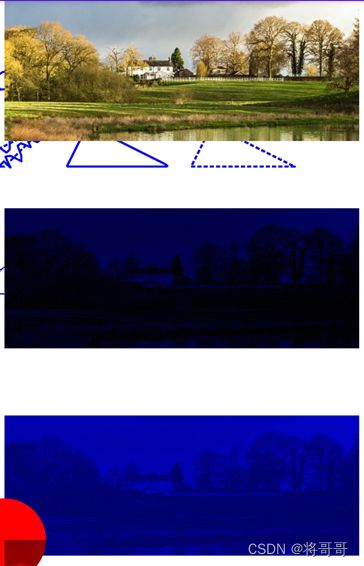
3、PorterDuffColorFilter 是一种颜色滤镜,可用于使用单一颜色和特定波特-达夫复合模式对源像素进行着色。
效果:

    private fun colorFilter(canvas: Canvas?) {

        //1、ColorMatrixColorFilter
        Paint().apply {
            val MATRIX = floatArrayOf(
                0.3f, 0f, 0f, 0f, 0f,
                0f, 0.5f, 0f, 0f, 0f,
                0f, 0f, 0.5f, 0f, 0f,
                0f, 0f,   0f, 1f, 0f
            )
            val bitmap = BitmapFactory.decodeResource(context.resources, R.mipmap.aa)
            canvas?.drawBitmap(bitmap, 100F, 0F, this);


            val filter = ColorMatrixColorFilter(MATRIX)
            colorFilter = filter
            canvas?.drawBitmap(bitmap, 100F, 500F, this)


            /*方式1*/
            val colorMatrix = ColorMatrix()
            colorMatrix.setSaturation(0f)
            colorFilter = ColorMatrixColorFilter(colorMatrix)
            canvas?.drawBitmap(bitmap, 100F, 1000F, this)
        }

        //2、LightingColorFilter

        Paint().apply {

            val bitmap = BitmapFactory.decodeResource(context.resources, R.mipmap.aa)
            canvas?.drawBitmap(bitmap, 100F, 0F, this);


            val filter = LightingColorFilter(100,0)
            colorFilter = filter
            canvas?.drawBitmap(bitmap, 100F, 500F, this)


            /*方式1*/
            colorFilter = LightingColorFilter(100,100)
            canvas?.drawBitmap(bitmap, 100F, 1000F, this)
        }

        //3、PorterDuffColorFilter 是一种颜色滤镜,可用于使用单一颜色和特定波特-达夫复合模式对源像素进行着色。
        Paint().apply {

            val bitmap = BitmapFactory.decodeResource(context.resources, R.mipmap.aa)
            canvas?.drawBitmap(bitmap, 100F, 0F, this);

            val filter = PorterDuffColorFilter(Color.YELLOW,PorterDuff.Mode.DARKEN)
            colorFilter = filter
            canvas?.drawBitmap(bitmap, 100F, 500F, this)
        }
    }
6、xfermode

1、PorterDuffXfermode
专门实现Paint的转移模式。参考PorterDuff的文档。关于可用的alpha合成和混合模式的更多信息的模式enum。
效果

例子
private fun xFerMode(canvas: Canvas) {

        /**
         * 创建一个新的层layer
         */
        canvas.saveLayer(RectF(0f, 0f, canvas.width.toFloat(), canvas.height.toFloat()),Paint())


        Paint().apply {
            strokeWidth=5f
            strokeCap = Paint.Cap.ROUND
            strokeJoin = Paint.Join.ROUND
            style = Paint.Style.FILL_AND_STROKE
            color = Color.GREEN


            /**
             * 步骤1、绘制一个底层圆形图形
             */
            val radius = 100f
            val top = 1200f
            val scr = Bitmap.createBitmap(radius.toInt()*2, radius.toInt()*2,Bitmap.Config.ARGB_8888)
            Canvas(scr).apply {
                drawBitmap(scr,0f,0f,Paint())
                drawCircle(radius,radius,radius,Paint().apply {
                    color = Color.RED
                })
            }
            canvas?.drawBitmap(scr,0f,top,Paint())


            /**
             * 1、PorterDuffXfermode
             */
            xfermode = PorterDuffXfermode(PorterDuff.Mode.MULTIPLY)

            /**
             * 步骤2、绘制上层图片
             */
            val bit = BitmapFactory.decodeResource(context.resources,R.mipmap.aa)
            canvas?.drawBitmap(bit,radius,top+radius,this)
        }
    }