2. text mode下的vga驱动
这篇文章分为两部分,前部分是写简单的vga驱动程序,后部分进行测试。但是kernel测试不同于普通的应用程序,首先要让kernel跑起来然后才能观测结果,所以后半部分又可分为两个部分 —— 制作引导盘和运行kernel。所以简单点儿,就分为三个部分吧:
1: 编写vga驱动程序
2: 制作引导盘 (此部分非常重要,写简单的kernel难点不在于程序的编写,而在于工具的使用)
3: 测试驱动程序
第一部分: 编写vga驱动程序
首先要定义下整个开发过程中都要用到的数据类型
1 #ifndef __TYPES_H__
2 #define __TYPES_H__
3
4 typedef unsigned char uint8_t;
5 typedef unsigned short uint16_t;
6 typedef unsigned int uint32_t;
7 typedef unsigned long long uint64_t;
8
9 typedef char int8_t;
10 typedef short int16_t;
11 typedef int int32_t;
12 typedef long long int64_t;
13
14 typedef uint32_t addr_t;
15
16 typedef uint32_t size_t;
17 typedef int32_t ssize_t;
18
19 #endif
因为在写终端驱动时要对IO设备的寄存器进行操作,所以再建立一个头文件 io.h
2 #define __IO_H__
3
4 #define outb(data,port) __asm__ __volatile__("outb %%al, %%dx"::"a"(data),"d"(port))
5 #endif
OK,现在正式进军终端驱动程序了。这个驱动提供什么功能呢,很简单,清屏以及打印字符串。注意程序向外提供的函数应该声明在.h文件中,只供内部使用的函数应该直接在 .c 文件中声明。好吧,实现以上两个功能的函数显然要声明在 console.h 中
2 #define __CONSOLE_H__
3
4 void cons_write( const char * str);
5 void cons_clear( void );
6
7 #endif
最后来真正实现这些功能吧。实现驱动必须了解硬件的相关信息:从b8000到bffff的32K地址空间是显存,屏幕是80*25的规格(即每行80字符,总共25行),屏幕上的每个字符在显存中用两个字节表示,高字节是字符的ASCII值,低字节是字符的属性(0x07代表背景黑前景白)。注意80*25*2=4000,比4K略小,而显存空间为32K,这说明屏幕只能显示一部分显存。这就说明显示控制器中肯定有个寄存器来说明到底显示显存的那一部分,显存通常划分为页,那个寄存器存放的就是要显示的页码。在Tinux(我取的名字)中,为了保持简单,我只使用从b8000开始的4000字节,当打印不下时就向上滚动。
1 #include "types.h"
2 #include "io.h"
3 #include "console.h"
4
5 addr_t video = (char*)0xb8000; // 显存的起始地址
6 uint16_t cons_attr = 0x07; // 始终是“黒纸白字”
7 uint16_t cons_x=0; // 屏幕坐标原点在左上角,con_x,cons_y 分别表示横
8 uint16_t cons_y=0; // 坐标,纵坐标
9 uint16_t cons_pos=0; // 字符在内存中的偏移
10
11 void cons_putc(uint16_t x, uint16_t y, char ch); // 将ch写入(x,y)
12 char cons_getc(uint16_t x, uint16_t y);
13 void cons_scrollup(uint16_t n); // 屏幕向上滚动n行
14 void cons_gotoxy(uint16_t x, uint16_t y); // 光标定位
15
16 void cons_gotoxy(uint16_t x, uint16_t y)
17 {
18 cons_x = x;
19 cons_y = y;
20 cons_pos = x+y*80;
21 // 保存光标的低8位
22 outb(0x0f,0x3d4);
23 outb((uint8_t)(cons_pos&0xff),0x3d5);
24 // 保存光标的高8位
25 outb(0x0e,0x3d4);
26 outb((uint8_t)((cons_pos>>8)&0xff),0x3d5);
27 }
28
29 void cons_putc(uint16_t x, uint16_t y, char ch)
30 {
31 *(char*)(video+(x+(y*80))*2) = ch;
32 *(uint8_t*)(video+(x+(y*80))*2+1) = cons_attr;
33 }
34
35 char cons_getc(uint16_t x, uint16_t y)
36 {
37 return *(char*)( video + (x+(y*80))*2 );
38 }
39
40 void cons_scollup(int n)
41 {
42 int i, j;
43 for (i=0;i<24;i++)
44 for (j=0;j<80;j++)
45 cons_putc(i,j,cons_getc(i+n,j));
46 }
47
48 void cons_write(const char* str)
49 {
50 int i;
51 for (;*str;str++)
52 {
53 switch (*str) {
54 case '\n':
55 for (i=cons_x;i<80;i++) cons_putc(i,cons_y,' ');
56 cons_x = 0;
57 cons_y++;
58 break;
59 case '\b':
60 if (cons_x==0&&cons_y==0) ;
61 else if (cons_x==0) {
62 cons_x = 79;
63 cons_y--;
64 } else {
65 cons_x--;
66 }
67 cons_putc(cons_x,cons_y,' ');
68 break;
69 default:
70 cons_putc(cons_x,cons_y,*str);
71 if (cons_x==79) {
72 cons_x = 0;
73 cons_y++;
74 } else {
75 cons_x++;
76 }
77 break;
78 }
79 }
80 if (cons_y<=23) {
81 cons_gotoxy(cons_x,cons_y);
82 } else {
83 cons_scollup(cons_y-23);
84 cons_gotoxy(cons_x,23);
85 }
86 }
87 void cons_clear(void)
88 {
89 int i,j;
90 for (i=0;i<80;i++)
91 for (j=0;j<25;j++)
92 cons_putc(i,j,' ');
93 cons_gotoxy(0,0);
94 }
至此,这一节的代码全部完成,有3个头文件types.h io.h console.h, 1个源文件 console.c
第二部分: 制作引导盘
下面我们来测试console.c, 不要小看测试, 我觉得在写OS kernel时,测试比写正式代码重要得多。记得上一节的helloworld程序的加载过程吗,不过很遗憾,那种自己写引导程序的方式很费时间,所以我准备采用Grub来引导我的Kernel,下面就跟着我一步一步做Grub引导盘吧。
1. Create the floppy disk image (1.44M capacity)
$ dd if=/dev/zero of=floppy.img bs=1024 count=1440
2. Create and attach a loopback device to floppy.img
$ sudo losetup /dev/loop1 floppy.img
3. Format floppy.img with ext2 file system.
$ sudo mke2fs /dev/loop1
4. Mount the device, so we can read or write to it.
$ sudo mount -o loop /dev/loop1 /mnt
5. Copy the stage1 and stage2 from /boot/grub to that /mnt/boot/grub
$ sudo mkdir -p /mnt/boot/grub
$ sudo cp /boot/grub/stage1 /boot/grub/stage2 /mnt/grub/
6. Create the Grub configuration file
$ sudo vi /mnt/boot/grub/menu.lst
Edit menu.lst like this:
2 root (fd0)
3 kernel / boot/kernel.bin
7. Unmount the device
$ sudo umount /mnt
8. Install and embed grub into floppy.img
$ sudo grub --device-map=/dev/null
Upon which you should get the grub interface. Enter the following commands into it:
grub> device (fd0) /dev/loop1
grub> root (fd0)
grub> setup (fd0) /* 这一步grub可能会说有分区表的问题,不要理会它 */
grub> quit
9. Detach the loopback device.
$ sudo losetup -d /dev/loop1
引导盘floppy.img已制作完成,我们以后要加载内核只要将内核映像kernel.bin拷进floppy.img就可以了。但是floppy.img毕竟不是一个真软盘,想要拷贝仍然要借助losetup和mount命令。
第三部分: 编写测试文件
最后来写测试文件吧,setup.S用来引导内核(这个引导只是为grub提供一些参数), test.c是真正的测试程序, Makefile文件用控制整个编译过程, kernel.ld则是Makefile要用到的链接脚本。
1 .set MULTIBOOT_PAGE_ALIGN, 1<<0
2 .set MULTIBOOT_MEMORY_INFO, 1<<1
3 .set MULTIBOOT_HEADER_MAGIC, 0x1badb002
4 .set MULTIBOOT_HEADER_FLAGS, MULTIBOOT_PAGE_ALIGN|MULTIBOOT_MEMORY_INFO
5 .set CHECKSUM, -(MULTIBOOT_HEADER_MAGIC+MULTIBOOT_HEADER_FLAGS)
6
7 .text
8 .globl _start
9 _start:
10 jmp multiboot_entry
11 .align 4
12 .long MULTIBOOT_HEADER_MAGIC
13 .long MULTIBOOT_HEADER_FLAGS
14 .long CHECKSUM
15 multiboot_entry:
16 call test
17 jmp .
1 #include "console.h"
2
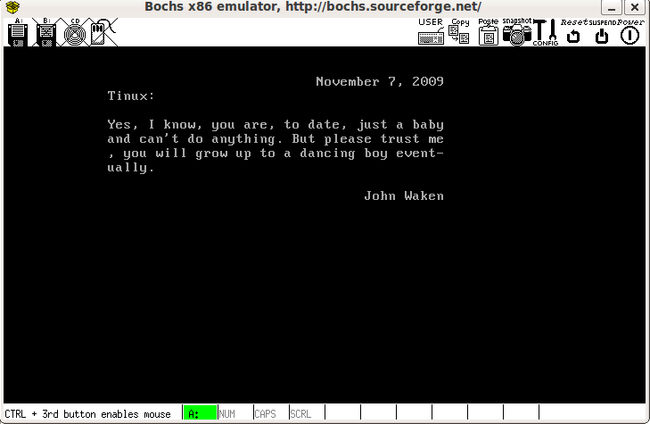
3 int test(void)
4 {
5 cons_clear();
6 cons_write("\n\n");
7 cons_write(" November 7, 2009\n");
8 cons_write(" Tinux:\n\n");
9 cons_write(" Yes, I know, you are, to date, just a baby\n");
10 cons_write(" and can't do anything. But please trust me\n");
11 cons_write(" , you will grow up to a dancing boy event-\n");
12 cons_write(" ually.\n\n");
13 cons_write(" John Waken\n");
14 return 0;
15 }
1 AS=as
2 CC=gcc
3 LD=ld
4 OBJDUMP=objdump
5 OBJCOPY=objcopy
6 CFLAGS = -fno-builtin -O0 -Wall -MD
7 OBJS = \
8 setup.o \
9 console.o \
10 test.o
11
12 floppy.img: kernel.bin
13 sudo losetup /dev/loop1 floppy.img
14 sudo mount /dev/loop1/ /mnt
15 sudo cp kernel.bin /mnt/boot/
16 sudo umount /mnt
17 sudo losetup -d /dev/loop1
18 kernel.bin: $(OBJS)
19 ld -N -e _start -T kernel.ld -o $@ $^
20 setup.o: setup.S
21 $(AS) -o $@ $^
22 console.o: console.c
23 $(CC) $(CFLAGS) -nostdlib -I. -c -o $@ $^
24 test.o: test.c
25 $(CC) $(CFLAGS) -nostdlib -I. -c -o $@ $^
26
27 clean:
28 rm -f *.o *.out *.asm bochs.log $(OBJS) *~ *.d
1 OUTPUT_FORMAT("elf32-i386")
2 ENTRY(_start)
3 phys = 0x100000;
4 SECTIONS {
5
6 .text phys : AT(phys)
7 {
8 code = .;
9 *(.text)
10 . = ALIGN(4096);
11 }
12 .data : AT(ADDR(.text) + SIZEOF(.text))
13 {
14 data = .;
15 *(.data)
16 . = ALIGN(4096);
17 }
18 .rodata : AT(ADDR(.data) + SIZEOF(.data))
19 {
20 rodata = .;
21 *(.rodata)
22 . = ALIGN(4096);
23 }
24 .bss : AT(ADDR(.rodata) + SIZEOF(.rodata))
25 {
26 bss = .;
27 *(.bss)
28 . = ALIGN(4096);
29 }
30 end = .;
31 }
32
OK, 加上这4个,现在你的目录下应该有8个文件了,在当前目录下运行make就可以得到包含kernel.bin的floppy.img文件了,接下来要做的就是用bochs虚拟机来运行floppy.img,所以我们还要写最后一个文件 bochsrc。我的bochsrc很长,但大部分是注释。
1 # You may now use double quotes around pathnames, in case
2 # your pathname includes spaces.
3
4 #=======================================================================
5 # CONFIG_INTERFACE
6 #
7 # The configuration interface is a series of menus or dialog boxes that
8 # allows you to change all the settings that control Bochs's behavior.
9 # There are two choices of configuration interface: a text mode version
10 # called "textconfig" and a graphical version called "wx". The text
11 # mode version uses stdin/stdout and is always compiled in. The graphical
12 # version is only available when you use "--with-wx" on the configure
13 # command. If you do not write a config_interface line, Bochs will
14 # choose a default for you.
15 #
16 # NOTE: if you use the "wx" configuration interface, you must also use
17 # the "wx" display library.
18 #=======================================================================
19 #config_interface: textconfig
20 #config_interface: wx
21
22 #=======================================================================
23 # DISPLAY_LIBRARY
24 #
25 # The display library is the code that displays the Bochs VGA screen. Bochs
26 # has a selection of about 10 different display library implementations for
27 # different platforms. If you run configure with multiple --with-* options,
28 # the display_library command lets you choose which one you want to run with.
29 # If you do not write a display_library line, Bochs will choose a default for
30 # you.
31 #
32 # The choices are:
33 # x use X windows interface, cross platform
34 # win32 use native win32 libraries
35 # carbon use Carbon library (for MacOS X)
36 # beos use native BeOS libraries
37 # macintosh use MacOS pre-10
38 # amigaos use native AmigaOS libraries
39 # sdl use SDL library, cross platform
40 # svga use SVGALIB library for Linux, allows graphics without X11
41 # term text only, uses curses/ncurses library, cross platform
42 # rfb provides an interface to AT&T's VNC viewer, cross platform
43 # wx use wxWidgets library, cross platform
44 # nogui no display at all
45 #
46 # NOTE: if you use the "wx" configuration interface, you must also use
47 # the "wx" display library.
48 #
49 # Specific options:
50 # Some display libraries now support specific option to control their
51 # behaviour. See the examples below for currently supported options.
52 #=======================================================================
53 #display_library: amigaos
54 #display_library: beos
55 #display_library: carbon
56 #display_library: macintosh
57 #display_library: nogui
58 #display_library: rfb, options="timeout=60" # time to wait for client
59 #display_library: sdl, options="fullscreen" # startup in fullscreen mode
60 #display_library: term
61 #display_library: win32, options="legacyF12" # use F12 to toggle mouse
62 #display_library: wx
63 #display_library: x
64
65 #=======================================================================
66 # ROMIMAGE:
67 # The ROM BIOS controls what the PC does when it first powers on.
68 # Normally, you can use a precompiled BIOS in the source or binary
69 # distribution called BIOS-bochs-latest. The ROM BIOS is usually loaded
70 # starting at address 0xf0000, and it is exactly 64k long.
71 # You can also use the environment variable $BXSHARE to specify the
72 # location of the BIOS.
73 # The usage of external large BIOS images (up to 512k) at memory top is
74 # now supported, but we still recommend to use the BIOS distributed with
75 # Bochs. Now the start address can be calculated from image size.
76 #=======================================================================
77 romimage: file=$BXSHARE/BIOS-bochs-latest #, address=0xf0000
78 #romimage: file=mybios.bin, address=0xfff80000 # 512k at memory top
79 #romimage: file=mybios.bin # calculate start address from image size
80
81 #=======================================================================
82 # CPU:
83 # This defines cpu-related parameters inside Bochs:
84 #
85 # COUNT:
86 # Set the number of processors when Bochs is compiled for SMP emulation.
87 # Bochs currently supports up to 8 processors. If Bochs is compiled
88 # without SMP support, it won't accept values different from 1.
89 #
90 # IPS:
91 # Emulated Instructions Per Second. This is the number of IPS that bochs
92 # is capable of running on your machine. You can recompile Bochs with
93 # --enable-show-ips option enabled, to find your workstation's capability.
94 # Measured IPS value will then be logged into your log file or status bar
95 # (if supported by the gui).
96 #
97 # IPS is used to calibrate many time-dependent events within the bochs
98 # simulation. For example, changing IPS affects the frequency of VGA
99 # updates, the duration of time before a key starts to autorepeat, and
100 # the measurement of BogoMips and other benchmarks.
101 #
102 # Examples:
103 # Machine Mips
104 # ________________________________________________________________
105 # 2.1Ghz Athlon XP with Linux 2.6/g++ 3.4 12 to 15 Mips
106 # 1.6Ghz Intel P4 with Win2000/g++ 3.3 5 to 7 Mips
107 # 650Mhz Athlon K-7 with Linux 2.4.4/egcs-2.91.66 2 to 2.5 Mips
108 # 400Mhz Pentium II with Linux 2.0.36/egcs-1.0.3 1 to 1.8 Mips
109 #=======================================================================
110 cpu: count=1, ips=10000000
111
112 #=======================================================================
113 # MEGS
114 # Set the number of Megabytes of physical memory you want to emulate.
115 # The default is 32MB, most OS's won't need more than that.
116 # The maximum amount of memory supported is 2048Mb.
117 #=======================================================================
118 #megs: 256
119 #megs: 128
120 #megs: 64
121 megs: 32
122 #megs: 16
123 #megs: 8
124
125 #=======================================================================
126 # OPTROMIMAGE[1-4]:
127 # You may now load up to 4 optional ROM images. Be sure to use a
128 # read-only area, typically between C8000 and EFFFF. These optional
129 # ROM images should not overwrite the rombios (located at
130 # F0000-FFFFF) and the videobios (located at C0000-C7FFF).
131 # Those ROM images will be initialized by the bios if they contain
132 # the right signature (0x55AA) and a valid checksum.
133 # It can also be a convenient way to upload some arbitrary code/data
134 # in the simulation, that can be retrieved by the boot loader
135 #=======================================================================
136 #optromimage1: file=optionalrom.bin, address=0xd0000
137 #optromimage2: file=optionalrom.bin, address=0xd1000
138 #optromimage3: file=optionalrom.bin, address=0xd2000
139 #optromimage4: file=optionalrom.bin, address=0xd3000
140
141 #optramimage1: file=/path/file1.img, address=0x0010000
142 #optramimage2: file=/path/file2.img, address=0x0020000
143 #optramimage3: file=/path/file3.img, address=0x0030000
144 #optramimage4: file=/path/file4.img, address=0x0040000
145
146 #=======================================================================
147 # VGAROMIMAGE
148 # You now need to load a VGA ROM BIOS into C0000.
149 #=======================================================================
150 #vgaromimage: file=bios/VGABIOS-elpin-2.40
151 vgaromimage: file=$BXSHARE/VGABIOS-lgpl-latest
152 #vgaromimage: file=bios/VGABIOS-lgpl-latest-cirrus
153
154 #=======================================================================
155 # VGA:
156 # Here you can specify the display extension to be used. With the value
157 # 'none' you can use standard VGA with no extension. Other supported
158 # values are 'vbe' for Bochs VBE and 'cirrus' for Cirrus SVGA support.
159 #=======================================================================
160 #vga: extension=cirrus
161 #vga: extension=vbe
162 vga: extension=none
163
164 #=======================================================================
165 # FLOPPYA:
166 # Point this to pathname of floppy image file or device
167 # This should be of a bootable floppy(image/device) if you're
168 # booting from 'a' (or 'floppy').
169 #
170 # You can set the initial status of the media to 'ejected' or 'inserted'.
171 # floppya: 2_88=path, status=ejected (2.88M 3.5" floppy)
172 # floppya: 1_44=path, status=inserted (1.44M 3.5" floppy)
173 # floppya: 1_2=path, status=ejected (1.2M 5.25" floppy)
174 # floppya: 720k=path, status=inserted (720K 3.5" floppy)
175 # floppya: 360k=path, status=inserted (360K 5.25" floppy)
176 # floppya: 320k=path, status=inserted (320K 5.25" floppy)
177 # floppya: 180k=path, status=inserted (180K 5.25" floppy)
178 # floppya: 160k=path, status=inserted (160K 5.25" floppy)
179 # floppya: image=path, status=inserted (guess type from image size)
180 #
181 # The path should be the name of a disk image file. On Unix, you can use a raw
182 # device name such as /dev/fd0 on Linux. On win32 platforms, use drive letters
183 # such as a: or b: as the path. The parameter 'image' works with image files
184 # only. In that case the size must match one of the supported types.
185 #=======================================================================
186 #floppya: 1_44=/dev/fd0, status=inserted
187 #floppya: image=../1.44, status=inserted
188 #floppya: 1_44=/dev/fd0H1440, status=inserted
189 #floppya: 1_2=../1_2, status=inserted
190 #floppya: 1_44=a:, status=inserted
191 #floppya: 1_44=a.img, status=inserted
192 #floppya: 1_44=/dev/rfd0a, status=inserted
193 floppya: 1_44=floppy.img, status=inserted
194
195 #=======================================================================
196 # FLOPPYB:
197 # See FLOPPYA above for syntax
198 #=======================================================================
199 #floppyb: 1_44=b:, status=inserted
200 #floppyb: 1_44=b.img, status=inserted
201
202 #=======================================================================
203 # ATA0, ATA1, ATA2, ATA3
204 # ATA controller for hard disks and cdroms
205 #
206 # ata[0-3]: enabled=[0|1], ioaddr1=addr, ioaddr2=addr, irq=number
207 #
208 # These options enables up to 4 ata channels. For each channel
209 # the two base io addresses and the irq must be specified.
210 #
211 # ata0 and ata1 are enabled by default with the values shown below
212 #
213 # Examples:
214 # ata0: enabled=1, ioaddr1=0x1f0, ioaddr2=0x3f0, irq=14
215 # ata1: enabled=1, ioaddr1=0x170, ioaddr2=0x370, irq=15
216 # ata2: enabled=1, ioaddr1=0x1e8, ioaddr2=0x3e0, irq=11
217 # ata3: enabled=1, ioaddr1=0x168, ioaddr2=0x360, irq=9
218 #=======================================================================
219 #ata0: enabled=1, ioaddr1=0x1f0, ioaddr2=0x3f0, irq=14
220 #ata1: enabled=1, ioaddr1=0x170, ioaddr2=0x370, irq=15
221 #ata2: enabled=0, ioaddr1=0x1e8, ioaddr2=0x3e0, irq=11
222 #ata3: enabled=0, ioaddr1=0x168, ioaddr2=0x360, irq=9
223
224 #=======================================================================
225 # ATA[0-3]-MASTER, ATA[0-3]-SLAVE
226 #
227 # This defines the type and characteristics of all attached ata devices:
228 # type= type of attached device [disk|cdrom]
229 # mode= only valid for disks [flat|concat|external|dll|sparse|vmware3]
230 # mode= only valid for disks [undoable|growing|volatile]
231 # path= path of the image
232 # cylinders= only valid for disks
233 # heads= only valid for disks
234 # spt= only valid for disks
235 # status= only valid for cdroms [inserted|ejected]
236 # biosdetect= type of biosdetection [none|auto], only for disks on ata0 [cmos]
237 # translation=type of translation of the bios, only for disks [none|lba|large|rechs|auto]
238 # model= string returned by identify device command
239 # journal= optional filename of the redolog for undoable and volatile disks
240 #
241 # Point this at a hard disk image file, cdrom iso file, or physical cdrom
242 # device. To create a hard disk image, try running bximage. It will help you
243 # choose the size and then suggest a line that works with it.
244 #
245 # In UNIX it may be possible to use a raw device as a Bochs hard disk,
246 # but WE DON'T RECOMMEND IT. In Windows there is no easy way.
247 #
248 # In windows, the drive letter + colon notation should be used for cdroms.
249 # Depending on versions of windows and drivers, you may only be able to
250 # access the "first" cdrom in the system. On MacOSX, use path="drive"
251 # to access the physical drive.
252 #
253 # The path is always mandatory. For flat hard disk images created with
254 # bximage geometry autodetection can be used (cylinders=0 -> cylinders are
255 # calculated using heads=16 and spt=63). For other hard disk images and modes
256 # the cylinders, heads, and spt are mandatory.
257 #
258 # Default values are:
259 # mode=flat, biosdetect=auto, translation=auto, model="Generic 1234"
260 #
261 # The biosdetect option has currently no effect on the bios
262 #
263 # Examples:
264 # ata0-master: type=disk, mode=flat, path=10M.sample, cylinders=306, heads=4, spt=17
265 # ata0-slave: type=disk, mode=flat, path=20M.sample, cylinders=615, heads=4, spt=17
266 # ata1-master: type=disk, mode=flat, path=30M.sample, cylinders=615, heads=6, spt=17
267 # ata1-slave: type=disk, mode=flat, path=46M.sample, cylinders=940, heads=6, spt=17
268 # ata2-master: type=disk, mode=flat, path=62M.sample, cylinders=940, heads=8, spt=17
269 # ata2-slave: type=disk, mode=flat, path=112M.sample, cylinders=900, heads=15, spt=17
270 # ata3-master: type=disk, mode=flat, path=483M.sample, cylinders=1024, heads=15, spt=63
271 # ata3-slave: type=cdrom, path=iso.sample, status=inserted
272 #=======================================================================
273 #ata0-master: type=disk, mode=flat, path="./obj/kern/bochs.img", cylinders=100, heads=10, spt=10
274
275 #=======================================================================
276 # BOOT:
277 # This defines the boot sequence. Now you can specify up to 3 boot drives.
278 # You can either boot from 'floppy', 'disk' or 'cdrom'
279 # legacy 'a' and 'c' are also supported
280 # Examples:
281 # boot: floppy
282 # boot: disk
283 # boot: cdrom
284 # boot: c
285 # boot: a
286 # boot: cdrom, floppy, disk
287 #=======================================================================
288 boot: a
289 #boot: disk
290
291 #=======================================================================
292 # CLOCK:
293 # This defines the parameters of the clock inside Bochs:
294 #
295 # SYNC:
296 # TO BE COMPLETED (see Greg explanation in feature request #536329)
297 #
298 # TIME0:
299 # Specifies the start (boot) time of the virtual machine. Use a time
300 # value as returned by the time(2) system call. If no time0 value is
301 # set or if time0 equal to 1 (special case) or if time0 equal 'local',
302 # the simulation will be started at the current local host time.
303 # If time0 equal to 2 (special case) or if time0 equal 'utc',
304 # the simulation will be started at the current utc time.
305 #
306 # Syntax:
307 # clock: sync=[none|slowdown|realtime|both], time0=[timeValue|local|utc]
308 #
309 # Example:
310 # clock: sync=none, time0=local # Now (localtime)
311 # clock: sync=slowdown, time0=315529200 # Tue Jan 1 00:00:00 1980
312 # clock: sync=none, time0=631148400 # Mon Jan 1 00:00:00 1990
313 # clock: sync=realtime, time0=938581955 # Wed Sep 29 07:12:35 1999
314 # clock: sync=realtime, time0=946681200 # Sat Jan 1 00:00:00 2000
315 # clock: sync=none, time0=1 # Now (localtime)
316 # clock: sync=none, time0=utc # Now (utc/gmt)
317 #
318 # Default value are sync=none, time0=local
319 #=======================================================================
320 #clock: sync=none, time0=local
321 clock: sync=realtime, time0=local
322
323
324 #=======================================================================
325 # FLOPPY_BOOTSIG_CHECK: disabled=[0|1]
326 # Enables or disables the 0xaa55 signature check on boot floppies
327 # Defaults to disabled=0
328 # Examples:
329 # floppy_bootsig_check: disabled=0
330 # floppy_bootsig_check: disabled=1
331 #=======================================================================
332 #floppy_bootsig_check: disabled=1
333 #floppy_bootsig_check: disabled=0
334
335 #=======================================================================
336 # LOG:
337 # Give the path of the log file you'd like Bochs debug and misc. verbiage
338 # to be written to. If you don't use this option or set the filename to
339 # '-' the output is written to the console. If you really don't want it,
340 # make it "/dev/null" (Unix) or "nul" (win32). :^(
341 #
342 # Examples:
343 # log: ./bochs.out
344 # log: /dev/tty
345 #=======================================================================
346 #log: /dev/null
347 log: bochs.log
348
349 #=======================================================================
350 # LOGPREFIX:
351 # This handles the format of the string prepended to each log line.
352 # You may use those special tokens :
353 # %t : 11 decimal digits timer tick
354 # %i : 8 hexadecimal digits of cpu current eip (ignored in SMP configuration)
355 # %e : 1 character event type ('i'nfo, 'd'ebug, 'p'anic, 'e'rror)
356 # %d : 5 characters string of the device, between brackets
357 #
358 # Default : %t%e%d
359 # Examples:
360 # logprefix: %t-%e-@%i-%d
361 # logprefix: %i%e%d
362 #=======================================================================
363 #logprefix: %t%e%d
364
365 #=======================================================================
366 # LOG CONTROLS
367 #
368 # Bochs now has four severity levels for event logging.
369 # panic: cannot proceed. If you choose to continue after a panic,
370 # don't be surprised if you get strange behavior or crashes.
371 # error: something went wrong, but it is probably safe to continue the
372 # simulation.
373 # info: interesting or useful messages.
374 # debug: messages useful only when debugging the code. This may
375 # spit out thousands per second.
376 #
377 # For events of each level, you can choose to crash, report, or ignore.
378 # TODO: allow choice based on the facility: e.g. crash on panics from
379 # everything except the cdrom, and only report those.
380 #
381 # If you are experiencing many panics, it can be helpful to change
382 # the panic action to report instead of fatal. However, be aware
383 # that anything executed after a panic is uncharted territory and can
384 # cause bochs to become unstable. The panic is a "graceful exit," so
385 # if you disable it you may get a spectacular disaster instead.
386 #=======================================================================
387 panic: action=ask
388 error: action=report
389 info: action=ignore
390 debug: action=ignore
391 #pass: action=fatal
392
393 #=======================================================================
394 # DEBUGGER_LOG:
395 # Give the path of the log file you'd like Bochs to log debugger output.
396 # If you really don't want it, make it /dev/null or '-'. :^(
397 #
398 # Examples:
399 # debugger_log: ./debugger.out
400 #=======================================================================
401 #debugger_log: /dev/null
402 #debugger_log: debugger.out
403 debugger_log: -
404
405 #=======================================================================
406 # COM1, COM2, COM3, COM4:
407 # This defines a serial port (UART type 16550A). In the 'term' you can specify
408 # a device to use as com1. This can be a real serial line, or a pty. To use
409 # a pty (under X/Unix), create two windows (xterms, usually). One of them will
410 # run bochs, and the other will act as com1. Find out the tty the com1
411 # window using the `tty' command, and use that as the `dev' parameter.
412 # Then do `sleep 1000000' in the com1 window to keep the shell from
413 # messing with things, and run bochs in the other window. Serial I/O to
414 # com1 (port 0x3f8) will all go to the other window.
415 # Other serial modes are 'null' (no input/output), 'file' (output to a file
416 # specified as the 'dev' parameter), 'raw' (use the real serial port - under
417 # construction for win32), 'mouse' (standard serial mouse - requires
418 # mouse option setting 'type=serial' or 'type=serial_wheel') and 'socket'
419 # (connect a networking socket).
420 #
421 # Examples:
422 # com1: enabled=1, mode=null
423 # com1: enabled=1, mode=mouse
424 # com2: enabled=1, mode=file, dev=serial.out
425 # com3: enabled=1, mode=raw, dev=com1
426 # com3: enabled=1, mode=socket, dev=localhost:8888
427 #=======================================================================
428 #com1: enabled=1, mode=term, dev=/dev/ttyp9
429
430
431 #=======================================================================
432 # PARPORT1, PARPORT2:
433 # This defines a parallel (printer) port. When turned on and an output file is
434 # defined the emulated printer port sends characters printed by the guest OS
435 # into the output file. On some platforms a device filename can be used to
436 # send the data to the real parallel port (e.g. "/dev/lp0" on Linux, "lpt1" on
437 # win32 platforms).
438 #
439 # Examples:
440 # parport1: enabled=1, file="parport.out"
441 # parport2: enabled=1, file="/dev/lp0"
442 # parport1: enabled=0
443 #=======================================================================
444 parport1: enabled=1, file="/dev/stdout"
445
446 #=======================================================================
447 # SB16:
448 # This defines the SB16 sound emulation. It can have several of the
449 # following properties.
450 # All properties are in the format sb16: property=value
451 # midi: The filename is where the midi data is sent. This can be a
452 # device or just a file if you want to record the midi data.
453 # midimode:
454 # 0=no data
455 # 1=output to device (system dependent. midi denotes the device driver)
456 # 2=SMF file output, including headers
457 # 3=output the midi data stream to the file (no midi headers and no
458 # delta times, just command and data bytes)
459 # wave: This is the device/file where wave output is stored
460 # wavemode:
461 # 0=no data
462 # 1=output to device (system dependent. wave denotes the device driver)
463 # 2=VOC file output, incl. headers
464 # 3=output the raw wave stream to the file
465 # log: The file to write the sb16 emulator messages to.
466 # loglevel:
467 # 0=no log
468 # 1=resource changes, midi program and bank changes
469 # 2=severe errors
470 # 3=all errors
471 # 4=all errors plus all port accesses
472 # 5=all errors and port accesses plus a lot of extra info
473 # dmatimer:
474 # microseconds per second for a DMA cycle. Make it smaller to fix
475 # non-continuous sound. 750000 is usually a good value. This needs a
476 # reasonably correct setting for the IPS parameter of the CPU option.
477 #
478 # For an example look at the next line:
479 #=======================================================================
480
481 #sb16: midimode=1, midi=/dev/midi00, wavemode=1, wave=/dev/dsp, loglevel=2, log=sb16.log, dmatimer=600000
482
483 #=======================================================================
484 # VGA_UPDATE_INTERVAL:
485 # Video memory is scanned for updates and screen updated every so many
486 # virtual seconds. The default is 40000, about 25Hz. Keep in mind that
487 # you must tweak the 'cpu: ips=N' directive to be as close to the number
488 # of emulated instructions-per-second your workstation can do, for this
489 # to be accurate.
490 #
491 # Examples:
492 # vga_update_interval: 250000
493 #=======================================================================
494 vga_update_interval: 300000
495
496 # using for Winstone '98 tests
497 #vga_update_interval: 100000
498
499 #=======================================================================
500 # KEYBOARD_SERIAL_DELAY:
501 # Approximate time in microseconds that it takes one character to
502 # be transfered from the keyboard to controller over the serial path.
503 # Examples:
504 # keyboard_serial_delay: 200
505 #=======================================================================
506 keyboard_serial_delay: 250
507
508 #=======================================================================
509 # KEYBOARD_PASTE_DELAY:
510 # Approximate time in microseconds between attempts to paste
511 # characters to the keyboard controller. This leaves time for the
512 # guest os to deal with the flow of characters. The ideal setting
513 # depends on how your operating system processes characters. The
514 # default of 100000 usec (.1 seconds) was chosen because it works
515 # consistently in Windows.
516 #
517 # If your OS is losing characters during a paste, increase the paste
518 # delay until it stops losing characters.
519 #
520 # Examples:
521 # keyboard_paste_delay: 100000
522 #=======================================================================
523 keyboard_paste_delay: 100000
524
525 #=======================================================================
526 # MOUSE:
527 # This option prevents Bochs from creating mouse "events" unless a mouse
528 # is enabled. The hardware emulation itself is not disabled by this.
529 # You can turn the mouse on by setting enabled to 1, or turn it off by
530 # setting enabled to 0. Unless you have a particular reason for enabling
531 # the mouse by default, it is recommended that you leave it off.
532 # You can also toggle the mouse usage at runtime (control key + middle
533 # mouse button on X11, SDL, wxWidgets and Win32).
534 # With the mouse type option you can select the type of mouse to emulate.
535 # The default value is 'ps2'. The other choices are 'imps2' (wheel mouse
536 # on PS/2), 'serial', 'serial_wheel' (one com port requires setting
537 # 'mode=mouse') and 'usb' (3-button mouse - one of the USB ports must be
538 # connected with the 'mouse' device - requires PCI and USB support).
539 #
540 # Examples:
541 # mouse: enabled=1
542 # mouse: enabled=1, type=imps2
543 # mouse: enabled=1, type=serial
544 # mouse: enabled=0
545 #=======================================================================
546 mouse: enabled=0
547
548 #=======================================================================
549 # private_colormap: Request that the GUI create and use it's own
550 # non-shared colormap. This colormap will be used
551 # when in the bochs window. If not enabled, a
552 # shared colormap scheme may be used. Not implemented
553 # on all GUI's.
554 #
555 # Examples:
556 # private_colormap: enabled=1
557 # private_colormap: enabled=0
558 #=======================================================================
559 private_colormap: enabled=0
560
561 #=======================================================================
562 # fullscreen: ONLY IMPLEMENTED ON AMIGA
563 # Request that Bochs occupy the entire screen instead of a
564 # window.
565 #
566 # Examples:
567 # fullscreen: enabled=0
568 # fullscreen: enabled=1
569 #=======================================================================
570 #fullscreen: enabled=0
571 #screenmode: name="sample"
572
573 #=======================================================================
574 # ne2k: NE2000 compatible ethernet adapter
575 #
576 # Examples:
577 # ne2k: ioaddr=IOADDR, irq=IRQ, mac=MACADDR, ethmod=MODULE, ethdev=DEVICE, script=SCRIPT
578 #
579 # ioaddr, irq: You probably won't need to change ioaddr and irq, unless there
580 # are IRQ conflicts.
581 #
582 # mac: The MAC address MUST NOT match the address of any machine on the net.
583 # Also, the first byte must be an even number (bit 0 set means a multicast
584 # address), and you cannot use ff:ff:ff:ff:ff:ff because that's the broadcast
585 # address. For the ethertap module, you must use fe:fd:00:00:00:01. There may
586 # be other restrictions too. To be safe, just use the b0:c4
587 #
588 # ethdev: The ethdev value is the name of the network interface on your host
589 # platform. On UNIX machines, you can get the name by running ifconfig. On
590 # Windows machines, you must run niclist to get the name of the ethdev.
591 # Niclist source code is in misc/niclist.c and it is included in Windows
592 # binary releases.
593 #
594 # script: The script value is optional, and is the name of a script that
595 # is executed after bochs initialize the network interface. You can use
596 # this script to configure this network interface, or enable masquerading.
597 # This is mainly useful for the tun/tap devices that only exist during
598 # Bochs execution. The network interface name is supplied to the script
599 # as first parameter
600 #
601 # If you don't want to make connections to any physical networks,
602 # you can use the following 'ethmod's to simulate a virtual network.
603 # null: All packets are discarded, but logged to a few files.
604 # arpback: ARP is simulated. Disabled by default.
605 # vde: Virtual Distributed Ethernet
606 # vnet: ARP, ICMP-echo(ping), DHCP and read/write TFTP are simulated.
607 # The virtual host uses 192.168.10.1.
608 # DHCP assigns 192.168.10.2 to the guest.
609 # TFTP uses the ethdev value for the root directory and doesn't
610 # overwrite files.
611 #
612 #=======================================================================
613 # ne2k: ioaddr=0x240, irq=9, mac=fe:fd:00:00:00:01, ethmod=fbsd, ethdev=en0 #macosx
614 # ne2k: ioaddr=0x240, irq=9, mac=b0:c4:20:00:00:00, ethmod=fbsd, ethdev=xl0
615 # ne2k: ioaddr=0x240, irq=9, mac=b0:c4:20:00:00:00, ethmod=linux, ethdev=eth0
616 # ne2k: ioaddr=0x240, irq=9, mac=b0:c4:20:00:00:01, ethmod=win32, ethdev=MYCARD
617 # ne2k: ioaddr=0x240, irq=9, mac=fe:fd:00:00:00:01, ethmod=tap, ethdev=tap0
618 # ne2k: ioaddr=0x240, irq=9, mac=fe:fd:00:00:00:01, ethmod=tuntap, ethdev=/dev/net/tun0, script=./tunconfig
619 # ne2k: ioaddr=0x240, irq=9, mac=b0:c4:20:00:00:01, ethmod=null, ethdev=eth0
620 # ne2k: ioaddr=0x240, irq=9, mac=b0:c4:20:00:00:01, ethmod=vde, ethdev="/tmp/vde.ctl"
621 # ne2k: ioaddr=0x240, irq=9, mac=b0:c4:20:00:00:01, ethmod=vnet, ethdev="c:/temp"
622
623 #=======================================================================
624 # KEYBOARD_MAPPING:
625 # This enables a remap of a physical localized keyboard to a
626 # virtualized us keyboard, as the PC architecture expects.
627 # If enabled, the keymap file must be specified.
628 #
629 # Examples:
630 # keyboard_mapping: enabled=1, map=gui/keymaps/x11-pc-de.map
631 #=======================================================================
632 keyboard_mapping: enabled=0, map=
633
634 #=======================================================================
635 # KEYBOARD_TYPE:
636 # Type of keyboard return by a "identify keyboard" command to the
637 # keyboard controler. It must be one of "xt", "at" or "mf".
638 # Defaults to "mf". It should be ok for almost everybody. A known
639 # exception is french macs, that do have a "at"-like keyboard.
640 #
641 # Examples:
642 # keyboard_type: mf
643 #=======================================================================
644 #keyboard_type: mf
645
646 #=======================================================================
647 # USER_SHORTCUT:
648 # This defines the keyboard shortcut to be sent when you press the "user"
649 # button in the headerbar. The shortcut string is a combination of maximum
650 # 3 key names (listed below) separated with a '-' character. The old-style
651 # syntax (without the '-') still works for the key combinations supported
652 # in Bochs 2.2.1.
653 # Valid key names:
654 # "alt", "bksl", "bksp", "ctrl", "del", "down", "end", "enter", "esc",
655 # "f1",
656 # "plus", "right", "shift", "space", "tab", "up", and "win".
657 #
658 # Example:
659 # user_shortcut: keys=ctrl-alt-del
660 #=======================================================================
661 #user_shortcut: keys=ctrl-alt-del
662
663 #=======================================================================
664 # I440FXSUPPORT:
665 # This option controls the presence of the i440FX PCI chipset. You can
666 # also specify the devices connected to PCI slots. Up to 5 slots are
667 # available now. These devices are currently supported: ne2k, pcivga,
668 # pcidev and pcipnic. If Bochs is compiled with Cirrus SVGA support
669 # you'll have the additional choice 'cirrus'.
670 #
671 # Example:
672 # i440fxsupport: enabled=1, slot1=pcivga, slot2=ne2k
673 #=======================================================================
674 #i440fxsupport: enabled=1
675
676 #=======================================================================
677 # USB1:
678 # This option controls the presence of the USB root hub which is a part
679 # of the i440FX PCI chipset. With the portX option you can connect devices
680 # to the hub (currently supported: 'mouse' and 'keypad'). If you connect
681 # the mouse to one of the ports and use the mouse option 'type=usb' you'll
682 # have a 3-button USB mouse.
683 #
684 # Example:
685 # usb1: enabled=1, port1=mouse, port2=keypad
686 #=======================================================================
687 #usb1: enabled=1
688
689 #=======================================================================
690 # CMOSIMAGE:
691 # This defines image file that can be loaded into the CMOS RAM at startup.
692 # The rtc_init parameter controls whether initialize the RTC with values stored
693 # in the image. By default the time0 argument given to the clock option is used.
694 # With 'rtc_init=image' the image is the source for the initial time.
695 #
696 # Example:
697 # cmosimage: file=cmos.img, rtc_init=image
698 #=======================================================================
699 #cmosimage: file=cmos.img, rtc_init=time0
700
701 #=======================================================================
702 # other stuff
703 #=======================================================================
704 #magic_break: enabled=1
705 #load32bitOSImage: os=nullkernel, path=../kernel.img, iolog=../vga_io.log
706 #load32bitOSImage: os=linux, path=../linux.img, iolog=../vga_io.log, initrd=../initrd.img
707 #text_snapshot_check: enable
708
709 #-------------------------
710 # PCI host device mapping
711 #-------------------------
712 #pcidev: vendor=0x1234, device=0x5678
713
714 #=======================================================================
715 # GDBSTUB:
716 # Enable GDB stub. See user documentation for details.
717 # Default value is enabled=0.
718 #=======================================================================
719 #gdbstub: enabled=0, port=1234, text_base=0, data_base=0, bss_base=0
720
721 #=======================================================================
722 # IPS:
723 # The IPS directive is DEPRECATED. Use the parameter IPS of the CPU
724 # directive instead.
725 #=======================================================================
726 #ips: 10000000
727
728 #=======================================================================
729 # for Macintosh, use the style of pathnames in the following
730 # examples.
731 #
732 # vgaromimage: :bios:VGABIOS-elpin-2.40
733 # romimage: file=:bios:BIOS-bochs-latest, address=0xf0000
734 # floppya: 1_44=[fd:], status=inserted
735 #=======================================================================
终于Complete了,你可以先make编译($ make) 再用bochs看结果了($ bochs),截图如下。不过这仅仅是完成了文本终端驱动,后面的路还长着呢, 只能慢慢地老汉推车了。
ps: 关于第二部分我主要参考http://sig9.com/bochs-grub,本想直接给个链接就完了,但是觉得它有些地方没说清楚,所以就做了些许改动,贴了上来。上面整个过程我都实验过了,如有问题可发邮件至 [email protected]
源码下载: Tinux2.tar.gz