react工程化配置
道阻且长,行而不辍,未来可期
1.安装react
yarn create react-app demo --template typescript
cd demo
yarn start
2.配置蓝图模版
https://github.com/shredor/blueprint-templates-cli#readme
yarn add blueprint-templates-cli
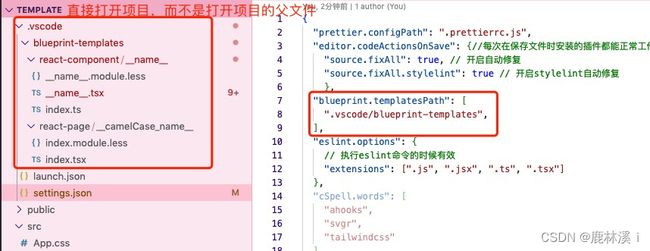
2.2创建一个blueprint-templates文件夹

创建文件的时候会出现New File from Template的选项

输入文件的名字,便会根据模版动态的创建文件
注意⚠️:在vscode中需要直接打开项目,而不能打开项目的父文件
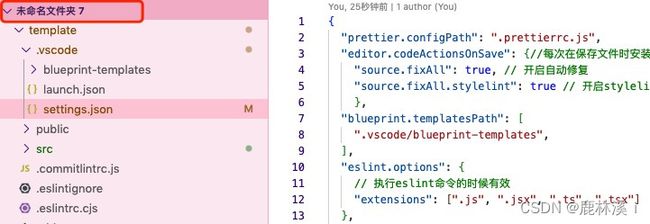
error如下图所示

项目的名字叫template,父文件叫“未命名文件夹7”
vs打开的是父文件,然后创建文件夹的时候如果选New File from Template就会报错
错误如下。
错误:No templates found. Please see https://github.com/reesemclean/blueprint for information on setting up Blueprint in your project.
可以去仓库中查看我的蓝图模版:https://github.com/1linan/template
创建模版后:
找不到模块“react”或其相应的类型声明。
yarn add @types/react --dev
3.配置less + less module
在react项目中如果我们想修改默认的webpack配置,我们可以通过eject导出默认配置文件进行修改
但是这样的操作是不可逆的。更推荐使用craco或者react-app-rewired这样的工具来达到修改webpack的目的。
我选择的是craco工具
3.1在工程中引入craco 和 craco-less
yarn add @craco/craco
yarn add craco-less
3.2修改package.json
打开package.json文件,修改 package.json 里的 scripts 属性。
/* package.json */
"scripts": {
-   "start": "react-scripts start",
-   "build": "react-scripts build",
-   "test": "react-scripts test",
+   "start": "craco start",
+   "build": "craco build",
+   "test": "craco test",
}
3.3在项目根目录创建一个 craco.config.js 用于修改默认配置。
const CracoLessPlugin = require("craco-less");
const { loaderByName } = require("@craco/craco");

module.exports = {
  plugins: [
    {
      plugin: CracoLessPlugin,
      options: {
        modifyLessModuleRule(lessModuleRule, context) {
          // Configure the file suffix
          lessModuleRule.test = /.module.less$/;

          // Configure the generated local ident name.
          console.log(lessModuleRule)
          const cssLoader = lessModuleRule.use.find(loaderByName("css-loader"));
          cssLoader.options.modules = {
            localIdentName: "[local]_[hash:base64:5]",
          };

          return lessModuleRule;
        },
      },
    },
  ],
};
如果使用的是TypeScript编程,则在react-app-env.d.ts.文件中添加以下内容,解决模块问题
declare module '*.module.less' {
  const classes: {
    readonly [key: string]: string
  }
  export default classes
  declare module '*.less'
}
4.配置别名路径
4.1在craco.config.js 文件中添加如下配置
const path = require('path')
module.exports = {
  // webpack 配置
  webpack: {
    // 配置别名
    alias: {
      // 约定:使用 @ 表示 src 文件所在路径
      '@': path.resolve(__dirname, 'src'),
      // 约定:使用 @scss 表示全局 SASS 样式所在路径
      // 在 SASS 中使用
      '@scss': path.resolve(__dirname, 'src/assets/styles')
    }
  }
}
4.2在tsconfig.json中添加如下配置
{
  "compilerOptions": {
    "baseUrl": "./",
    "paths": {
      "@/*": ["src/*"],
      "@scss/*": ["src/assets/styles/*"]
    }
  }
}
4.3 在./tsconfig.json中新增一条配置, “extends”: “./path.tsconfig.json”
{
  "extends": "./path.tsconfig.json",
  "compilerOptions": {
    "target": "es5",
    "lib": [
      "dom",
      "dom.iterable",
      "esnext"
    ],
    ...
}
5.ESLint+Prettier
5.1 添加ESlint的配置
ESLint的主要功能包含代码格式和代码质量的校验。
Prettier 是一款代码格式化工具,用于检测代码中的格式问题,比如单行代码长度、tab长度、空格、逗号表达式等。更偏向于统一项目的编码风格。
yarn eslint --dev
yarn add eslint-config-prettier eslint-plugin-prettier prettier --dev
yarn add @typescript-eslint eslint-plugin-react --dev
prettier 需要用prettier对代码的格式进行检查和修正,下载prettier包
eslint-config-prettier:关闭不必要的或者可能和Prettier冲突的规则
eslint-plugin-react:插件–React 代码规范的校验规则
- react/jsx-key:用来检查是否声明了 key 属性
- no-array-index-key:用来检查是否使用了数组索引声明 key 属性
react-hooks:React hooks 代码规范的校验规则
- rules-of-hooks: 用来检查 Hook 的规则(不能 if/循环中使用 Hooks)
- exhaustive-deps 规则,此规则会在useEffct添加错误依赖时发出警告并给出修复建议
创建.eslintrc.cjs
module.exports = {
  env: {
    browser: true,
    es2021: true,
    node: true
  },
  extends: [
    "eslint:recommended", //作为基本规则集,继承eslint官方推荐的一些配置
    "plugin:react/recommended", //作为基本规则集
    "plugin:@typescript-eslint/recommended", //作为基本规则集,继承了一个由typesript官方提供的适合于ts代码检查的配置
    "prettier", //由于eslint和prettier都具备代码格式化的功能,并且可能出现冲突,所以继承eslint-config-prettier
    "plugin:prettier/recommended"
  ],
  parser: "@typescript-eslint/parser", //作为ESlint的解析器,将Ts代码纳入ESLint校验范围,因为eslint默认的parser智能解析js,所以配置了parser
  parserOptions: {
    //对parser进行配置
    ecmaFeatures: {
      jsx: true
    },
    ecmaVersion: "latest",
    sourceType: "module"
  },
  plugins: [
    "react",
    "@typescript-eslint",
    "prettier", //注册eslint-plugin-prettier插件
    "import",
    "eslint-plugin-react", //注册插件,React 代码规范的校验规则
    //react/jsx-key:用来检查是否声明了 key 属性
    //no-array-index-key:用来检查是否使用了数组索引声明 key 属性
    "react-hooks" //React hooks 代码规范的校验规则
    //rules-of-hooks: 用来检查 Hook 的规则(不能 if/循环中使用 Hooks)
    //exhaustive-deps 规则,此规则会在useEffct添加错误依赖时发出警告并给出修复建议
  ],
  rules: {
    //开启eslint-plugin-prettier中的prettier规则
    //开启这条规则后,会将prettier的校验规则传递给eslint,这样eslint就可以按照prettier的方式来进行代码格式的校验
    "prettier/prettier": "error", //表示被prettier标记的地方抛出错误信息。
    quotes: ["error"], // // 字符串必须使用双引号,否则报错
    "react/jsx-boolean-value": 1,
    "react-hooks/rules-of-hooks": "error",
    "react-hooks/exhaustive-deps": "warn",
    "react/prop-types": "off",
    //Typescript 中,必须明确指定函数的返回值类型。并且函数中的return后的类型必须与指定的类型一致 参考文档
    /*
    下面是一个 "explicit-module-boundary-types" 规则的栗子
    // 会出现 explicit-module-boundary-types警告
	export default function () {
	  return 1;
	}

	// 下面的函数不会出现警告
	export var fn = function (): number {
	  return 1;
	};
    */
    "@typescript-eslint/explicit-module-boundary-types": "off",//关闭explicit-module-boundary-types,TS 中可以通过类型推断判断出函数的返回值类型,因此可以关闭此 Lint
    semi: ["error", "always"],
    "react/react-in-jsx-scope": "off",
    "import/order": [
      "error",
      {
        alphabetize: {
          order: "asc"
        }
      }
    ]
  }
};
添加 NPM 脚本
{
  "script": {
    "lint-staged:js": "eslint --ext .js,.jsx,.ts,.tsx ",
    "lint:js": "eslint --cache --ext .js,.jsx,.ts,.tsx ./src",
    "lint:fix": "eslint --fix --cache --ext .js,.jsx,.ts,.tsx"
  }
}
lint-staged:js: 只校验后缀名为".js,.jsx,.ts,.tsx"的文件
lint:js: 只校验src目录下,后缀名为".js,.jsx,.ts,.tsx"的文件中,被修改过的文件。这会生成一个.eslintcache文件用来缓存已校验过的文件
lint:fix: 根据 .eslintcache文件,校验被修改过的文件。并且自动修复
创建.eslintignore
如果需要屏蔽不需要检测的文件或目录,可以在项目根目录添加 .eslintignore
build
output
node_modules
src/idl
lib
.temp/
mock.js
.eslintrc.js
idl/
5.2添加 Prettier 代码自动格式化工具
yarn add prettier --dev
在项目根目录新建.prettierrc 并加入以下内容
module.exports = {
printWidth: 100, //一行的字符数,如果超过会进行换行,默认为80
tabWidth: 2, //一个tab代表几个空格数,默认为2
useTabs: false, //是否使用tab进行缩进,默认为false,表示用空格进行缩减
singleQuote: false, //字符串是否使用单引号,默认为false,使用双引号
semi: true, //如果 semi 设置为 true,将在语句末尾加上;
trailingComma: "none", //是否使用尾逗号,有三个可选值""
bracketSpacing: true, //对象大括号直接是否有空格,默认为true,效果:{ foo: bar }
endOfLine: "auto",//换行符使用lf
proseWrap: "preserve",//使用默认的折行标准
htmlWhitespaceSensitivity: "ignore",
sxBracketSameLine: false,
tsxBracketSameLine: false,
jsxBracketSameLine: false,
/**
// true example
// false example
*/
};
为VSCode 安装 Prettier 插件

通过在“设置”中勾选“保存时进行格式化”选项, 就可以在文件保存时使用 Prettier 进行自动格式化
如果需要屏蔽不必要的文件,可以在项目根目录添加 .prettierignore并加入以下内容
*.svg
package.json
.DS_Store
.eslintignore
*.png
*.toml
.editorconfig
.gitignore
.prettierignore
LICENSE
.eslintcache
*.lock
yarn-error.log
/build
/public
添加 npm 脚本
"script":{
  "lint:prettier": "prettier --check \"src/**/*\" --end-of-line auto",
  "prettier": "prettier -c --write \"src/**/*\""
}
lint:prettier:当想要检查文件是否已被格式化时,则可以使用–check标志(或-c)运行 Prettier。这将输出一条语义化的消息和未格式化文件的列表。上面脚本的意思是格式化src目录下的所有文件
prettier:重新格式化所有已被处理过的文件。类似于eslint --fix的工作。上面脚本的意思是重新格式化src目录下的所有文件
6.添加 stylelint
 "stylelint-config-prettier": "^9.0.5",
 "stylelint-config-recess-order": "^4.0.0",
 "stylelint-config-standard": "^30.0.1",
 "stylelint-prettier": "^3.0.0",
新建 .stylelintrc.js并加入以下内容
module.exports = {
   // 继承一系列规则集合
    extends: [
    'stylelint-config-standard',
  ],
  rules: {
        "indentation": 4,//# 缩进 4 个空格
        "string-quotes": "double",//使用双引号
        "declaration-block-trailing-semicolon": "always",//每个属性声明末尾都要加分号
        "declaration-empty-line-before": [//第一条属性声明前不允许有空行
          "never",
          { ignore: [ "after-declaration" ] }
        ],
        "rule-empty-line-before": [//每个样式规则前后都有空行,除了第一条规则与规则前有注释
          "always",
          { except: [ "after-single-line-comment", "first-nested" ] }
        ],
        "max-empty-lines": 1,//不允许超过一行的空行
        "no-eol-whitespace": true,//每行句末不允许有多余空格
        "no-missing-end-of-source-newline": true,//文件末尾需要有一个空行
        //大小写处理
        "unit-case": "lower",
        "color-hex-case": "upper",
        "value-keyword-case": "lower",
        "function-name-case": "lower",
        "property-case": "lower",
        "at-rule-name-case": "lower",
        "selector-pseudo-class-case": "lower",
        "selector-pseudo-element-case": "lower",
        "selector-type-case": "lower",
        "media-feature-name-case": "lower",
        /****** */
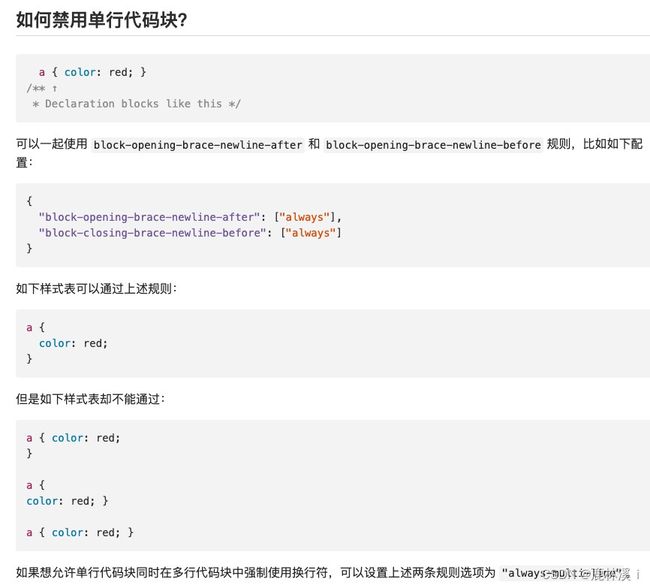
        "block-opening-brace-newline-after": ["always"],
        "block-closing-brace-newline-before": ["always"],
        /**
         * demo
         * 正确
         * a{
         * color:red
         * }
         *
         * 错误
         * a{color:red}
         * a{color:red
         * }
         * a{
         * color:red}
         */
         /****** */
       // "selector-class-pattern":"^[a-z][a-zA-Z0-9]+$",//className命名为小驼峰
  },
  // 忽略其他文件,只校验样式相关的文件
  ignoreFiles: [
    "node_modules/**/*",
    "public/**/*",
    "build/**/*",
    "**/*.js",
    "**/*.jsx",
    "**/*.tsx",
    "**/*.ts",
  ],
};
配置stylelint时常见问题

stylelint中className的命名

如果需要屏蔽不必要的文件,可以在项目根目录添加 .stylelintignore,并添加一下内容
node_modules

dist
public
docs
bin

.husky
.local
.vscode
.idea
.cache

*.md
*.woff
*.ttf
7.配置Git Hook
husky是一个gitHook工具,可以配置 git 的一些钩子,这里配置一个commit钩子。
在 git commit 命令运行时先校验 lint(eslint, stylelint 等)是否通过,未通过则不予提交。
lint-staged 是一个在 git 暂存文件上运行 lint 校验的工具,配合 husky 配置 commit 钩子,用于 git commit 前的强制校验
yarn add husky lint-staged --dev
{
  "scripts": {
    "precommit": "lint-staged",
    "lint-staged:js": "eslint --ext .js,.jsx,.ts,.tsx"
  },
  "husky": {
    "hooks": {
      "pre-commit": "lint-staged"
    }
  },
  "lint-staged": {
    "**/*.less": "stylelint --syntax less",
    "**/*.{js,jsx,ts,tsx}": "npm run lint-staged:js",
    "**/*.{js,jsx,tsx,ts,less,md,json}": ["prettier --write"]
  }
}
在每次 git commit 之前会进入工作区文件扫描,自动修复 eslint/stylelint 问题再使用 prettier 自动格式化,最后再提交到工作区。
注意⚠️:必选先使用git init 初始化 git 仓库,之后使用 husky 才能生效
