Linux —— nginx服务
简介
nginx是linux里的一个提供网站的服务的软件,支持http协议,做反向代理(负载均衡),将用户的访问流量转发到后端的服务器去
安装
安装方式: yum安装、编译安装
yum安装: yum install nginx 底层是需要知道nginx的已经做好的rpm包存在的哪个位置,不然也不能去安装
rpm包: 是redhat/centos系统里的软件安装包,以.rpm结尾 ,理解为windows里的.exe结尾的安装包
rpm包是别人使用源码制作好的可以直接安装使用的软件包
去衣服专卖店直接购买衣服: 衣服已经做好的,款式,颜色都是固定的,不能修改了
rpm包: 系统盘里有,官方网站有,第3方的网站也有
yum 底层其实就是调用rpm包去安装
rpm 是linux里的软件安装的命令,不能自动解决依赖关系,需要手工完成 ,难度要大
yum 也是linux里的软件安装的命令,但是yum可以帮助我们自动解决依赖关系
为什么软件之间有依赖关系?
一个软件有很多模块,有些功能某些软件已经有了,而且还非常好用,我们就可以直接调用,不需要再自己写一个了
编译安装: 下载源代码包,安装固定的流程去安装
1.下载源码
2.编译前的配置 --》选款式,颜色,面料,量尺寸等操作的确定--》形成一个方案
3.编译 --》开始制作衣服
4.编译安装 --》交付给用户
去裁缝店定制衣服,选款式,颜色,面料,量尺寸等操作,不能立马就做出衣服,需要一个制作的过程
可以定制:哪些功能需要,哪些不需要,安装到指定的位置等
企业里业务需要根据自身的情况,进行定制,更加节约资源,性能更加好
1.下载
[root@zabbix-agent sc]# mkdir   /nginx
[root@zabbix-agent sc]# cd /nginx/
[root@zabbix-agent nginx]# ls
[root@zabbix-agent nginx]# wget http://nginx.org/download/nginx-1.23.2.tar.gz

[root@zabbix-agent nginx]# curl  -O  http://nginx.org/download/nginx-1.23.2.tar.gz
wget 是linux里的下载软件,理解为linux里的迅雷下载软件
curl 是linxu里的字符界面的浏览器
2.解压软件
[root@zabbix-agent sc]# tar xf nginx-1.23.2.tar.gz
[root@zabbix-agent sc]# ls
nginx-1.23.2  nginx-1.23.2.tar.gz
[root@zabbix-agent sc]# du -sh nginx-1.23.2
7.5M	nginx-1.23.2
[root@zabbix-agent sc]# cd nginx-1.23.2  进入解压后的文件夹
[root@zabbix-agent nginx-1.23.2]# ls
auto  CHANGES  CHANGES.ru  conf  configure  contrib  html  LICENSE  man  README  src
src文件夹里存放的是nginx的程序源代码 source code 源代码
编译安装:
编写一个一键安装ngix的脚本
[root@zabbix-agent nginx]# vim onekey_install_shushan_nginx.sh
#!/bin/bash

#新建一个文件夹用来存放下载的nginx源码包
mkdir  -p  /shushan_nginx
cd  /shushan_nginx

#新建用户
useradd  -s /sbin/nologin  tiankai
#下载nginx
curl -O http://nginx.org/download/nginx-1.23.2.tar.gz

#解压nginx源码包
tar  xf  nginx-1.23.2.tar.gz

#解决依赖关系
yum  install gcc   openssl openssl-devel  pcre pcre-devel automake make -y

#编译前的配置
cd  nginx-1.23.2

./configure  --prefix=/usr/local/scnginx88   --user=tiankai  --with-http_ssl_module  --with-http_v2_module   --with-threads    --with-http_stub_status_module   --with-stream
#编译,开启2个进程同时编译,速度会快些
make -j 2

#安装
make   install

#启动nginx
/usr/local/scnginx88/sbin/nginx
#修改PATH变量
PATH=$PATH:/usr/local/scnginx88/sbin
echo "PATH=$PATH:/usr/local/scnginx88/sbin"  >>/root/.bashrc

#设置nginx的开机启动
echo  "/usr/local/scnginx88/sbin/nginx"  >>/etc/rc.local
chmod +x /etc/rc.d/rc.local

#selinux和firewalld防火墙都关闭
service firewalld stop
systemctl disable firewalld

#临时关闭selinux
setenforce 0
#永久关闭selinux
sed -i '/^SELINUX=/ s/enforcing/disabled/'  /etc/selinux/config
configure 是一个配置的脚本文件,nginx给我们提供的,这个脚本会收集我们指定的配置,然后生成一个Makefile的文件
这个Makefile会告诉后面的make命令,如何去编译。理解为一个设计图纸
Makefile
--prefix=path 指定安装路径
--prefix=/usr/local/scnginx99
--conf-path=path 指定配置文件的路径
--conf-path=/usr/local/scnginx99/conf
--user=name 指定启动nginx worker 进程的用户
--with-http_ssl_module 开启https的功能
--without-http_memcached_module 禁用http_memcached功能
--with开头的表示开启某个功能 -> 表示默认不安装,需要指定开启
--without开头的表示禁用某个功能 -> 表示默认是安装的
--with-http_ssl_module 对开启https的功能
--with-threads 支持线程池技术
--with-http_v2_module 对http 2.0版本的支持 http 1.1
--with-http_stub_status_module 开启nginx的状态统计功能,可以知道有多少人访问你的nginx
--with-stream 支持tcp/udp反向代理 load balancing 4层负载均衡功能
--with-http_realip_module 让后端的web服务器知道前面的代理的ip地址,获得真正的客户端的ip地址
--with-http_geo_module 根据客户端的ip地址进行限制
./configure --prefix=/usr/local/scnginx99 --user=zhanghaoyang --with-http_ssl_module --with-http_v2_module --with-threads --with-http_stub_status_module --with-stream
yum install gcc openssl openssl-devel pcre pcre-devel automake make -y
make 其实就是安装Makefile的配置去编译程序成二进制文件,二进制文件就是执行可以运行的程序
make install 就是将编译好的二进制文件复制到指定的安装路径目录下
[root@sanchuang nginx]# cd /usr/local/scnginx99/
[root@sanchuang scnginx99]# ls
conf  html  logs  sbin
html 目录,存放网站的网页文件
conf 存放nginx的配置文件
logs 存放日志文件
sbin 存放nginx的可执行文件
[root@sanchuang sbin]# service nginx restart
Redirecting to /bin/systemctl restart nginx.service
[root@sanchuang sbin]# ps aux|grep nginx
root      19779  0.0  0.2 149756  5432 pts/0    S+   10:11   0:00 vim onekey_install_nginx.sh
root      23629  0.0  0.0  46236  1168 ?        Ss   10:18   0:00 nginx: master process ./nginx
tianyang  23630  0.0  0.1  46696  1916 ?        S    10:18   0:00 nginx: worker process
root      23929  0.0  0.0  39304  1044 ?        Ss   10:20   0:00 nginx: master process /usr/sbin/nginx
nginx     23930  0.3  0.0  39696  1820 ?        S    10:20   0:00 nginx: worker process
nginx     23931  0.3  0.0  39696  1820 ?        S    10:20   0:00 nginx: worker process
nginx     23932  0.0  0.0  39696  1820 ?        S    10:20   0:00 nginx: worker process
nginx     23933  0.0  0.0  39696  1556 ?        S    10:20   0:00 nginx: worker process
root      23951  0.0  0.0 112828   984 pts/2    S+   10:20   0:00 grep --color=auto nginx
master process 主进程--》管理进程
worker process 工作进程
master进程不产生新的进程,worker进程会产生新的进程
[root@sanchuang logs]# pwd
/usr/local/scnginx88/logs
[root@sanchuang logs]# ls
access.log  error.log  nginx.pid
access.log 正常的访问网站的日志
error.log 访问错误的日志
nginx -s stop 停止nginx服务
日志的好处:
1.排除故障: 根据日志的记录
2.进行数据分析
判断nginx服务是否启动、
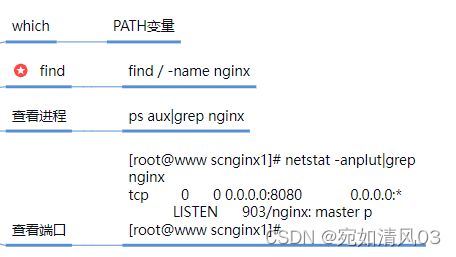
- 1.看进程 ps aux|grep nginx
- 2.看端口 netstat -anplut lsof -i:80 ss -anplut
- 3. 直接访问
- 4.看日志 rail -f access.log
如何知道这台服务器是否安装nginx?
1.直接查找 find
yum安装的nginx和编译安装的nginx是否冲突?
答案:冲突的点: 默认都想抢占80端口
如果不使用相同的端口,不冲突的
能否在机器里编译安装多个nginx?
答案:可以,如果不使用相同的端口,不冲突的
一个nginx对应一个网站,占用不同的端口
编译安装的热升级
参考:https://blog.csdn.net/gybshen/article/details/126562111
nginx配置文件分析
配置文件的作用: 传参
#user  nobody;    指定使用nobody用户去启动nginx worker进程
worker_processes  4;  启动4个worker 进程,看cpu的核心的数量,一般是cpu核心数量一致
                          16核心,启动16个进程


#error_log  logs/error.log;  指定错误日志存放的路径
#error_log  logs/error.log  notice;    记录notice级别以上的日志
#error_log  logs/error.log  info;  记录info级别以上的日志


#pid        logs/nginx.pid;  记录master进程的pid号
events {
    worker_connections  1024;   一个worker进程允许1024个用户访问,4个woker*1024,一个worker进程里产生1024个线程
}

keepalive_timeout  65;  65秒后用户和web服务器建立的连接就会断开

http {
	访问日志的格式
	#log_format  main  '$remote_addr - $remote_user [$time_local] "$request" '
    #                  '$status $body_bytes_sent "$http_referer" '
    #                  '"$http_user_agent" "$http_x_forwarded_for"';

    #access_log  logs/access.log  main;  访问日志

$remote_add 远程服务器的ip  ,本质上是nginx内部调用某个变量的值
 [$time_local]  时间
 "$request" 请求的网址
$status 响应的状态码  200  404
$body_bytes_sent  发送的数据
$http_referer"  从哪个网址引流过来的,从哪个网址跳转过来的  reference 参考/引用
$http_user_agent"  用户使用的浏览器
}


server {
        listen       80;  监听80端口
        server_name  www.feng.com;  为www.feng.com域名提供服务
        access_log  logs/feng.com.access.log  main;  访问日志的路径和格式

        定义的路由
        location / {
            root   html;  网站的根目录在html文件夹,在nginx的安装路径下
            index  shouye.html index.html index.htm;  定义访问的时候,第1个被访问的页面,最左边的优先级最高
        }
       error_page  404              /404.html;  定义出现404错误的时候,去访问404.html网页,在html目录下

        # redirect server error pages to the static page /50x.html
        #
        error_page   500 502 503 504  /50x.html;
        location = /50x.html {
            root   html;
        }
并发: 在一段时间内同时发生的事情 --》例如1分钟内 --》一段时间内同时发生
并行: 在某个时间点同时发生的事情 --》15:03:01 ---》同时发生
日志分为九个级别,严重级别从小到大为:
none 1个进程里可以包含很多线程,只是1个线程 线程thread:tcb(线程控制块)+程序代码+程序产生的数据 ESTABLISHED 表示与nginx进程建立连接 nginx的使用类别 一个域名对应一个server(虚拟主机) www.liu.com --->welcome to liu 只安装一个nginx,开启3个server(虚拟主机),对应3个域名,一个域名就是一个网站 例子: 在/usr/local/scnginx88/html下新建3个目录 feng zhang liu,然后去新建首页index.html,里面的内容自己定义,例如welcome to ** 重新加载nginx的配置,不会中断服务 在windows里修改C:\Windows\System32\drivers\etc\hosts文件,进行域名解析 复制hosts文件到桌面,修改完成后,再复制过去覆盖 再调出cmd命令行工具,测试域名是否生效 最后使用浏览器输入不同的域名测试访问 同一个服务器,一个进程,相同的端口,用户访问的时候,nginx是如何区分开不同的网站的? 1.请求报文 request 2.响应报文 response 什么是多路复用? IO多路复用:解决了大并发连接的问题 文件句柄: 文件描述符(fd file descriptor): 一个进程打开一个文件,就会给这个文件一个编号 /proc文件夹: proc文件系统用于存放内核的相关信息 内核管进程,内核给每个进程都会建立一个文件描述符表,表里会记录这个进程打开了哪些文件,给每个文件编号 http://www.feng.com/download/ --》url/uri 统一资源定位符 http:// -> 使用的协议 www.feng.com 具体的服务器域名 -> ip uri和url的区别 下面的这些是uri,在nginx内部就是这样叫的 为了找到匹配给定请求的位置,nginx首先检查使用前缀字符串定义的位置(前缀位置)。其中,选择匹配前缀最长的位置并记住。然后按照正则表达式在配置文件中的出现顺序检查它们。 参考:https://blog.csdn.net/zwl18210851801/article/details/81699977 优先级 正确的顺序为 = -->^~-->~*-->~ 根据不同的url做转发 优点: 节省服务器,省钱 最常见 一个网站对应一个公网ip 一个网站一个端口 rewrite功能就是,使用nginx提供的全局变量或自己设置的变量,结合正则表达式和标志位实现url重写以及重定向。rewrite只能放在server{},location{},if{}中,并且只能对域名后边的除去传递的参数外的字符串起作用 表明看rewrite和location功能有点像,都能实现跳转,主要区别在于rewrite是在同一域名内更改获取资源的路径,而location是对一类路径做控制访问或反向代理,可以proxy_pass到其他机器。很多情况下rewrite也会写在location里,它们的执行顺序是: 如果其中某步URI被重写,则重新循环执行1-3,直到找到真实存在的文件;循环超过10次,则返回500 Internal Server Error错误。 参考:https://www.cnblogs.com/brianzhu/p/8624703.html https://segmentfault.com/a/1190000002797606 有单独路由的配置文件,需要在location里单独添加autoindex 没有单独路由的,共享location /下面的配置 单独添加的location效果不佳 nginx1.21.4-解决了单独路由配置下载的功能 在http里对所有的虚拟主机生效,如果只是在一个server里,只对设置了autoindex的虚拟主机生效 参考:https://www.cnblogs.com/CarpenterLee/p/8084533.html https://www.cnblogs.com/yyxianren/p/10837424.html https://segmentfault.com/a/1190000011166016 可以根据ip地址或者域名来限制 放在http里或者server里 nginx1.21.1版本可以放在location里进行限速 相关算法 漏桶算法(leaky bucket) 令牌桶算法(token bucket) 相比漏桶算法,令牌桶算法不同之处在于它不但有一只“桶”,还有个队列,这个桶是用来存放令牌的,队列才是用来存放请求的。 从作用上来说,漏桶和令牌桶算法最明显的区别就是是否允许突发流量(burst)的处理,漏桶算法能够强行限制数据的实时传输(处理)速率,对突发流量不做额外处理;而令牌桶算法能够在限制数据的平均传输速率的同时允许某种程度的突发传输。 Nginx按请求速率限速模块使用的是漏桶算法,即能够强行保证请求的实时处理速度不会超过设置的阈值。 禁止爬虫爬过来 网站访问量的常用衡量标准:独立访客(UV) 和 综合浏览量(PV),一般以日为单位来衡量和计算。 独立访客(UV):指一定时间范围内相同访客多次访问网站,只计算为1个独立访客。 综合浏览量(PV):指一定时间范围内页面浏览量或点击量,用户每次刷新即被计算一次。 效果图 Active connections 当前活动的客户端连接数,包括Waiting连接数。 历史记录 htpasswd文件存放的路径 conf目录下 htpasswd命令去生成这个htpasswd文件 下载目录进行账号和密码验证,才能去下载文件 allow和deny指令将按其定义的顺序应用。 依次检查规则,直到找到第一个匹配项。在此示例中,仅允许对IPv4网络 10.1.1.0/16(192.168.1.0/24 不包括地址192.168.1.1)和IPv6网络进行访问2001:0db8::/32。 参考:https://blog.csdn.net/zsx0728/article/details/104160678 案例:将nginx的状态统计爬取下俩,入库,python实现 Linux搭建Python web环境(nginx + flask + uwsgi): https://www.jianshu.com/p/85692a94e99b 证书建议大家存放在conf目录下 http://www.baidu.com/ --》https://www.baidu.com/ http://www.sanchuangedu.cn/ --》https://www.sanchuangedu.cn/ 精简的配置 nginx里https功能默认没有开启,而且编译安装默认也不开启,需要指定选项参数--with-http_ssl_module 实践配置过程 If you see this page, the nginx web server is successfully installed and
working. Further configuration is required. For online documentation and support please refer to
nginx.org. Thank you for using nginx. 参考:https://www.jianshu.com/p/de4749970469/ 文件描述符(File descriptor)是计算机科学中的一个术语,是一个用于表述指向文件的引用的抽象化概念。 文件描述符在形式上是一个非负整数。实际上,它是一个索引值,指向内核为每一个进程所维护的该进程打开文件的记录表。 方法二 默认情况下linux内核允许一个进程打开的文件数量是1024 nginx的并发数量 调整内核对一个进程打开文件数量的限制 日志文件 access.log 记录正常的访问 error.log 记录访问出错的信息 参考:https://zhuanlan.zhihu.com/p/272891398 https://www.cnblogs.com/cangqinglang/p/11361617.html 内核去解决大并发问题 nginx的 默认是epoll 对于网页服务器 Nginx 来说,会有很多连接进来, epoll 会把他们都监视起来,然后像拨开关一样,谁有数据就拨向谁,然后调用相应的代码处理。 相比较 select 和 poll,epoll 的最大特点是: 什么是回调?一个简单的例子: 另一个方便理解的对比如下: sendfile实际上是 Linux2.0+以后的推出的一个系统调用,web服务器可以通过调整自身的配置来决定是否利用 sendfile这个系统调用。 read(file,tmp_buf, len); write(socket,tmp_buf, len); 硬盘 >> kernel buffer >> user buffer>> kernel socket buffer >>协议栈 一个基于socket的服务,首先读硬盘数据,然后写数据到socket 来完成网络传输的。上面2行用代码解释了这一点,不过上面2行简单的代码掩盖了底层的很多操作。来看看底层是怎么执行上面2行代码的: 1、系统调用 read()产生一个上下文切换:从 user mode 切换到 kernel mode,然后 DMA 执行拷贝,把文件数据从硬盘读到一个 kernel buffer 里。 2、数据从 kernel buffer拷贝到 user buffer,然后系统调用 read() 返回,这时又产生一个上下文切换:从kernel mode 切换到 user mode page not found
日志等级
说明(级别从低到高,记录信息越来越少)
none
不记录日志
debug
调试信息,系统进行调试时产生的日志,不属于错误日志,不需要过多关注
info
一般的通知信息,用来反馈系统的当前状态给当前用户
notice
提醒信息,需要检查一下程序了,不理会可能会出现错误
warning
警告信息,当出现警告时,你的程序可能已经出现了问题,但不影响程序正常运行,尽快进行处理,以免导致服务宕掉
error/err
错误信息,出现这一项时,已经挑明服务出现了问题,服务都无法确认是否能正常运行
critical
比较严重的错误信息,服务已经宕了,可能已经无法修复
alert
警报信息,需要立即采取行动,不仅是服务宕了,还会影响系统的正常启动
emerg
紧急信息,系统可能已经不能使用了,如果不能解决,就重新装机吧
进程proces: pcb(进程控制块process control block)+程序代码+程序产生的数据
pcb(进程控制块)理解为进程的身份证,包含pid,用户启动,内存里的地址,进程的状态等信息
线程比进程更加节约内存资源,因为所有的线程都共享同一份程序代码
一个用户访问过来,就启动一个线程来接待,从web服务器里读取数据给用户[root@sanchuang logs]# netstat -anplut|grep nginx 查看nginx进程网络的状态
tcp 0 0 0.0.0.0:8088 0.0.0.0:* LISTEN 36434/nginx: master
tcp 0 0 192.168.2.197:8088 192.168.2.130:58073 ESTABLISHED 57461/nginx: worker
tcp 0 0 192.168.2.197:8088 192.168.2.122:61999 ESTABLISHED 57463/nginx: worker
tcp 0 0 192.168.2.197:8088 192.168.2.122:62000 ESTABLISHED 57460/nginx: worker
tcp 0 0 192.168.2.197:8088 192.168.2.105:61721 ESTABLISHED 57461/nginx: worker
tcp 0 0 192.168.2.197:8088 192.168.2.111:65119 ESTABLISHED 57454/nginx: worker
tcp 0 0 192.168.2.197:8088 192.168.2.118:58240 ESTABLISHED 57460/nginx: worker
tcp 0 0 192.168.2.197:8088 192.168.2.105:61722 ESTABLISHED 57460/nginx: worker
tcp 0 0 192.168.2.197:8088 192.168.2.111:65116 ESTABLISHED 57464/nginx: worker
www.zhang.com --->welcome to zhang
www.feng.com --->welcome to feng[root@sanchuang conf]# cat nginx.conf|egrep -v "^$|#"
user tiankai;
worker_processes 4;
error_log logs/error.log notice;
pid logs/nginx.pid;
events {
worker_connections 2048;
}
http {
include mime.types;
default_type application/octet-stream;
log_format main '$remote_addr - $remote_user [$time_local] "$request" '
'$status $body_bytes_sent "$http_referer" '
'"$http_user_agent" "$http_x_forwarded_for"';
access_log logs/access.log main;
sendfile on;
keepalive_timeout 65;
server {
listen 80;
server_name www.feng.com;
access_log logs/feng.com.access.log main;
location / {
root html/feng;
index shouye.html index.html index.htm;
}
error_page 404 /404.html;
error_page 500 502 503 504 /50x.html;
location = /50x.html {
root html;
}
}
server {
listen 80;
server_name www.liu.com;
access_log logs/liu.com.access.log main;
location / {
root html/liu;
index shouye.html index.html index.htm;
}
error_page 404 /404.html;
error_page 500 502 503 504 /50x.html;
location = /50x.html {
root html;
}
}
server {
listen 80;
server_name www.zhang.com;
access_log logs/zhang.com.access.log main;
location / {
root html/zhang;
index shouye.html index.html index.htm;
}
error_page 404 /404.html;
error_page 500 502 503 504 /50x.html;
location = /50x.html {
root html;
}
}
}[root@sanchuang html]# pwd
/usr/local/scnginx88/html
[root@sanchuang html]# tree
.
├── 404.html
├── 50x.html
├── feng
│ └── index.html
├── index.html
├── liu
│ └── index.html
├── shouye.html
└── zhang
└── index.html[root@sanchuang zhang]# nginx -s reload[root@sanchuang zhang]# ulimit -n 1000000 临时调整linux内核允许一个进程可以打开的文件数量,调整为100万
[root@sanchuang zhang]# ulimit -a
core file size (blocks, -c) 0
data seg size (kbytes, -d) unlimited
scheduling priority (-e) 0
file size (blocks, -f) unlimited
pending signals (-i) 7183
max locked memory (kbytes, -l) 64
max memory size (kbytes, -m) unlimited
open files (-n) 1000000
pipe size (512 bytes, -p) 8
POSIX message queues (bytes, -q) 819200
real-time priority (-r) 0
stack size (kbytes, -s) 8192
cpu time (seconds, -t) unlimited
max user processes (-u) 7183
virtual memory (kbytes, -v) unlimited
file locks (-x) unlimited[root@sanchuang zhang]# nginx -t 测试配置文件语法是否正确
nginx: the configuration file /usr/local/scnginx88/conf/nginx.conf syntax is ok
nginx: configuration file /usr/local/scnginx88/conf/nginx.conf test is successful192.168.2.197 www.feng.com
192.168.2.197 www.liu.com
192.168.2.197 www.zhang.com
ping www.feng.com
host: www.feng.com
IO多路复用(IO Multiplexing)一种同步IO模型,单个进程/线程就可以同时处理多个IO请求。一个进程/线程可以监视多个文件句柄;一旦某个文件句柄就绪,就能够通知应用程序进行相应的读写操作;没有文件句柄就绪时会阻塞应用程序,交出cpu。多路是指网络连接,复用指的是同一个进程/线程。
一个进程/线程虽然任一时刻只能处理一个请求,但是处理每个请求的事件时,耗时控制在 1 毫秒以内,这样 1 秒内就可以处理上千个请求,把时间拉长来看,多个请求复用了一个进程/线程,这就是多路复用,这种思想很类似一个 CPU 并发多个进程,所以也叫做时分多路复用。
IO 多路复用是一种同步 IO 模型,实现一个线程可以监视多个一旦某个文件句柄就绪,就能够通知应用程序进行相应的读写操作;没有文件句柄就绪时会阻塞应用程序,交出 cpu。IO 是指网络 IO,多路指多个TCP连接(即 socket 或者 channel),复用指复用一个或几个线程。
这个文件夹消耗的是内存的空间,重启系统,这个文件夹里的内容会消耗
因为proc文件系统消耗的是内存的空间,内存停电会丢失数据[root@sanchuang proc]# cat /proc/cpuinfo cpu的信息
[root@sanchuang proc]# cat /proc/meminfo 内存的信息
MemTotal: 1863032 kB
MemFree: 901336 kB
MemAvailable: 1490912 kB
Buffers: 2108 kB
Cached: 701080 kB
SwapCached: 0 kB[root@sanchuang fd]# ll
总用量 0
lrwx------ 1 root root 64 11月 22 11:34 0 -> /dev/pts/3
lrwx------ 1 root root 64 11月 22 11:34 1 -> /dev/pts/3
lrwx------ 1 root root 64 11月 22 11:34 2 -> /dev/pts/3
lrwx------ 1 root root 64 11月 22 15:24 255 -> /dev/pts/3
url是统一资源定位符号: 不同的资源有不同的路径,我们可以通过这个路径找到 --》全球范围
uri是统一资源标识符: 是一个概念,不同的资源有不同的标识 --》nginx内部的资源的区别标识
/download/feng.txt
/download/passwd.jpglocation 对 url 的配置
匹配顺序
路由转发功能
   server{
                listen 80;
                server_name  www.d.com;
                location / {
                        proxy_pass http://www.qq.com;
                }
        }

location /user/ {
    proxy_pass http://user.example.com;
}

location = /user {
    proxy_pass http://login.example.com;
}
location /login{
    proxy_pass http://192.168.0.161;
}
location /pic{
    proxy_pass http://192.168.0.162;
}
location /music{
    proxy_pass http://192.168.0.163;
}
虚拟主机配置
缺点:一台虚拟服务器受到攻击,其他的会收到牵连。
共用cpu、内存、磁盘、带宽,如果一台服务器的访问量特别大,会导致其他的网站访问的时候异常。基于域名的
基于IP的虚拟主机
基于端口的虚拟主机
rewrite(地址重定向)功能
利用nginx做网站提供下载功能
location / {
            root   html/bcom;
            autoindex on;  #将目录里的内容显示出来
            index  index.html index.htm;
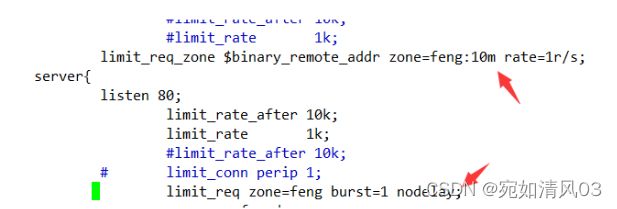
}ngnix的限速和限制并发连接数、限制请求数 ngx_http_core_module
限制并发连接数 ngx_http_limit_conn_module
limit_conn_zone $binary_remote_addr zone=perip:10m;
limit_conn_zone $server_name zone=perserver:10m;

说明:首先用limit_conn_zone定义了一个内存区块索引perip,大小为10m,它以$binary_remote_addr作为key 根据ip地址来进行连接限制。该配置只能在http里面配置,不支持在server里配置

server {
    ...
    limit_conn perip 10;   限制一个ip地址同时只能发起10个连接
    limit_conn perserver 100;   限制一个虚拟主机同时只能发起多少个并发连接
}
限速
limit_rate_after 500k;
limit_rate 50k;限制请求数 ngx_http_limit_req_module
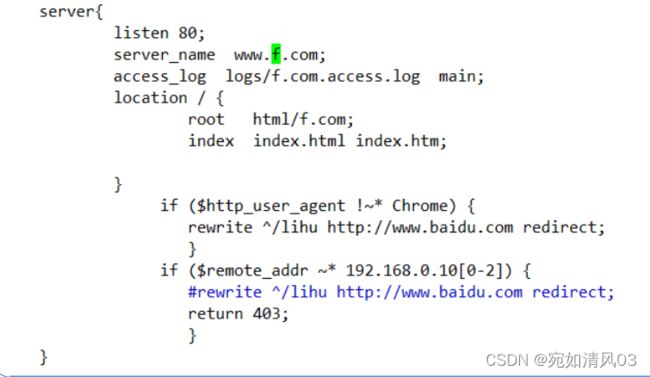
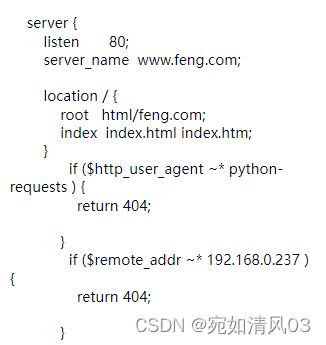
限制浏览器和ip
#对浏览器进行限制
            if ($http_user_agent !~* Chrome) {
               return 403;
            }
#对ip地址进行限制
             if ($remote_addr ~* 192.168.0.1[0-9]) {
              return 403;
}状态统计 ngx_http_stub_status_module
 #在server配置块里添加状态信息统计的功能
        location = /info {
                    stub_status;
        }
accepts 接受的客户端连接总数。
handled 已处理的连接总数。通常,参数值与accepts 除非达到某些资源限制(例如, worker_connections限制)相同。
requests 客户端请求总数。
Reading nginx正在读取请求标头的当前连接数。
Writing nginx正在将响应写回到客户端的当前连接数。
Waiting 当前等待请求的空闲客户端连接数 --》占着茅坑不拉屎的人的数量
accepts handled requests
实时数据:
active
reading
writing
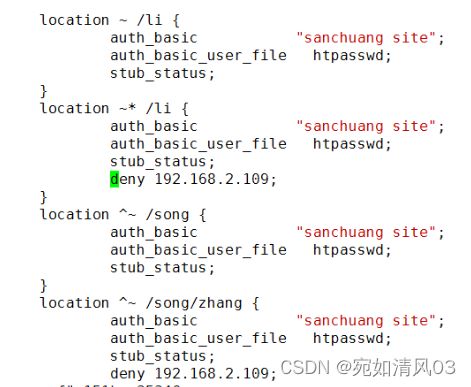
waiting 添加认证
#添加状态信息统计的功能
        location = /sc_status {
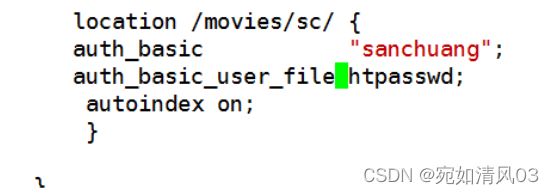
        auth_basic "sanchuang";
        auth_basic_user_file htpasswd;
                    stub_status;
        }
[root@www conf]# yum provides htpasswd
上次元数据过期检查:1:52:44 前,执行于 2021年11月12日 星期五 14时12分25秒。
httpd-tools-2.4.37-39.module_el8.4.0+778+c970deab.x86_64 : Tools for use with the Apache HTTP Server仓库        :appstream匹配来源:文件名    :/usr/bin/htpasswdhttpd-tools-2.4.37-39.module_el8.4.0+950+0577e6ac.1.x86_64 : Tools for use with the Apache HTTP Server仓库        :appstream匹配来源:文件名    :/usr/bin/htpasswd
[root@www conf]# yum install httpd-tools  -y

[root@sc-nginx conf]# htpasswd -c /usr/local/nginx8/conf/htpasswd cali
New password:
Re-type new password:
Adding password for user cali
[root@sc-nginx conf]# cat htpasswd
cali:$apr1$jYrNsFlj$MVJEw.OVoE/DnUgycC0hc.
[root@sc-nginx conf]# deny和allow指令
     #添加状态信息统计的功能
        location = /sc_status {
        #启用基本认证,访问上面的/sc_status这个路由
        auth_basic "sanchuang";
        #指定认证的文件的路径,文件里面是存放用户名和密码,文件默认我使用的名字是htpasswd
        #htpasswd文件存放的路径在conf目录下,不要放在html目录下,因为它属于nginx的一个配置文件,给nginx提供密码的认证的文件
        auth_basic_user_file htpasswd;
        allow 192.168.0.16;
        allow 192.168.0.24;
        deny all;
                    stub_status;
}import requests
import urllib3
from multiprocessing.dummy import Pool
# 设置session
urllib3.disable_warnings()
requests.adapters.DEFAULT_RETRIES = 10000000000000 # 增加重连次数
session = requests.session()
session.keep_alive = False # 关闭多余连接,以免链接过多 request报错
def Req(dic):
try:
idx = dic["idx"]
url = 'http://www.feng.com'
# 发送get请求
r = session.get(url=url, verify=False)
# 递归再次访问,如此循环,所有线程都不会闲着,都会一直运行
print(f'线程{idx}访问成功,继续递归访问')
Req(dic)
except Exception as e:
print('出错了')
# print(e)
# traceback.print_exc()
# 出错了,也继续递归访问
print(f'线程{idx}访问失败,继续递归访问')
Req(dic)
def Main():
threadLists = [] # 线程用的列表
threadcount = 500 # 线程大小3000个,看自己电脑性能分配
pool1 = Pool(threadcount) # 线程池,3000个线程
# 给列表初始化共有多少个请求 20w个
for i in range(1, 20000):
threadLists.append({"idx": i})
pool1.map(Req, threadLists)
pool1.close()
pool1.join()
if __name__ == "__main__":
Main();
https
server {
        listen       443 ssl;    #监听的端口号
        server_name  www.sanchuangedu.cn;  #虚拟主机对应的域名

        ssl_certificate      3608523_www.sanchuangedu.cn.pem;   #公钥--》证书
        ssl_certificate_key  3608523_www.sanchuangedu.cn.key;   #私钥

        ssl_session_cache    shared:SSL:1m;
        ssl_session_timeout  5m;

        ssl_ciphers  HIGH:!aNULL:!MD5;
        ssl_prefer_server_ciphers  on;

        location / {
            root   html;
            index  index.html index.htm;
        }
}http跳到https
url的跳转的问题 从http协议跳动https协议
思考下有多少种解决方法?
1. rewrite
#rewrite ^/(.*) https://www.sanchuangedu.cn permanent;
2.location 结合return 301具体配置如下:server {
listen 80;
server_name www.sc.com;
#rewrite ^/(.*) https://www.sanchuangedu.cn permanent;
location / {
return 301 https://www.baidu.com;
}
} server {
listen 80;
server_name www.sanchuangedu.cn;
location / {
#proxy_pass https://www.sanchuangedu.cn; #效果不是特别好
#return 301 https://www.baidu.com; #效果非常好
return 301 https://www.sanchuangedu.cn;
#rewrite ^/(.*) https://www.sanchuangedu.cn permanent;
#rewrite ^/(.*) https://www.qq.com permanent; #效果也非常好
}
}https的配置
 server {
        listen       443 ssl;
        server_name  www.sanchuangedu.cn;
        access_log  logs/sanchuang_edu.cn.access.log  main;
        error_log  logs/sanchuang_edu.cn.error.log;
        ssl_certificate      5151775_www.sanchuangedu.cn.pem;
        ssl_certificate_key  5151775_www.sanchuangedu.cn.key;
        ssl_session_cache    shared:SSL:1m;
        ssl_session_timeout  5m;
        ssl_ciphers  HIGH:!aNULL:!MD5;
        ssl_prefer_server_ciphers  on;
        location / {
            root   html/sanchuangedu.cn;
            index  index.html index.htm;
        }
    }
在nginx里部署https服务
1.到阿里云去申请免费的证书digicert类型的免费证书,可以使用1年,下载下来
7318014_sanchuangedu.cn_nginx.zip
2.上传下载的证书到nginx服务器的conf目录下
[root@sc-web conf]# pwd
/usr/local/sclilin99/conf
[root@sc-web conf]#
[root@sc-web conf]# ls
7318014_sanchuangedu.cn_nginx.zip fastcgi_params.default mime.types scgi_params win-utf
fastcgi.conf htpasswd mime.types.default scgi_params.default
fastcgi.conf.default koi-utf nginx.conf uwsgi_params
fastcgi_params koi-win nginx.conf.default uwsgi_params.default
[root@sc-web conf]#
[root@sc-web conf]# yum install unzip -y 安装unzip软件
[root@sc-web conf]# unzip 7318014_sanchuangedu.cn_nginx.zip 解压
Archive: 7318014_sanchuangedu.cn_nginx.zip
Aliyun Certificate Download
inflating: 7318014_sanchuangedu.cn.pem
inflating: 7318014_sanchuangedu.cn.key
[root@sc-web conf]# ls
7318014_sanchuangedu.cn.key fastcgi.conf.default koi-utf nginx.conf uwsgi_params
7318014_sanchuangedu.cn_nginx.zip fastcgi_params koi-win nginx.conf.default uwsgi_params.default
7318014_sanchuangedu.cn.pem fastcgi_params.default mime.types scgi_params win-utf
fastcgi.conf htpasswd mime.types.default scgi_params.default
[root@sc-web conf]#
7318014_sanchuangedu.cn.key 私钥
7318014_sanchuangedu.cn.pem 公钥
3.修改配置文件启用https服务
[root@sc-web conf]# vim nginx.conf
server {
listen 443 ssl;
server_name www.sanchuangedu.cn;
ssl_certificate 7318014_sanchuangedu.cn.pem;
ssl_certificate_key 7318014_sanchuangedu.cn.key;
ssl_session_cache shared:SSL:1m;
ssl_session_timeout 5m;
ssl_ciphers HIGH:!aNULL:!MD5;
ssl_prefer_server_ciphers on;
location / {
root html;
index index.html index.htm;
}
}
4.重启nginx服务
[root@sc-web conf]# nginx -t
nginx: the configuration file /usr/local/sclilin99/conf/nginx.conf syntax is ok
nginx: configuration file /usr/local/sclilin99/conf/nginx.conf test is successful
[root@sc-web conf]# nginx -s reload
[root@sc-web conf]#
5.验证
[root@sc-web conf]# netstat -anplut|grep nginx
tcp 0 0 0.0.0.0:80 0.0.0.0:* LISTEN 2884/nginx: master
tcp 0 0 0.0.0.0:443 0.0.0.0:* LISTEN 2884/nginx: master
[root@sc-web conf]#
[root@sc-web conf]# ip add 查看ip地址
1: lo: Welcome to sanchuang!
Commercial support is available at
nginx.com.301 Moved Permanently
301 Moved Permanently
根据ip地址地区限制geoIP
[root@www sc]# yum  install unzip -y
[root@www sc]# ls
geoip.zip
[root@www sc]# unzip geoip.zip
Archive:  geoip.zip
  inflating: GeoIPCityv6.dat
  inflating: GeoIPv6.dat
  inflating: GeoLite2-City.mmdb
  inflating: GeoLite2-Country.mmdb
  inflating: GeoLiteASNum.dat
  inflating: GeoLiteASNumv6.dat
  inflating: GeoLiteCity.dat
  inflating: GeoLiteCityv6.dat
  inflating: GeoLiteCountry.dat
  inflating: readme.txt
  inflating: GeoIP.dat
  inflating: GeoIPASNum.dat
  inflating: GeoIPASNumv6.dat
  inflating: GeoIPCity.dat
[root@www sc]# ls
GeoIPASNum.dat    GeoIPCityv6.dat  geoip.zip              GeoLiteASNum.dat    GeoLiteCityv6.dat
GeoIPASNumv6.dat  GeoIP.dat        GeoLite2-City.mmdb     GeoLiteASNumv6.dat  GeoLiteCountry.dat
GeoIPCity.dat     GeoIPv6.dat      GeoLite2-Country.mmdb  GeoLiteCity.dat     readme.txt
[root@www sc]#
[root@www sc]# cp GeoIP.dat GeoLiteCountry.dat /usr/local/scxiongxue99/conf/
[root@www sc]# cp GeoLiteCity.dat /usr/local/scxiongxue99/conf/
[root@www conf]# vim nginx.conf

     geoip_country         /usr/local/scxiongxue99/conf/GeoIP.dat;   -->在http块里添加的
    geoip_city            /usr/local/scxiongxue99/conf/GeoLiteCity.dat;  -->在http块里添加的
    #keepalive_timeout  0;
    keepalive_timeout  65;

    #gzip  on;

    server {
        listen  8080;
        server_name www.xiongxue.com;
        if ($geoip_country_code != 'CN' ){            -->在server块里添加的
        return 403;
        }

[root@www conf]# /usr/local/scxiongxue99/sbin/nginx -t
nginx: the configuration file /usr/local/scxiongxue99/conf/nginx.conf syntax is ok
nginx: configuration file /usr/local/scxiongxue99/conf/nginx.conf test is successful
[root@www conf]#
[root@www conf]# /usr/local/scxiongxue99/sbin/nginx -s reload
[root@www conf]#
隐藏nginx的版本
文件描述符
内核给每个进程打开的每个文件进行编号,编号从0开始,这个编号就是文件描述符 [root@sc-nginx conf]# ulimit -n 655350 修改linux内核对一个进程打开文件数量的限制,修改为655350
临时修改 vim /etc/rc.local 永久修改
ulimit -n 1000000 [root@sc-nginx conf]# chmod +x /etc/rc.d/rc.local
[root@sc-nginx conf]# ll /etc/rc.d/rc.local
-rwxr-xr-x. 1 root root 520 2月 3 10:07 /etc/rc.d/rc.local永久修改文件描述符的限制
[root@sc-nginx ~]# vim /etc/security/limits.conf
# - nofile - max number of open file descriptors
* soft nofile 1000000
* hard nofile 1000000[root@slave-mysql hejin]# ulimit -n 1000000
[root@slave-mysql hejin]# nginx -t
nginx: the configuration file /usr/local/sclilin99/conf/nginx.conf syntax is ok
nginx: configuration file /usr/local/sclilin99/conf/nginx.conf test is successful
[root@slave-mysql hejin]# 日志
IO多路复用
selelct
poll
epoll
进程的状态
sendfile
 系统调用 sendfile() 就是用来简化上面步骤提升性能的。sendfile() 不但能减少切换次数而且还能减少拷贝次数。硬盘 >> kernel buffer (快速拷贝到kernelsocket buffer) >>协议栈
 404错误页面的使用
https://www.qq.com/404page.html
404错误页面的使用
[root@slave-mysql sclilin99]# cd html/
[root@slave-mysql html]# ls
50x.html caogy.jpg hejin huang index.html li peng song
[root@slave-mysql html]# vim 404.html
[root@slave-mysql sclilin99]# cd html/
[root@slave-mysql html]# ls
50x.html caogy.jpg hejin huang index.html li peng song
[root@slave-mysql html]# vim 404.html
admin: teacher feng 18908495097

realip问题
问题:
后端的real server不知道前端真正访问的ip地址,只是知道负载均衡的ip地址,如何让后端的real server知道前端真正的用户的ip地址?
解决方法一:
步骤1:在负载均衡器上修改http请求报文头部字段,添加一个X-Real-IP字段
  server {
        listen       80;
        server_name  www.sc.com;
        location / {
                proxy_pass http://myweb1;
                proxy_set_header   X-Real-IP        $remote_addr;
           }

    }
将nginx内部的remote_addr这个变量的值,赋值给X-Real-IP这个变量,X-Real-IP这个变量会在http协议的请求报文里添加一个X-Real-IP的字段,后端的real server 服务器上的nginx就可以读取这个字段的值
X-Real-IP 这个变量名可以自己定义,随便取名,后面引用的时候,不区分大小写
步骤2:在后端real server上使用这个x_real_ip这个字段
http {
    include       mime.types;
    default_type  application/octet-stream;

    log_format  main  '$remote_addr -  $HTTP_X_REAL_IP - $remote_user [$time_local] "$request" '
                      '$status $body_bytes_sent "$http_referer" '
                      '"$http_user_agent" "$http_x_forwarded_for"';

access_log  logs/access.log  main;
在主配置文件nginx.conf里的日志部分调用这个变量,获取x_real_ip的值
解决方法二:
后端real server使用realip模块
提前条件,需要在后端的backend服务器上在编译安装nginx的时候,需要接 --with-http_realip_module 开启这个功能
步骤1:在负载均衡器上修改http请求报文头部字段,添加一个X_REAL_IP字段
  server {
        listen       80;
        server_name  www.sc.com;
        location / {
                proxy_pass http://myweb1;
                proxy_set_header   X-Real-IP        $remote_addr;
           }

    }
将nginx内部的remote_addr这个变量的值,赋值给X-Real-IP这个变量,X-Real-IP这个变量会在http协议的请求报文里添加一个X-Real-IP的字段,后端的real server 服务器上的nginx就可以读取这个字段的值
X-Real-IP 这个变量名可以自己定义,随便取名,后面引用的时候,不区分大小写
步骤2:在后端real server上使用set_real_ip_from 192.168.0.160
server{
                listen 80;
                set_real_ip_from 192.168.0.160;
set_real_ip_from 192.168.0.160; 告诉本机的nginx 192.168.0.160 是负载均衡器,不是真正的client
real-ip模块的使用
realip模块的作用是:当本机的nginx处于一个反向代理的后端时获取到真实的用户IP。
给后端的backend服务器使用的
负载均衡 ngx_stream_core_module
参考:https://docs.nginx.com/nginx/admin-guide/load-balancer/http-load-balancer/
七层负载均衡
只能给web 应用,使用http协议的
跨多个应用程序实例的负载平衡是常用的优化资源利用率、最大化吞吐量的技术, 减少延迟,并确保容错配置。
可以使用nginx作为非常有效的HTTP负载均衡器来 将流量分配到多个应用程序服务器并改进 使用 nginx 的 Web 应用程序的性能、可扩展性和可靠性。
负载均衡的方法 算法
轮询 — 分发对应用程序服务器的请求 以循环赛的方式,
upstream backend {
   # no load balancing method is specified for Round Robin
   server backend1.example.com;
   server backend2.example.com;
}
默认情况下,NGINX 使用循环方法根据请求的权重在组中的服务器之间分发请求。服务器指令的权重参数设置服务器的权重;默认值为 :1
upstream backend {
    server backend1.example.com weight=5;
    server backend2.example.com;
    server 192.0.0.1 backup;
}
最少连接 — 下一个请求分配给服务器,其中 最少的活动连接数,
upstream backend {
    least_conn;
    server backend1.example.com;
    server backend2.example.com;
}
ip-hash — 哈希函数用于确定哪个服务器应该 为下一个请求选择(基于客户端的 IP 地址)。
向其发送请求的服务器由客户端 IP 地址确定。在这种情况下,IPv4 地址的前三个八位字节或整个 IPv6 地址用于计算哈希值。该方法保证来自同一地址的请求到达同一服务器,除非它不可用。
upstream backend {
    ip_hash;
    server backend1.example.com;
    server backend2.example.com;
}最短时间(仅限NGINX Plus) - 对于每个请求,NGINX Plus选择平均延迟最低和活动连接数最少的服务器,其中最低平均延迟是根据包含指令的以下参数计算的:least_time
header–从服务器接收第一个字节的时间last_byte–从服务器接收完整响应的时间last_byte inflight–考虑到不完整的请求,从服务器接收完整响应的时间
upstream backend {
    least_time header;
    server backend1.example.com;
    server backend2.example.com;
}
随机 – 每个请求都将传递到随机选择的服务器。 如果指定了参数,NGINX首先在考虑服务器权重的情况下随机选择两台服务器,然后使用指定的方法选择其中一台服务器:two
least_conn– 最少的活动连接数least_time=header(NGINX Plus) – 从服务器接收响应标头的最短平均时间 ($upstream_header_time)least_time=last_byte(NGINX Plus) – 从服务器接收完整响应的最短平均时间($upstream_response_time)
upstream backend {
    random two least_time=last_byte;
    server backend1.example.com;
    server backend2.example.com;
    server backend3.example.com;
    server backend4.example.com;
}
将 HTTP 流量代理到一组服务器
组中的服务器是使用服务器指令配置的(不要与定义在NGINX上运行的虚拟服务器的块混淆)。例如,以下配置定义了一个名为 backend 的组,它由三个服务器配置组成(可以在三个以上的实际服务器中解析):server
http {
    upstream backend {
        server backend1.example.com weight=5;
        server backend2.example.com;
        server 192.0.0.1 backup;
    }
}
若要将请求传递到服务器组,请在 proxy_pass 指令(或这些协议的 fastcgi_pass、memcached_pass、scgi_pass 或 uwsgi_pass 指令)中指定组的名称。在下一个示例中,在 NGINX 上运行的虚拟服务器将所有请求传递到上一示例中定义的后端上游组:
server {
    location / {
        proxy_pass http://backend;
    }
}
健康检查
主动检查
Active Health Checks 主动的健康检查,LB每隔一段时间就去检查下后端的real server的状态,不管是否有client发请求过来,都会去检查。 需要安装nginx plus,要购买
在将请求 (proxy_pass) 传递到上游组的位置,包括 health_check 指令
server {
    location / {
        proxy_pass http://backend;
        health_check;
    }
}
此代码段定义了一个服务器,该服务器将所有请求 () 传递到名为 的上游组。它还通过health_check指令启用高级运行状况监视:默认情况下,NGINX Plus每五秒向组中的每个服务器发送一个“/”请求。如果发生任何通信错误或超时(服务器使用超出 范围的状态代码进行响应),则运行状况检查将失败。服务器被标记为不健康,NGINX Plus在再次通过健康检查之前不会向其发送客户端请求。
(可选)您可以为运行状况检查指定另一个端口,例如,用于监视同一主机上许多服务的运行状况。使用 health_check 指令的 port 参数指定一个新端口:
server {
    location / {
        proxy_pass   http://backend;
        health_check port=8080;
    }
}
可以使用指令的参数覆盖主动运行状况检查的默认值
location / {
    proxy_pass   http://backend;
    health_check interval=10 fails=3 passes=2;
}
每隔10秒去检查一次后端的real server, 失败的次数到达3次的时候,就标识这台上游服务器不可用,如果连续2次又可用访问了,就标识这台上游的服务器为up(可用)
主动检查:默认的失败次数是1次,默认的时间间隔是5秒,默认只要能成功访问一次就认为服务器up 了
被动检查
Passive Health Checks 被动的健康检查: 当client发请求给LB,然后LB再去转发请求给后端的real server ,这个时候如果后端的服务器出现问题,LB就发现了。被客户机逼着去检查后端的real server
定义自定义条件
您可以设置响应必须满足的自定义条件,服务器才能通过运行状况检查。条件在匹配块中定义,该块在 health_check 指令的 match 参数中引用。
在级别上,指定块并命名它,例如:http {}match{}server_o
http {
    #...
    match server_ok {
        # tests are here
    }
}
通过指定 match 参数和 match 块的名称来引用 health_check 指令中的块:
http {
    #...
    match server_ok {
        status 200-399;
        body   !~ "maintenance mode";
    }
    server {
        #...
        location / {
            proxy_pass   http://backend;
            health_check match=server_ok;
        }
    }
}
四层负载均衡
根据端口号做转发
在http里不需要server块的配置,全部放到stream里
配置
#4层的负载均衡
stream {
        #负载均衡器的定义web
    upstream scweb {
        server 192.168.0.163:80;
        server 192.168.0.161:80;
        server 192.168.0.162:8080;
      }
        #负载均衡器的定义dns
   upstream dns_servers {
        hash   $remote_addr consistent;
        server 192.168.0.130:53;
        server 192.168.0.131:53;
        }
server {
        listen     80;
        proxy_pass scweb;
    }
server {
        listen     53;
        proxy_pass dns_servers;
    }
}
nginx的四层负载均衡和七层负载均衡的区别
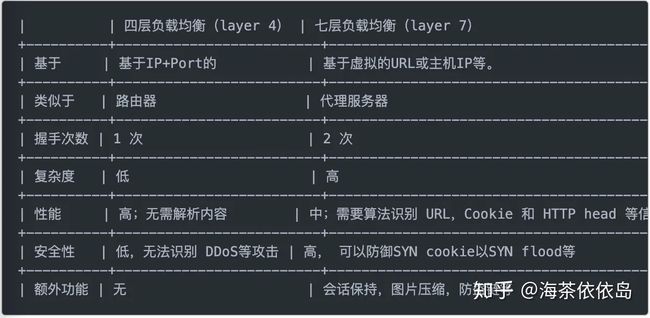
所谓四层就是基于IP+端口的负载均衡,通过虚拟IP+端口接收请求,然后再分配到真实的服务器;七层通过虚拟的URL或主机名接收请求,然后再分配到真实的服务器七层就是基于URL等应用层信息的负载均衡。
从上面的对比看来四层负载与七层负载最大的区别就是效率与功能的区别。四层负载架构设计比较简单,无需解析具体的消息内容,在网络吞吐量及处理能力上会相对比较高,而七层负载均衡的优势则体现在功能多,控制灵活强大。在具体业务架构设计时,使用七层负载或者四层负载还得根据具体的情况综合考虑
支持服务的数量:四层:http 七层: http mysql ftp dns 等
lvs和nginx的在做负载均衡的区别?
参考:https://blog.csdn.net/mingongge/article/details/121092068#:~:text=%E9%A6%96%E5%85%88%E8%A6%81%E6%B8%85%E6%A5%9A%E7%9A%84%E4%B8%80%E7%82%B9,%E6%98%AF%E5%9F%BA%E4%BA%8E%E8%BF%99%E4%B8%AA%E5%8C%BA%E5%88%AB%E3%80%82
LVS是一个四层的负载均衡器,虽然是四层,但并没有TCP握手以及分手,只是偷窥了IP等信息,而Nginx是一个七层的负载均衡器,所以效率势必比四层的LVS低很多,但是可操作性比LVS高,后面所有的讨论都是基于这个区别。
为什么四层比七层效率高?
四层是TCP层,使用IP+端口四元组的方式。只是修改下IP地址,然后转发给后端服务器,TCP三次握手是直接和后端连接的。只不过在后端机器上看到的都是与代理机的IP的established而已,LVS中没有握手。
7层代理则必须要先和代理机三次握手后,才能得到7层(HTT层)的具体内容,然后再转发。意思就是代理机必须要与client和后端的机器都要建立连接。显然性能不行,但胜在于七层,人工可操作性高,能写更多的转发规则。
Nginx的优势
可操作性大
Nginx是一个应用层的程序,所以用户可操作性的空间大得多,可以作为网页静态服务器,支持 Rewrite 重写规则;支持 GZIP 压缩,节省带宽;可以做缓存;可以针对 http 应用本身来做分流策略,静态分离,针对域名、目录结构等相比之下 LVS 并不具备这样的功能,所以 nginx 单凭这点可以利用的场合就远多于 LVS 了;但 nginx 有用的这些功能使其可调整度要高于 LVS,所以经常要去触碰,人为出现问题的几率也就大。
网络依赖小
nginx 对网络的依赖较小,理论上只要 ping 得通,网页访问正常,nginx 就能连得通,nginx 同时还能区分内外网,如果是同时拥有内外网的节点,就相当于单机拥有了备份线路;LVS 就比较依赖于网络环境,目前来看服务器在同一网段内并且 LVS 使用 direct 方式分流,效果较能得到保证。另外注意,LVS 需要向托管商至少申请多于一个 ip 来做 visual ip。
安装简单
nginx安装和配置比较简单,测试起来也很方便,因为它基本能把错误用日志打印出来。LVS的安装和配置、测试就要花比较长的时间,因为同上所述,LVS对网络依赖性比较大,很多时候不能配置成功都是因为网络问题而不是配置问题,出了问题要解决也相应的会麻烦的多。
nginx 也同样能承受很高负载且稳定,但负载度和稳定度差 LVS 还有几个等级:nginx 处理所有流量所以受限于机器 IO 和配置;本身的 bug 也还是难以避免的;nginx 没有现成的双机热备方案,所以跑在单机上还是风险比较大,单机上的事情全都很难说。
支持健康检查以及请求重发
nginx 可以检测到服务器内部的故障(健康检查),比如根据服务器处理网页返回的状态码、超时等等,并且会把返回错误的请求重新提交到另一个节点。目前 LVS 中 ldirectd 也能支持针对服务器内部的情况来监控,但 LVS 的原理使其不能重发请求。比如用户正在上传一个文件,而处理该上传的节点刚好在上传过程中出现故障,nginx 会把上传切到另一台服务器重新处理,而 LVS 就直接断掉了。
LVS 的优势
抗负载能力强
因为 LVS 工作方式的逻辑是非常简单的,而且工作在网络的第 4 层,仅作请求分发用,没有流量,所以在效率上基本不需要太过考虑。LVS 一般很少出现故障,即使出现故障一般也是其他地方(如内存、CPU 等)出现问题导致 LVS 出现问题。
配置性低
这通常是一大劣势同时也是一大优势,因为没有太多的可配置的选项,所以除了增减服务器,并不需要经常去触碰它,大大减少了人为出错的几率。
工作稳定
因为其本身抗负载能力很强,所以稳定性高也是顺理成章的事,另外各种 LVS 都有完整的双机热备方案,所以一点不用担心均衡器本身会出什么问题,节点出现故障的话,LVS 会自动判别,所以系统整体是非常稳定的。
无流量
LVS 仅仅分发请求,而流量并不从它本身出去,所以可以利用它这点来做一些线路分流之用。没有流量同时也保住了均衡器的 IO 性能不会受到大流量的影响。
LVS 基本上能支持所有应用,因为 LVS 工作在第 4 层,所以它可以对几乎所有应用做负载均衡,包括 http、数据库、聊天室等。
正向代理和反向代理
参考:https://zhuanlan.zhihu.com/p/163948996
https://www.cnblogs.com/taostaryu/p/10547132.html
什么是代理
代理其实就是一个中介,A和B本来可以直连,中间插入一个C,C就是中介。
刚开始的时候,代理多数是帮助内网client访问外网server用的
后来出现了反向代理,"反向"这个词在这儿的意思其实是指方向相反,即代理将来自外网客户端的请求转发到内网服务器,从外到内
正向代理
正向代理类似一个跳板机,代理访问外部资源
比如我们国内访问谷歌,直接访问访问不到,我们可以通过一个正向代理服务器,请求发到代理服,代理服务器能够访问谷歌,这样由代理去谷歌取到返回数据,再返回给我们,这样我们就能访问谷歌了
正向代理的用途:
(1)访问原来无法访问的资源,如google
(2) 可以做缓存,加速访问资源
(3)对客户端访问授权,上网进行认证
(4)代理可以记录用户访问记录(上网行为管理),对外隐藏用户信息
反向代理
反向代理(Reverse Proxy)实际运行方式是指以代理服务器来接受internet上的连接请求,然后将请求转发给内部网络上的服务器,并将从服务器上得到的结果返回给internet上请求连接的客户端,此时代理服务器对外就表现为一个服务器
反向代理的作用:
(1)保证内网的安全,阻止web攻击,大型网站,通常将反向代理作为公网访问地址,Web服务器是内网
(2)负载均衡,通过反向代理服务器来优化网站的负载,解决访问量过大、大并发的问题
两者的区别与联系
正向代理即是客户端代理, 代理客户端, 服务端不知道实际发起请求的客户端.
反向代理即是服务端代理, 代理服务端, 客户端不知道实际提供服务的服务端.
负载均衡
准备4台/3台服务器,一台做负载均衡器,另外的2/3台做web服务器,都要安装nginx,建议都编译安装nginx,统一配置
LB -->192.168.2.197
web1 -->192.168.2.120
web2 -->192.168.2.198
web3 -->192.168.2.179
在所有的没有安装nginx的服务器上,执行我们编写的一键编译安装nginx的脚本
[root@lb nginx]# scp onekey_install_nginx.sh 192.168.2.120:/root
The authenticity of host '192.168.2.120 (192.168.2.120)' can't be established.
ECDSA key fingerprint is SHA256:tv3msGixbmim9N4hYLyqOqiajlci5JvPLv2gb4P7/3g.
ECDSA key fingerprint is MD5:04:b8:d8:6a:71:06:26:63:0a:1f:d3:67:0d:3a:07:2a.
Are you sure you want to continue connecting (yes/no)? yes
Warning: Permanently added '192.168.2.120' (ECDSA) to the list of known hosts.
[email protected]'s password:
onekey_install_nginx.sh                                                      100% 1173   464.3KB/s   00:00
[root@lb nginx]#
[root@web2 ~]# bash onekey_install_nginx.sh
在负载均衡服务器上进行
备份原来的nginx.conf的配置文件,使用默认的配置文件
[root@lb conf]# cp nginx.conf nginx.conf.bak
[root@lb conf]# cp nginx.conf.default nginx.conf
cp:是否覆盖"nginx.conf"? y
Load balancing methods 负载均衡的算法--》调度算法
1.轮循机制 ― 对应用进程服务器的请求以轮循机制方式分发
2.最少连接 — 将下一个请求分配给活动连接数最少的服务器
3.ip-hash — 哈希函数用于确定应为下一个请求选择哪个服务器(基于客户端的 IP 地址)。可以保持会话的一致性,总是让客户机访问到相同的后端服务器,因为它是根据客户机的ip地址进行选择的,相同的ip地址总是访问第一次的哪个后端服务器
负载均衡的配置
http {
	#....省略的配置
 upstream  scapp1{
        server  192.168.2.120;
        server  192.168.2.198;
        server  192.168.2.179;

    }
    server {
        listen       80;
        location / {
                proxy_pass http://scapp1;
        }
    }
}
[root@lb conf]# nginx -t 检测语法是否正确
nginx: the configuration file /usr/local/scnginx88/conf/nginx.conf syntax is ok
nginx: configuration file /usr/local/scnginx88/conf/nginx.conf test is successful
[root@lb conf]# nginx -s reload 重置配置然后验证负载均衡的效果
 upstream  scapp1{
         #least_conn;
         #ip_hash;
        server  192.168.2.120 weight=1;    加权轮询
        server  192.168.2.198 weight=1;
        server  192.168.2.179 weight=5;

    }
https的负载均衡
upstream  scapp1 {
        #ip_hash;
        #least_conn;
        server  192.168.227.147 weight=5;
        server  192.168.227.146 weight=2;
        server  192.168.227.129 weight=1;
    }


    server {
        listen       443 ssl;
        server_name  localhost;

        ssl_certificate      8905404_sanchuangedu.cn.pem;
        ssl_certificate_key  8905404_sanchuangedu.cn.key;

        ssl_session_cache    shared:SSL:1m;
        ssl_session_timeout  5m;

        ssl_ciphers  HIGH:!aNULL:!MD5;
        ssl_prefer_server_ciphers  on;

        location / {
                proxy_pass http://scapp1;

        }
    }
backend server是如何知道前端的client的ip地址
应用层http协议添加新的ip存储字段 x_real_ip
如何提升负载均衡的并发数量?
1.增加负载均衡的集群数量和后端服务器的数量
2.软件层面的优化: linux 内核参数调优,nginx的参数调优等优化
worker_connections 2048;
worker_processes 2;
[root@lb-1 conf]# ulimit -a
core file size          (blocks, -c) 0
data seg size           (kbytes, -d) unlimited
scheduling priority             (-e) 0
file size               (blocks, -f) unlimited
pending signals                 (-i) 16706
max locked memory       (kbytes, -l) 64
max memory size         (kbytes, -m) unlimited
open files                      (-n) 1024
pipe size            (512 bytes, -p) 8
POSIX message queues     (bytes, -q) 819200
real-time priority              (-r) 0
stack size              (kbytes, -s) 8192
cpu time               (seconds, -t) unlimited
max user processes              (-u) 16706
virtual memory          (kbytes, -v) unlimited
file locks                      (-x) unlimited
[root@lb-1 conf]# ulimit -n 1000000  允许一个进程可以打开的文件数量
压力测试
ab压力测试工具
-n requests #在测试会话中所执行的请求总个数,默认仅执行一个请求
-c concurrency #每次请求的并发数,相当于同时模拟多少个人访问url,默认是一次一个
[root@scmaster ~]# ab -c 1000  -n 20000  http://192.168.227.144/
This is ApacheBench, Version 2.3 <$Revision: 1430300 $>
Copyright 1996 Adam Twiss, Zeus Technology Ltd, http://www.zeustech.net/
Licensed to The Apache Software Foundation, http://www.apache.org/

Benchmarking 192.168.227.144 (be patient)
Completed 2000 requests
Completed 4000 requests
Completed 6000 requests
Completed 8000 requests
Completed 10000 requests
Completed 12000 requests
Completed 14000 requests
Completed 16000 requests
Completed 18000 requests
Completed 20000 requests
Finished 20000 requests


Server Software:        nginx/1.23.2
Server Hostname:        192.168.227.144
Server Port:            80

Document Path:          /
Document Length:        620 bytes

Concurrency Level:      1000
Time taken for tests:   8.049 seconds
Complete requests:      20000
Failed requests:        2535
   (Connect: 0, Receive: 0, Length: 2535, Exceptions: 0)
Write errors:           0
Non-2xx responses:      35
Total transferred:      17039510 bytes
HTML transferred:       12381995 bytes
Requests per second:    2484.72 [#/sec] (mean)   目前测试的最大并发数(吞吐量)
Time per request:       402.460 [ms] (mean)
Time per request:       0.402 [ms] (mean, across all concurrent requests)
Transfer rate:          2067.30 [Kbytes/sec] received

Connection Times (ms)
              min  mean[+/-sd] median   max
Connect:        0  198 482.9     46    7035
Processing:    20  165 156.7    118    1822
Waiting:        3  151 152.9    104    1797
Total:         31  363 502.2    183    7194

Percentage of the requests served within a certain time (ms)
  50%    183
  66%    254
  75%    315
  80%    395
  90%   1124
  95%   1209
  98%   1498
  99%   3120
 100%   7194 (long
7层负载均衡
使用nginx作为7层负载均衡
 upstream  scapp1 {
        #ip_hash;
        #least_conn;
        server  192.168.227.147 weight=5;
        server  192.168.227.146 weight=2;
        server  192.168.227.129 weight=1;
    }
    server {
        listen       80;
        server_name  localhost;
        location / {
            proxy_pass http://scapp1;
            proxy_set_header  X-Real-IP  $remote_addr;
        }
nginx是根据http协议来做负载均衡的,http协议工作在应用层,是web服务的一部分,安装OSI 7层网络参考模型,属于第7层。只能对http协议做负载均衡
4层负载均衡
在传输层完成所有的工作,是根据端口号来区分不同的业务的
支持的服务数量多: 可以支持非http服务
mysql: 3306 sshd:22 http:80 https 443 dns:53
4层负载均衡的效率要比7层要高,因为做得事情要少
4层负载均衡和7层负载均衡的区别?
最大的区别就是效率与功能的区别。四层负载架构设计比较简单,无需解析具体的消息内容,在网络吞吐量及处理能力上会相对比较高,而七层负载均衡的优势则体现在功能多,控制灵活强大。在具体业务架构设计时,使用七层负载或者四层负载还得根据具体的情况综合考虑。
做实验:
1.real ip实验,让后端的backend 服务器知道前端的client的ip地址
2.使用ab压力测试工具,对整个nginx web集群进行压力测试,测试出最大并发数
3.4层的负载均衡的实验
[root@lb-1 conf]# cat nginx.conf.4layer
stream {

    upstream dns_servers {
        least_conn;
        server 192.168.136.130:53;
        server 192.168.136.131:53;
        server 192.168.136.132:53;
    }

    upstream web_servers {
        #server 192.168.227.147:80;
        #server 192.168.227.146:80;
        server 192.168.227.130:80;
    }
    server {
        listen     53 udp;
        proxy_pass dns_servers;
    }

    server {
        listen   80  ;
        proxy_pass web_servers;
    }
}

events {
    worker_connections  1024;
}

worker_processes  2;
nfs
网络文件系统,英文Network File System(NFS),是由SUN公司研制的UNIX表示层协议(presentation layer protocol),能使使用者访问网络上别处的文件就像在使用自己的计算机一样。
不同的机器之间通过网络实现文件共享 ---》NFS Network File System
nfs 使用传统的网络来传输数据,速度是有限的,性能一般
nfs解决了什么问题?
数据同源: 到同一个地方去拿数据,保障数据的一致性
nfs的优点和缺点
优点: 随便一台linux服务器都可以搭建,成本非常低,构建非常容易
缺点: 读取速度有限,跟网络质量,磁盘IO,cpu,内存等因素有关,在传统的tcp/ip网络上传输的
SAN
存储区域网络(Storage Area Network,SAN)采用网状通道(Fibre Channel ,简称FC,区别与Fiber Channel光纤通道)技术,通过FC交换机连接存储阵列和服务器主机,建立专用于数据存储的区域网络。
设备:
1.专业的存储服务器 ,有很大块磁盘,总容量非常大
2.专业的光纤交换机
3.业务服务器: 例如web服务器或者数据库服务器等,业务服务器通过HBA卡设备与光纤连接到光纤交换机
大量的金钱投入: 效果好,传输速度快
老的数据一致性解决方案:
1.nfs
2.san
新型的解决方案:使用云存储
金山云:
亚马逊:
谷歌云
华为云
阿里云
七牛云:
安装nfs服务器
1.安装软件
[root@scmaster ~]# yum install nfs-utils -y2.启动nfs服务
[root@scmaster ~]# service nfs restart
Redirecting to /bin/systemctl restart nfs.service
[root@scmaster ~]# ps aux|grep nfs
root      64092  0.0  0.0      0     0 ?        S<   12月19   0:00 [nfsiod]
root      64102  0.0  0.0      0     0 ?        S    12月19   0:00 [nfsv4.1-svc]
root     129762  0.0  0.0      0     0 ?        S<   10:23   0:00 [nfsd4_callbacks]
root     129768  0.0  0.0      0     0 ?        S    10:23   0:00 [nfsd]
root     129769  0.0  0.0      0     0 ?        S    10:23   0:00 [nfsd]
root     129770  0.0  0.0      0     0 ?        S    10:23   0:00 [nfsd]
root     129771  0.0  0.0      0     0 ?        S    10:23   0:00 [nfsd]
root     129772  0.0  0.0      0     0 ?        S    10:23   0:00 [nfsd]
root     129773  0.0  0.0      0     0 ?        S    10:23   0:00 [nfsd]
root     129774  0.0  0.0      0     0 ?        S    10:23   0:00 [nfsd]
root     129775  0.0  0.0      0     0 ?        S    10:23   0:00 [nfsd]
root     129867  0.0  0.0 112824   988 pts/1    R+   10:24   0:00 grep --color=auto nfs
[root@scmaster ~]#
3.编辑共享文件的配置文件
[root@scmaster ~]# vim /etc/exports

[root@scmaster ~]# cat /etc/exports
/web   192.168.227.0/24(ro,all_squash,sync)           ---》共享/web出去,允许102.168.227.0/24网段的机器能过来访问,只有只读的权限
共享出去的目录建议在根目录下,非常好找,路径非常简洁
权限:
共享权限 --》看/etc/exports里的 ro还是rw
linux里的文件夹的权限
nfs里受2种权限的限制
nfsnobody:x:65534:65534:Anonymous NFS User:/var/lib/nfs:/sbin/nologin
所有的其他机器上的nfs连接过来的,都以nfsnobody的身份来对待
[root@scmaster ~]# mkdir /web     创建共享出去的文件夹
[root@scmaster ~]# cd /web
[root@scmaster web]# ls
[root@scmaster web]# mkdir  sanchuang
[root@scmaster web]# ls
sanchuang
[root@scmaster web]#
[root@scmaster web]# vim index.html
[root@scmaster web]# ls
index.html  sanchuang
[root@scmaster web]# ll
总用量 4
-rw-r--r-- 1 root root 21 12月 20 10:36 index.html
drwxr-xr-x 2 root root  6 12月 20 10:33 sanchuang
[root@scmaster web]# pwd
/web
[root@scmaster web]# cat index.html
welcome to sanchuang
[root@scmaster web]#

[root@scmaster web]# exportfs  -rv   使共享文件生效
exporting 192.168.227.0/24:/web
[root@scmaster web]#
[root@scmaster web]# service nfs restart
Redirecting to /bin/systemctl restart nfs.service
关闭防火墙防止其他的机器能访问过来
[root@scmaster web]# service firewalld stop
Redirecting to /bin/systemctl stop firewalld.service
在其他的web服务器上挂载使用共享目录(共享文件夹)
将nfs共享的目录,挂载到nginx提供网页服务的目录/usr/local/scnginx88/html/
每台挂载使用nfs共享目录的客户机都需要安装
yum install nfs-utils -y[root@web1 html]# mount 192.168.227.135:/web /usr/local/scnginx88/html/
[root@web1 html]# df
文件系统 1K-块 已用 可用 已用% 挂载点
devtmpfs 2138408 0 2138408 0% /dev
tmpfs 2163356 0 2163356 0% /dev/shm
tmpfs 2163356 11992 2151364 1% /run
tmpfs 2163356 0 2163356 0% /sys/fs/cgroup
/dev/mapper/centos-root 52403200 11990200 40413000 23% /
/dev/sda1 1038336 208240 830096 21% /boot
/dev/mapper/centos-home 46958180 33492 46924688 1% /home
tmpfs 432672 0 432672 0% /run/user/0
tmpfs 432672 0 432672 0% /run/user/2001
192.168.227.135:/web 17811456 4950528 12860928 28% /usr/local/scnginx88/html
[root@web1 html]# cd /usr/local/scnginx88/html/
[root@web1 html]# ls
index.html sanchuang
[root@web1 html]#
[root@web3 ~]# mount 192.168.227.135:/web /usr/local/scnginx88/html/
[root@web2 ~]# mount 192.168.227.135:/web /usr/local/scnginx88/html/
源路径文件(远程机器上的) 挂载点是本机上的mount 挂载: 连接起来
umount 卸载
我们共享出来的网页内容,就是要给用户看的
考虑nfs文件系统的自动挂载问题:
1./etc/rc.local
	mount  192.168.227.135:/web   /usr/local/scnginx88/html/
    chmod  +x  /etc/rc.d/rc.local
2./etc/fstab
[root@web2 html]# cat /etc/fstab

#
# /etc/fstab
# Created by anaconda on Sat Sep 17 06:30:12 2022
#
# Accessible filesystems, by reference, are maintained under '/dev/disk'
# See man pages fstab(5), findfs(8), mount(8) and/or blkid(8) for more info
#
/dev/mapper/centos-root /                       xfs     defaults        0 0
UUID=65e7147a-cab9-41ac-866a-31dc6a0c49e6 /boot                   xfs     defaults        0 0
/dev/mapper/centos-swap swap                    swap    defaults        0 0
192.168.227.135:/web     /usr/local/scnginx88/html   nfs  defaults 0 0
系统架构中,是要尽量避免的
单点故障: 某个重要的功能,只有一份,容易出现这个点出现问题,导致全局不能使用
单点故障: 本质上就是一份,没有其他的备份
高可用: High Availability --》HA: 都要有备份,一个坏了,另外一个可以顶替,核心业务基本上不受到影响。
高可用性H.A.(High Availability)指的是通过尽量缩短因日常维护操作(计划)和突发的系统崩溃(非计划)所导致的停机时间,以提高系统和应用的可用性。它也被认为是不间断操作的容错技术有所不同。HA系统是企业防止核心计算机系统因故障停机的最有效手段。
花钱消灾--》HA
master :主要的,对外提供服务的
backup :备份的,不对外提供服务,在master是好的情况下。一旦master挂了,backup马上就会接替master的工作,成为master
高可用的软件:keepalived 、HA Proxy、heartbeat
压力测试
参考:https://www.jianshu.com/p/43d04d8baaf7
ab软件
[root@scmaster ~]# yum install httpd-tools -yab -n 100 -c 10 http://test.com/
其中-n表示请求数,-c表示并发数
如何提升负载均衡的并发数量?
1.增加负载均衡的集群数量和后端服务器的数量
2.软件层面的优化: linux 内核参数调优,nginx的参数调优等优化
worker_connections 2048;
worker_processes 2;
[root@lb-1 conf]# ulimit -a
缓存
CDN
CDN的全称是Content Delivery Network,即内容分发网络。CDN是构建在现有网络基础之上的智能虚拟网络,依靠部署在各地的边缘服务器,通过中心平台的负载均衡、内容分发、调度等功能模块,使用户就近获取所需内容,降低网络拥塞,提高用户访问响应速度和命中率。CDN的关键技术主要有内容存储和分发技术。
部署的大量的边缘服务器,缓存数据、加速
调优
1.硬件调优: 加内存,换ssd磁盘,换网卡等上好设备 --》效果显著,简单粗暴 --》运维
2.系统调优 --》运维
操作系统调优:内核,io调度,网络,swap分区,文件描述符
应用软件调优:nginx,ssh,MySQL等
3.SQL的调优 --》dba,开发
4.代码调优--》开发
5.架构的调优: 加缓存,中间件,搞集群,加CDN等 --》运维,架构师(系统架构和软件架构)
先讲硬件--》软件(系统,应用软件的配置参数调优)--》代码调优(重写)--》sql语句和底层代码
从一台到很多台--》架构调优,加缓存或者中间件
常见面试题目
1.你了解nginx哪些模块?或者你使用过哪些模块?
ngx_http_core_module http核心模块
ngx_http_access_module deny allow
ngx_http_rewrite_module 重定向 if rewrite return
ngx_http_limit_conn_module 限制并发连接
ngx_http_limit_req_module 限制请求数
ngx_http_realip_module 展示真正的ip地址
--with-http_geoip_module 限制国外的用户访问
ngx_http_stub_status_module 状态统计
ngx_http_log_module 日志
ngx_http_upstream_module 定义负载均衡器
2.请你说说nginx的主配置文件里有哪些内容?
user
worker_processes
pid
error_log
events
http
listen
server_name
location
https
3.nginx经常出现的状态码?
4.请说说nginx有哪些常见的调度算法?
轮询rr 最小连接 ip_hash 最短时间 随机
5.nginx的master和worker的关系
master process 主进程--》管理进程
worker process 工作进程
master进程不产生新的进程,worker进程会产生新的进程
6.如何知道一台机器是否安装nginx?
7. 升级和卸载nginx-编译安装的?
8. 衡量一个网站的访问量的指标
PV(访问量):Page View, 即页面浏览量或点击量,用户每次访问即被计算一次。
UV(独立访客):Unique Visitor,访问您网站的一台电脑客户端为一个访客。00:00-24:00内相同的客户端只会被计算一次。
IP(独立IP):指独立IP数。00:00-24:00内相同IP地址之被计算一次。
9.你知道session和cookie吗?
参考另一篇博客:https://blog.csdn.net/ZhouXin1111112/article/details/132209724?spm=1001.2014.3001.5501
10.用户反映访问不了我们的www.song.com这个网站,你如何排查?
客户的问题
hosts文件
是否上网?ping
我们的问题
外--》里
1.服务器是否还是开机?还是运行的
2.服务器的网络是否正常
ping
3.检查nginx是否运行?
ps aux
4.检查端口号是否开放?--》查看防火墙
netstat
lsof
ss
5.看nginx的日志了
access.log
error.log
1.查看服务器的防火墙是否关闭?
iptables -L
service firewalld status
2.检查网络(服务器)
11.请求报文和响应报文里有哪些字段?
参考另一篇博客:https://blog.csdn.net/ZhouXin1111112/article/details/132209724?spm=1001.2014.3001.5501
12.http协议里有哪些方法?
参考另一篇博客:https://blog.csdn.net/ZhouXin1111112/article/details/132209724?spm=1001.2014.3001.5501


