Vue3 [Day11]
Vue3的优势
create-vue搭建Vue3项目
node -v
npm init vue@latest
npm install
Vue3项目目录和关键文件
main.js
import './assets/main.css'

// new Vue() 创建一个应用实例 => createApp()
// createRouter()  createStore()
// 将创建实例进行了封装,保证每个实例的独立封闭性

import { createApp } from 'vue'
import App from './App.vue'

// createApp(App) 创建实例
// mount设置挂载点 #app(id为app的盒子)
createApp(App).mount('#app')
App.vue
<!-- 加上setup就允许在script中直接编写组合式API -->
<script setup>
import HelloWorld from './components/HelloWorld.vue'
import TheWelcome from './components/TheWelcome.vue'
</script>

<template>
    <!-- 不再要求唯一根元素 -->
  <header>
    <img alt="Vue logo" class="logo" src="./assets/logo.svg" width="125" height="125" />

    <div class="wrapper">
      <HelloWorld msg="You did it!" />
    </div>
  </header>

  <main>
    <!-- 组件不用注册,就可以直接用 -->
    <TheWelcome />
  </main>
</template>

<style scoped>
</style>
组合式API - setup选项
setup执行时机
![Vue3 [Day11]_第7张图片](http://img.e-com-net.com/image/info8/fb24608b61984b72904c838e7b681f9c.jpg) 执行时机,比beforeCreate更早,
执行时机,比beforeCreate更早,
所以,获取不到this(this是undefined
setup写法
数据和函数 需要在setup最后return 才能在模板中应用
组合式API - reactive 和 ref 函数
reactive
<script setup>
import {reactive} from 'vue'
const state=reactive({
    count:100
})
const setCount= ()=>{
    state.count++
}
</script>


<template>
<div>{{ state.count }}</div>
<button @click="setCount">+1</button>
</template>

<style></style>
ref
![Vue3 [Day11]_第13张图片](http://img.e-com-net.com/image/info8/10313a9217d2427aac553658ac1d5381.jpg) 本质:在原有传入数据基础上,外层包含了一层对象,包成了复杂类型,底层包成复杂类型之后,再借助reactive 实现响应式,所以,
本质:在原有传入数据基础上,外层包含了一层对象,包成了复杂类型,底层包成复杂类型之后,再借助reactive 实现响应式,所以,
脚本中访问数据,需要通过 .value
在template中, .vue不需要加(帮我们扒了一层)
所以
推荐以后声明数据,统一用ref => 统一编码规范
App.vue
<script setup>
import {ref} from 'vue'
const count = ref(0)
const obj = ref({
    age:18,
    name:'slx'
})
console.log(obj.value);
console.log(obj.value.age);

// console.log(count.value)
const countChange = () => {
    // count本质上是对象,所以要count.value++ 不是count++
    count.value++
}
</script>


<template>
<div>{{ count }}</div>
<button @click="countChange">+1</button>
</template>

<style></style>
什么是响应式数据,有什么作用
响应式数据是指在数据发生变化时,相关的视图能够自动更新的数据。在 Vue 中,通过将数据转换为响应式对象,当数据发生变化时,Vue 会自动追踪这些变化,并通知相关的视图进行更新。
响应式数据的作用是使开发者能够以声明式的方式编写代码,而不需要手动操作 DOM 或追踪数据变化。它提供了一种简单且高效的方式来维护数据和视图之间的关系,使开发者能够专注于业务逻辑而不是手动的视图更新。
通过响应式数据,当数据发生变化时,相关的视图会自动更新,保持数据和视图的同步。这大大简化了开发过程,提高了代码的可维护性和可读性。
响应式数据在 Vue 中是核心概念之一,它使得开发者能够构建动态、交互式和响应式的应用程序。
在 Vue 2 和 Vue 3 中,响应式数据的处理有什么区别
在 Vue 2 中,使用 data 选项来声明响应式数据,Vue 会将这些数据转换为响应式的对象。当数据发生变化时,Vue 会自动更新相关的视图。
在 Vue 3 中,使用 ref 和 reactive 函数来声明响应式数据。
组合式API - computed
<script setup>
import { computed,ref } from 'vue'

const list = ref(
    [1,2,3,4,5,6,7,8,9]
)

// 基于list派生一个计算属性,从list中过滤
const computerList = computed(() => {
    return list.value.filter((item) => item%2===0)
})

// 定义一个修改数组的方法
const addFn = () =>{
    list.value.push(666)
}
</script>


<template>
<div>{{ list }}</div>
<div>{{ computerList }}</div>
<button @click="addFn">+666</button>
</template>

<style></style>
组合式API - watch
侦听单个数据
侦听多个数据
<script setup>
import {ref, watch} from 'vue'
const count = ref(0)
const nickname = ref('slx')
const changeCount = () => {
    count.value++
}

const changeName = () => {
    nickname.value='hhhhh'
}

// 1.监视单个数据变化
//   watch(ref对象,(newValue,oldValue) => { ... } )
//   直接传对象,所以就不要count.value
// watch(count,(newValue, oldValue)=> {
//     console.log(newValue, oldValue);
// })

// 2.监视多个数据变化
//   watch([ref对象1,ref对象2], (newArr,oldArr) => { ... } )
//   直接传对象,所以就不要count.value
// watch([count,nickname],(newArr, oldArr)=> {
//     console.log(newArr, oldArr);
// })


</script>


<template>
    <div>{{ count }}</div>
    <button @click="changeCount">change-count</button>
    <div>{{ nickname }}</div>
    <button @click="changeName">change-Name</button>
</template>

<style></style>
配置项
<script setup>
import {ref, watch} from 'vue'
const count = ref(0)
const nickname = ref('slx')
const changeCount = () => {
    count.value++
}

const changeName = () => {
    nickname.value='hhhhh'
}

// 添加额外配置项
// 3.immediate 立刻执行
watch(count,(newValue, oldValue)=> {
    console.log(newValue, oldValue)
},{
    immediate:true,
    deep:true
})


const userInfo = ref({
    name:'ssss',
    age:12
})
const setUserInfo = () => {
    // 修改userInfo.value ,修改对象的地址,才能监视到,浅层监视
    // userInfo.value={name:'qqqq',age:10}
    userInfo.value.age++
}
// 4.deep 深度监视,默认watch进行的是 浅层监视
//        const ref1 = ref(简单类型) 可以直接监视
//        const ref1 = ref(复杂类型) 监视不到复杂类型内部数据的变化
watch(userInfo,(newValue)=> {
    console.log(newValue)
},{
    deep:true
})


</script>


<template>
    <div>{{ userInfo }}</div>
    <button @click="setUserInfo">change-userInfo</button>
    <div>{{ count }}</div>
    <button @click="changeCount">change-count</button>
    <div>{{ nickname }}</div>
    <button @click="changeName">change-Name</button>
</template>

<style></style>
精确监听对象的某个属性变化
<script setup>
import {ref, watch} from 'vue'
const count = ref(0)
const nickname = ref('slx')
const changeCount = () => {
    count.value++
}
const changeName = () => {
    nickname.value='hhhhh'
}

const userInfo = ref({
    name:'ssss',
    age:12
})
const setUserInfo = () => {
    // 修改userInfo.value ,修改对象的地址,才能监视到,浅层监视
    // userInfo.value={name:'qqqq',age:10}
    userInfo.value.age++
}


// 5.精确监视,某一属性
watch(() => userInfo.value.age,(newValue, oldValue) => {
    console.log('5555', newValue, oldValue);

})
</script>


<template>
    <div>{{ userInfo }}</div>
    <button @click="setUserInfo">change-userInfo</button>
    <div>{{ count }}</div>
    <button @click="changeCount">change-count</button>
    <div>{{ nickname }}</div>
    <button @click="changeName">change-Name</button>
</template>

<style></style>
组合式API - 生命周期函数
<script setup>
import { onMounted } from 'vue';

// beforeCreate 和 created 的相关代码
// 一律放在 setup 中执行

const getList = () => {
  setTimeout(() => {
    console.log('发送请求,获取数据')
  }, 2000)
}
// 一进入页面的请求
getList()

// 如果有些代码需要在mounted生命周期中执行
onMounted(() => {
  console.log('mounted生命周期函数 - 逻辑1')
})

// 写成函数的调用方式,可以调用多次,并不会冲突,而是按照顺序依次执行
onMounted(() => {
  console.log('mounted生命周期函数 - 逻辑2')
})

</script>

<template>
  <div></div>
</template>
组合式API - 父子通信
父传子
// 父传子
// 1. 给子组件,添加属性的方式传值
// 2. 在子组件,通过props接收
<script setup>
import {ref} from 'vue'
import MySon from '@/components/MySon.vue'

const money = ref(100)
const getMoney = () =>{
    money.value+=10
}
</script>


<template>
    <h3>father</h3>
    <button @click="getMoney">+money</button>
 <MySon car="宝马" :money="money"></MySon>
</template>

<style></style>
MySon.vue
<script setup>

// 由于写了setup 所以无法直接配置props选项
// 所以要借助“编译器宏”函数接受子组件传递的数据
// import {ref, watch} from 'vue'
const props = defineProps({
    car:String,
    money:Number
})

</script>


<template>
    <div class="son">
        <h4>Son</h4>
        <h4>{{ car }} {{ money }}</h4>
    </div>
</template>

<style>
.son{
    width: 200px;
    height: 200px;
    background-color: #b17b7b;
}
</style>
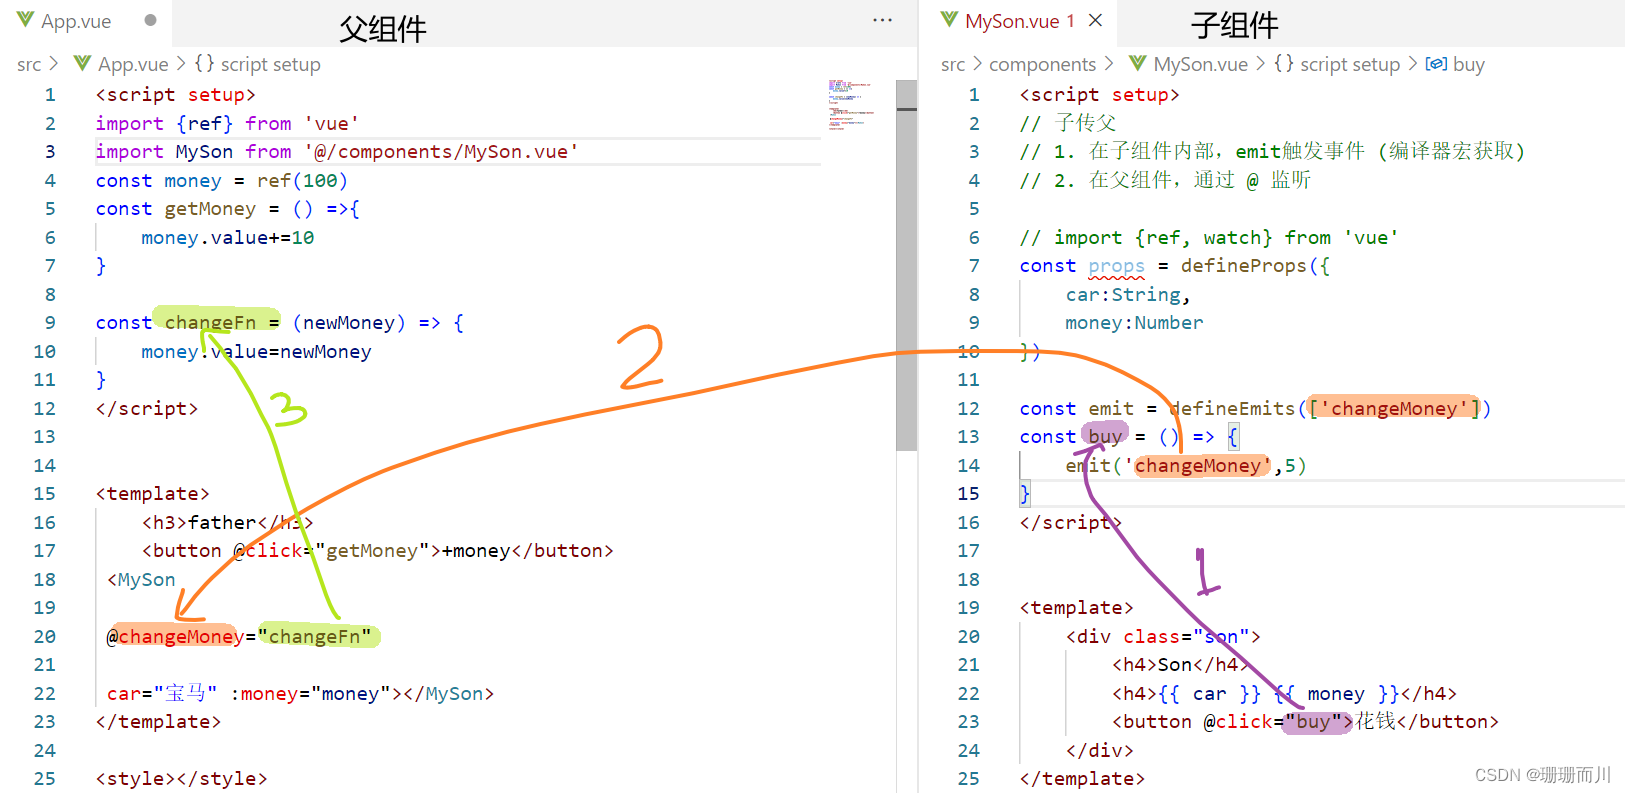
## 子传父
<script setup>
import {ref} from 'vue'
import MySon from '@/components/MySon.vue'

const money = ref(100)
const getMoney = () =>{
    money.value+=10
}

const changeFn = (newMoney) => {
    money.value=newMoney
}
</script>


<template>
    <h3>father</h3>
    <button @click="getMoney">+money</button>
 <MySon

 @changeMoney="changeFn"

 car="宝马" :money="money"></MySon>
</template>

<style></style>
MySon.vue
<script setup>
// 子传父
// 1. 在子组件内部,emit触发事件 (编译器宏获取)
// 2. 在父组件,通过 @ 监听

// import {ref, watch} from 'vue'
const props = defineProps({
    car:String,
    money:Number
})

const emit = defineEmits(['changeMoney'])
const buy = () => {
    emit('changeMoney',5)
}
</script>


<template>
    <div class="son">
        <h4>Son</h4>
        <h4>{{ car }} {{ money }}</h4>
        <button @click="buy">花钱</button>
    </div>
</template>

<style>
.son{
    width: 200px;
    height: 200px;
    background-color: #b17b7b;
}
</style>

![Vue3 [Day11]_第1张图片](http://img.e-com-net.com/image/info8/00865c01e0bd41bfb9b6d67c53a24fc1.jpg)
![Vue3 [Day11]_第2张图片](http://img.e-com-net.com/image/info8/b8b75c9136f8478a8de4e664504db609.jpg)
![Vue3 [Day11]_第3张图片](http://img.e-com-net.com/image/info8/f326872070234e52b798d2137938733b.jpg)
![Vue3 [Day11]_第4张图片](http://img.e-com-net.com/image/info8/fe42194298de4d97935065a8bd23bd89.jpg)
![Vue3 [Day11]_第5张图片](http://img.e-com-net.com/image/info8/81a3c30317c34654b51bd4bebe0234e6.jpg)
![Vue3 [Day11]_第6张图片](http://img.e-com-net.com/image/info8/8b0046b52a444a97b4cd615894b1f67f.jpg)
![Vue3 [Day11]_第8张图片](http://img.e-com-net.com/image/info8/07c1f43c8cd4427e8663346e00d68676.jpg)
![Vue3 [Day11]_第9张图片](http://img.e-com-net.com/image/info8/76d25b55b54f42b6b80a47356ecea2d2.jpg)
![Vue3 [Day11]_第10张图片](http://img.e-com-net.com/image/info8/10a1010b8b614641aead5a8aba1855ea.jpg)
![Vue3 [Day11]_第11张图片](http://img.e-com-net.com/image/info8/0e5f30bd30404b67aff1cbfc24e3b817.jpg)
![Vue3 [Day11]_第12张图片](http://img.e-com-net.com/image/info8/ecdae614191343a9a75500ff3c854b9d.jpg)
![Vue3 [Day11]_第14张图片](http://img.e-com-net.com/image/info8/998846564c004f93bcd2b5856b5dfa67.jpg)
![Vue3 [Day11]_第15张图片](http://img.e-com-net.com/image/info8/d9b3c10199464b358e5cda47f0c57b3f.jpg)
![Vue3 [Day11]_第16张图片](http://img.e-com-net.com/image/info8/b7479758f5554f12bc57107e5b80a625.jpg)
![Vue3 [Day11]_第17张图片](http://img.e-com-net.com/image/info8/18b609a8526e458a90228a9ffaac4bba.jpg)
![Vue3 [Day11]_第18张图片](http://img.e-com-net.com/image/info8/b5aa9f024859478db61c5d4b3cc43093.jpg)
![Vue3 [Day11]_第19张图片](http://img.e-com-net.com/image/info8/8e8e7edab46c4ccdb7e0b61259eebe7a.jpg)
![Vue3 [Day11]_第20张图片](http://img.e-com-net.com/image/info8/32ddb2765e1140c9a506ab47f537f062.jpg)
![Vue3 [Day11]_第21张图片](http://img.e-com-net.com/image/info8/47f834ce20a344e9a17dea86fe991fc5.jpg)
![Vue3 [Day11]_第22张图片](http://img.e-com-net.com/image/info8/dcf8241f496245b586e6897cf118e505.jpg)
![Vue3 [Day11]_第23张图片](http://img.e-com-net.com/image/info8/f5c1ab2568d749958b130a1d6219f9f7.jpg)
![Vue3 [Day11]_第24张图片](http://img.e-com-net.com/image/info8/f5c383ef90be414ebe45ebdb0b5266dd.jpg)
![Vue3 [Day11]_第25张图片](http://img.e-com-net.com/image/info8/900e812d9487478ba2cf5ebf8554f539.jpg)
![Vue3 [Day11]_第26张图片](http://img.e-com-net.com/image/info8/24359e61605647e0bda10b132b43497a.jpg)