Tensorflow2.0搭建网络八股扩展
目录
一、自制数据集
准备:txt和图片
制作函数
二、断点继训,存取模型
1.读取保存的模型
2.保存模型
3.正确使用
三、参数提取,把参数存入txt
参数提取
四、acc/loss可视化,查看效果
1.前提开启:获取history
2.history参数表
3.代码
五、应用程序,给图识物
代码实现
总结
一、自制数据集
准备:txt和图片
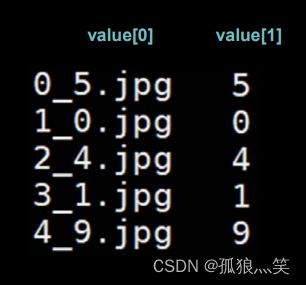
需要有图片的名称信息,并且有txt文件进行汇总,下面是txt信息
制作函数
//路径
train_path = './mnist_image_label/mnist_train_jpg_60000/'
train_txt = './mnist_image_label/mnist_train_jpg_60000.txt'
x_train_savepath = './mnist_image_label/mnist_x_train.npy'
y_train_savepath = './mnist_image_label/mnist_y_train.npy'

//函数
def generateds(path, txt):
    f = open(txt, 'r')  # 以只读形式打开txt文件
    contents = f.readlines()  # 读取文件中所有行
    f.close()  # 关闭txt文件
    x, y_ = [], []  # 建立空列表
    for content in contents:  # 逐行取出
        value = content.split()  # 以空格分开,图片路径为value[0] , 标签为value[1] , 存入列表
        img_path = path + value[0]  # 拼出图片路径和文件名
        img = Image.open(img_path)  # 读入图片
        img = np.array(img.convert('L'))  # 图片变为8位宽灰度值的np.array格式
        img = img / 255.  # 数据归一化 (实现预处理)
        x.append(img)  # 归一化后的数据,贴到列表x
        y_.append(value[1])  # 标签贴到列表y_
        print('loading : ' + content)  # 打印状态提示

    x = np.array(x)  # 变为np.array格式
    y_ = np.array(y_)  # 变为np.array格式
    y_ = y_.astype(np.int64)  # 变为64位整型
    return x, y_  # 返回输入特征x,返回标签y_
//调用函数,并保存numpy格式的训练数据
    x_train, y_train = generateds(train_path, train_txt)
    x_train_save = np.reshape(x_train, (len(x_train), -1))
    np.save(x_train_savepath, x_train_save)
    np.save(y_train_savepath, y_train)
二、断点继训,存取模型
1.读取保存的模型
load_weights(路径文件名)2.保存模型
tf.keras.callbacks.ModelCheckpoint(
filepath=路径文件名,
save_weights_only=True/False,
save_best_only=True/False)
history = model.fit( callbacks=[cp_callback]
3.正确使用
# 保存训练的模型路径
checkpoint_save_path = "./checkpoint/fashion.ckpt"
if os.path.exists(checkpoint_save_path + '.index'):
    print('-------------load the model-----------------')
    # 读取文件模型名字
    model.load_weights(checkpoint_save_path)

cp_callback = tf.keras.callbacks.ModelCheckpoint(filepath=checkpoint_save_path,
                                                 save_weights_only=True,
                                                 save_best_only=True)
# 回调函数,将训练好的模型返回history
history = model.fit(x_train, y_train, batch_size=32, epochs=5, validation_data=(x_test, y_test), validation_freq=1,
                    callbacks=[cp_callback])
三、参数提取,把参数存入txt
提取可训练参数
model.trainable_variables 返回模型中可训练的参数
参数提取
print(model.trainable_variables)
file = open('./weights.txt', 'w')
for v in model.trainable_variables:
    file.write(str(v.name) + '\n')
    file.write(str(v.shape) + '\n')
    file.write(str(v.numpy()) + '\n')
file.close()
四、acc/loss可视化,查看效果
1.前提开启:获取history
history=model.fit(训练集数据, 训练集标签, batch_size= , epochs=, validation_split=用作测试数据的比例,validation_data=测试集, validation_freq=测试频率)
2.history参数表
训练集loss: loss
测试集loss: val_loss
训练集准确率: sparse_categorical_accuracy
测试集准确率: val_sparse_categorical_accuracy
3.代码
# 显示训练集和验证集的acc和loss曲线
acc = history.history['sparse_categorical_accuracy']
val_acc = history.history['val_sparse_categorical_accuracy']
loss = history.history['loss']
val_loss = history.history['val_loss']

plt.subplot(1, 2, 1)
plt.plot(acc, label='Training Accuracy')
plt.plot(val_acc, label='Validation Accuracy')
plt.title('Training and Validation Accuracy')
plt.legend()

plt.subplot(1, 2, 2)
plt.plot(loss, label='Training Loss')
plt.plot(val_loss, label='Validation Loss')
plt.title('Training and Validation Loss')
plt.legend()
plt.show()
五、应用程序,给图识物
前向传播执行应用
predict(输入特征, batch_size=整数) 返回前向传播计算结果
代码实现
from PIL import Image
import numpy as np
import tensorflow as tf
# 训练好的模型
model_save_path = './checkpoint/mnist.ckpt'

model = tf.keras.models.Sequential([
    tf.keras.layers.Flatten(),
    tf.keras.layers.Dense(128, activation='relu'),
    tf.keras.layers.Dense(10, activation='softmax')])
# 读取模型
model.load_weights(model_save_path)
# 测试数据
preNum = int(input("input the number of test pictures:"))
# 将输入的数据修改成我们想要的数据
for i in range(preNum):
    image_path = input("the path of test picture:")
    img = Image.open(image_path)
    img = img.resize((28, 28), Image.ANTIALIAS)
    img_arr = np.array(img.convert('L'))

    for i in range(28):
        for j in range(28):
            if img_arr[i][j] < 200:
                img_arr[i][j] = 255
            else:
                img_arr[i][j] = 0

    img_arr = img_arr / 255.0
    x_predict = img_arr[tf.newaxis, ...]
    result = model.predict(x_predict)

    pred = tf.argmax(result, axis=1)

    print('\n')
    tf.print(pred)
总结
- 本文主要借鉴:mooc曹健老师的《人工智能实践:Tensorflow笔记》
- 可以利用这几种方式将八股神经网络进行优化应用到我们想要的场景中
- 可差分的神经网络体系方便我们使用