Android网络请求,全方位优雅解析
网络请求的基本流程
网络请求步骤(用户输入一个网址到网页最终展现到用户面前)大致流程总结如下:
- 在客户端浏览器中输入网址URL。
- 发送到DNS(域名服务器)获得域名对应的WEB服务器的IP地址。
- 客户端浏览器与WEB服务器建立TCP(传输控制协议)连接。
- 客户端浏览器向对应IP地址的WEB服务器发送相应的HTTP或HTTPS请求。
- WEB服务器响应请求,返回指定的URL数据或错误信息;如果设定重定向,则重定向到新的URL地址。
- 客户端浏览器下载数据,解析HTML源文件,解析的过程中实现对页面的排版,解析完成后,在浏览器中显示基础的页面。
- 分析页面中的超链接,显示在当前页面,重复以上过程直至没有超链接需要发送,完成页面的全部显示。
1、输入地址
当我们开始在浏览器中输入网址的时候,浏览器其实就已经在智能的匹配可能得 url 了,他会从历史记录,书签等地方,找到已经输入的字符串可能对应的 url,然后给出智能提示,让你可以补全url地址。对于 google的chrome 的浏览器,他甚至会直接从缓存中把网页展示出来,就是说,你还没有按下 enter,页面就出来了。
2、浏览器查找域名的 IP 地址
- 请求一旦发起,浏览器首先要做的事情就是解析这个域名,一般来说,浏览器会首先查看本地硬盘的 hosts 文件,看看其中有没有和这个域名对应的规则,如果有的话就直接使用 hosts 文件里面的 ip 地址。
- 如果在本地的 hosts 文件没有能够找到对应的 ip 地址,浏览器会发出一个 DNS请求到本地DNS服务器 。本地DNS服务器一般都是你的网络接入服务器商提供,比如中国电信,中国移动。
- 查询你输入的网址的DNS请求到达本地DNS服务器之后,本地DNS服务器会首先查询它的缓存记录,如果缓存中有此条记录,就可以直接返回结果,此过程是递归的方式进行查询。如果没有,本地DNS服务器还要向DNS根服务器进行查询。
- 根DNS服务器没有记录具体的域名和IP地址的对应关系,而是告诉本地DNS服务器,你可以到域服务器上去继续查询,并给出域服务器的地址。这种过程是迭代的过程。
- 本地DNS服务器继续向域服务器发出请求,在这个例子中,请求的对象是.com域服务器。.com域服务器收到请求之后,也不会直接返回域名和IP地址的对应关系,而是告诉本地DNS服务器,你的域名的解析服务器的地址。
- 最后,本地DNS服务器向域名的解析服务器发出请求,这时就能收到一个域名和IP地址对应关系,本地DNS服务器不仅要把IP地址返回给用户电脑,还要把这个对应关系保存在缓存中,以备下次别的用户查询时,可以直接返回结果,加快网络访问。
HttpURLconnection的介绍
在Android开发中网络请求是最常用的操作之一, Android SDK中对HTTP(超文本传输协议)也提供了很好的支持,这里包括两种接口:
- 标准Java接口(java.NET) —-HttpURLConnection,可以实现简单的基于URL请求、响应功能;
- Apache接口(org.appache.http)—-HttpClient,使用起来更方面更强大。
但在android API23的SDK中Google将HttpClient移除了。Google建议使用httpURLconnection进行网络访问操作。
HttpURLconnection是基于http协议的,支持get,post,put,delete等各种请求方式,最常用的就是get和post,下面针对这两种请求方式进行讲解。
Get请求的使用方法
HttpURLconnection是同步的请求,所以必须放在子线程中。使用示例如下:
new Thread(new Runnable() {
@Override
public void run() {
try {
String url = "https://www.baidu.com/";
URL url = new URL(url);
//得到connection对象。
HttpURLConnection connection = (HttpURLConnection) url.openConnection();
//设置请求方式
connection.setRequestMethod("GET");
//连接
connection.connect();
//得到响应码
int responseCode = connection.getResponseCode();
if(responseCode == HttpURLConnection.HTTP_OK){
//得到响应流
InputStream inputStream = connection.getInputStream();
//将响应流转换成字符串
String result = is2String(inputStream);//将流转换为字符串。
Log.d("kwwl","result============="+result);
}
} catch (Exception e) {
e.printStackTrace();
}
}
}).start();
123456789101112131415161718192021222324252627
get请求的使用方法如上。如果需要传递参数,则直接把参数拼接到url后面,其他完全相同,如下:
String url = "https://www.baidu.com/?userName=zhangsan&password=123456";
1
注意点: 1,url与参数之间用?隔开。 2,键值对中键与值用=连接。 3,两个键值对之间用&连接。
分析: 1, 使用connection.setRequestMethod(“GET”);设置请求方式。 2, 使用connection.connect();连接网络。请求行,请求头的设置必须放在网络连接前。 3, connection.getInputStream()只是得到一个流对象,并不是数据,不过我们可以从流中读出数据,从流中读取数据的操作必须放在子线程。 4, connection.getInputStream()得到一个流对象,从这个流对象中只能读取一次数据,第二次读取时将会得到空数据。
Post请求的使用方法
post的基本用法如下:
使用示例如下:
new Thread(new Runnable() {
@Override
public void run() {
try {
URL url = new URL(getUrl);
HttpURLConnection connection = (HttpURLConnection) url.openConnection();
connection.setRequestMethod("POST");//设置请求方式为POST
connection.setDoOutput(true);//允许写出
connection.setDoInput(true);//允许读入
connection.setUseCaches(false);//不使用缓存
connection.connect();//连接
int responseCode = connection.getResponseCode();
if(responseCode == HttpURLConnection.HTTP_OK){
InputStream inputStream = connection.getInputStream();
String result = is2String(inputStream);//将流转换为字符串。
Log.d("kwwl","result============="+result);
}
} catch (Exception e) {
e.printStackTrace();
}
}
}).start();
1234567891011121314151617181920212223
注:post请求与get请求有很多相似,只是在连接之前多了一些设置,两者可以对比学习使用。
使用post请求传递键值对参数
new Thread(new Runnable() {
@Override
public void run() {
try {
URL url = new URL(getUrl);
HttpURLConnection connection = (HttpURLConnection) url.openConnection();
connection.setRequestMethod("POST");
connection.setDoOutput(true);
connection.setDoInput(true);
connection.setUseCaches(false);
connection.connect();
String body = "userName=zhangsan&password=123456";
BufferedWriter writer = new BufferedWriter(new OutputStreamWriter(connection.getOutputStream(), "UTF-8"));
writer.write(body);
writer.close();
int responseCode = connection.getResponseCode();
if(responseCode == HttpURLConnection.HTTP_OK){
InputStream inputStream = connection.getInputStream();
String result = is2String(inputStream);//将流转换为字符串。
Log.d("kwwl","result============="+result);
}
} catch (Exception e) {
e.printStackTrace();
}
}
}).start();
1234567891011121314151617181920212223242526272829
分析:
- post方式传递参数的本质是:从连接中得到一个输出流,通过输出流把数据写到服务器。
- 数据的拼接采用键值对格式,键与值之间用=连接。每个键值对之间用&连接。
使用post请求传递json格式参数
post请求也可以传递json格式的参数,使用示例如下:
new Thread(new Runnable() {
@Override
public void run() {
try {
URL url = new URL(getUrl);
HttpURLConnection connection = (HttpURLConnection) url.openConnection();
connection.setRequestMethod("POST");
connection.setDoOutput(true);
connection.setDoInput(true);
connection.setUseCaches(false);
connection.setRequestProperty("Content-Type", "application/json;charset=utf-8");//设置参数类型是json格式
connection.connect();
String body = "{userName:zhangsan,password:123456}";
BufferedWriter writer = new BufferedWriter(new OutputStreamWriter(connection.getOutputStream(), "UTF-8"));
writer.write(body);
writer.close();
int responseCode = connection.getResponseCode();
if(responseCode == HttpURLConnection.HTTP_OK){
InputStream inputStream = connection.getInputStream();
String result = is2String(inputStream);//将流转换为字符串。
Log.d("kwwl","result============="+result);
}
} catch (Exception e) {
e.printStackTrace();
}
}
}).start();
123456789101112131415161718192021222324252627282930
传递json格式的参数与传递键值对参数不同点有两个:
- 传递json格式数据时需要在请求头中设置参数类型是json格式。
- body是json格式的字符串。
设置请求头
Get请求与post请求都可以设置请求头,设置请求头的方式也是相同的。为了节约篇幅,重复的代码不再列出,核心代码如下:
connection.setRequestMethod("POST");
connection.setRequestProperty("version", "1.2.3");//设置请求头
connection.setRequestProperty("token", token);//设置请求头
connection.connect();
1234
OkHttp的优点
网络优化方面:
- 内置连接池,支持连接复用;
- 支持gzip压缩响应体;
- 通过缓存避免重复的请求;
- 支持http2,对一台机器的所有请求共享同一个socket。
功能方面:
功能全面,满足了网络请求的大部分需求
扩展性方面:
责任链模式使得很容易添加一个自定义拦截器对请求和返回结果进行处理
原理
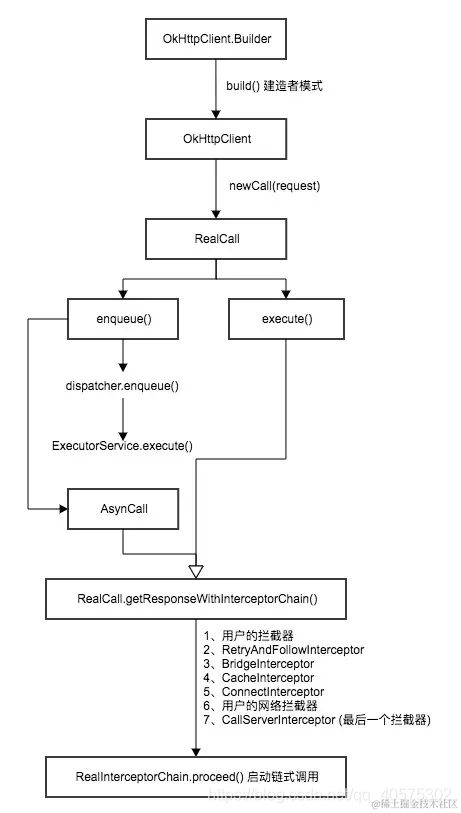
工作流程:
- 通过OkhttpClient创建一个Call,并发起同步或异步请求时;
- okhttp会通过Dispatcher对我们所有的RealCall(Call的具体实现类)进行统一管理,并通过 execute()及enqueue()方法对同步或异步请求进行处理;
- execute()及enqueue()这两个方法会最终调用RealCall中的getResponseWithInterceptorChain()(重点)方法,从拦截器链中获取返回结果;
- 拦截器链中,依次通过RetryAndFollowUpInterceptor(重定向拦截器)、BridgeInterceptor(桥接拦截器)、CacheInterceptor(缓存拦截器)、ConnectInterceptor(连接拦截器)、CallServerInterceptor(网络拦截器)对请求依次处理,与服务的建立连接后,获取返回数据,再经过上述拦截器依次处理后,最后将结果返回给调用方。
原理图:
编辑
添加图片注释,不超过 140 字(可选)
使用
1.okhttp初始化
Interceptor REWRITE_CACHE_CONTROL_INTERCEPTOR = new Interceptor() {
@Override public Response intercept(Chain chain) throws IOException {
Response originalResponse = chain.proceed(chain.request());
return originalResponse.newBuilder()
.removeHeader("Pragma")
.header("Cache-Control", String.format("max-age=%d", 60))
.build();
}
};
mOkHttpClient.setConnectTimeout(15000, TimeUnit.SECONDS);
mOkHttpClient.setReadTimeout(15000, TimeUnit.SECONDS);
mOkHttpClient.setWriteTimeout(15000, TimeUnit.SECONDS);
mOkHttpClient.setRetryOnConnectionFailure(true);
//-------------------------------设置http缓存,提升用户体验-----------------------------------
Cache cache;
File httpCacheDirectory = StorageUtils.getOwnCacheDirectory(context,HTTP_CACHE_FILENAME);
cache = new Cache(httpCacheDirectory, 10 * 1024);
mOkHttpClient.setCache(cache);
mOkHttpClient.networkInterceptors().add(REWRITE_CACHE_CONTROL_INTERCEPTOR);
//-------------------------------设置http缓存,提升用户体验-----------------------------------
// Handler mDelivery = new Handler(Looper.getMainLooper());
if (false) {
mOkHttpClient.setHostnameVerifier(new HostnameVerifier() {
@Override
public boolean verify(String hostname, SSLSession session) {
return true;
}
});
}
2.Get申请数据
Request request = new Request.Builder()
.url("网络地址这里面设置一个传参数如何办")
.addHeader("Accept", "application/json; q=0.5").build();
上面代码看到url缺么有带post,这就是get,我当时看到这个半天还在想这就是Get,至少带get的字样,缺么有,这就是Get,然后这
里面涉及的一个参数如何传。会有两个问题参数如何传、如果是apache的,如何转到okhttps,后面都会在我的github会封装一个库。
FormEncodingBuilder body = new FormEncodingBuilder();
for (ConcurrentHashMap.Entry entry : params.urlParams.entrySet()) {
body.addEncoded(entry.getKey(), entry.getValue());
}
Request request = new Request.Builder()
.url(getUrlWithQueryString(true, params.url, params))
.build();
try {
BaseOkHandler handler = new BaseOkHandler(callback, params);
client.newCall(request).enqueue(handler);
} catch (Exception e) {
e.printStackTrace();
}
上面看到的params就相当于apache中的RequestParams类,里面传入参数就可以,借鉴的并做修改后得到。
getUrlWithQueryString(boolean shouldEncodeUrl, String url, BaseParams params) {
if (url == null)
return null;
if (shouldEncodeUrl) {
try {
String decodedURL = URLDecoder.decode(url, "UTF-8");
URL _url = new URL(decodedURL);
URI _uri = new URI(_url.getProtocol(), _url.getUserInfo(), _url.getHost(), _url.getPort(), _url.getPath(),
_url.getQuery(), _url.getRef());
url = _uri.toASCIIString();
} catch (Exception ex) {
// Should not really happen, added just for sake of validity
}
}
if (params != null) {
// Construct the query string and trim it, in case it
// includes any excessive white spaces.
String paramString = params.getParamString().trim();
// Only add the query string if it isn't empty and it
// isn't equal to '?'.
if (!paramString.equals("") && !paramString.equals("?")) {
url += url.contains("?") ? "&" : "?";
url += paramString;
}
}
return url;
}
而这个函数就是把所有参数格式化拼接成一个字符串。
3.Post申请数据
 Request request = new Request.Builder()
      .url(url)
      .post(body)//post是关键,提交表单数据、这里面有封装好多库。
      .build();
      Response response = client.newCall(request).execute();
4.Post提交文件
 MultipartBuilder builder = new MultipartBuilder().type(MultipartBuilder.FORM);
        if (params.fileParams.size() > 0) {
            RequestBody fileBody = null;
       for (ConcurrentHashMap.Entry entry1 : params.fileParams.entrySet()) {
                {
                    File file = entry1.getValue().file;
                    String fileName = file.getName();
                    fileBody = RequestBody.create(MediaType.parse(guessMimeType(fileName)), file);
                    //TODO 根据文件名设置contentType
                    builder.addPart(Headers.of("Content-Disposition",
                                "form-data; name="" + entry1.getKey() + ""; filename="" + fileName + """),
                            fileBody);
                }
            }
        }
        Request request = new Request.Builder()
                .url(params.url)
                .post(builder.build())
                .build();
大家看到上传文件只要使用MultipartBuilder类表单传入就可以。
5.消息回来处理
public class BaseOkHandler implements Callback {
private HttpCallback callBack;
BaseParams param;
public BaseOkHandler(HttpCallback response, BaseParams cacheParams) {
this.callBack = response;
param = cacheParams;
}
@Override
public void onFailure(Request request, IOException e) {
}
@Override
public void onResponse(Response response) throws IOException {
try {
if (response.isSuccessful()) {
//成功得到文本信息
String content = response.body().string();
//通过Handler来传给UI线程。
Message msg =new Message();
msg.obj = content;
msg.what=0;
mHandler.sendMessage(msg);
}
} catch (Exception e) {
// TODO Auto-generated catch block
e.printStackTrace();
}
}
Handler mHandler = new Handler() {
@Override
public void handleMessage(Message msg) {
super.handleMessage(msg);
switch (msg.what) {
case 0:
//得到数据并去做解析类。
BaseEntity entity = JsonPaserFactory.paserObj(msg.obj.toString(), param.paserType);
//通知UI界面
callBack.onSuccess(msg.obj.toString(), entity, param.paserType);
break;
default:
break;
}
}
};
}
本文主要讲解了在Android开发开发中的网络请求技术,更多有关Android网络技术可以参考《Android核心技术手册》里面记录了大部分的Android技巧上1000个技术点.点击查看详细类目。

