微服务Spring Cloud快速入门
本文不探讨微服务的好处以及各项功能,做快速入门,演示代码的演变。
通过学习这篇文章,你发现调用第三方服务代码的演化。
文章目录
- 1.传统SOA架构项目
-
- 1.1.创建商品信息系统
- 1.2.创建订单信息系统
- 1.3.订单系统调用商品系统
- 1.4使用Spring RestTemplate发起http请求
-
- 1.4.1.配置RestTemplate
- 1.4.2.使用RestTemplate
- 1.4.3.演示RestTemplate
- 2.微服务架构项目
-
- 2.1.服务注册中心
-
- 2.1.1.理解什么是注册中心
- 2.1.2.常用的注册中心
- 2.1.3.服务注册中心Eureka
-
- 2.1.3.1.Eureka Server
- 2.1.3.2.Eureka Client
- 2.1.4.创建Eureka Server
-
- 2.1.4.1.STS选择Eureka或者pom.xml自行添加依赖
- 2.1.4.2.编写Eureka服务启动类@EnableEurekaServer
- 2.1.4.3.编写application.yml
- 2.1.4.4.SpringBoot和SpringCloud版本对应关系
- 2.1.4.5.访问Eureka
- 2.2.服务提供者(服务注册)
-
- 2.2.1.将商品服务改为SpringCloud微服务项目
- 2.2.2.编写application.yml
- 2.2.3.启动类@EnableDiscoveryClient
- 2.2.4.访问注册中心,查看我们注册的商品服务
- 2.2.5.访问SpringCloud版本的商品服务
- 2.3.服务消费者(服务发现)
-
- 2.3.1.将订单服务改为SpringCloud微服务项目
- 2.3.2.编写application.yml
- 2.3.3.添加Feign依赖
- 2.3.4.定义Feign接口
- 2.3.5.Feign接口调用微服务
- 2.3.6.启动类添加@EnableFeignClients
- 2.3.7.微服务调用演示效果
- 2.4.SpringCloud入门总结
在进行微服务入门之前,我们最好了解下SOA架构和微服务的区别和联系
具体可参考如下
云服务和SOA架构以及微服务架构的区别及联系
相信大家都经历这样的需求,A系统需要调用B系统的某个接口来完成自己的功能
通常我们在项目里面可能都会有这样情况,封装一个HTTP请求工具类,如下
	/**
	 * @Description 发送带Auth认证的post XML请求
	 * @author hutao
	 * @mail [email protected]
	 * @date 2020年4月26日
	 */
	public static String postXmlWithAuth( String url, String requestStr, String contentType, String charset,String auUserName, String auPassWord)
	/**
	 * @Description 发送带Auth认证的post JSON请求
	 * @author hutao
	 * @mail [email protected]
	 * @date 2020年5月14日
	 */
	public static String postJsonWithAuth( String url, String requestStr, String contentType, String charset,String auUserName, String auPassWord)
然后在我们的业务代码中写如下代码。
logger.info("请求CQ创建CR,请求地址{},请求报文:{}",url,requestXml);
String response = HttpUtil.postXmlWithAuth(url, requestXml, "application/xml", "utf-8",authUserName,authPassWord);
logger.info("请求CQ创建CR,响应报文:{}",response);

logger.info("推送企业微信请求地址{},请求参数:{}", pushUrl, requesJson);
String response = HttpUtil.postJsonWithAuth(pushUrl, requesJson, "application/json", "utf-8", auUserName,auPassWord);
logger.info("响应企业微信返回参数:{}", response);
这种方式的代码相信大家都很常见,通过封装httpclent或者okhttp实现一个http+json/xml实现客户端调用。
之前我们说到Spring Cloud是一种RPC框架。但是他的通讯协议不是RPC协议,而是http协议,遵循REST ful风格。
幻想下,如果采用Spring Cloud来实现上述方式,我们的代码会变成什么样恩?
1.传统SOA架构项目
需要实现订单系统调用商品信息系统获取到商品信息
1.1.创建商品信息系统
代码结构如下
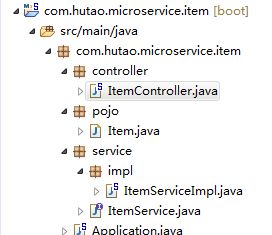
商品实体类Item
public class Item {

	private Long id;

	private String title;

	private String desc;

	private Long price;
	//省略get/set
}

```java
public class Items {
	private List<Item> listItem;
	//省略get/set
}
商品service定义
/**
 * Description:商品接口
 * @author hutao
 * @mail [email protected]
 * @date 2020年8月27日
 */
public interface ItemService {

	/**
	 * @Description:根据ID查询订单
	 * @author hutao
	 * @mail [email protected]
	 * @date 2020年8月27日
	 */
	Items queryItem(Long itemId);
}
商品service实现
@Service
public class ItemServiceImpl implements ItemService {

	@Override
	public Items queryItem(Long itemId) {
		Items Items = new Items();
		List<Item> listItem = new ArrayList<Item>();
		Item item1 = new Item();
		item1.setId(itemId);
		item1.setTitle("p30pro");
		item1.setDesc("这是华为手机");
		item1.setPrice(5000L);
		Item item2 = new Item();
		item2.setId(itemId);
		item2.setTitle("p40pro");
		item2.setDesc("这是华为手机");
		item2.setPrice(6000L);
		listItem.add(item1);
		listItem.add(item2);
		Items.setListItem(listItem);
		return Items;
	}
}
控制器Controller
/**
 * Description: 订单控制器类
 * @author hutao
 * @mail [email protected]
 * @date 2020年8月27日
 */
@RestController
@RequestMapping("/itemservice")
public class ItemController {

	@Autowired
	private ItemService itemService;

	@GetMapping(value = "item/{itemId}")
	public Items  queryOrderById(@PathVariable("itemId") long itemId) {
		Items items = itemService.queryItem(itemId);
		return items ;
	}

}
启动端口
server.port=8081
调用示例

1.2.创建订单信息系统
代码结构如下
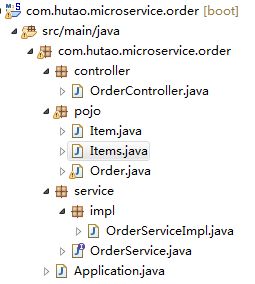
商品实体类Item
public class Item {

	private Long id;

	private String title;

	private String desc;

	private Long price;
	//省略get/set
}

```java
public class Items {
	private List<Item> listItem;
	//省略get/set
}
**订单实体类**
```java
/**
 * Description:订单
 * @author hutao
 * @mail [email protected]
 * @date 2020年8月27日
 */
public class Order {

	private String orderId;

	private String userName;

	private Date createDate;

	private Items items;;
	//省略get/set
}
订单服务OrderService 定义
/**
 * Description:订单接口
 * @author hutao
 * @mail [email protected]
 * @date 2020年8月27日
 */
public interface OrderService {

	/**
	 * @Description:根据ID查询订单
	 * @author hutao
	 * @mail [email protected]
	 * @date 2020年8月27日
	 */
	Order queryOrderById(String id);

}
订单服务OrderService实现
@Service
public class OrderServiceImpl implements OrderService{

	@Override
	public Order queryOrderById(String id) {
		Order order = new Order();
		order.setOrderId(id);
		order.setUserName("胡涛");
		order.setCreateDate(new Date());
		return order;
	}
}
订单控制器类
/**
 * Description: 订单控制器类
 * @author hutao
 * @mail [email protected]
 * @date 2020年8月27日
 */
@RestController
@RequestMapping("/orderservice")
public class OrderController {

	@Autowired
	private OrderService orderService;

	@GetMapping(value = "order/{orderId}")
	public Order queryOrderById(@PathVariable("orderId") String orderId) {
		Order order = orderService.queryOrderById(orderId);
		return order;
	}
}
端口
server.port=8082
调用示例

1.3.订单系统调用商品系统
在上述中的订单系统中,我们并没有商品信息,商品信息在商品系统中,因此我们需要在订单系统中,调商品系统的接口,获取商品信息。如下
@RestController
@RequestMapping("/orderservice")
public class OrderController {

	@Autowired
	private OrderService orderService;

	@GetMapping(value = "order/{orderId}")
	public Order queryOrderById(@PathVariable("orderId") String orderId) {
		Order order = orderService.queryOrderById(orderId);
		List<Item> listItem = new ArrayList<Item>();//商品信息应该从商品系统中获取
		order.setListItem(listItem);
		return order;
	}
}
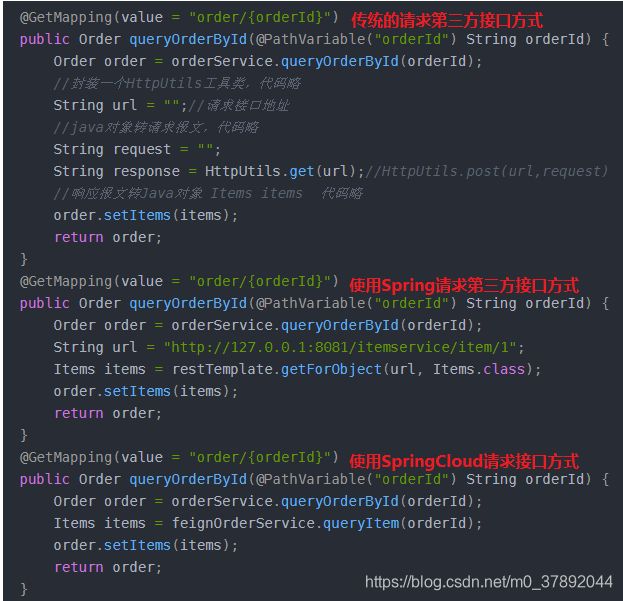
在这里,可能很多人都会像文章开头,我们所说那样,封装一个HTTP请求,然后代码可能是如下这样的
@GetMapping(value = "order/{orderId}")
	public Order queryOrderById(@PathVariable("orderId") String orderId) {
		Order order = orderService.queryOrderById(orderId);
		Items items = new Items ();//商品信息应该从商品系统中获取
		//组装请求报文
		String request = "";
		String url = "http://127.0.0.1:8081/itemservice/item/1";
		//发起请求
		String response = HttpUtil.getJson(url);
		//String response = HttpUtil.postJson(url,request);
		//使用一些json工具解析response报文获取到信息,映射到Items
		order.setItems (Items);
		return order;
	}
但是恩,既然这里我们使用的是SpringBoot,其实就不用自己来封装Http请求了,Spring已经给我们提供好了模板,我们直接使用就可以了
1.4使用Spring RestTemplate发起http请求
1.4.1.配置RestTemplate
RestTemplate为我们封装了HTTP Rest请求,对于一些Http请求的一些参数我们可以在RestTemplateConfig中进行配置,此处做演示,就不做配置了,全部采用默认值。
@SpringBootConfiguration
public class RestTemplateConfig {
    @Bean
    public RestTemplate restTemplate() {
        return new RestTemplate();
    }
}
1.4.2.使用RestTemplate
通过如下代码,在以往我们自己封装http,大多分为4步:
1、组装请求参数;
2、请求参数转Str报文;
3、发起请求(自己封装的Http请求);
4、解析请求报文。
在Spring RestTemplate中,我们则只关注请求参数,请求地址,返回报文需要映射的实体类,大大简化代码量。
@GetMapping(value = "order/{orderId}")
	public Order queryOrderById(@PathVariable("orderId") String orderId) {
		Order order = orderService.queryOrderById(orderId);
		String url = "http://127.0.0.1:8081/itemservice/item/1";
		Items items = restTemplate.getForObject(url, Items.class);
		order.setItems(items);
		return order;
	}
1.4.3.演示RestTemplate
上述的SOA架构中,其实存在两个问题,一个是接口地址问题,一个是高可用的问题,当然实际情况中,远远不止这两个问题,还存在其他问题:如雪崩效应。
1、商品服务是被调用者,如果商品服务的地址发生了改变,调用者订单也需要随之做更改。
2、提供商品服务的服务器如果崩了,怎么高可用怎么来保证,以及怎么做横向扩展。
2.微服务架构项目
如下所示,微服务项目,至少需要2个项目(既是服务提供者,又是服务消费者:自产自销),正常情况是3个以上。
2.1.服务注册中心
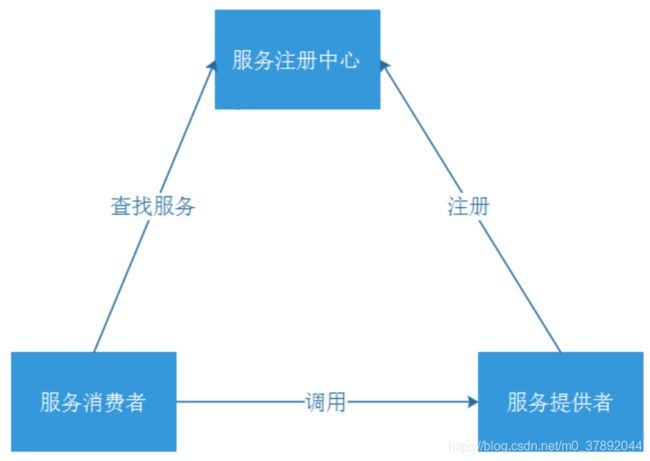
2.1.1.理解什么是注册中心
我们可以把注册中心比喻成通讯录
为什么叫他通讯录恩?因为注册中心记录了各个服务和服务地址的映射关系,当我们需要调用其他服务时,我们可以从注册中心,找到服务的地址。
就像我们不知道同学,同事,朋友,亲人的联系电话,不代表我们就不能打电话联系他们,因为他们联系方式已经存在于你手机里面的通讯录,这时候只需要我们打开通讯录,找到胡涛,你就能在通讯录里面找到胡涛的电话号码一样。
在上述案例中,如果商品服务把他的地址信息存到了注册中心里面了,那对于订单服务,我们就不需要只要商品服务的接口地址是多少了,因为这个地址我们能在注册中心里面找到。
2.1.2.常用的注册中心
常用的注册中心有:ZooKeeper、Eureka、Consul、Nacos。
1、ZooKeeper是由雅虎公司创建的,是google chubby 的开源实现。
2、Eureka是由Netflix 公司开发的,被Spring封装到了Spring Cloud中。
3、Consul是由HashiCorp 公司用 Go 语言开发, 基于 Mozilla Public License 2.0 的协议进行开源。
4、Nacos这个可能目前使用的相对较少,不过值得注意的是,他是阿里巴巴出品的。未来会不会成为国内主流的注册中心,很难说。
2.1.3.服务注册中心Eureka
Eureka包含两个组件:Eureka Server和Eureka Client。Eureka通过心跳检查、客户端缓存等机制,确保了系统的高可用性、灵活性和可伸缩性。
2.1.3.1.Eureka Server
Eureka Server 作为一个独立的部署单元,以 REST 接口的方式为服务实例提供了注册、管理和查询等操作。同时,Eureka Server 也为我们提供了可视化的监控页面,可以直观地看到各个 Eureka Server 当前的运行状态和所有已注册服务的情况。
2.1.3.2.Eureka Client
Eureka Client是一个java客户端,用于简化与Eureka Server的交互,客户端拥有一个内置的、使用轮询(round-robin)负载算法的负载均衡器。
2.1.4.创建Eureka Server
2.1.4.1.STS选择Eureka或者pom.xml自行添加依赖
本文,使用STS,创建一个spring Boot项目,插件选择eureka,自动会给你配置好SpringCloud和Eureka依赖。
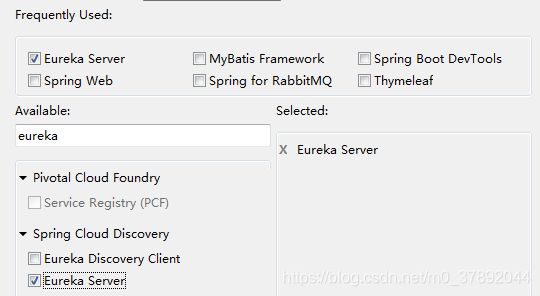
其余的IDE根据自身需要创建maven项目添加Spring Cloud和Eureka依赖
<project xmlns="http://maven.apache.org/POM/4.0.0" xmlns:xsi="http://www.w3.org/2001/XMLSchema-instance"
	xsi:schemaLocation="http://maven.apache.org/POM/4.0.0 https://maven.apache.org/xsd/maven-4.0.0.xsd">
	<modelVersion>4.0.0modelVersion>
	<parent>
		<groupId>org.springframework.bootgroupId>
		<artifactId>spring-boot-starter-parentartifactId>
		<version>2.1.0.RELEASEversion>
		<relativePath/>
	parent>
	<groupId>com.hutao.microservice.eurekagroupId>
	<artifactId>com.hutao.microservice.eurekaartifactId>
	<version>0.0.1-SNAPSHOTversion>
	<name>com.hutao.microservice.eurekaname>
	<description>Demo project for Spring Bootdescription>

	<properties>
		<java.version>1.8java.version>
		<spring-cloud.version>Greenwich.SR6spring-cloud.version>
	properties>

	<dependencies>

		<dependency>
			<groupId>org.springframework.cloudgroupId>
			<artifactId>spring-cloud-starter-netflix-eureka-serverartifactId>
		dependency>
		<dependency>
			<groupId>org.springframework.bootgroupId>
			<artifactId>spring-boot-starter-testartifactId>
			<scope>testscope>
			<exclusions>
				<exclusion>
					<groupId>org.junit.vintagegroupId>
					<artifactId>junit-vintage-engineartifactId>
				exclusion>
			exclusions>
		dependency>
	dependencies>

	<dependencyManagement>
		<dependencies>
			<dependency>
				<groupId>org.springframework.cloudgroupId>
				<artifactId>spring-cloud-dependenciesartifactId>
				<version>${spring-cloud.version}version>
				<type>pomtype>
				<scope>importscope>
			dependency>
		dependencies>
	dependencyManagement>

	<build>
		<plugins>
			<plugin>
				<groupId>org.springframework.bootgroupId>
				<artifactId>spring-boot-maven-pluginartifactId>
			plugin>
		plugins>
	build>

project>
2.1.4.2.编写Eureka服务启动类@EnableEurekaServer
/**
 * Description:Eureka服务
 * @author hutao
 * @mail [email protected]
 * @date 2020年8月30日
 */
@EnableEurekaServer
@SpringBootApplication
public class Application {

	public static void main(String[] args) {
		SpringApplication.run(Application.class, args);
	}
}
2.1.4.3.编写application.yml
server:
  port: 9090 #端口
eureka:
  client:
    registerWithEureka: false #是否将自己注册到Eureka服务中
    fetchRegistry: false #是否从Eureka中获取注册信息
    serviceUrl: #Eureka客户端与Eureka服务端进行交互的地址
      defaultZone: http://127.0.0.1:${server.port}/eureka/
2.1.4.4.SpringBoot和SpringCloud版本对应关系
启动服务发现报错:
Error creating bean with name ‘bootstrapImportSelectorConfiguration’: Initialization of bean failed; nested exception is java.lang.NoClassDefFoundError: org/springframework/boot/context/properties/ConfigurationPropertiesBean
这是由于SpringBoot版本和SpringCloud不兼容,我们需要查找下兼容版本
查看SpringBoot和SpringCloud版本对应关系
查看SpringBoot和SpringCloud对应关系的API
{
    "git": {
        "branch": "212c61533988da78b0aada8dd1e9e11933d54f2c",
        "commit": {
            "id": "212c615",
            "time": "2020-08-29T05:55:50Z"
        }
    },
    "build": {
        "version": "0.0.1-SNAPSHOT",
        "artifact": "start-site",
        "versions": {
            "spring-boot": "2.3.3.RELEASE",
            "initializr": "0.9.2-SNAPSHOT"
        },
        "name": "start.spring.io website",
        "time": "2020-08-29T05:56:47.438Z",
        "group": "io.spring.start"
    },
    "bom-ranges": {
        "azure": {
            "2.0.10": "Spring Boot >=2.0.0.RELEASE and <2.1.0.RELEASE",
            "2.1.10": "Spring Boot >=2.1.0.RELEASE and <2.2.0.M1",
            "2.2.4": "Spring Boot >=2.2.0.M1 and <2.3.0.M1",
            "2.3.3": "Spring Boot >=2.3.0.M1"
        },
        "codecentric-spring-boot-admin": {
            "2.0.6": "Spring Boot >=2.0.0.M1 and <2.1.0.M1",
            "2.1.6": "Spring Boot >=2.1.0.M1 and <2.2.0.M1",
            "2.2.4": "Spring Boot >=2.2.0.M1 and <2.3.0.M1",
            "2.3.0": "Spring Boot >=2.3.0.M1 and <2.4.0-M1"
        },
        "solace-spring-boot": {
            "1.0.0": "Spring Boot >=2.2.0.RELEASE and <2.3.0.M1",
            "1.1.0": "Spring Boot >=2.3.0.M1"
        },
        "solace-spring-cloud": {
            "1.0.0": "Spring Boot >=2.2.0.RELEASE and <2.3.0.M1",
            "1.1.1": "Spring Boot >=2.3.0.M1"
        },
        "spring-cloud": {
            "Finchley.M2": "Spring Boot >=2.0.0.M3 and <2.0.0.M5",
            "Finchley.M3": "Spring Boot >=2.0.0.M5 and <=2.0.0.M5",
            "Finchley.M4": "Spring Boot >=2.0.0.M6 and <=2.0.0.M6",
            "Finchley.M5": "Spring Boot >=2.0.0.M7 and <=2.0.0.M7",
            "Finchley.M6": "Spring Boot >=2.0.0.RC1 and <=2.0.0.RC1",
            "Finchley.M7": "Spring Boot >=2.0.0.RC2 and <=2.0.0.RC2",
            "Finchley.M9": "Spring Boot >=2.0.0.RELEASE and <=2.0.0.RELEASE",
            "Finchley.RC1": "Spring Boot >=2.0.1.RELEASE and <2.0.2.RELEASE",
            "Finchley.RC2": "Spring Boot >=2.0.2.RELEASE and <2.0.3.RELEASE",
            "Finchley.SR4": "Spring Boot >=2.0.3.RELEASE and <2.0.999.BUILD-SNAPSHOT",
            "Finchley.BUILD-SNAPSHOT": "Spring Boot >=2.0.999.BUILD-SNAPSHOT and <2.1.0.M3",
            "Greenwich.M1": "Spring Boot >=2.1.0.M3 and <2.1.0.RELEASE",
            "Greenwich.SR6": "Spring Boot >=2.1.0.RELEASE and <2.1.17.BUILD-SNAPSHOT",
            "Greenwich.BUILD-SNAPSHOT": "Spring Boot >=2.1.17.BUILD-SNAPSHOT and <2.2.0.M4",
            "Hoxton.SR8": "Spring Boot >=2.2.0.M4 and <2.3.4.BUILD-SNAPSHOT",
            "Hoxton.BUILD-SNAPSHOT": "Spring Boot >=2.3.4.BUILD-SNAPSHOT and <2.4.0.M1",
            "2020.0.0-SNAPSHOT": "Spring Boot >=2.4.0.M1"
        },
        "spring-cloud-alibaba": {
            "2.2.1.RELEASE": "Spring Boot >=2.2.0.RELEASE and <2.3.0.M1"
        },
        "spring-cloud-services": {
            "2.0.3.RELEASE": "Spring Boot >=2.0.0.RELEASE and <2.1.0.RELEASE",
            "2.1.7.RELEASE": "Spring Boot >=2.1.0.RELEASE and <2.2.0.RELEASE",
            "2.2.3.RELEASE": "Spring Boot >=2.2.0.RELEASE and <2.3.0.M1"
        },
        "spring-statemachine": {
            "2.0.0.M4": "Spring Boot >=2.0.0.RC1 and <=2.0.0.RC1",
            "2.0.0.M5": "Spring Boot >=2.0.0.RC2 and <=2.0.0.RC2",
            "2.0.1.RELEASE": "Spring Boot >=2.0.0.RELEASE"
        },
        "vaadin": {
            "10.0.17": "Spring Boot >=2.0.0.M1 and <2.1.0.M1",
            "14.3.4": "Spring Boot >=2.1.0.M1 and <2.4.0-M1"
        },
        "wavefront": {
            "2.0.0": "Spring Boot >=2.1.0.RELEASE"
        }
    },
    "dependency-ranges": {
        "okta": {
            "1.2.1": "Spring Boot >=2.1.2.RELEASE and <2.2.0.M1",
            "1.4.0": "Spring Boot >=2.2.0.M1 and <2.4.0-M1"
        },
        "mybatis": {
            "2.0.1": "Spring Boot >=2.0.0.RELEASE and <2.1.0.RELEASE",
            "2.1.3": "Spring Boot >=2.1.0.RELEASE and <2.4.0-M1"
        },
        "geode": {
            "1.2.9.RELEASE": "Spring Boot >=2.2.0.M5 and <2.3.0.M1",
            "1.3.3.RELEASE": "Spring Boot >=2.3.0.M1 and <2.4.0-M1",
            "1.4.0-M2": "Spring Boot >=2.4.0-M1"
        },
        "camel": {
            "2.22.4": "Spring Boot >=2.0.0.M1 and <2.1.0.M1",
            "2.25.2": "Spring Boot >=2.1.0.M1 and <2.2.0.M1",
            "3.3.0": "Spring Boot >=2.2.0.M1 and <2.3.0.M1",
            "3.4.3": "Spring Boot >=2.3.0.M1 and <2.4.0-M1"
        },
        "open-service-broker": {
            "2.1.3.RELEASE": "Spring Boot >=2.0.0.RELEASE and <2.1.0.M1",
            "3.0.4.RELEASE": "Spring Boot >=2.1.0.M1 and <2.2.0.M1",
            "3.1.1.RELEASE": "Spring Boot >=2.2.0.M1 and <2.4.0-M1"
        }
    }
}
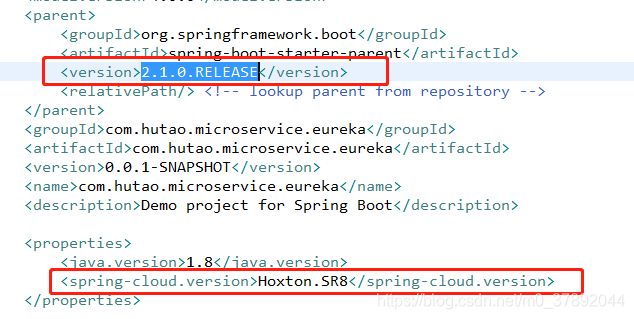
笔者使用SpringBoot的是2.1.0.RELEASE,而SpringCloud是Hoxton.SR8。通过查询官网知道,推荐使用的SpringBoot版本是Greenwich.SR6
切换SpringCloud版本后,服务器启动成功
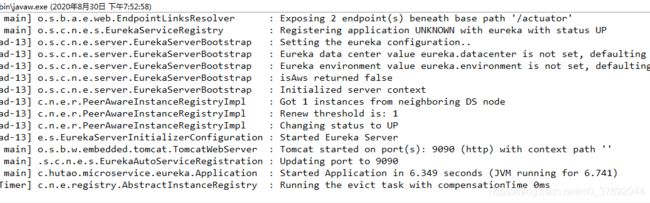
2.1.4.5.访问Eureka

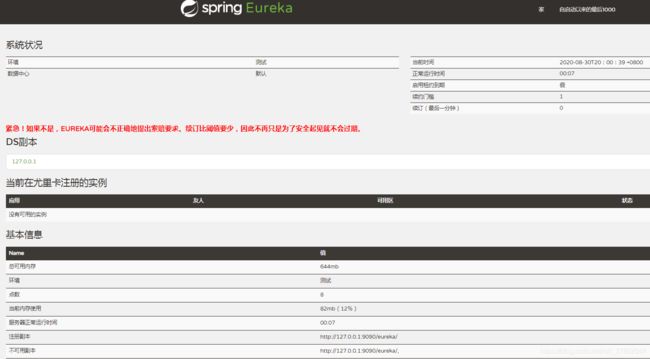
至此,Eureka服务入门搭建完毕。
2.2.服务提供者(服务注册)
服务提供方
将自身服务注册到Eureka,从而使服务消费方能够找到
2.2.1.将商品服务改为SpringCloud微服务项目
在商品服务中心,添加SpringCloud和Eureka依赖,把我们的eureka服务项目中的依赖复制过来即可
<project xmlns="http://maven.apache.org/POM/4.0.0" xmlns:xsi="http://www.w3.org/2001/XMLSchema-instance"
	xsi:schemaLocation="http://maven.apache.org/POM/4.0.0 https://maven.apache.org/xsd/maven-4.0.0.xsd">
	<modelVersion>4.0.0modelVersion>
	<parent>
		<groupId>org.springframework.bootgroupId>
		<artifactId>spring-boot-starter-parentartifactId>
		<version>2.1.0.RELEASEversion>
		<relativePath/>
	parent>
	<groupId>com.hutao.microservice.studentgroupId>
	<artifactId>com.hutao.microservice.studentartifactId>
	<version>0.0.1-SNAPSHOTversion>
	<name>com.hutao.microservice.itemname>
	<description>Demo project for Spring Bootdescription>

	<properties>
		<java.version>1.8java.version>
		<spring-cloud.version>Greenwich.SR6spring-cloud.version>
	properties>

	<dependencies>

		<dependency>
			<groupId>org.springframework.cloudgroupId>
			<artifactId>spring-cloud-starter-netflix-eureka-serverartifactId>
			<exclusions>

				<exclusion>
					<groupId>com.fasterxml.jackson.dataformatgroupId>
					<artifactId>jackson-dataformat-xmlartifactId>
				exclusion>
			exclusions>
		dependency>
		<dependency>
			<groupId>org.springframework.bootgroupId>
			<artifactId>spring-boot-starter-webartifactId>
		dependency>
		<dependency>
			<groupId>org.springframework.bootgroupId>
			<artifactId>spring-boot-starter-testartifactId>
			<scope>testscope>
			<exclusions>
				<exclusion>
					<groupId>org.junit.vintagegroupId>
					<artifactId>junit-vintage-engineartifactId>
				exclusion>
			exclusions>
		dependency>
	dependencies>

	<dependencyManagement>
		<dependencies>
			<dependency>
				<groupId>org.springframework.cloudgroupId>
				<artifactId>spring-cloud-dependenciesartifactId>
				<version>${spring-cloud.version}version>
				<type>pomtype>
				<scope>importscope>
			dependency>
		dependencies>
	dependencyManagement>
	<build>
		<plugins>
			<plugin>
				<groupId>org.springframework.bootgroupId>
				<artifactId>spring-boot-maven-pluginartifactId>
			plugin>
		plugins>
	build>
project>
2.2.2.编写application.yml
server:
  port: 8081 #服务端口
spring:
  application:
    name: itcast-microservice-item #指定服务名

eureka:
  client:
    registerWithEureka: true #是否将自己注册到Eureka服务中,默认为true
    fetchRegistry: true #是否从Eureka中获取注册信息,默认为true
    serviceUrl: #Eureka客户端与Eureka服务端进行交互的地址
      defaultZone: http://127.0.0.1:9090/eureka/
  instance:
    prefer-ip-address: true #将自己的ip地址注册到Eureka服务中
2.2.3.启动类@EnableDiscoveryClient
@EnableDiscoveryClient
@SpringBootApplication
public class Application {
	public static void main(String[] args) {
		SpringApplication.run(Application.class, args);
	}

}
2.2.4.访问注册中心,查看我们注册的商品服务
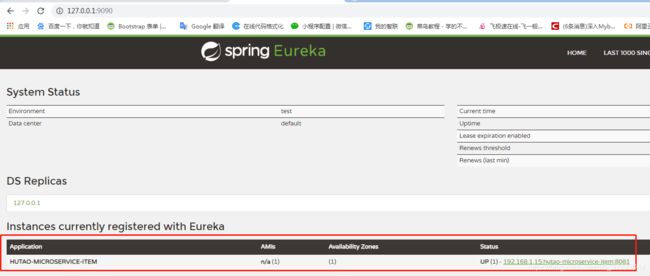
2.2.5.访问SpringCloud版本的商品服务

至此服务注册完毕。
2.3.服务消费者(服务发现)
2.3.1.将订单服务改为SpringCloud微服务项目
和商品服务一样,把相关依赖拷贝过来即可。
<project xmlns="http://maven.apache.org/POM/4.0.0" xmlns:xsi="http://www.w3.org/2001/XMLSchema-instance"
	xsi:schemaLocation="http://maven.apache.org/POM/4.0.0 https://maven.apache.org/xsd/maven-4.0.0.xsd">
	<modelVersion>4.0.0modelVersion>
	<parent>
		<groupId>org.springframework.bootgroupId>
		<artifactId>spring-boot-starter-parentartifactId>
		<version>2.1.0.RELEASEversion>
		<relativePath/>
	parent>
	<groupId>com.hutao.microservice.studentgroupId>
	<artifactId>com.hutao.microservice.studentartifactId>
	<version>0.0.1-SNAPSHOTversion>
	<name>com.hutao.microservice.ordername>
	<description>Demo project for Spring Bootdescription>

	<properties>
		<java.version>1.8java.version>
		<spring-cloud.version>Greenwich.SR6spring-cloud.version>
	properties>

	<dependencies>

		<dependency>
			<groupId>org.springframework.cloudgroupId>
			<artifactId>spring-cloud-starter-netflix-eureka-serverartifactId>
			<exclusions>

				<exclusion>
					<groupId>com.fasterxml.jackson.dataformatgroupId>
					<artifactId>jackson-dataformat-xmlartifactId>
				exclusion>
			exclusions>
		dependency>
		<dependency>
			<groupId>org.springframework.bootgroupId>
			<artifactId>spring-boot-starter-webartifactId>
		dependency>

		<dependency>
			<groupId>org.springframework.bootgroupId>
			<artifactId>spring-boot-starter-testartifactId>
			<scope>testscope>
			<exclusions>
				<exclusion>
					<groupId>org.junit.vintagegroupId>
					<artifactId>junit-vintage-engineartifactId>
				exclusion>
			exclusions>
		dependency>
	dependencies>

	<dependencyManagement>
		<dependencies>
			<dependency>
				<groupId>org.springframework.cloudgroupId>
				<artifactId>spring-cloud-dependenciesartifactId>
				<version>${spring-cloud.version}version>
				<type>pomtype>
				<scope>importscope>
			dependency>
		dependencies>
	dependencyManagement>
	<build>
		<plugins>
			<plugin>
				<groupId>org.springframework.bootgroupId>
				<artifactId>spring-boot-maven-pluginartifactId>
			plugin>
		plugins>
	build>

project>
2.3.2.编写application.yml
server:
  port: 8082 #服务端口

spring:
  application:
    name: hutao-microservice-order #指定服务名

eureka:
  client:
    registerWithEureka: true #是否将自己注册到Eureka服务中,默认为true
    fetchRegistry: true #是否从Eureka中获取注册信息,默认为true
    serviceUrl: #Eureka客户端与Eureka服务端进行交互的地址
      defaultZone: http://127.0.0.1:9090/eureka/
2.3.3.添加Feign依赖
在之前的方式中,我们可以通过封装HTTP方式,或者使用RestTemplate去调用接口,那么在SpringCloud中,我们怎么去调用微服务?
导入Feign依赖
	<dependency>
		<groupId>org.springframework.cloudgroupId>
		<artifactId>spring-cloud-starter-openfeignartifactId>
	dependency>
2.3.4.定义Feign接口

/**
 * Description:申明这是一个Feign客户端,并且指明服务id
 * @author hutao
 * @mail [email protected]
 * @date 2020年8月30日
 */
@FeignClient(value = "hutao-microservice-item")
@RequestMapping("/itemservice")
public interface FeignOrderService {

	/**
	 * @Description:根据ID查询订单
	 * @author hutao
	 * @mail [email protected]
	 * @date 2020年8月30日
	 */
	@GetMapping(value = "item/{itemId}")
	Items queryItem(@PathVariable("itemId")String itemId);
}
2.3.5.Feign接口调用微服务
/**
	 * @Description:使用微服务方式调用商品服务
	 * @author hutao
	 * @mail [email protected]
	 * @date 2020年8月30日
	 */
	@GetMapping(value = "order/{orderId}")
	public Order queryOrderById(@PathVariable("orderId") String orderId) {
		Order order = orderService.queryOrderById(orderId);
		//Feign接口调用微服务
		Items items = feignOrderService.queryItem(orderId);
		order.setItems(items);
		return order;
	}
2.3.6.启动类添加@EnableFeignClients
@EnableFeignClients
@EnableDiscoveryClient
@SpringBootApplication
public class OrderApplication {

	public static void main(String[] args) {
		SpringApplication.run(OrderApplication.class, args);
	}
}
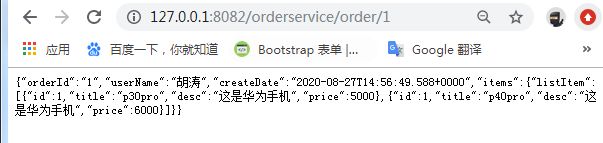
2.3.7.微服务调用演示效果
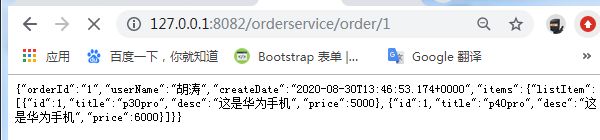
至此,微服务入门,到此结束。
下篇文章我们会着重的讲解,为什么定义下面这个接口,就能实现调用第三方服务接口。而且看起来定义的这个接口和SpringMVC的controller如此之像!
/**
 * Description:申明这是一个Feign客户端,并且指明服务id
 * @author hutao
 * @mail [email protected]
 * @date 2020年8月30日
 */
@FeignClient(value = "hutao-microservice-item")
@RequestMapping("/itemservice")
public interface FeignOrderService {

	/**
	 * @Description:根据ID查询订单
	 * @author hutao
	 * @mail [email protected]
	 * @date 2020年8月30日
	 */
	@GetMapping(value = "item/{itemId}")
	Items queryItem(@PathVariable("itemId")String itemId);
}
2.4.SpringCloud入门总结
1、注册中心
注册中心就想通讯录一样,记录和各个服务的地址和服务ID的映射关系。我们可以通过服务ID找到服务的URL,不管URL怎么变,始终能通过服务ID找到URL。
2、服务注册
将服务注册到注册中心,注册服务的时候需要指定服务URL和服务ID,让别人能够通过服务ID找到服务URL
3、服务发现
通过服务ID在注册中心找到服务URL
4、Feign接口定义
通过定义一个Feign接口,指明服务ID,调用这个Feign接口,这个接口会帮我们去注册中心找到服务的URL,帮我们发起HTTP求。