Android 蓝牙开发( 三 )
前言
前两篇文章给大家分享了Android蓝牙的基础开发,用的都是JAVA写的,有人希望我用Kotlin语言来写,因为目前使用Kotlin开发Android的人越来越多了,那今天小编今天就先分享一下Kotlin版的蓝牙开发教程吧
Android蓝牙开发步骤
1.检查设备是否支持蓝牙
在应用程序中,你需要首先检查设备是否支持蓝牙。你可以在AndroidManifest.xml文件中声明必需的蓝牙权限,并使用BluetoothAdapter类来查询设备是否支持蓝牙
val bluetoothAdapter = BluetoothAdapter.getDefaultAdapter()
if (bluetoothAdapter == null) {
    // 该设备不支持蓝牙
} else {
    // 该设备支持蓝牙
}
2.打开蓝牙
在你的应用程序中,你需要引导用户打开他们的蓝牙功能。你可以使用ACTION_REQUEST_ENABLE活动提供一个请求
if (!bluetoothAdapter.isEnabled()) {
    //如果该设备蓝牙未开启

    Intent enableBtIntent = new Intent(BluetoothAdapter.ACTION_REQUEST_ENABLE);
    startActivityForResult(enableBtIntent, REQUEST_ENABLE_BT);
}
3.扫描可用蓝牙设备
一旦蓝牙已启用,你就可以开始扫描设备了。你可以使用BluetoothAdapter类和BluetoothDevice类执行扫描操作
bluetoothAdapter.startDiscovery();
可以使用BroadcastReceiver类来接收扫描结果:
private val broadcastReceiver: BroadcastReceiver = object : BroadcastReceiver() {
    override fun onReceive(context: Context?, intent: Intent) {
        val action = intent.action
        if (BluetoothDevice.ACTION_FOUND == action) {
            val device =
                intent.getParcelableExtra(BluetoothDevice.EXTRA_DEVICE)
            //该设备成功搜索到蓝牙设备
        }
    }
}
4.选择蓝牙并与其配对成功
通过BluetoothAdapter对象,你可以来进行蓝牙配对。你需要将BluetoothDevice类实例化并使用其connect()方法来建立连接
var mBluetoothAdapter: BluetoothAdapter
val device: BluetoothDevice = mBluetoothAdapter.getRemoteDevice(address)
device.createBond()
5.选择蓝牙并与其建立连接
通过BluetoothDevice对象,你可以使用BluetoothSocket类来建立蓝牙连接。你需要将BluetoothSocket类实例化并使用其connect()方法来建立连接
val socket: BluetoothSocket = device.createRfcommSocketToServiceRecord(MY_UUID)
socket.connect()
6.数据传输
一旦蓝牙连接已建立,你可以使用BluetoothSocket的getInputStream()和getOutputStream()方法来发送和接收数据
val inputStream: InputStream = socket.getInputStream()
val outputStream: OutputStream = socket.getOutputStream()
以上就是Android蓝牙开发的基本流程,需要注意的是在实际开发中,还需要处理蓝牙连接的断开、多设备连接等复杂情况
7.断开蓝牙连接并关闭蓝牙
val bluetoothAdapter = BluetoothAdapter.getDefaultAdapter()
bluetoothAdapter.disable() //关闭蓝牙注意:Android提供了蓝牙模块的管理工具BluetoothAdapter(蓝牙适配器)
BluetoothAdapter类的一些常用方法说明:
1. enable() - 开启蓝牙
2. disable() - 关闭蓝牙
3. startDiscovery() - 开始搜索设备
4. cancelDiscovery() - 取消搜索设备
5. getBondedDevices() - 获取已配对的设备列表
6. getRemoteDevice(String address) - 获取远程设备对象
7. setState(int state) - 设置蓝牙状态
8. setScanMode(int mode) - 设置扫描模式
9. getScanMode() - 获取扫描模式
10. getName() - 获取本地蓝牙设备名称
11. setName(String name) - 设置本地蓝牙设备名称
12. getAddress() - 获取本地蓝牙设备地址
13. isDiscovering:判断是否正在搜索周围的蓝牙设备
14. getBluetoothLeScanner() - 获取BluetoothLeScanner对象
15. getProfileProxy(Context context, BluetoothProfile.ServiceListener listener, int profile) - 获取BluetoothProfile对象
16. closeProfileProxy(int profile, BluetoothProfile proxy) - 关闭BluetoothProfile对象的连接
Android蓝牙开发效果演示
1. 声明蓝牙权限
新建一个Android项目,然后在AndroidManifest清单文件里声明相关的权限
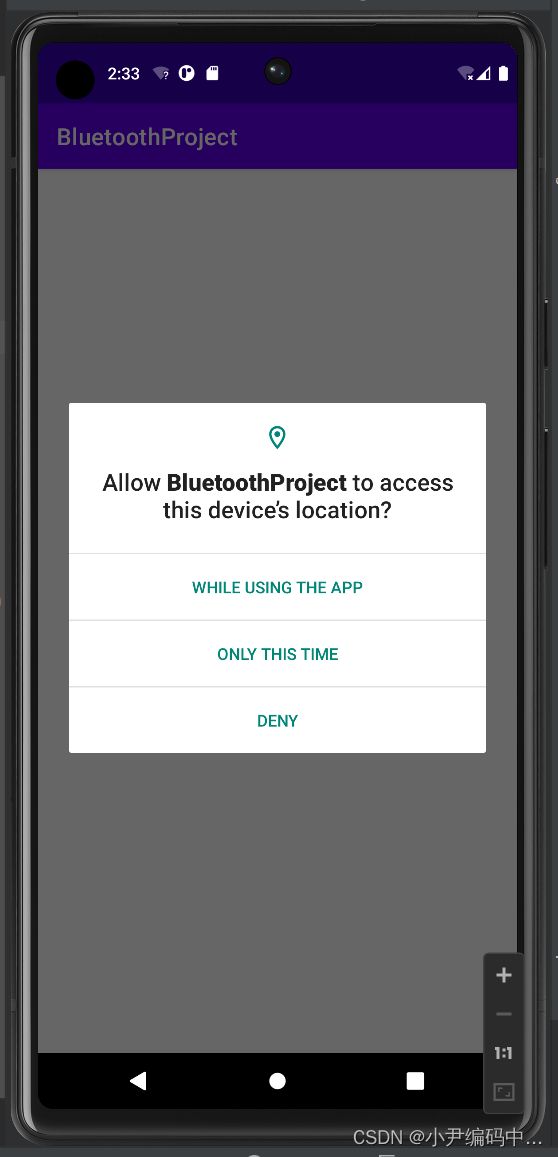
2. 动态获取定位权限
package com.example.bluetoothproject

import android.Manifest
import android.annotation.SuppressLint
import android.content.pm.PackageManager
import android.os.Bundle
import androidx.appcompat.app.AppCompatActivity


class MainActivity : AppCompatActivity() {
    override fun onCreate(savedInstanceState: Bundle?) {
        super.onCreate(savedInstanceState)
        setContentView(R.layout.activity_main)

        isPermission()
    }

    //动态获取位置权限
    @SuppressLint("NewApi")
    private fun isPermission() {
        if (checkSelfPermission(Manifest.permission.ACCESS_COARSE_LOCATION) != PackageManager.PERMISSION_GRANTED
            || checkSelfPermission(Manifest.permission.ACCESS_FINE_LOCATION) != PackageManager.PERMISSION_GRANTED
        ) {
            requestPermissions(
                arrayOf(
                    Manifest.permission.ACCESS_COARSE_LOCATION,
                    Manifest.permission.ACCESS_FINE_LOCATION
                ), 200
            )
        }
    }
}
运行效果:
3. 判断该设备是否支持蓝牙功能
package com.example.bluetoothproject

import android.bluetooth.BluetoothAdapter
import android.os.Bundle
import android.widget.Toast
import androidx.appcompat.app.AppCompatActivity


class MainActivity : AppCompatActivity() {
    private var mBluetoothAdapter: BluetoothAdapter? = null

    override fun onCreate(savedInstanceState: Bundle?) {
        super.onCreate(savedInstanceState)
        setContentView(R.layout.activity_main)

        //初始化蓝牙适配器
        mBluetoothAdapter = BluetoothAdapter.getDefaultAdapter()
        if (isBluetoothSupport()) {
            Toast.makeText(this@MainActivity, "该设备支持蓝牙功能", Toast.LENGTH_SHORT).show()
        } else {
            Toast.makeText(this@MainActivity, "该设备不支持蓝牙功能", Toast.LENGTH_SHORT).show()
        }
    }


    //判断该设备是否支持蓝牙功能
    private fun isBluetoothSupport(): Boolean {
        return when (mBluetoothAdapter) {
            null -> {
                false
            }
            else -> {
                true
            }
        }
    }
}
运行效果:
4. 判断本机是否开启蓝牙
package com.example.bluetoothproject

import android.annotation.SuppressLint
import android.bluetooth.BluetoothAdapter
import android.content.Intent
import android.os.Bundle
import android.widget.Toast
import androidx.appcompat.app.AppCompatActivity


class MainActivity : AppCompatActivity() {
    private var mBluetoothAdapter: BluetoothAdapter? = null

    @SuppressLint("MissingPermission")
    override fun onCreate(savedInstanceState: Bundle?) {
        super.onCreate(savedInstanceState)
        setContentView(R.layout.activity_main)

        //初始化蓝牙适配器
        mBluetoothAdapter = BluetoothAdapter.getDefaultAdapter()


        //判断蓝牙是否打开
        if (!isBluetoothEnabled()) {
            //如果蓝牙未开启,则申请打开蓝牙
            val enableBluetoothIntent = Intent(BluetoothAdapter.ACTION_REQUEST_ENABLE)
            startActivityForResult(enableBluetoothIntent, RESULT_CANCELED)
        } else {
        }
    }


    /**
     * 检查该设备蓝牙是否开启
     */
    private fun isBluetoothEnabled(): Boolean {
        return when {
            mBluetoothAdapter!!.isEnabled -> {
                true
            }
            else -> {
                false
            }
        }
    }


    override fun onActivityResult(requestCode: Int, resultCode: Int, data: Intent?) {
        super.onActivityResult(requestCode, resultCode, data)
        if (requestCode == RESULT_CANCELED) {
            if (resultCode == RESULT_OK) {
                // 蓝牙已成功开启
                Toast.makeText(this@MainActivity, "用户已开启蓝牙", Toast.LENGTH_SHORT).show()
            } else {
                // 用户取消了蓝牙开启请求
                Toast.makeText(this@MainActivity, "用户已拒绝开启蓝牙", Toast.LENGTH_SHORT).show()
            }
        }
    }
}
运行效果:
5. 获取设备已配对过的蓝牙设备
package com.example.bluetoothproject

import android.Manifest
import android.annotation.SuppressLint
import android.bluetooth.BluetoothAdapter
import android.content.pm.PackageManager
import android.os.Bundle
import android.util.Log
import androidx.appcompat.app.AppCompatActivity


class MainActivity : AppCompatActivity() {
    private var mBluetoothAdapter: BluetoothAdapter? = null


    @SuppressLint("MissingPermission", "MissingInflatedId")
    override fun onCreate(savedInstanceState: Bundle?) {
        super.onCreate(savedInstanceState)
        setContentView(R.layout.activity_main)

        //初始化蓝牙适配器
        mBluetoothAdapter = BluetoothAdapter.getDefaultAdapter()

        //判断是否有访问位置的权限,没有权限,直接申请位置权限
        isPermission()
        getPairedDevices()
    }

    //动态获取位置权限
    @SuppressLint("NewApi")
    private fun isPermission() {
        if (checkSelfPermission(Manifest.permission.ACCESS_COARSE_LOCATION) != PackageManager.PERMISSION_GRANTED
            || checkSelfPermission(Manifest.permission.ACCESS_FINE_LOCATION) != PackageManager.PERMISSION_GRANTED
        ) {
            requestPermissions(
                arrayOf(
                    Manifest.permission.ACCESS_COARSE_LOCATION,
                    Manifest.permission.ACCESS_FINE_LOCATION
                ), 200
            )
        }
    }


    @SuppressLint("MissingPermission")
    private fun getPairedDevices() {
        val bluetoothAdapter = BluetoothAdapter.getDefaultAdapter()
        val pairedDevices = bluetoothAdapter.bondedDevices
        if (pairedDevices.size > 0) {
            for (device in pairedDevices) {
                val deviceName = device.name
                val deviceHardwareAddress = device.address
                Log.d("MainActivity", "设备名:$deviceName\n地址:$deviceHardwareAddress")
            }
        }
    }

}
运行效果:
6. 搜索蓝牙设备
package com.example.bluetoothproject

import android.Manifest
import android.annotation.SuppressLint
import android.bluetooth.BluetoothAdapter
import android.bluetooth.BluetoothDevice
import android.content.BroadcastReceiver
import android.content.Context
import android.content.Intent
import android.content.IntentFilter
import android.content.pm.PackageManager
import android.os.Bundle
import android.util.Log
import android.widget.Toast
import androidx.appcompat.app.AppCompatActivity


class MainActivity : AppCompatActivity() {
    private var mBluetoothAdapter: BluetoothAdapter? = null


    @SuppressLint("MissingPermission", "MissingInflatedId")
    override fun onCreate(savedInstanceState: Bundle?) {
        super.onCreate(savedInstanceState)
        setContentView(R.layout.activity_main)

        //初始化蓝牙适配器
        mBluetoothAdapter = BluetoothAdapter.getDefaultAdapter()

        //判断是否有访问位置的权限,没有权限,直接申请位置权限
        isPermission()
        mBluetoothAdapter!!.startDiscovery()
        registerBluetoothReceiver()
    }

    //动态获取位置权限
    @SuppressLint("NewApi")
    private fun isPermission() {
        if (checkSelfPermission(Manifest.permission.ACCESS_COARSE_LOCATION) != PackageManager.PERMISSION_GRANTED
            || checkSelfPermission(Manifest.permission.ACCESS_FINE_LOCATION) != PackageManager.PERMISSION_GRANTED
        ) {
            requestPermissions(
                arrayOf(
                    Manifest.permission.ACCESS_COARSE_LOCATION,
                    Manifest.permission.ACCESS_FINE_LOCATION
                ), 200
            )
        }
    }


    private fun registerBluetoothReceiver() {
        //filter注册广播接收器
        val filter = IntentFilter()


        //蓝牙当前状态
        filter.addAction(BluetoothAdapter.ACTION_STATE_CHANGED)


        //开始扫描蓝牙设备广播
        filter.addAction(BluetoothAdapter.ACTION_DISCOVERY_STARTED)

        //找到蓝牙设备广播
        filter.addAction(BluetoothDevice.ACTION_FOUND)

        //扫描蓝牙设备结束广播
        filter.addAction(BluetoothAdapter.ACTION_DISCOVERY_FINISHED)

        //蓝牙设备配对状态改变广播
        filter.addAction(BluetoothDevice.ACTION_BOND_STATE_CHANGED)

        //设备扫描模式改变广播
        filter.addAction(BluetoothAdapter.ACTION_SCAN_MODE_CHANGED)
        registerReceiver(receiver, filter)
    }


    //处理找到蓝牙设备和搜索完成的广播消息
    var receiver: BroadcastReceiver = object : BroadcastReceiver() {
        @SuppressLint("MissingPermission")
        override fun onReceive(context: Context?, intent: Intent) {
            val action = intent.action

            //开始查找设备
            if (BluetoothAdapter.ACTION_DISCOVERY_STARTED == action) {
                Log.d("", "开始查找")
            } else if (BluetoothDevice.ACTION_FOUND == action) {
                //搜到蓝牙设备
                val device =
                    intent.getParcelableExtra(BluetoothDevice.EXTRA_DEVICE)

                //把搜索到的设备添加到已找到列表中,显示它的信息
                Log.d(
                    "", """
                        设备名:${device!!.name}
                        地址:${device.address}
                        """.trimIndent()
                )
            } else if (BluetoothAdapter.ACTION_DISCOVERY_FINISHED == action) {
                //搜索完毕
                Toast.makeText(this@MainActivity, "选择要配对的蓝牙设备", Toast.LENGTH_SHORT).show()
                Log.d("", "查找结束")
            }
        }
    }

}
运行效果:
7. 配对蓝牙设备
package com.example.bluetoothdemo;

import androidx.appcompat.app.AppCompatActivity;

import android.Manifest;
import android.annotation.SuppressLint;
import android.bluetooth.BluetoothAdapter;
import android.bluetooth.BluetoothDevice;
import android.content.BroadcastReceiver;
import android.content.Context;
import android.content.Intent;
import android.content.IntentFilter;
import android.content.pm.PackageManager;
import android.os.Bundle;
import android.util.Log;
import android.widget.Toast;

import java.util.Set;

public class MainActivity extends AppCompatActivity {
    package com.example.bluetoothproject

import android.Manifest
import android.annotation.SuppressLint
import android.bluetooth.BluetoothAdapter
import android.content.pm.PackageManager
import android.os.Bundle
import android.util.Log
import androidx.appcompat.app.AppCompatActivity


class MainActivity : AppCompatActivity() {
    private var mBluetoothAdapter: BluetoothAdapter? = null


    @SuppressLint("MissingPermission", "MissingInflatedId")
    override fun onCreate(savedInstanceState: Bundle?) {
        super.onCreate(savedInstanceState)
        setContentView(R.layout.activity_main)

        //初始化蓝牙适配器
        mBluetoothAdapter = BluetoothAdapter.getDefaultAdapter()

        //判断是否有访问位置的权限,没有权限,直接申请位置权限
        isPermission()
        getPairedDevices()
    }

    //动态获取位置权限
    @SuppressLint("NewApi")
    private fun isPermission() {
        if (checkSelfPermission(Manifest.permission.ACCESS_COARSE_LOCATION) != PackageManager.PERMISSION_GRANTED
            || checkSelfPermission(Manifest.permission.ACCESS_FINE_LOCATION) != PackageManager.PERMISSION_GRANTED
        ) {
            requestPermissions(
                arrayOf(
                    Manifest.permission.ACCESS_COARSE_LOCATION,
                    Manifest.permission.ACCESS_FINE_LOCATION
                ), 200
            )
        }
    }


    @SuppressLint("MissingPermission")
    private fun getPairedDevices() {
        val bluetoothAdapter = BluetoothAdapter.getDefaultAdapter()
        val pairedDevices = bluetoothAdapter.bondedDevices
        if (pairedDevices.size > 0) {
            var i = 0
            for (device in pairedDevices) {
                i++
                if (i == pairedDevices.size) {
                    device.createBond()
                    Log.d("", "本机与另一个蓝牙设备" + device.name + "成功配对")
                }
                val deviceName = device.name
                val deviceHardwareAddress = device.address
                Log.d("", "设备名:$deviceName\n地址:$deviceHardwareAddress")
            }
        }
    }
}


}
运行效果:
![]()
这一篇文章就先分享到这里,大家可以把代码复制一下去运行;下一篇给大家分享一下Kotlin+Compose蓝牙项目实战用法
Android蓝牙开发注意事项:
-
确保设备支持蓝牙:在开发之前,请确保您的设备支持蓝牙。大多数现代智能手机和平板电脑都支持蓝牙。
-
获取必要的权限:在开发蓝牙应用之前,您需要获取适当的权限。例如,您需要请求“android.permission.BLUETOOTH”权限,以便您的应用程序可以使用蓝牙。
-
确定您需要的蓝牙配置类型:Android提供了两种不同的蓝牙配置类型:经典蓝牙和低功耗蓝牙。使用低功耗蓝牙可以延长设备电池寿命,但需要Android 4.3(API level 18)或更高版本。
-
确保您的应用程序与其他应用程序兼容:在您的应用程序中使用蓝牙之前,请确保它与其他应用程序兼容。如果您的应用程序和其他应用程序同时使用蓝牙,可能会导致冲突和不稳定的行为。
-
使用正确的蓝牙协议:在开发蓝牙应用程序时,您需要确保使用正确的蓝牙协议。不同的设备和应用程序可能使用不同的蓝牙协议,因此您需要确定您的应用程序需要使用哪些协议。
-
处理错误和异常:在使用蓝牙时,可能会出现错误和异常。要确保您的应用程序具有适当的错误处理和异常处理代码,以确保它可以在出现问题时正确地处理蓝牙连接。
-
调试您的应用程序:在开发蓝牙应用程序时,请确保使用适当的调试工具。Android Studio提供了一些内置的调试工具,用于诊断和修复蓝牙连接问题。
-
避免使用已知的蓝牙错误:在使用蓝牙时,可能会出现许多已知的错误。要避免这些错误,请编写适当的代码,以确保您的应用程序可以正确处理这些错误。
需要注意的是,蓝牙开发需要特别注意电量和性能问题,对于频繁的蓝牙搜索、连接和数据传输等操作,应尽量减少或优化,避免对设备电量和性能造成过大的影响。


