动力节点Spring (16-17)
⼗六、Spring对事务的⽀持
16.1 事务概述
● 什么是事务
○ 在⼀个业务流程当中,通常需要多条DML(insert delete update)语句共同联合才能完成,这多条DML语句必须同时成功,或者同时失败,这样才能保证数据的安全。
○ 多条DML要么同时成功,要么同时失败,这叫做事务。
○ 事务:Transaction(tx)
● 事务的四个处理过程:
○ 第⼀步:开启事务 (start transaction)
○ 第⼆步:执⾏核⼼业务代码
○ 第三步:提交事务(如果核⼼业务处理过程中没有出现异常)(commit transaction)
○ 第四步:回滚事务(如果核⼼业务处理过程中出现异常)(rollback transaction)
● 事务的四个特性:
○ A 原⼦性:事务是最⼩的⼯作单元,不可再分。
○ C ⼀致性:事务要求要么同时成功,要么同时失败。事务前和事务后的总量不变。
○ I 隔离性:事务和事务之间因为有隔离性,才可以保证互不⼲扰。
○ D 持久性:持久性是事务结束的标志。
16.2 引⼊事务场景
以银⾏账户转账为例学习事务。两个账户act- 001 和act- 002 。act- 001 账户向act- 002 账户转账 10000 ,必须同时成功,或者同时失败。(⼀个减成功,⼀个加成功, 这两条update语句必须同时成功,或同时失败。)
连接数据库的技术采⽤Spring框架的JdbcTemplate。
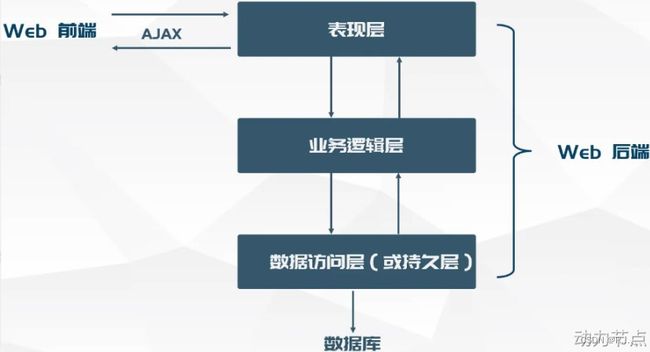
采⽤三层架构搭建:
模块名:spring6-013-tx-bank(依赖如下)
    jar


            junit
            junit
            4.12
            test


            org.springframework
            spring-jdbc
            6.0.0


            org.springframework
            spring-context
            6.0.0


            mysql
            mysql-connector-java
            8.0.31


            com.alibaba
            druid
            1.2.13


            jakarta.annotation
            jakarta.annotation-api
            2.1.1
第⼀步:准备数据库表
第⼆步:创建包结构
第三步:准备POJO类
public class Account {
    private String actno;
    private Double balance;

    public Account(){}

    public Account(String actno, Double balance) {
        this.actno = actno;
        this.balance = balance;
    }
    //get,set,toString方法
}
第四步:编写持久层
AccountDao接口:
/*
专门负责账户信息的CRUD操作
DAO中只执行SQL语句,没有任何业务逻辑
也就是说DAO不和业务挂钩。
*/
public interface AccountDao {
    //根据账号查询信息
    Account selectByActno(String actno);

    //更新账户信息
    int update(Account act);


}
AccountDaoImpl类:
@Repository("accountDao")
public class AccountDaoImpl implements AccountDao {
    @Resource(name="jdbcTemplate")
    private JdbcTemplate jdbcTemplate;

    @Override
    public Account selectByActno(String actno) {
        String sql = "select actno,balance from t_act where actno=?";
        Account account = jdbcTemplate.queryForObject(sql, new BeanPropertyRowMapper<>(Account.class), actno);
        return account;
    }

    @Override
    public int update(Account act) {
        String sql = "update t_act set balance=? where actno=?";
        int count = jdbcTemplate.update(sql, act.getBalance(),act.getActno());
        return count;
    }
}
第五步:编写业务层
AccountService接口:
/*
* 业务接口
* 事物就是在这个接口下控制的
* */
public interface AccountService {
    //转账业务方法
    void transfer(String fromActno,String toActno,double money);

}
AccountServiceImpl类:
@Service("accountService")
public class AccountServiceImpl implements AccountService {
    @Resource(name="accountDao")
    private AccountDao accountDao;

    //控制事物,因为在这个方法中要完成所有的转账业务
    @Override
    public void transfer(String fromActno, String toActno, double money) {
        //查询转出账户的余额是否充足
        Account fromAct = accountDao.selectByActno(fromActno);
        if (fromAct.getBalance()
第六步:编写Spring配置⽂件
第七步:编写表示层(测试程序)
public class SpringTxTest {
    @Test
    public void testSpringTx(){
        ApplicationContext applicationContext = new ClassPathXmlApplicationContext("spring.xml");
        AccountService accountService = applicationContext.getBean("accountService", AccountService.class);
        try{
            accountService.transfer("act-001","act-002",10000);
            System.out.println("转账成功");
        }catch (Exception e){
            e.printStackTrace();
        }
    }
}
模拟异常
@Service("accountService")
@Transactional
public class AccountServiceImpl implements AccountService {
    @Resource(name="accountDao")
    private AccountDao accountDao;

    //控制事物,因为在这个方法中要完成所有的转账业务
    @Override
    //@Transactional
    public void transfer(String fromActno, String toActno, double money) {
        //第一步:开启事物

        //第二步:执行核心业务逻辑
        //查询转出账户的余额是否充足
        Account fromAct = accountDao.selectByActno(fromActno);
        if (fromAct.getBalance()
数据库表中数据: 发现少了1W
16.3 Spring对事务的⽀持
Spring实现事务的两种⽅式
● 编程式事务
○ 通过编写代码的⽅式来实现事务的管理。
● 声明式事务
○ 基于注解⽅式
○ 基于XML配置⽅式
Spring事务管理API
Spring对事务的管理底层实现⽅式是基于AOP实现的。采⽤AOP的⽅式进⾏了封装。所以Spring专⻔针对事务开发了⼀套API,API的核⼼接⼝如下:
PlatformTransactionManager接⼝:spring事务管理器的核⼼接⼝。在 Spring 6 中它有两个实现:
●DataSourceTransactionManager:⽀持JdbcTemplate、MyBatis、Hibernate等事务管理。
●JtaTransactionManager:⽀持分布式事务管理。
如果要在Spring 6 中使⽤JdbcTemplate,就要使⽤DataSourceTransactionManager来管理事务。
(Spring内置写好了,可以直接⽤。)
声明式事务之注解实现⽅式
●第⼀步:在spring配置⽂件中配置事务管理器。
●第⼆步:在spring配置⽂件中引⼊tx命名空间。
●第三步:在spring配置⽂件中配置“事务注解驱动器”,开始注解的⽅式控制事务。
●第四步:在service类上或⽅法上添加@Transactional注解
在类上添加该注解,该类中所有的⽅法都有事务。在某个⽅法上添加该注解,表示只有这个⽅法使⽤事务。
@Service("accountService")
@Transactional
public class AccountServiceImpl implements AccountService {
    @Resource(name="accountDao")
    private AccountDao accountDao;

    //控制事物,因为在这个方法中要完成所有的转账业务
    @Override
    //@Transactional
    public void transfer(String fromActno, String toActno, double money) {
        //第一步:开启事物

        //第二步:执行核心业务逻辑
        //查询转出账户的余额是否充足
        Account fromAct = accountDao.selectByActno(fromActno);
        if (fromAct.getBalance()
通过测试,发现数据没有变化,事务起作⽤了。
16.3.1 事务属性
事务属性包括哪些
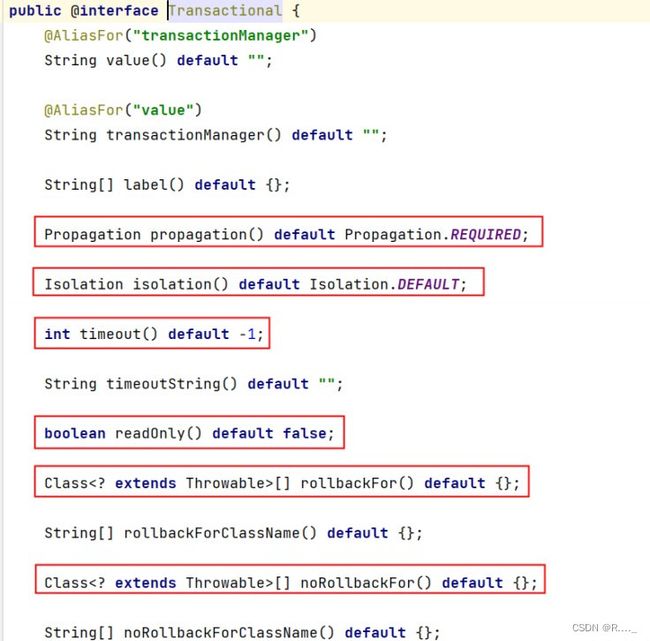
事务中的重点属性:
● 事务传播⾏为
● 事务隔离级别
● 事务超时
● 只读事务
● 设置出现哪些异常回滚事务
● 设置出现哪些异常不回滚事务
16.3.2 事务传播⾏为
什么是事务的传播⾏为?
在service类中有a()⽅法和b()⽅法,a()⽅法上有事务,b()⽅法上也有事务,当a()⽅法执⾏过程中调⽤了 b()⽅法,事务是如何传递的?合并到⼀个事务⾥?还是开启⼀个新的事务?这就是事务传播⾏为。
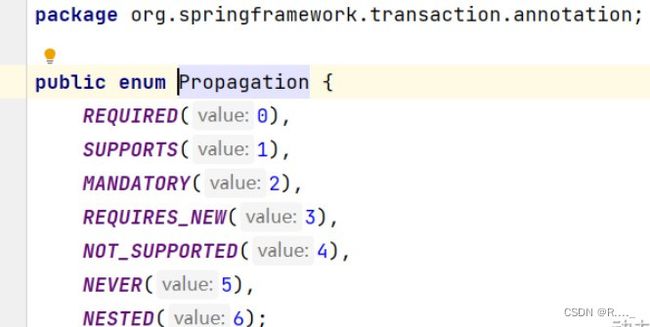
事务传播⾏为在spring框架中被定义为枚举类型:
⼀共有七种传播⾏为:
● REQUIRED:⽀持当前事务,如果不存在就新建⼀个(默认) 【没有就新建,有就加⼊】
● SUPPORTS:⽀持当前事务,如果当前没有事务,就以⾮事务⽅式执⾏ 【有就加⼊,没有就不管了】
● MANDATORY: 必须运⾏在⼀个事务中,如果当前没有事务正在发⽣,将抛出⼀个异常 【有就
加⼊,没有就抛异常】
● REQUIRES_NEW: 开启⼀个新的事务,如果⼀个事务已经存在,则将这个存在的事务挂起
【不管有没有,直接开启⼀个新事务,开启的新事务和之前的事务不存在嵌套关系,之前事务
被挂起】
● NOT_SUPPORTED: 以⾮事务⽅式运⾏,如果有事务存在,挂起当前事务 【不⽀持事务,存在
就挂起】
● NEVER: 以⾮事务⽅式运⾏,如果有事务存在,抛出异常 【不⽀持事务,存在就抛异常】
● NESTED: 如果当前正有⼀个事务在进⾏中,则该⽅法应当运⾏在⼀个嵌套式事务中。被嵌套
的事务可以独⽴于外层事务进⾏提交或回滚。如果外层事务不存在,⾏为就像REQUIRED⼀
样。 【有事务的话,就在这个事务⾥再嵌套⼀个完全独⽴的事务,嵌套的事务可以独⽴的提交
和回滚。没有事务就和 REQUIRED⼀样。 】
在代码中设置事务的传播⾏为:
@ Transactional ( propagation = Propagation . REQUIRED )
可以编写程序测试⼀下传播⾏为:
AccountServiceImpl:
@Service("accountService")
public class AccountServiceImpl implements AccountService {
    @Resource(name="accountDao")
    private AccountDao accountDao;


    @Resource(name="accountServiceImpl2")
    private AccountService accountService;

    @Override
    @Transactional(propagation = Propagation.REQUIRED)
    public void save(Account act) {
        //这里调用dao的insert方法
        accountDao.insert(act);//保存act-003账户

        //创建账户对象
        Account act2 = new Account("act-004",1000.0);
        accountService.save(act2);//保存act-004账户
    }
}
AccountServiceImpl2:
@Service("accountServiceImpl2")
public class AccountServiceImpl2 implements AccountService {
    @Resource(name="accountDao")
    private AccountDao accountDao;

    @Override
    public void transfer(String fromActno, String toActno, double money) {

    }

    @Override
    @Transactional(propagation = Propagation.REQUIRED)
    public void save(Account act) {
        accountDao.insert(act);
    }
}
@Test
public void testPropagation(){
ApplicationContext applicationContext = new ClassPathXmlApplicationContext("spring.xml");
//获取1号service对象
AccountService accountService = applicationContext.getBean("accountService", AccountService.class);
Account act =new Account("act-003",100.0);
accountService.save(act);
} ⼀定要集成Log 4 j 2 ⽇志框架,在⽇志信息中可以看到更加详细的信息。
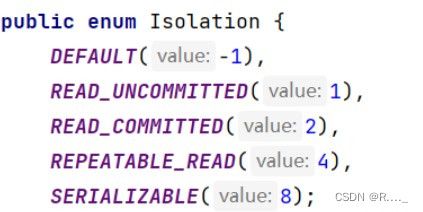
16.3.3 事务隔离级别
事务隔离级别类似于教室A和教室B之间的那道墙,隔离级别越⾼表示墙体越厚。隔⾳效果越好。
数据库中读取数据存在的三⼤问题:(三⼤读问题)
●脏读:读取到没有提交到数据库的数据,叫做脏读。
●不可重复读:在同⼀个事务当中,第⼀次和第⼆次读取的数据不⼀样。
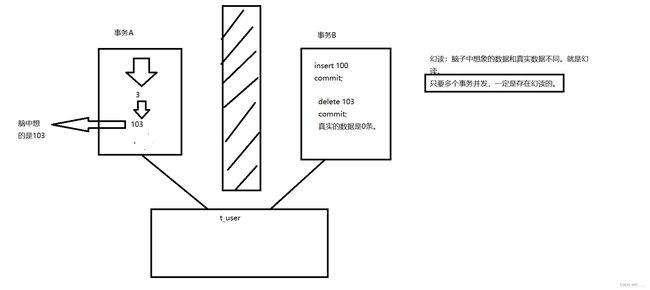
●幻读:读到的数据是假的。
事务隔离级别包括四个级别:
●读未提交:READ_UNCOMMITTED
○这种隔离级别,存在脏读问题,所谓的脏读(dirty read)表示能够读取到其它事务未提交的 数据。
●读提交:READ_COMMITTED
○解决了脏读问题,其它事务提交之后才能读到,但存在不可重复读问题。
●可重复读:REPEATABLE_READ
○解决了不可重复读,可以达到可重复读效果,只要当前事务不结束,读取到的数据⼀直都
是⼀样的。但存在幻读问题。
●序列化:SERIALIZABLE
○解决了幻读问题,事务排队执⾏。不⽀持并发。
⼤家可以通过⼀个表格来记忆:
测试事务隔离级别:READ_UNCOMMITTED 和 READ_COMMITTED
怎么测试:⼀个service负责插⼊,⼀个service负责查询。负责插⼊的service要模拟延迟。
IsolationService1:
@Service("i1")
public class IsolationService1 {
    @Resource(name="accountDao")
    private AccountDao accountDao;

    //负责查询
    //当前事物可以读取到别的事物没有提交的数据
//    @Transactional(isolation = Isolation.READ_UNCOMMITTED)
    //对方事物提交之后的数据我才能读取到
    @Transactional(isolation = Isolation.READ_COMMITTED)
    public void getByActno(String actno){
        Account account =accountDao.selectByActno(actno);
        System.out.println("查询到的账户信息:"+account);
    }
}
IsolationService2:
@Service("i2")
public class IsolationService2 {

    @Resource(name="accountDao")
    private AccountDao accountDao;

    //负责插入
    @Transactional
    public void save(Account act){
        accountDao.insert(act);
        //睡眠一会
        try {
            Thread.sleep(1000*10);
        } catch (InterruptedException e) {
            e.printStackTrace();
        }
    }
}
@Test
public void testIsolation1(){
ApplicationContext applicationContext=new ClassPathXmlApplicationContext("spring.xml");
IsolationService1 i1 = applicationContext.getBean("i1", IsolationService1.class);
i1.getByActno("act-005");
}
@Test
public void testIsolation2(){
ApplicationContext applicationContext=new ClassPathXmlApplicationContext("spring.xml");
IsolationService2 i2 = applicationContext.getBean("i2", IsolationService2.class);
Account act = new Account("act-005", 500.0);
i2.save(act);
} 通过执⾏结果可以清晰的看出隔离级别不同,执⾏效果不同。
16.3.4 事务超时
@ Transactional ( timeout = 10 )
以上代码表示设置事务的超时时间为 10 秒。
表示超过 10 秒如果该事务中所有的DML语句还没有执⾏完毕的话,最终结果会选择回滚。
默认值- 1 ,表示没有时间限制。
这⾥有个坑,事务的超时时间指的是哪段时间?
在当前事务当中,最后⼀条DML语句执⾏之前的时间。如果最后⼀条DML语句后⾯很有很多业务逻辑,这些业务代码执⾏的时间不被计⼊超时时间。
以下代码的超时不会被计⼊超时时间
@Service("i2")
public class IsolationService2 {

    @Resource(name="accountDao")
    private AccountDao accountDao;

    //负责插入
    @Transactional(timeout = 10)//设置事物超时时间为10
    public void save(Account act){
        accountDao.insert(act);*/
        //睡眠一会
        try {
            Thread.sleep(1000*15);
        } catch (InterruptedException e) {
            e.printStackTrace();
        }
    }
}
以下代码超时时间会被计⼊超时时间
@Service("i2")
public class IsolationService2 {

    @Resource(name="accountDao")
    private AccountDao accountDao;

    //负责插入
    @Transactional(timeout = 10)//设置事物超时时间为10
    public void save(Account act){
       //睡眠一会
        try {
            Thread.sleep(1000*15);
        } catch (InterruptedException e) {
            e.printStackTrace();
        }
        accountDao.insert(act);
    }
}
当然,如果想让整个⽅法的所有代码都计⼊超时时间的话,可以在⽅法最后⼀⾏添加⼀⾏⽆关紧要的 DML语句。
16.3.5 只读事务
@Transactional(readOnly = true)
将当前事务设置为只读事务,在该事务执⾏过程中只允许select语句执⾏,delete insert update均不可执⾏。
该特性的作⽤是: 启动spring的优化策略。提⾼select语句执⾏效率。
如果该事务中确实没有增删改操作,建议设置为只读事务。
设置哪些异常回滚事务
@Transactional(rollbackFor = RuntimeException.class)
表示只有发⽣RuntimeException异常或该异常的⼦类异常才回滚。
设置哪些异常不回滚事务
@Transactional(noRollbackFor = NullPointerException.class)
表示发⽣NullPointerException或该异常的⼦类异常不回滚,其他异常则回滚。
16.3.6 事务的全注解式开发
编写⼀个类来代替配置⽂件,代码如下:
@Configuration//代替spring.xml文件,在这个类当中完成配置
@ComponentScan("com.powernode.bank")//组件扫描
@EnableTransactionManagement//开启事物注解驱动器,开启事物注解。告诉Spring框架,采用注解的方式去控制事物
public class Spring6Config {
    // Spring框架,看到这个@Bean注解后,会调用这个被标注的方法,这个方法的返回值是一个java对象,这个java对象会自动纳入IoC容器管理。
    // 返回的对象就是Spring容器当中的一个Bean了。
    // 并且这个bean的名字是:dataSource
    @Bean(name = "dataSource")
    public DruidDataSource getDataSource(){
        DruidDataSource dataSource = new DruidDataSource();
        dataSource.setDriverClassName("com.mysql.cj.jdbc.Driver");
        dataSource.setUrl("jdbc:mysql://localhost:3306/spring6");
        dataSource.setUsername("root");
        dataSource.setPassword("r38153");
        return dataSource;
    }

    @Bean(name="jdbcTemplate")
    public JdbcTemplate getJdbcTemplate(DataSource dataSource){//Spring在调用这个方法的时候会自动给我们传递过来一个dataSource对象。
        JdbcTemplate jdbcTemplate = new JdbcTemplate();
        jdbcTemplate.setDataSource(dataSource);
        return jdbcTemplate;
    }

    @Bean(name="txManager")
    public DataSourceTransactionManager getDataSourceTransactionManager(DataSource dataSource){
        DataSourceTransactionManager txManager = new DataSourceTransactionManager();
        txManager.setDataSource(dataSource);
        return txManager;
    }
}
测试程序如下:
 @Test
    public void testNoXml(){
        ApplicationContext applicationContext =new AnnotationConfigApplicationContext(Spring6Config.class);
        AccountService accountService = applicationContext.getBean("accountService", AccountService.class);
        try{
            accountService.transfer("act-001","act-002",10000);
            System.out.println("转账成功");
        }catch (Exception e){
            e.printStackTrace();
        }
    }
16.3.7 声明式事务之XML实现方式
配置步骤:
●第⼀步:配置事务管理器
●第⼆步:配置通知
●第三步:配置切⾯
记得添加aspectj的依赖:
    jar


            org.springframework
            spring-context
            6.0.0


            org.springframework
            spring-jdbc
            6.0.0


            mysql
            mysql-connector-java
            8.0.31


            junit
            junit
            4.12
            test


            com.alibaba
            druid
            1.2.13


            jakarta.annotation
            jakarta.annotation-api
            2.1.1


            org.springframework
            spring-aspects
            6.0.11
Spring配置⽂件如下:
记得添加aop的命名空间。
Account:
public class Account {
    private String actno;
    private Double balance;

    public Account(){}

    public Account(String actno, Double balance) {
        this.actno = actno;
        this.balance = balance;
    }
//get.set,toString方法
}
AccountDao:
/*
专门负责账户信息的CRUD操作
DAO中只执行SQL语句,没有任何业务逻辑
也就是说DAO不和业务挂钩。
*/
public interface AccountDao {
    //根据账号查询信息
    Account selectByActno(String actno);

    //更新账户信息
    int update(Account act);
}
AccountDaoImpl:
@Repository("accountDao")
public class AccountDaoImpl implements AccountDao {
    @Resource(name="jdbcTemplate")
    private JdbcTemplate jdbcTemplate;

    @Override
    public Account selectByActno(String actno) {
        String sql = "select actno,balance from t_act where actno=?";
        Account account = jdbcTemplate.queryForObject(sql, new BeanPropertyRowMapper<>(Account.class), actno);
        return account;
    }

    @Override
    public int update(Account act) {
        String sql = "update t_act set balance=? where actno=?";
        int count = jdbcTemplate.update(sql, act.getBalance(),act.getActno());
        return count;
    }
}
AccountService:
/*
* 业务接口
* 事物就是在这个接口下控制的
* */
public interface AccountService {
    //转账业务方法
    void transfer(String fromActno,String toActno,double money);
}
AccountServiceImpl:
@Service("accountService")
public class AccountServiceImpl implements AccountService {
    @Resource(name="accountDao")
    private AccountDao accountDao;

    //控制事物,因为在这个方法中要完成所有的转账业务
    @Override
    public void transfer(String fromActno, String toActno, double money) {
        //第一步:开启事物

        //第二步:执行核心业务逻辑
        //查询转出账户的余额是否充足
        Account fromAct = accountDao.selectByActno(fromActno);
        if (fromAct.getBalance()
测试程序:
public class BankTxTest {
    @Test
    public void testNoAnnotation() {
        ApplicationContext applicationContext = new ClassPathXmlApplicationContext("spring.xml");
        AccountService accountService = applicationContext.getBean("accountService", AccountService.class);
        try {
            accountService.transfer("act-001", "act-002", 10000.0);
            System.out.println("转账成功!");
        } catch (Exception e) {
            e.printStackTrace();
        }
    }
}⼗七、Spring6整合JUnit5
17.1 Spring对JUnit4的⽀持
准备⼯作:
    jar


            org.springframework
            spring-context
            6.0.0


            junit
            junit
            4.12
            test


            org.springframework
            spring-test

            6.0.0
User:
@Component
public class User {
    @Value("张三")
    private String name;

    @Override
    public String toString() {
        return "User{" +
                "name='" + name + '\'' +
                '}';
    }

    public String getName() {
        return name;
    }

    public void setName(String name) {
        this.name = name;
    }

    public User(){

    }

    public User(String name) {
        this.name = name;
    }
}
spring.xml:
程序测试:
@RunWith(SpringJUnit4ClassRunner.class)
@ContextConfiguration("classpath:spring.xml")
public class SpringJUnit4Test {
    @Autowired
    private User user;

    @Test
    public void testUser2(){
        System.out.println(user.getName());
    }

    @Test
    public void testUser(){
        ApplicationContext applicationContext = new ClassPathXmlApplicationContext("spring.xml");
        User user = applicationContext.getBean("user", User.class);
        System.out.println(user.getName());
    }
}17.2 Spring对JUnit5的⽀持
引⼊JUnit5的依赖,Spring对JUnit⽀持的依赖还是:spring-test,如下:
            org.junit.jupiter
            junit-jupiter
            5.9.0
            test
程序测试:
@ExtendWith(SpringExtension.class)
@ContextConfiguration("classpath:spring.xml")
public class SpringJUnit5Test {
    @Autowired
    private User user;

    @Test
    public void testUser(){
        System.out.println(user.getName());
    }
}
在JUnit 5 当中,可以使⽤Spring提供的以下两个注解,标注到单元测试类上,这样在类当中就可以使⽤
@Autowired注解了。
@ExtendWith(SpringExtension.class)
@ContextConfiguration("classpath:spring.xml")
