【iOS】Masonry的基本使用
文章目录
- 前言
- 一、使用Masonry的原因
- 二、约束的常识
- 三、Masonry的简单使用
- 四、Masonry的用例
- 总结
前言
暑假安装了cocoapods,简单使用其调用了SVGKit,但是没有学习Masonry,特此总结博客记录Masonry的学习
一、使用Masonry的原因
Masonry是一个轻量级的布局框架。通过链式调用的方式来描述布局,是排版代码更加简洁易读。masonry支持iOS和Mac OS X。
在iOS开发中,UI是我们必须设计的,在先前设计UI的过程中我们往往会通过计算来确定各个控件间的相对位置,也就是使用frame来对我们的控件进行位置确定,如果对于相对简单的UI,使用frame无疑会提高我们的性能,但是对于复杂的UI来说,使用frame来确定控件的位置就显得十分繁琐了。因此我们就需要用到我们的AutoLayout布局,但是使用传统的AutoLayout布局显得十分繁琐,我们可以来看一个例子:
- 系统给的自动布局(AutoLayout)的API
+(instancetype)constraintWithItem:(id)view1
                       attribute:(NSLayoutAttribute)attr1
                       relatedBy:(NSLayoutRelation)relation
                          toItem:(nullable id)view2
                       attribute:(NSLayoutAttribute)attr2
                      multiplier:(CGFloat)multiplier
                        constant:(CGFloat)c;
- 传统代码中使用系统API进行布局
- (void)viewDidLoad {
    [super viewDidLoad];
    // Do any additional setup after loading the view, typically from a nib.
    self.view.backgroundColor = [UIColor yellowColor];


    UIView *subView = [[UIView alloc] init];
    subView.backgroundColor = [UIColor redColor];
    // 在设置约束前,先将子视图添加进来
    [self.view addSubview:subView];

    // 使用autoLayout约束,禁止将AutoresizingMask转换为约束
    [subView setTranslatesAutoresizingMaskIntoConstraints:NO];

    // 设置subView相对于VIEW的上左下右各40像素
    NSLayoutConstraint *constraintTop = [NSLayoutConstraint constraintWithItem:subView attribute:NSLayoutAttributeTop relatedBy:NSLayoutRelationEqual toItem:self.view attribute:NSLayoutAttributeTop multiplier:1.0 constant:40];
    NSLayoutConstraint *constraintLeft = [NSLayoutConstraint constraintWithItem:subView attribute:NSLayoutAttributeLeft relatedBy:NSLayoutRelationEqual toItem:self.view attribute:NSLayoutAttributeLeft multiplier:1.0 constant:40];
    // 由于iOS坐标系的原点在左上角,所以设置下,右边距使用负值
    NSLayoutConstraint *constraintBottom = [NSLayoutConstraint constraintWithItem:subView attribute:NSLayoutAttributeBottom relatedBy:NSLayoutRelationEqual toItem:self.view attribute:NSLayoutAttributeBottom multiplier:1.0 constant:-40];
    NSLayoutConstraint *constraintRight = [NSLayoutConstraint constraintWithItem:subView attribute:NSLayoutAttributeRight relatedBy:NSLayoutRelationEqual toItem:self.view attribute:NSLayoutAttributeRight multiplier:1.0 constant:-40];

    // 将四条约束加进数组中
    NSArray *array = [NSArray arrayWithObjects:constraintTop, constraintLeft, constraintBottom, constraintRight, nil];
    // 把约束条件设置到父视图的Contraints中
    [self.view addConstraints:array];
}
可见使用传统的api进行约束十分繁琐,因此Mosonry应运而生,我们可以通过使用Mosonry简化我们的AutoLayout布局

二、约束的常识
在iOS中,约束是一种用于定义视图之间关系的规则,以便在各种屏幕尺寸和设备方向下,自动调整界面布局。iOS的自动布局系统基于一些核心原理来实现这些约束。
- 自动布局引擎: iOS的自动布局引擎负责解析视图之间的约束,计算视图的位置和尺寸,以确保它们正确地适应屏幕。这个引擎在视图层次结构中自动运行,根据约束条件来计算视图的实际位置和大小。
- 优先级: 约束可以分配优先级,用于处理可能发生冲突的约束。当不同约束之间存在冲突时,系统会根据约束的优先级来决定哪些约束应该被保留,哪些应该被抛弃。这使得开发者可以在特定情况下指定应该受到更高重视的约束。
- 约束解决: 约束系统尝试解决视图层次结构中的所有约束,以找到一个满足所有条件的解决方案。它通过不断迭代来调整视图的位置和尺寸,直到满足所有的约束条件。有时候,可能会存在无法满足所有约束的情况,这时需要进行调整或放宽约束条件。
- 内在内容尺寸: 自动布局系统还考虑视图的内在内容尺寸,例如文本标签的文本大小。当视图具有内在内容时,系统会根据内容的大小自动调整视图的尺寸。
- 基于框架的约束: 在iOS中,约束通常基于视图的框架,包括左边距、右边距、顶边距、底边距、宽度和高度等。这些约束会在不同的设备和屏幕方向下进行自动调整,以适应不同的布局需求。
- 可伸缩约束: 一些约束可以设置为可伸缩的,使得视图在不同尺寸下能够以比例方式进行调整。这对于创建响应式布局非常有用。
iOS中的约束原理基于自动布局引擎和约束系统,通过定义视图之间的关系,以自动适应不同的屏幕尺寸和方向。这种方法使得开发者能够更灵活、更简便地创建适应多种设备的用户界面。
三、Masonry的简单使用
Masonry的添加布局主要有三个,三个方法的作用分别是创建约束;更新某个约束,其他约束不变;移除先前所有约束,添加新到的约束。这三个方法根据场景需要合理使用,否则可能造成内存问题
- (NSArray *)mas_makeConstraints:(void(NS_NOESCAPE ^)(MASConstraintMaker *make))block;

- (NSArray *)mas_updateConstraints:(void(NS_NOESCAPE ^)(MASConstraintMaker *make))block;

- (NSArray *)mas_remakeConstraints:(void(NS_NOESCAPE ^)(MASConstraintMaker *make))block;
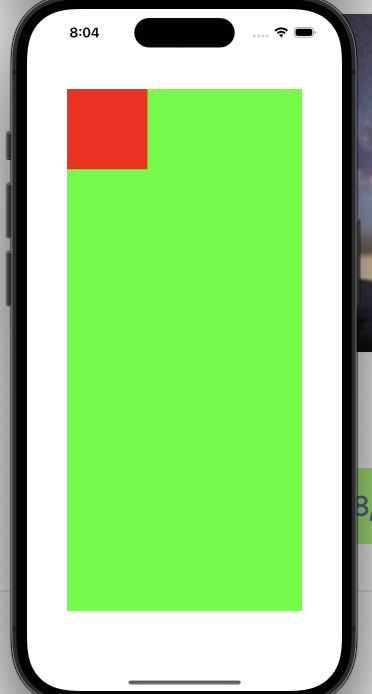
假如我们现在有一个子视图,我们需要对其添加约束,我们可以使用如下代码:
    [_firstview mas_makeConstraints:^(MASConstraintMaker *make) {
        make.left.mas_equalTo(50);//等价于 make.left.mas_equalTo(demoView.superview.mas_left).mas_offset(50);
        make.right.mas_equalTo(-50);//等价于 make.right.mas_equalTo(demoView.superview.mas_right).mas_offset(-50);
        make.top.mas_equalTo(100);//等价于 make.top.mas_equalTo(demoView.superview.mas_top).mas_offset(100);
        make.bottom.mas_equalTo(-100);//等价于 make.bottom.mas_equalTo(demoView.superview.mas_bottom).mas_offset(-100);
    }];
然后将我们的子视图添加到我们的self.view中,就能得到如下视图:

除了上述这种写法之外,我们对还有另外几种Masonry的写法:
- 第一种。mas_equalTo()只需要传入相对的约束的视图,不需要指定约束边,默认取前面第一个需要添加约束的边
    UIView *demoView = [[UIView alloc] init];
    demoView.backgroundColor = UIColor.greenColor;
    [self.view addSubview:demoView];
    [demoView mas_makeConstraints:^(MASConstraintMaker *make) {
        make.left.mas_equalTo(self.view).mas_offset(50);//等价于 make.left.mas_equalTo(self.view.mas_left).mas_offset(50);
        make.right.mas_equalTo(self.view).mas_offset(-50);//等价于 make.right.mas_equalTo(self.view.mas_right).mas_offset(-50);
        make.top.mas_equalTo(self.view).mas_offset(100);//等价于 make.top.mas_equalTo(self.view.mas_top).mas_offset(100);
        make.bottom.mas_equalTo(self.view).mas_offset(-100);//等价于 make.bottom.mas_equalTo(self.view.mas_bottom).mas_offset(-100);
    }];
与之类似的写法还有这一种:
        make.top.equalTo(self.view).with.offset(10);
        make.left.equalTo(self.view).with.offset(10);
        make.bottom.equalTo(self.view).with.offset(-10);
		make.right.equalTo(self.view).with.offset(-10);
这两种写法都是自行确认约束边来对我们的控件进行布局
- 第二种。mas_equalTo() 传入一个值,这个值就是相对于依赖父视图对应相同约束的偏移量
    UIView *demoView = [[UIView alloc] init];
    demoView.backgroundColor = UIColor.greenColor;
    [self.view addSubview:demoView];
    [demoView mas_makeConstraints:^(MASConstraintMaker *make) {
        make.left.mas_equalTo(50);//等价于 make.left.mas_equalTo(demoView.superview.mas_left).mas_offset(50);
        make.right.mas_equalTo(-50);//等价于 make.right.mas_equalTo(demoView.superview.mas_right).mas_offset(-50);
        make.top.mas_equalTo(100);//等价于 make.top.mas_equalTo(demoView.superview.mas_top).mas_offset(100);
        make.bottom.mas_equalTo(-100);//等价于 make.bottom.mas_equalTo(demoView.superview.mas_bottom).mas_offset(-100);
    }];
如果只是简单的父视图中嵌套子视图,这种简单的写法可以做到,但是对于相对复杂的UI,例如计算器,就需要使用第一种写法了
四、Masonry的用例
我们接下来简单给出一个使用Masonry实现布局的例子:
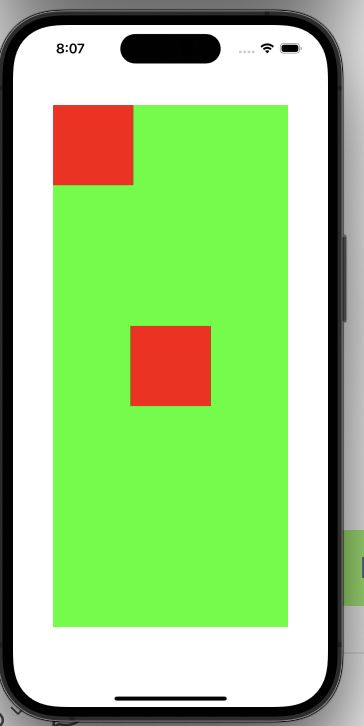
我们在上文中简单给出了一个使用Masonry约束的视图,我们现在将另一个视图作为子视图添加到其中
[_firstview addSubview:_secondview];
然后利用添加约束
    [_secondview mas_makeConstraints:^(MASConstraintMaker *make) {
        make.left.mas_equalTo(0);
        make.top.mas_equalTo(0);
        make.height.mas_equalTo(100);
        make.width.mas_equalTo(100);
    }];
再上文中已经简单介绍了这种Masonry的约束写法,这里不再赘述,最后的效果如图:

另外我们还可以在其居中位置添加控件:
    [_thirdview mas_makeConstraints:^(MASConstraintMaker *make) {
        make.center.mas_equalTo(0);
        make.height.mas_equalTo(100);
        make.width.mas_equalTo(100);
    }];
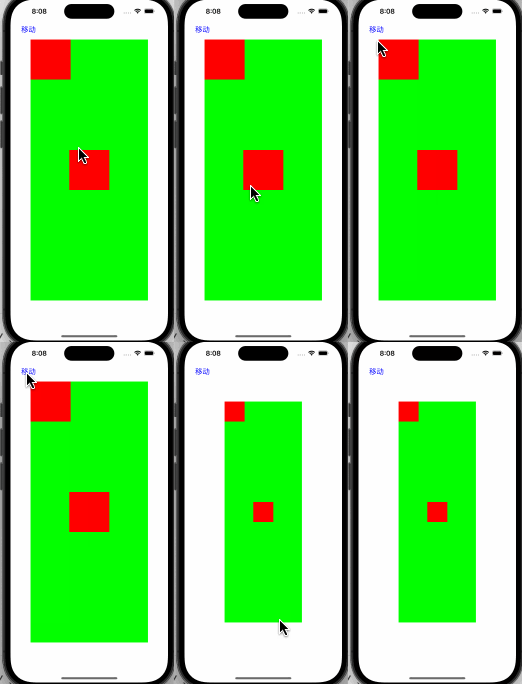
还可以通过改变父视图的约束从而使其子视图位置发生改变:
(上方移动是一个UIButtom,press则是事件函数)
- (void)press {
    [_firstview mas_updateConstraints:^(MASConstraintMaker *make) {
        make.left.mas_equalTo(100);//等价于 make.left.mas_equalTo(demoView.superview.mas_left).mas_offset(50);
        make.right.mas_equalTo(-100);//等价于 make.right.mas_equalTo(demoView.superview.mas_right).mas_offset(-50);
        make.top.mas_equalTo(150);//等价于 make.top.mas_equalTo(demoView.superview.mas_top).mas_offset(100);
        make.bottom.mas_equalTo(-150);//等价于 make.bottom.mas_equalTo(demoView.superview.mas_bottom).mas_offset(-100);
    }];
    [_secondview mas_updateConstraints:^(MASConstraintMaker *make) {
        make.height.mas_equalTo(50);
        make.width.mas_equalTo(50);
    }];
    [_thirdview mas_updateConstraints:^(MASConstraintMaker *make) {
//        make.center.mas_equalTo(0);
        make.height.mas_equalTo(50);
        make.width.mas_equalTo(50);
    }];
}
总结
于此基础的Masonry的使用已经基本讲解完了,后续在写计算器的时候会更多的使用到Masonry,一些更深层次的用法会在后面的博客中讲解
另外需要记住的一点是使用Masonry会影响我们的性能,frame往往是最简单高效的,在实际的设计中我们可以将这两种布局方式进行混合使用

