- Long类型前后端数据不一致
igotyback
前端
响应给前端的数据浏览器控制台中response中看到的Long类型的数据是正常的到前端数据不一致前后端数据类型不匹配是一个常见问题,尤其是当后端使用Java的Long类型(64位)与前端JavaScript的Number类型(最大安全整数为2^53-1,即16位)进行数据交互时,很容易出现精度丢失的问题。这是因为JavaScript中的Number类型无法安全地表示超过16位的整数。为了解决这个问
- swagger访问路径
igotyback
swagger
Swagger2.x版本访问地址:http://{ip}:{port}/{context-path}/swagger-ui.html{ip}是你的服务器IP地址。{port}是你的应用服务端口,通常为8080。{context-path}是你的应用上下文路径,如果应用部署在根路径下,则为空。Swagger3.x版本对于Swagger3.x版本(也称为OpenAPI3)访问地址:http://{ip
- html 中如何使用 uniapp 的部分方法
某公司摸鱼前端
htmluni-app前端
示例代码:Documentconsole.log(window);效果展示:好了,现在就可以uni.使用相关的方法了
- 四章-32-点要素的聚合
彩云飘过
本文基于腾讯课堂老胡的课《跟我学Openlayers--基础实例详解》做的学习笔记,使用的openlayers5.3.xapi。源码见1032.html,对应的官网示例https://openlayers.org/en/latest/examples/cluster.htmlhttps://openlayers.org/en/latest/examples/earthquake-clusters.
- DIV+CSS+JavaScript技术制作网页(旅游主题网页设计与制作)云南大理
STU学生网页设计
网页设计期末网页作业html静态网页html5期末大作业网页设计web大作业
️精彩专栏推荐作者主页:【进入主页—获取更多源码】web前端期末大作业:【HTML5网页期末作业(1000套)】程序员有趣的告白方式:【HTML七夕情人节表白网页制作(110套)】文章目录二、网站介绍三、网站效果▶️1.视频演示2.图片演示四、网站代码HTML结构代码CSS样式代码五、更多源码二、网站介绍网站布局方面:计划采用目前主流的、能兼容各大主流浏览器、显示效果稳定的浮动网页布局结构。网站程
- 【加密社】Solidity 中的事件机制及其应用
加密社
闲侃区块链智能合约区块链
加密社引言在Solidity合约开发过程中,事件(Events)是一种非常重要的机制。它们不仅能够让开发者记录智能合约的重要状态变更,还能够让外部系统(如前端应用)监听这些状态的变化。本文将详细介绍Solidity中的事件机制以及如何利用不同的手段来触发、监听和获取这些事件。事件存储的地方当我们在Solidity合约中使用emit关键字触发事件时,该事件会被记录在区块链的交易收据中。具体而言,事件
- 关于城市旅游的HTML网页设计——(旅游风景云南 5页)HTML+CSS+JavaScript
二挡起步
web前端期末大作业javascripthtmlcss旅游风景
⛵源码获取文末联系✈Web前端开发技术描述网页设计题材,DIV+CSS布局制作,HTML+CSS网页设计期末课程大作业|游景点介绍|旅游风景区|家乡介绍|等网站的设计与制作|HTML期末大学生网页设计作业,Web大学生网页HTML:结构CSS:样式在操作方面上运用了html5和css3,采用了div+css结构、表单、超链接、浮动、绝对定位、相对定位、字体样式、引用视频等基础知识JavaScrip
- HTML网页设计制作大作业(div+css) 云南我的家乡旅游景点 带文字滚动
二挡起步
web前端期末大作业web设计网页规划与设计htmlcssjavascriptdreamweaver前端
Web前端开发技术描述网页设计题材,DIV+CSS布局制作,HTML+CSS网页设计期末课程大作业游景点介绍|旅游风景区|家乡介绍|等网站的设计与制作HTML期末大学生网页设计作业HTML:结构CSS:样式在操作方面上运用了html5和css3,采用了div+css结构、表单、超链接、浮动、绝对定位、相对定位、字体样式、引用视频等基础知识JavaScript:做与用户的交互行为文章目录前端学习路线
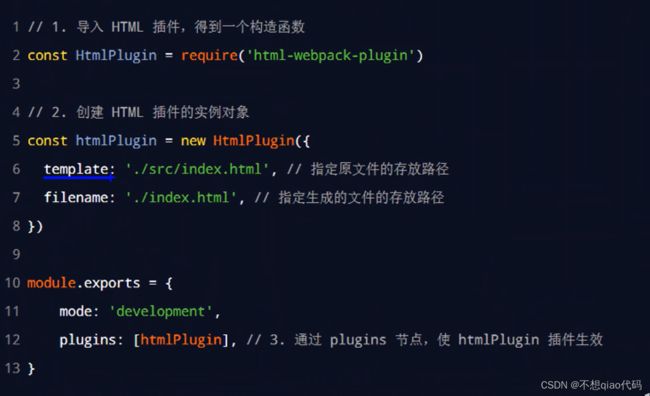
- webpack图片等资源的处理
dmengmeng
需要的loaderfile-loader(让我们可以引入这些资源文件)url-loader(其实是file-loader的二次封装)img-loader(处理图片所需要的)在没有使用任何处理图片的loader之前,比如说css中用到了背景图片,那么最后打包会报错的,因为他没办法处理图片。其实你只想能够使用图片的话。只加一个file-loader就可以,打开网页能准确看到图片。{test:/\.(p
- springboot+vue项目实战一-创建SpringBoot简单项目
苹果酱0567
面试题汇总与解析springboot后端java中间件开发语言
这段时间抽空给女朋友搭建一个个人博客,想着记录一下建站的过程,就当做笔记吧。虽然复制zjblog只要一个小时就可以搞定一个网站,或者用cms系统,三四个小时就可以做出一个前后台都有的网站,而且想做成啥样也都行。但是就是要从新做,自己做的意义不一样,更何况,俺就是专门干这个的,嘿嘿嘿要做一个网站,而且从零开始,首先呢就是技术选型了,经过一番思量决定选择-SpringBoot做后端,前端使用Vue做一
- 博客网站制作教程
2401_85194651
javamaven
首先就是技术框架:后端:Java+SpringBoot数据库:MySQL前端:Vue.js数据库连接:JPA(JavaPersistenceAPI)1.项目结构blog-app/├──backend/│├──src/main/java/com/example/blogapp/││├──BlogApplication.java││├──config/│││└──DatabaseConfig.java
- 00. 这里整理了最全的爬虫框架(Java + Python)
有一只柴犬
爬虫系列爬虫javapython
目录1、前言2、什么是网络爬虫3、常见的爬虫框架3.1、java框架3.1.1、WebMagic3.1.2、Jsoup3.1.3、HttpClient3.1.4、Crawler4j3.1.5、HtmlUnit3.1.6、Selenium3.2、Python框架3.2.1、Scrapy3.2.2、BeautifulSoup+Requests3.2.3、Selenium3.2.4、PyQuery3.2
- 详解:如何设计出健壮的秒杀系统?
夜空_2cd3
作者:Yrion博客园:cnblogs.com/wyq178/p/11261711.html前言:秒杀系统相信很多人见过,比如京东或者淘宝的秒杀,小米手机的秒杀。那么秒杀系统的后台是如何实现的呢?我们如何设计一个秒杀系统呢?对于秒杀系统应该考虑哪些问题?如何设计出健壮的秒杀系统?本期我们就来探讨一下这个问题:image目录一:****秒杀系统应该考虑的问题二:****秒杀系统的设计和技术方案三:*
- 最简单将静态网页挂载到服务器上(不用nginx)
全能全知者
服务器nginx运维前端html笔记
最简单将静态网页挂载到服务器上(不用nginx)如果随便弄个静态网页挂在服务器都要用nignx就太麻烦了,所以直接使用Apache来搭建一些简单前端静态网页会相对方便很多检查Web服务器服务状态:sudosystemctlstatushttpd#ApacheWeb服务器如果发现没有安装web服务器:安装Apache:sudoyuminstallhttpd启动Apache:sudosystemctl
- 补充元象二面
Redstone Monstrosity
前端面试
1.请尽可能详细地说明,防抖和节流的区别,应用场景?你的回答中不要写出示例代码。防抖(Debounce)和节流(Throttle)是两种常用的前端性能优化技术,它们的主要区别在于如何处理高频事件的触发。以下是防抖和节流的区别和应用场景的详细说明:防抖和节流的定义防抖:在一段时间内,多次执行变为只执行最后一次。防抖的原理是,当事件被触发后,设置一个延迟定时器。如果在这个延迟时间内事件再次被触发,则重
- 微信小程序开发注意事项
jun778895
微信小程序小程序
微信小程序开发是一个融合了前端开发、用户体验设计、后端服务(可选)以及微信小程序平台特性的综合性项目。这里,我将详细介绍一个典型的小程序开发项目的全过程,包括项目规划、设计、开发、测试及部署上线等各个环节,并尽量使内容达到或超过2000字的要求。一、项目规划1.1项目背景与目标假设我们要开发一个名为“智慧校园助手”的微信小程序,旨在为学生提供一站式校园生活服务,包括课程表查询、图书馆座位预约、食堂
- 字节二面
Redstone Monstrosity
前端面试
1.假设你是正在面试前端开发工程师的候选人,面试官让你详细说出你上一段实习过程的收获和感悟。在上一段实习过程中,我获得了宝贵的实践经验和深刻的行业洞察,以下是我的主要收获和感悟:一、专业技能提升框架应用熟练度:通过实际项目,我深入掌握了React、Vue等前端框架的使用,不仅提升了编码效率,还学会了如何根据项目需求选择合适的框架。问题解决能力:在实习期间,我遇到了许多预料之外的技术难题。通过查阅文
- 斟一小组鸡血视频
和自己一起成长
http://m.v.qq.com/play/play.html?coverid=&vid=c0518henl2a&ptag=2_6.0.0.14297_copy有一种努力叫做靠自己http://m.v.qq.com/play/play.html?coverid=&vid=i0547o426g4&ptag=2_6.0.0.14297_copy世界最励志短片https://v.qq.com/x/pa
- 前端代码上传文件
余生逆风飞翔
前端javascript开发语言
点击上传文件import{ElNotification}from'element-plus'import{API_CONFIG}from'../config/index.js'import{UploadFilled}from'@element-plus/icons-vue'import{reactive}from'vue'import{BASE_URL}from'../config/index'i
- Dockerfile命令详解之 FROM
清风怎不知意
容器化java前端javascript
许多同学不知道Dockerfile应该如何写,不清楚Dockerfile中的指令分别有什么意义,能达到什么样的目的,接下来我将在容器化专栏中详细的为大家解释每一个指令的含义以及用法。专栏订阅传送门https://blog.csdn.net/qq_38220908/category_11989778.html指令不区分大小写。但是,按照惯例,它们应该是大写的,以便更容易地将它们与参数区分开来。(引用
- 详解“c:/work/src/components/a/b.vue“‘ has no default export报错原因
hw_happy
开发语言前端vue.jsjavascript
前情提要在一个vue文件中需要引入定义的b.vue文件,但是提示b文件没有默认导出,对于vue2文件来说有exportdefault,在中,所有定义的变量、函数和组件都会自动被视为默认导出的组件内容。因此,不需要显式地使用exportdefault来导出组件。但是在我引用这个文件的时候还是提示了这个错误,原来是我的项目使用了ts和vite\webpack,因为TypeScript和Vue的默认导出
- 《HTML 与 CSS—— 响应式设计》
陈在天box
htmlcss前端
一、引言在当今数字化时代,人们使用各种不同的设备访问互联网,包括智能手机、平板电脑、笔记本电脑和台式机等。为了确保网站在不同设备上都能提供良好的用户体验,响应式设计成为了网页开发的关键。HTML和CSS作为网页开发的基础技术,在实现响应式设计方面发挥着重要作用。本文将深入探讨HTML与CSS中的响应式设计原理、方法和最佳实践。二、响应式设计的概念与重要性(一)概念响应式设计是一种网页设计方法,旨在
- 【C语言】- 自定义类型:结构体、枚举、联合
Cavalier_01
C语言
【C语言】:操作符(https://mp.csdn.net/editor/html/115218055)数据类型(https://mp.csdn.net/editor/html/115219664)自定义类型:结构体、枚举、联合(https://mp.csdn.net/editor/html/115373785)变量、常量(https://mp.csdn.net/editor/html/11523
- uniapp实现动态标记效果详细步骤【前端开发】
2401_85123349
uni-app
第二个点在于实现将已经被用户标记的内容在下一次获取后刷新它的状态为已标记。这是什么意思呢?比如说上面gif图中的这些人物对象,有一些已被该用户添加为关心,那么当用户下一次进入该页面时,这些已经被添加关心的对象需要以“红心”状态显现出来。这个点的难度还不算大,只需要在每一次获取后端的内容后对标记对象进行状态更新即可。II.动态标记效果实现思路和步骤首先,整体的思路是利用动态类名对不同的元素进行选择。
- html+css网页设计 旅游网站首页1个页面
html+css+js网页设计
htmlcss旅游
html+css网页设计旅游网站首页1个页面网页作品代码简单,可使用任意HTML辑软件(如:Dreamweaver、HBuilder、Vscode、Sublime、Webstorm、Text、Notepad++等任意html编辑软件进行运行及修改编辑等操作)。获取源码1,访问该网站https://download.csdn.net/download/qq_42431718/897527112,点击
- spring mvc @RequestBody String类型参数
zoyation
spring-mvcspringmvc
通过如下配置:text/html;charset=UTF-8application/json;charset=UTF-8在springmvc的Controller层使用@RequestBody接收Content-Type为application/json的数据时,默认支持Map方式和对象方式参数@RequestMapping(value="/{code}/saveUser",method=Requ
- ubuntu安装opencv最快的方法
Derek重名了
最快方法,当然不能太多文字$sudoapt-getinstallpython-opencv借助python就可以把ubuntu的opencv环境搞起来,非常快非常容易参考:https://docs.opencv.org/trunk/d2/de6/tutorial_py_setup_in_ubuntu.html
- 处理标签包裹的字符串,并取出前250字符
周bro
前端javascript开发语言
//假设这是你的HTML字符串varhtmlString=`这是一个段落。这是一个标题这是另一个段落,包含一些链接。`;//解析HTML字符串并提取文本functionextractTextFromHTML(html){varparser=newDOMParser();vardoc=parser.parseFromString(html,"text/html");vartextContent=do
- 360前端星计划-动画可以这么玩
马小蜗
动画的基本原理定时器改变对象的属性根据新的属性重新渲染动画functionupdate(context){//更新属性}constticker=newTicker();ticker.tick(update,context);动画的种类1、JavaScript动画操作DOMCanvas2、CSS动画transitionanimation3、SVG动画SMILJS动画的优缺点优点:灵活度、可控性、性能
- h5小游戏定制开发
红匣子实力推荐
随着科技的不断发展,移动互联网已经成为人们生活中不可或缺的一部分。在这个背景下,H5小游戏应运而生,为人们带来了丰富的娱乐体验。H5小游戏定制开发作为一种新兴的游戏开发方式,正逐渐受到市场的关注和青睐。那么,什么是H5小游戏定制开发呢?它又具有哪些特点和优势呢?让我们一起来深入了解一下。首先,我们来了解一下H5小游戏的基本概念。H5小游戏是一种基于HTML5技术的游戏,可以在移动端、PC端等多平台
- mondb入手
木zi_鸣
mongodb
windows 启动mongodb 编写bat文件,
mongod --dbpath D:\software\MongoDBDATA
mongod --help 查询各种配置
配置在mongob
打开批处理,即可启动,27017原生端口,shell操作监控端口 扩展28017,web端操作端口
启动配置文件配置,
数据更灵活
- 大型高并发高负载网站的系统架构
bijian1013
高并发负载均衡
扩展Web应用程序
一.概念
简单的来说,如果一个系统可扩展,那么你可以通过扩展来提供系统的性能。这代表着系统能够容纳更高的负载、更大的数据集,并且系统是可维护的。扩展和语言、某项具体的技术都是无关的。扩展可以分为两种:
1.
- DISPLAY变量和xhost(原创)
czmmiao
display
DISPLAY
在Linux/Unix类操作系统上, DISPLAY用来设置将图形显示到何处. 直接登陆图形界面或者登陆命令行界面后使用startx启动图形, DISPLAY环境变量将自动设置为:0:0, 此时可以打开终端, 输出图形程序的名称(比如xclock)来启动程序, 图形将显示在本地窗口上, 在终端上输入printenv查看当前环境变量, 输出结果中有如下内容:DISPLAY=:0.0
- 获取B/S客户端IP
周凡杨
java编程jspWeb浏览器
最近想写个B/S架构的聊天系统,因为以前做过C/S架构的QQ聊天系统,所以对于Socket通信编程只是一个巩固。对于C/S架构的聊天系统,由于存在客户端Java应用,所以直接在代码中获取客户端的IP,应用的方法为:
String ip = InetAddress.getLocalHost().getHostAddress();
然而对于WEB
- 浅谈类和对象
朱辉辉33
编程
类是对一类事物的总称,对象是描述一个物体的特征,类是对象的抽象。简单来说,类是抽象的,不占用内存,对象是具体的,
占用存储空间。
类是由属性和方法构成的,基本格式是public class 类名{
//定义属性
private/public 数据类型 属性名;
//定义方法
publ
- android activity与viewpager+fragment的生命周期问题
肆无忌惮_
viewpager
有一个Activity里面是ViewPager,ViewPager里面放了两个Fragment。
第一次进入这个Activity。开启了服务,并在onResume方法中绑定服务后,对Service进行了一定的初始化,其中调用了Fragment中的一个属性。
super.onResume();
bindService(intent, conn, BIND_AUTO_CREATE);
- base64Encode对图片进行编码
843977358
base64图片encoder
/**
* 对图片进行base64encoder编码
*
* @author mrZhang
* @param path
* @return
*/
public static String encodeImage(String path) {
BASE64Encoder encoder = null;
byte[] b = null;
I
- Request Header简介
aigo
servlet
当一个客户端(通常是浏览器)向Web服务器发送一个请求是,它要发送一个请求的命令行,一般是GET或POST命令,当发送POST命令时,它还必须向服务器发送一个叫“Content-Length”的请求头(Request Header) 用以指明请求数据的长度,除了Content-Length之外,它还可以向服务器发送其它一些Headers,如:
- HttpClient4.3 创建SSL协议的HttpClient对象
alleni123
httpclient爬虫ssl
public class HttpClientUtils
{
public static CloseableHttpClient createSSLClientDefault(CookieStore cookies){
SSLContext sslContext=null;
try
{
sslContext=new SSLContextBuilder().l
- java取反 -右移-左移-无符号右移的探讨
百合不是茶
位运算符 位移
取反:
在二进制中第一位,1表示符数,0表示正数
byte a = -1;
原码:10000001
反码:11111110
补码:11111111
//异或: 00000000
byte b = -2;
原码:10000010
反码:11111101
补码:11111110
//异或: 00000001
- java多线程join的作用与用法
bijian1013
java多线程
对于JAVA的join,JDK 是这样说的:join public final void join (long millis )throws InterruptedException Waits at most millis milliseconds for this thread to die. A timeout of 0 means t
- Java发送http请求(get 与post方法请求)
bijian1013
javaspring
PostRequest.java
package com.bijian.study;
import java.io.BufferedReader;
import java.io.DataOutputStream;
import java.io.IOException;
import java.io.InputStreamReader;
import java.net.HttpURL
- 【Struts2二】struts.xml中package下的action配置项默认值
bit1129
struts.xml
在第一部份,定义了struts.xml文件,如下所示:
<!DOCTYPE struts PUBLIC
"-//Apache Software Foundation//DTD Struts Configuration 2.3//EN"
"http://struts.apache.org/dtds/struts
- 【Kafka十三】Kafka Simple Consumer
bit1129
simple
代码中关于Host和Port是割裂开的,这会导致单机环境下的伪分布式Kafka集群环境下,这个例子没法运行。
实际情况是需要将host和port绑定到一起,
package kafka.examples.lowlevel;
import kafka.api.FetchRequest;
import kafka.api.FetchRequestBuilder;
impo
- nodejs学习api
ronin47
nodejs api
NodeJS基础 什么是NodeJS
JS是脚本语言,脚本语言都需要一个解析器才能运行。对于写在HTML页面里的JS,浏览器充当了解析器的角色。而对于需要独立运行的JS,NodeJS就是一个解析器。
每一种解析器都是一个运行环境,不但允许JS定义各种数据结构,进行各种计算,还允许JS使用运行环境提供的内置对象和方法做一些事情。例如运行在浏览器中的JS的用途是操作DOM,浏览器就提供了docum
- java-64.寻找第N个丑数
bylijinnan
java
public class UglyNumber {
/**
* 64.查找第N个丑数
具体思路可参考 [url] http://zhedahht.blog.163.com/blog/static/2541117420094245366965/[/url]
*
题目:我们把只包含因子
2、3和5的数称作丑数(Ugly Number)。例如6、8都是丑数,但14
- 二维数组(矩阵)对角线输出
bylijinnan
二维数组
/**
二维数组 对角线输出 两个方向
例如对于数组:
{ 1, 2, 3, 4 },
{ 5, 6, 7, 8 },
{ 9, 10, 11, 12 },
{ 13, 14, 15, 16 },
slash方向输出:
1
5 2
9 6 3
13 10 7 4
14 11 8
15 12
16
backslash输出:
4
3
- [JWFD开源工作流设计]工作流跳跃模式开发关键点(今日更新)
comsci
工作流
既然是做开源软件的,我们的宗旨就是给大家分享设计和代码,那么现在我就用很简单扼要的语言来透露这个跳跃模式的设计原理
大家如果用过JWFD的ARC-自动运行控制器,或者看过代码,应该知道在ARC算法模块中有一个函数叫做SAN(),这个函数就是ARC的核心控制器,要实现跳跃模式,在SAN函数中一定要对LN链表数据结构进行操作,首先写一段代码,把
- redis常见使用
cuityang
redis常见使用
redis 通常被认为是一个数据结构服务器,主要是因为其有着丰富的数据结构 strings、map、 list、sets、 sorted sets
引入jar包 jedis-2.1.0.jar (本文下方提供下载)
package redistest;
import redis.clients.jedis.Jedis;
public class Listtest
- 配置多个redis
dalan_123
redis
配置多个redis客户端
<?xml version="1.0" encoding="UTF-8"?><beans xmlns="http://www.springframework.org/schema/beans" xmlns:xsi=&quo
- attrib命令
dcj3sjt126com
attr
attrib指令用于修改文件的属性.文件的常见属性有:只读.存档.隐藏和系统.
只读属性是指文件只可以做读的操作.不能对文件进行写的操作.就是文件的写保护.
存档属性是用来标记文件改动的.即在上一次备份后文件有所改动.一些备份软件在备份的时候会只去备份带有存档属性的文件.
- Yii使用公共函数
dcj3sjt126com
yii
在网站项目中,没必要把公用的函数写成一个工具类,有时候面向过程其实更方便。 在入口文件index.php里添加 require_once('protected/function.php'); 即可对其引用,成为公用的函数集合。 function.php如下:
<?php /** * This is the shortcut to D
- linux 系统资源的查看(free、uname、uptime、netstat)
eksliang
netstatlinux unamelinux uptimelinux free
linux 系统资源的查看
转载请出自出处:http://eksliang.iteye.com/blog/2167081
http://eksliang.iteye.com 一、free查看内存的使用情况
语法如下:
free [-b][-k][-m][-g] [-t]
参数含义
-b:直接输入free时,显示的单位是kb我们可以使用b(bytes),m
- JAVA的位操作符
greemranqq
位运算JAVA位移<<>>>
最近几种进制,加上各种位操作符,发现都比较模糊,不能完全掌握,这里就再熟悉熟悉。
1.按位操作符 :
按位操作符是用来操作基本数据类型中的单个bit,即二进制位,会对两个参数执行布尔代数运算,获得结果。
与(&)运算:
1&1 = 1, 1&0 = 0, 0&0 &
- Web前段学习网站
ihuning
Web
Web前段学习网站
菜鸟学习:http://www.w3cschool.cc/
JQuery中文网:http://www.jquerycn.cn/
内存溢出:http://outofmemory.cn/#csdn.blog
http://www.icoolxue.com/
http://www.jikexue
- 强强联合:FluxBB 作者加盟 Flarum
justjavac
r
原文:FluxBB Joins Forces With Flarum作者:Toby Zerner译文:强强联合:FluxBB 作者加盟 Flarum译者:justjavac
FluxBB 是一个快速、轻量级论坛软件,它的开发者是一名德国的 PHP 天才 Franz Liedke。FluxBB 的下一个版本(2.0)将被完全重写,并已经开发了一段时间。FluxBB 看起来非常有前途的,
- java统计在线人数(session存储信息的)
macroli
javaWeb
这篇日志是我写的第三次了 前两次都发布失败!郁闷极了!
由于在web开发中常常用到这一部分所以在此记录一下,呵呵,就到备忘录了!
我对于登录信息时使用session存储的,所以我这里是通过实现HttpSessionAttributeListener这个接口完成的。
1、实现接口类,在web.xml文件中配置监听类,从而可以使该类完成其工作。
public class Ses
- bootstrp carousel初体验 快速构建图片播放
qiaolevip
每天进步一点点学习永无止境bootstrap纵观千象
img{
border: 1px solid white;
box-shadow: 2px 2px 12px #333;
_width: expression(this.width > 600 ? "600px" : this.width + "px");
_height: expression(this.width &
- SparkSQL读取HBase数据,通过自定义外部数据源
superlxw1234
sparksparksqlsparksql读取hbasesparksql外部数据源
关键字:SparkSQL读取HBase、SparkSQL自定义外部数据源
前面文章介绍了SparSQL通过Hive操作HBase表。
SparkSQL从1.2开始支持自定义外部数据源(External DataSource),这样就可以通过API接口来实现自己的外部数据源。这里基于Spark1.4.0,简单介绍SparkSQL自定义外部数据源,访
- Spring Boot 1.3.0.M1发布
wiselyman
spring boot
Spring Boot 1.3.0.M1于6.12日发布,现在可以从Spring milestone repository下载。这个版本是基于Spring Framework 4.2.0.RC1,并在Spring Boot 1.2之上提供了大量的新特性improvements and new features。主要包含以下:
1.提供一个新的sprin