python编写MQTT订阅程序
Download | Eclipse Mosquitto
1、下载:
https://mosquitto.org/files/binary/win64/mosquitto-2.0.17-install-windows-x64.exe
2、安装:
3、conf配置
1)使用notepad打开“C:\Program Files\mosquitto\mosquitto.conf”另存为c:\myapp\msquitto\mosquitto.conf.txt
listener 1883
protocol mqtt
listener 9005
protocol websockets
allow_anonymous true

log_type notice
log_type websockets
log_type warning
log_type error
log_type information
2)重命名txt文档为conf
C:\myApp\mosquitto>rename mosquitto.conf.txt mosquitto.conf4、启动服务;
"C:\Program Files\mosquitto\mosquitto.exe" -c C:\myApp\mosquitto\mosquitto.confMQTTX 下载
5、下载mqtt x 客户端
https://packages.emqx.net/MQTTX/v1.9.5/MQTTX-Setup-1.9.5-x64.exe
6、 安装mqtt x 客户端。
1)新建连接
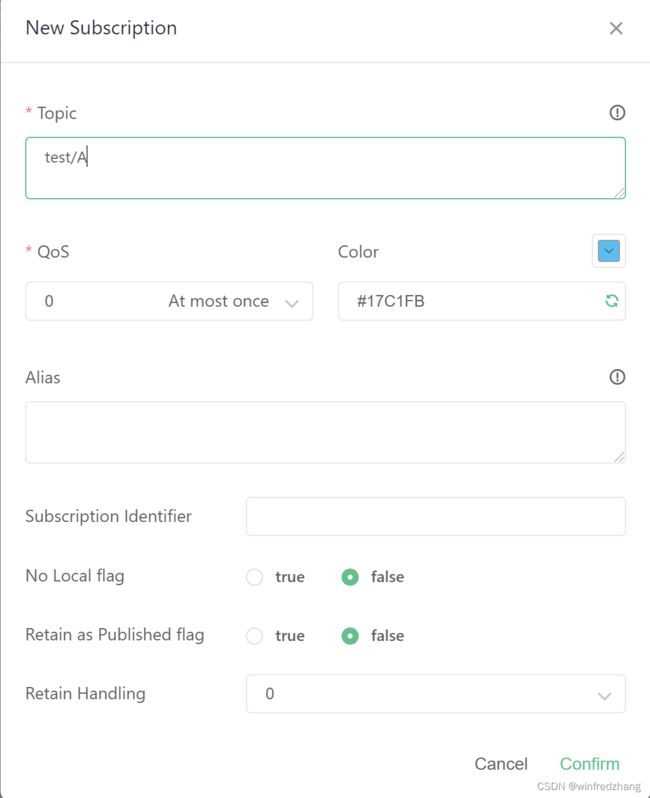
2)新的订阅
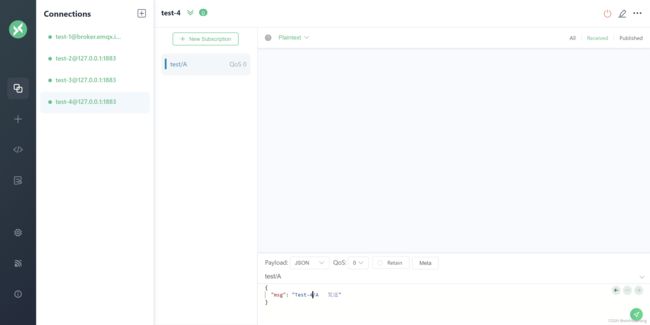
3)发布
4)接受
python代码部分:
下面这段代码是一个使用Python的wxPython库和paho-mqtt库创建一个简单的MQTT订阅者应用程序的示例。下面是对代码的详细解释:
C:\pythoncode\new\mqtt.py
1. 导入wx和paho.mqtt.client模块:
import wx
import paho.mqtt.client as mqtt
这里导入了wx模块用于创建GUI界面,以及paho.mqtt.client模块用于实现MQTT客户端功能。
2. 创建MQTTSubscriber类,并继承自wx.Frame类:
class MQTTSubscriber(wx.Frame):
这个类表示MQTT订阅者应用程序的主窗口。
3. 定义类的构造函数`__init__`:
def __init__(self):
    wx.Frame.__init__(self, None, title="MQTT Subscriber", size=(400, 300))
    self.panel = wx.Panel(self)
构造函数中创建了一个带有指定标题和大小的wx.Frame窗口,并在窗口上创建了一个wx.Panel面板用于放置其他GUI元素。
4. 创建标签和文本框用于输入IP地址、端口号和客户端ID:
wx.StaticText(self.panel, label="IP Address:", pos=(20, 20))
self.ip_text = wx.TextCtrl(self.panel, pos=(120, 20), size=(240, -1))
这些代码创建了一个静态文本标签和一个文本框,用于输入MQTT代理服务器的IP地址。
类似地,使用`wx.StaticText`和`wx.TextCtrl`创建了端口号和客户端ID的输入标签和文本框。
5. 创建下拉框用于选择主题:
wx.StaticText(self.panel, label="Topic:", pos=(20, 110))
self.topic_choice = wx.Choice(self.panel, pos=(120, 110), size=(240, -1))
self.topic_choice.Append("test/A")
self.topic_choice.Append("test/B")
这段代码创建了一个静态文本标签和一个下拉框(Choice),用于选择要订阅的MQTT主题。在下拉框中添加了两个选项:“test/A”和“test/B”。
6. 创建按钮用于接收MQTT消息:
self.receive_button = wx.Button(self.panel, label="Receive", pos=(160, 140))
self.receive_button.Bind(wx.EVT_BUTTON, self.on_receive)
这段代码创建了一个按钮,用于触发接收MQTT消息的操作。按钮的标签为“Receive”,并将按钮的点击事件绑定到`self.on_receive`方法上。
7. 创建多行文本框用于显示接收到的消息:
wx.StaticText(self.panel, label="Received Messages:", pos=(20, 180))
self.message_text = wx.TextCtrl(self.panel, pos=(20, 200), size=(360, 80), style=wx.TE_READONLY|wx.TE_MULTILINE)
这段代码创建了一个静态文本标签和一个多行文本框(TextCtrl),用于显示接收到的MQTT消息。文本框是只读的,并且可以显示多行文本。8. 定义`on_receive`方法:
def on_receive(self, event):
    ip = self.ip_text.GetValue()
    port = int(self.port_text.GetValue())
    client_id = self.client_id_text.GetValue()
    topic = self.topic_choice.GetString(self.topic_choice.GetSelection())

    # 创建MQTT客户端并连接到代理服务器
    client = mqtt.Client(client_id)
    client.on_connect = self.on_connect
    client.on_message = self.on_message
    client.connect(ip, port)

    # 订阅主题
    client.subscribe(topic)

    # 启动MQTT消息循环
    client.loop_start()
这个方法是按钮点击事件的处理函数。它从输入框和下拉框中获取IP地址、端口号、客户端ID和主题的值,然后创建一个MQTT客户端并连接到指定的MQTT代理服务器。通过调用`client.subscribe(topic)`方法来订阅指定的主题,并通过`client.loop_start()`方法启动MQTT消息循环。9. 定义`on_connect`方法和`on_message`方法:
def on_connect(self, client, userdata, flags, rc):
    print("Connected with result code " + str(rc))

def on_message(self, client, userdata, msg):
    message = msg.payload.decode("utf-8")
    self.message_text.AppendText(message + "\n")
这两个方法分别是MQTT客户端连接成功和接收到消息时的回调函数。`on_connect`方法在客户端成功连接到MQTT代理服务器时被调用,并打印连接结果代码。`on_message`方法在接收到消息时被调用,将消息的内容解码为字符串,并将其附加到多行文本框中显示。
10. 在`if __name__ == '__main__':`条件下创建应用程序实例并运行主循环:
app = wx.App()
frame = MQTTSubscriber()
frame.Show()
app.MainLoop()
全部代码
import wx
import paho.mqtt.client as mqtt

class MQTTSubscriber(wx.Frame):
    def __init__(self):
        wx.Frame.__init__(self, None, title="MQTT Subscriber", size=(400, 300))
        self.panel = wx.Panel(self)

        # 创建标签和文本框用于输入IP地址、端口号和客户端ID
        wx.StaticText(self.panel, label="IP Address:", pos=(20, 20))
        self.ip_text = wx.TextCtrl(self.panel, pos=(120, 20), size=(240, -1))

        wx.StaticText(self.panel, label="Port:", pos=(20, 50))
        self.port_text = wx.TextCtrl(self.panel, pos=(120, 50), size=(240, -1))

        wx.StaticText(self.panel, label="Client ID:", pos=(20, 80))
        self.client_id_text = wx.TextCtrl(self.panel, pos=(120, 80), size=(240, -1))

        # 创建下拉框用于选择主题
        wx.StaticText(self.panel, label="Topic:", pos=(20, 110))
        self.topic_choice = wx.Choice(self.panel, pos=(120, 110), size=(240, -1))
        self.topic_choice.Append("test/A")
        self.topic_choice.Append("test/B")

        # 创建按钮用于接收MQTT消息
        self.receive_button = wx.Button(self.panel, label="Receive", pos=(160, 140))
        self.receive_button.Bind(wx.EVT_BUTTON, self.on_receive)

        # 创建多行文本框用于显示接收到的消息
        wx.StaticText(self.panel, label="Received Messages:", pos=(20, 180))
        self.message_text = wx.TextCtrl(self.panel, pos=(20, 200), size=(360, 80), style=wx.TE_READONLY|wx.TE_MULTILINE)

    def on_receive(self, event):
        ip = self.ip_text.GetValue()
        port = int(self.port_text.GetValue())
        client_id = self.client_id_text.GetValue()
        topic = self.topic_choice.GetString(self.topic_choice.GetSelection())

        # 创建MQTT客户端并连接到代理服务器
        client = mqtt.Client(client_id)
        client.on_connect = self.on_connect
        client.on_message = self.on_message
        client.connect(ip, port)

        # 订阅主题
        client.subscribe(topic)

        # 启动MQTT消息循环
        client.loop_start()

    def on_connect(self, client, userdata, flags, rc):
        print("Connected with result code " + str(rc))

    def on_message(self, client, userdata, msg):
        message = msg.payload.decode("utf-8")
        self.message_text.AppendText(message + "\n")

if __name__ == '__main__':
    app = wx.App()
    frame = MQTTSubscriber()
    frame.Show()
    app.MainLoop()
这段代码创建了一个`wx.App`实例,然后创建了`MQTTSubscriber`类的对象`frame`。最后,通过调用`app.MainLoop()`来进入主循环,使应用程序保持运行状态,直到关闭窗口。
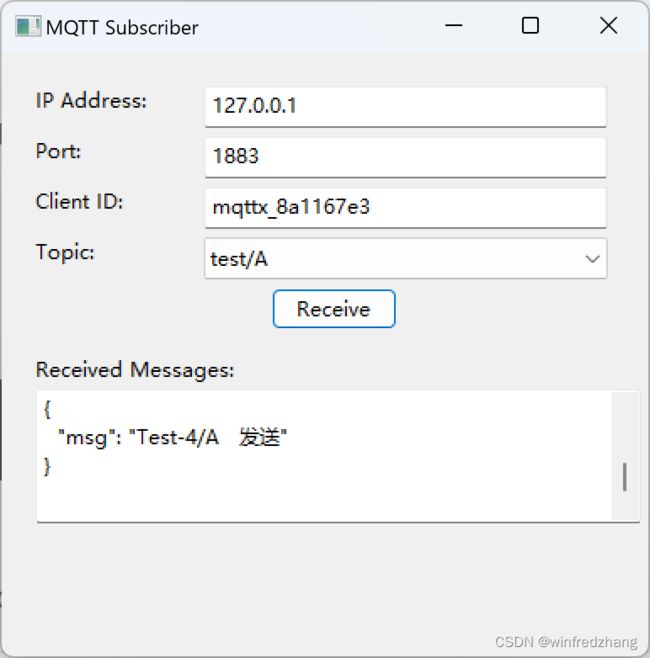
通过运行这段代码,您将获得一个简单的MQTT订阅者应用程序窗口。您可以在窗口中输入MQTT代理服务器的IP地址、端口号和客户端ID,选择要订阅的主题,然后点击“Receive”按钮开始接收MQTT消息,并将接收到的消息显示在窗口中。


