ELK集群搭建流程(实践可用)
一、概述
ELK 是一个由三个开源软件工具组成的数据处理和可视化平台,包括 Elasticsearch、Logstash 和 Kibana。这些工具都是由 Elastic 公司创建和维护的。
-
Elasticsearch 是一个分布式的搜索和分析引擎,可以将大量数据存储在一个或多个节点上,支持实时搜索、分析和聚合,提供高性能的全文搜索、复杂查询和分析能力。
-
Logstash 是一个数据采集和处理工具,可以将来自各种数据源的日志数据收集、转换、过滤和存储到 Elasticsearch 中,从而实现对数据的集中管理和分析。
-
Kibana 是一个数据可视化和分析平台,可以使用其可视化界面来创建仪表盘、图表、地图和警报,对 Elasticsearch 中的数据进行交互式分析和可视化展示。
ELK 平台结合了这三个工具的功能,提供了一个完整的解决方案,能够满足各种数据处理和分析的需求。ELK 平台被广泛应用于日志分析、安全监控、业务分析等领域。

二、准备
1)机器环境准备
我们准备3台机器,并都装好JDK 1.8且设置好hostname。
| 机器IP |
hostname |
| 10.10.21.73 |
node-1 |
| 10.10.21.74 |
node-2 |
| 10.10.21.75 |
node-3 |
es依赖JDK环境,检查是否安装JDK,官方建议jdk1.8.0_11版本以上
[root@els-node home]# java -version
openjdk version "1.8.0_161"
OpenJDK Runtime Environment (build 1.8.0_161-b14)
OpenJDK 64-Bit Server VM (build 25.161-b14, mixed mode)
修改limits资源限制
[root@els-node ~]# tail -5f /etc/security/limits.conf
* soft nofile 65536
* hard nofile 65536
* soft nproc 32000
* hard nproc 32000
* hard memlock unlimited
* soft memlock unlimited
配置最大虚拟内存
[root@els-node ~]# vim /etc/sysctl.conf
vm.max_map_count=655360
[root@els-node ~]# sysctl -p
vm.max_map_count = 655360
2)创建elsearch用户
(Linux 下不要使用 root 用户运行 Elasticsearch, 否则会报异常 can not run elasticsearch as root)
# 创建用户组
groupadd elasticsearch

# 创建用户,-p : 登录密码
useradd elasticsearch -g elasticsearch -p elasticsearch
三、elasticsearch 部署
1)下载并安装
官网下载:www.elastic.co/cn/download…
# 下载
wget https://artifacts.elastic.co/downloads/elasticsearch/elasticsearch-8.9.1-linux-x86_64.tar.gz

# 解压
tar zxvf elasticsearch-8.9.1-linux-x86_64.tar.gz && cd elasticsearch-8.9.1/

# 切换用户组:所有者,跟上面创建的用户相对应
chown -R elasticsearch:elasticsearch .
2)修改配置文件以支持集群
备份:
cp -a config/elasticsearch.yml config/elasticsearch.yml.bak配置:
cluster.name: elasticsearch-cluster
node.name: 'node-1'

network.host: 10.10.21.73
http.port: 9200

discovery.seed_hosts:
  - "10.10.21.73:9300"
  - "10.10.21.74:9300"
  - "10.10.21.75:9300"

gateway.recover_after_data_nodes: 3

http.cors.enabled: true
http.cors.allow-origin: "*"
启动ES:
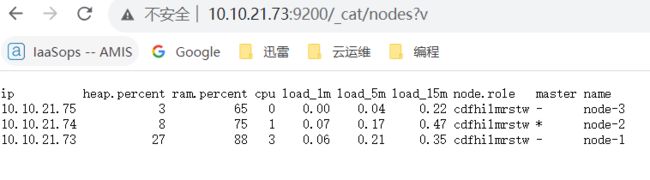
/usr/local/elasticsearch/bin/elasticsearch -d浏览器验证:http://10.10.21.73:9200/_cat/nodes?v
四、ELK密码认证
1、创建ES 之间的SSL证书,到master 主节点执行
[elasticsearch@kubenode01 elasticsearch]$ ./bin/elasticsearch-certutil ca
Please enter the desired output file [elastic-stack-ca.p12]:   #回车
Enter password for elastic-stack-ca.p12   #CA证书的密码,回车
[elasticsearch@kubenode01 elasticsearch]$ ./bin/elasticsearch-certutil cert --ca elastic-stack-ca.p12
Enter password for CA (elastic-stack-ca.p12) :  # CA证书的密码,回车
Please enter the desired output file [elastic-certificates.p12]: # 默认
Enter password for elastic-certificates.p12   # 证书密码,回车
2、将生成的 elastic-stack-ca.p12、elastic-certificates.p12 文件复制到各节点的config/certs目录下,更改普通用户权限
# certs需要手动创建,路径可自定义
[elasticsearch@kubenode01 certs]$ scp elastic-*.p12  root@host2:/home/elasticsearch-7.10.1/config/certs/
[elasticsearch@kubenode01 certs]$ scp elastic-*.p12  root@host3:/home/elasticsearch-7.10.1/config/certs/
[elasticsearch@kubenode01 certs]$ chown -R elasticsearch.elasticsearch elastic-*.p12    #所有es节点都需要修改
4、重启所有ES节点
[elasticsearch@kubenode01 config]$ ps -ef | grep elastic
[elasticsearch@kubenode01 config]$ #kill -9 6948(PID)
[elasticsearch@kubenode01 bin]$ ./elasticsearch -d
5、到ES的bin目录下执行命令设置初始密码,设置六个账户的密码
我的密码统一设置为123456
[elasticsearch@kubenode01 bin]$ ./elasticsearch-setup-passwords interactive
Initiating the setup of passwords for reserved users elastic,apm_system,kibana,kibana_system,logstash_system,beats_system,remote_monitoring_user.
You will be prompted to enter passwords as the process progresses.
Please confirm that you would like to continue [y/N]y
Enter password for [elastic]:
Reenter password for [elastic]:
Enter password for [apm_system]:
.....此处省略
四、启动出现的问题及解决方案
1)JDK版本过低
报错信息:
bash复制代码OpenJDK 64-Bit Server VM warning: Option UseConcMarkSweepGC was deprecated in version 9.0 and will likely be removed in a future release.
[2019-11-04T00:12:07,213][WARN ][o.e.b.ElasticsearchUncaughtExceptionHandler] [node-1] uncaught exception in thread [main]
org.elasticsearch.bootstrap.StartupException: java.lang.RuntimeException: can not run elasticsearch as root
    at org.elasticsearch.bootstrap.Elasticsearch.init(Elasticsearch.java:163) ~[elasticsearch-7.4.2.jar:7.4.2]
    at org.elasticsearch.bootstrap.Elasticsearch.execute(Elasticsearch.java:150) ~[elasticsearch-7.4.2.jar:7.4.2]
    at org.elasticsearch.cli.EnvironmentAwareCommand.execute(EnvironmentAwareCommand.java:86) ~[elasticsearch-7.4.2.jar:7.4.2]
    at org.elasticsearch.cli.Command.mainWithoutErrorHandling(Command.java:125) ~[elasticsearch-cli-7.4.2.jar:7.4.2]
    at org.elasticsearch.cli.Command.main(Command.java:90) ~[elasticsearch-cli-7.4.2.jar:7.4.2]
    at org.elasticsearch.bootstrap.Elasticsearch.main(Elasticsearch.java:115) ~[elasticsearch-7.4.2.jar:7.4.2]
    at org.elasticsearch.bootstrap.Elasticsearch.main(Elasticsearch.java:92) ~[elasticsearch-7.4.2.jar:7.4.2]
Caused by: java.lang.RuntimeException: can not run elasticsearch as root
    at org.elasticsearch.bootstrap.Bootstrap.initializeNatives(Bootstrap.java:105) ~[elasticsearch-7.4.2.jar:7.4.2]
    at org.elasticsearch.bootstrap.Bootstrap.setup(Bootstrap.java:172) ~[elasticsearch-7.4.2.jar:7.4.2]
    at org.elasticsearch.bootstrap.Bootstrap.init(Bootstrap.java:349) ~[elasticsearch-7.4.2.jar:7.4.2]
    at org.elasticsearch.bootstrap.Elasticsearch.init(Elasticsearch.java:159) ~[elasticsearch-7.4.2.jar:7.4.2]
    ... 6 more
解决:下载安装OpenJDK11
bash复制代码wget https://download.java.net/java/GA/jdk11/13/GPL/openjdk-11.0.1_linux-x64_bin.tar.gz
tar -xzvf jdk-11.0.4_linux-x64_bin.tar.gz /opt/
修改ES启动脚本加上jdk11的配置:
为了方便大家参考,这里贴上完整的配置文件
![]()
#!/bin/bash

# CONTROLLING STARTUP:
#
# This script relies on a few environment variables to determine startup
# behavior, those variables are:
#
#   ES_PATH_CONF -- Path to config directory
#   ES_JAVA_OPTS -- External Java Opts on top of the defaults set
#
# Optionally, exact memory values can be set using the `ES_JAVA_OPTS`. Note that
# the Xms and Xmx lines in the JVM options file must be commented out. Example
# values are "512m", and "10g".
#
#   ES_JAVA_OPTS="-Xms8g -Xmx8g" ./bin/elasticsearch

# 配置自己的jdk11
export JAVA_HOME=/home/elsearch/jdk-11.0.1
export PATH=$JAVA_HOME/bin:$PATH

source "`dirname "$0"`"/elasticsearch-env

if [ -z "$ES_TMPDIR" ]; then
  ES_TMPDIR=`"$JAVA" -cp "$ES_CLASSPATH" org.elasticsearch.tools.launchers.TempDirectory`
fi

ES_JVM_OPTIONS="$ES_PATH_CONF"/jvm.options
JVM_OPTIONS=`"$JAVA" -cp "$ES_CLASSPATH" org.elasticsearch.tools.launchers.JvmOptionsParser "$ES_JVM_OPTIONS"`
ES_JAVA_OPTS="${JVM_OPTIONS//\$\{ES_TMPDIR\}/$ES_TMPDIR}"

# 添加jdk判断
if [ -x "$JAVA_HOME/bin/java" ]; then
        JAVA="/home/elsearch/jdk-11.0.1/bin/java"
else
        JAVA=`which java`
fi

# manual parsing to find out, if process should be detached
if ! echo $* | grep -E '(^-d |-d$| -d |--daemonize$|--daemonize )' > /dev/null; then
  exec \
    "$JAVA" \
    $ES_JAVA_OPTS \
    -Des.path.home="$ES_HOME" \
    -Des.path.conf="$ES_PATH_CONF" \
    -Des.distribution.flavor="$ES_DISTRIBUTION_FLAVOR" \
    -Des.distribution.type="$ES_DISTRIBUTION_TYPE" \
    -Des.bundled_jdk="$ES_BUNDLED_JDK" \
    -cp "$ES_CLASSPATH" \
    org.elasticsearch.bootstrap.Elasticsearch \
    "$@"
else
  exec \
    "$JAVA" \
    $ES_JAVA_OPTS \
    -Des.path.home="$ES_HOME" \
    -Des.path.conf="$ES_PATH_CONF" \
    -Des.distribution.flavor="$ES_DISTRIBUTION_FLAVOR" \
    -Des.distribution.type="$ES_DISTRIBUTION_TYPE" \
    -Des.bundled_jdk="$ES_BUNDLED_JDK" \
    -cp "$ES_CLASSPATH" \
    org.elasticsearch.bootstrap.Elasticsearch \
    "$@" \
    <&- &
  retval=$?
  pid=$!
  [ $retval -eq 0 ] || exit $retval
  if [ ! -z "$ES_STARTUP_SLEEP_TIME" ]; then
    sleep $ES_STARTUP_SLEEP_TIME
  fi
  if ! ps -p $pid > /dev/null ; then
    exit 1
  fi
  exit 0
fi

exit $?
2)配置过低
bash复制代码[1]: max file descriptors [4096] for elasticsearch process is too low, increase to at least [65535]
[2]: max virtual memory areas vm.max_map_count [65530] is too low, increase to at least [262144]
解决:
-
文件描述符配置
-
临时生效
-
使用 root 用户
-
运行 ulimit -n 65536
-
-
永久生效
-
使用 root 用户
-
进入 /etc/security/limits.conf
-
添加
-
-
* hard nofile 65536
* hard nofile 65536
-
虚拟内存配置
-
临时生效
-
使用 root 用户
-
运行 sysctl -w vm.max_map_count=262144
-
-
永久生效
-
使用 root 用户
-
进入 /etc/sysctl.conf
-
添加或更新一行 vm.max_map_count=262144
-
-
-
自动发现配置
-
单节点
-
进入 elasticsearch 安装目录,打开 config/elasticsearch.yml
-
添加或更新一行 discovery.type: single-node
-
3)JVM内存大小指定太大,但本机内存不够用
bash复制代码[root@file elasticsearch-7.1.1]# ./bin/elasticsearch
Java HotSpot(TM) 64-Bit Server VM warning: INFO: os::commit_memory(0x00000000c5330000, 986513408, 0) failed; error='Cannot allocate memory' (errno
#
# There is insufficient memory for the Java Runtime Environment to continue.
# Native memory allocation (mmap) failed to map 986513408 bytes for committing reserved memory.
# An error report file with more information is saved as:
# logs/hs_err_pid27766.log
解决:
bash复制代码# 修改jvm.options文件配置即可,从1g改成了100m

# Xms represents the initial size of total heap space
# Xmx represents the maximum size of total heap space

-Xms100m
-Xmx100m
五、安装 elasticsearch-head
1)下载安装
# 下载wget https://github.com/mobz/elasticsearch-head.git# 解压
unzip elasticsearch-head-master.zip && cd elasticsearch-head-master
# 安装
npm install grunt --save
2)修改服务器监听地址
修改elasticsearch-head下Gruntfile.js文件,默认监听在127.0.0.1下9200端口

或者修改 elasticsearch-head-master/Gruntfile.js,在connect属性中,增加hostname: ‘0.0.0.0’
1、修改连接地址
cd _site
vim app.js
this.base_uri = this.config.base_uri || this.prefs.get("app-base_uri") || "http://localhost:9200";
2、启动
#执行
grunt server
输出信息:
>> Local Npm module "grunt-contrib-jasmine" not found. Is it installed?

Running "connect:server" (connect) task
Waiting forever...
Started connect web server on http://localhost:9100
3、elasticsearch-head 设置后台启动和关闭
进入elasticsearch-head-master目录
# vim elasticsearch-head_start.sh

#!/bin/bash
echo "START elasticsearch-head "
nohup grunt server &exit
关闭(可忽略):
#!/bin/bash
echo "STOP elasticsearch-head "
ps -ef |grep head|awk '{print $2}'|xargs kill -9
最后附上配置完整说明:
cluster.name: elasticsearch
# 配置的集群名称,默认是elasticsearch,es服务会通过广播方式自动连接在同一网段下的es服务,通过多播方式进行通信,同一网段下可以有多个集群,通过集群名称这个属性来区分不同的集群。

node.name: "Franz Kafka"
# 当前配置所在机器的节点名,你不设置就默认随机指定一个name列表中名字,该name列表在es的jar包中config文件夹里name.txt文件中,其中有很多作者添加的有趣名字。

index.number_of_shards: 5
# 设置默认索引分片个数,默认为5片。

index.number_of_replicas: 1
# 设置默认索引副本个数,默认为1个副本。如果采用默认设置,而你集群只配置了一台机器,那么集群的健康度为yellow,也就是所有的数据都是可用的,但是某些复制没有被分配
# (健康度可用 curl 'localhost:9200/_cat/health?v' 查看, 分为绿色、黄色或红色。绿色代表一切正常,集群功能齐全,黄色意味着所有的数据都是可用的,但是某些复制没有被分配,红色则代表因为某些原因,某些数据不可用)。

path.conf: /path/to/conf
# 设置配置文件的存储路径,默认是es根目录下的config文件夹。

path.data: /path/to/data
# 设置索引数据的存储路径,默认是es根目录下的data文件夹,可以设置多个存储路径,用逗号隔开,例:
# path.data: /path/to/data1,/path/to/data2

path.work: /path/to/work
# 设置临时文件的存储路径,默认是es根目录下的work文件夹。

path.logs: /path/to/logs
# 设置日志文件的存储路径,默认是es根目录下的logs文件夹

path.plugins: /path/to/plugins
# 设置插件的存放路径,默认是es根目录下的plugins文件夹, 插件在es里面普遍使用,用来增强原系统核心功能。

bootstrap.mlockall: true
# 设置为true来锁住内存不进行swapping。因为当jvm开始swapping时es的效率 会降低,所以要保证它不swap,可以把ES_MIN_MEM和ES_MAX_MEM两个环境变量设置成同一个值,并且保证机器有足够的内存分配给es。 同时也要允许elasticsearch的进程可以锁住内# # 存,linux下启动es之前可以通过`ulimit -l unlimited`命令设置。

network.bind_host: 192.168.0.1
# 设置绑定的ip地址,可以是ipv4或ipv6的,默认为0.0.0.0,绑定这台机器的任何一个ip。

network.publish_host: 192.168.0.1
# 设置其它节点和该节点交互的ip地址,如果不设置它会自动判断,值必须是个真实的ip地址。

network.host: 192.168.0.1
# 这个参数是用来同时设置bind_host和publish_host上面两个参数。

transport.tcp.port: 9300
# 设置节点之间交互的tcp端口,默认是9300。

transport.tcp.compress: true
# 设置是否压缩tcp传输时的数据,默认为false,不压缩。

http.port: 9200
# 设置对外服务的http端口,默认为9200。

http.max_content_length: 100mb
# 设置内容的最大容量,默认100mb

http.enabled: false
# 是否使用http协议对外提供服务,默认为true,开启。

gateway.type: local
# gateway的类型,默认为local即为本地文件系统,可以设置为本地文件系统,分布式文件系统,hadoop的HDFS,和amazon的s3服务器等。

gateway.recover_after_nodes: 1
# 设置集群中N个节点启动时进行数据恢复,默认为1。

gateway.recover_after_time: 5m
# 设置初始化数据恢复进程的超时时间,默认是5分钟。

gateway.expected_nodes: 2
# 设置这个集群中节点的数量,默认为2,一旦这N个节点启动,就会立即进行数据恢复。

cluster.routing.allocation.node_initial_primaries_recoveries: 4
# 初始化数据恢复时,并发恢复线程的个数,默认为4。

cluster.routing.allocation.node_concurrent_recoveries: 2
# 添加删除节点或负载均衡时并发恢复线程的个数,默认为4。

indices.recovery.max_size_per_sec: 0
# 设置数据恢复时限制的带宽,如入100mb,默认为0,即无限制。

indices.recovery.concurrent_streams: 5
# 设置这个参数来限制从其它分片恢复数据时最大同时打开并发流的个数,默认为5。

discovery.zen.minimum_master_nodes: 1
# 设置这个参数来保证集群中的节点可以知道其它N个有master资格的节点。默认为1,对于大的集群来说,可以设置大一点的值(2-4)

discovery.zen.ping.timeout: 3s
# 设置集群中自动发现其它节点时ping连接超时时间,默认为3秒,对于比较差的网络环境可以高点的值来防止自动发现时出错。

discovery.zen.ping.multicast.enabled: false
# 设置是否打开多播发现节点,默认是true。

discovery.zen.ping.unicast.hosts: ["host1", "host2:port", "host3[portX-portY]"]
# 设置集群中master节点的初始列表,可以通过这些节点来自动发现新加入集群的节点。
六、安装 Kibana
1)Kibana 下载
官网下载:www.elastic.co/cn/download…
2)Kibana 安装
wget https://artifacts.elastic.co/downloads/kibana/kibana-8.9.1-linux-x86_64.tar.gz

tar -zxvf kibana-8.9.1-linux-x86_64.tar.gz && cd  kibana-8.9.1-linux-x86_64
3)Kibana 修改配置
# vim config/kibana.yml
# 允许外部访问
server.host: "0.0.0.0"# 修改默认关联的ES地址elasticsearch.hosts: ["http://192.168.182.132:9200"]
4)Kibana 启动
# 默认不支持root启动,可以后面加参数允许root启动
./kibana --allow-root
七、logstash 部署
1)logstash 下载解压
wget https://artifacts.elastic.co/downloads/logstash/logstash-8.9.1.tar.gz
tar -zxf  logstash-8.9.1.tar.gz && cd logstash-8.9.1
2)创建并编辑 logstash.conf 文件,添加如下内容
[elasticsearch@kubenode01 bin]$ cd /usr/local/logstash/config
[elasticsearch@kubenode01 bin]$ cat logstash.conf
input {
    file{
	path => ['/usr/local/nginx/logs/access.log']
	type => "nginx"
	stat_interval => "2"
    }
}

filter {
      date {
         match => [ "timestamp" , "yyyy-MM-dd HH:mm:ss.SSS" ]
      }
}


output {

	if [type] == "nginx" {
 		 elasticsearch {
    			hosts  => ["192.168.169.10:9200","192.168.169.30:9200","192.168.169.30:9200"]
    			index  => "nginx-%{+YYYY.MM.dd}"
                         user => "elastic"     #增加用户认证
                         password => "123456"   #增加密码认证
  			}
		}
}
3)启动logstash
/usr/local/logstash/bin/logstash -f config/logstash.conf >/dev/null 2>&1 &