Flowable 之基础教程
文章目录
- 一、简介
- 二、基础使用
-
- 2.1 创建 ProcessEngine
- 2.2 配置 bpmn20.xml 文件
- 2.3 部署流程定义
- 2.4 查看、删除流程
- 2.5 启动流程实例
- 2.6 查看、完成任务
- 2.7 查看历史信息
- 三、SpringBoot 整合 Flowable
-
- 3.1 添加依赖
- 3.2 yml配置文件
- 3.3 创建流程图
- 3.4 部署流程
- 3.5 启动流程
- 3.6 完成流程
- 四、FlowableUI 流程设计器
-
-
- 4.1 安装部署
- 4.2 用户管理
- 4.3 绘制流程
- 4.4 FlowableUI 演示
-
- 4.4.1 部署流程
- 4.4.2 启动流程
-
提示:以下是本篇文章正文内容,Java 系列学习将会持续更新

一、简介
Flowable 是 BPMN 的一个基于 java 的软件实现,不过 Flowable 不仅仅包括 BPMN,还有 DMN 决策表和 CMMN Case 管理引擎,并且有自己的用户管理、微服务 API 等一系列功能,是一个服务平台。
二、基础使用
官方手册:https://tkjohn.github.io/flowable-userguide/#_introduction
2.1 创建 ProcessEngine

①添加依赖:
<dependency>
    <groupId>org.flowablegroupId>
    <artifactId>flowable-engineartifactId>
    <version>6.3.0version>
dependency>
<dependency>
    <groupId>mysqlgroupId>
    <artifactId>mysql-connector-javaartifactId>
    <version>5.1.47version>
dependency>
②获取流程引擎对象。
方法一:如果是 spring 项目,则可以搞个配置类。使用的时候可以直接注入,很方便:
@Configuration
public class MyProcessEngine {
    @Bean
    public ProcessEngine getProcessEngine() {
        // 获取 ProcessEngineConfiguration 对象
        ProcessEngineConfiguration configuration = new StandaloneProcessEngineConfiguration();
        // 配置数据库连接
        configuration.setJdbcDriver("com.mysql.jdbc.Driver");
        configuration.setJdbcUsername("root");
        configuration.setJdbcPassword("123456");
        configuration.setJdbcUrl("jdbc:mysql://127.0.0.1:3306/flowable-study?characterEncoding=utf8&useSSL=false&serverTimezone=Asia/Shanghai");
        // 如果数据库中的表结构不存在,就新建表
        configuration.setDatabaseSchemaUpdate(ProcessEngineConfiguration.DB_SCHEMA_UPDATE_TRUE);

        // 返回 通过 ProcessEngineConfiguration 构建 ProcessEngine 的对象
        return configuration.buildProcessEngine();
    }
}
方法二:配置文件。在 resources 目录下创建一个 flowable.cfg.xml 文件。
<beans xmlns="http://www.springframework.org/schema/beans"
       xmlns:xsi="http://www.w3.org/2001/XMLSchema-instance"
       xsi:schemaLocation="http://www.springframework.org/schema/beans http://www.springframework.org/schema/beans/spring-beans.xsd">
    <bean id="processEngineConfiguration"
          class="org.flowable.engine.impl.cfg.StandaloneProcessEngineConfiguration">
        <property name="jdbcUrl" value="jdbc:mysql://localhost:3306/flow1?allowMultiQueries=true&useUnicode=true&characterEncoding=UTF-8&useSSL=false&serverTimezone=UTC&nullCatalogMeansCurrent=true" /><property name="jdbcDriver" value="com.mysql.cj.jdbc.Driver" />
        <property name="jdbcUsername" value="root" />
        <property name="jdbcPassword" value="123456" />
        <property name="databaseSchemaUpdate" value="true" />
        <property name="asyncExecutorActivate" value="false" />
    bean>
beans>
然后就可以直接获取流程引擎对象了。
ProcessEngine processEngine = ProcessEngines.getDefaultProcessEngine();
如果 xml 文件的名称是自定义的,就采用以下的方式获取。
ProcessEngineConfiguration configuration = ProcessEngineConfiguration.createProcessEngineConfigurationFromResource("MyFlowableCfg.xml");
ProcessEngine processEngine = configuration.buildProcessEngine();
③启动程序。此时以看到创建了相关的表结构在数据库中。
④配置日志输出。Flowable 可以使用 SLF4J 作为内部日志框架。我们使用 log4j 作为 SLF4J 的实现,因此添加下列依赖:
<dependency>
    <groupId>org.slf4jgroupId>
    <artifactId>slf4j-apiartifactId>
    <version>1.7.21version>
dependency>
<dependency>
    <groupId>org.slf4jgroupId>
    <artifactId>slf4j-log4j12artifactId>
    <version>1.7.21version>
dependency>
Log4j 需要一个配置文件。在 src/main/resources 文件夹下添加 log4j.properties 文件,并写入下列内容:
log4j.rootLogger=DEBUG, CA
log4j.appender.CA=org.apache.log4j.ConsoleAppender
log4j.appender.CA.layout=org.apache.log4j.PatternLayout
log4j.appender.CA.layout.ConversionPattern= %d{hh:mm:ss,SSS} [%t] %-5p %c %x - %m%n
重新运行应用。应该可以看到关于引擎启动与创建数据库表结构的日志信息了。

回到目录…
2.2 配置 bpmn20.xml 文件
接下来我们构建一个非常简单的请假流程,Flowable 引擎需要流程定义为 BPMN 2.0 格式。BPMN 2.0 存储为 XML,并包含可视化的部分:使用标准方式定义了每个步骤类型(人工任务,自动服务调用,等等)如何呈现,以及如何互相连接。这样 BPMN 2.0 标准使技术人员与业务人员能用双方都能理解的方式交流业务流程。
我们要使用的流程定义为:
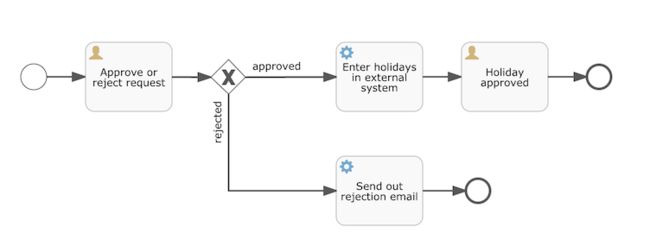
流程定义说明:
- 左侧的圆圈叫做启动事件(start event)。这是一个流程实例的起点。
- 第一个矩形是一个用户任务(user task)。这是流程中用户操作的步骤。在这个例子中,经理需要批准或驳回申请
- 取决于经理的决定,排他网关(exclusive gateway) (带叉的菱形)会将流程实例路由至批准或驳回路径
- 如果批准,则需要将申请注册至某个外部系统,并跟着另一个用户任务,将经理的决定通知给申请人。当然也可以改为发送邮件。
- 如果驳回,则为雇员发送一封邮件通知他。
将下面的XML保存在 src/main/resources 文件夹下名为 holiday-request.bpmn20.xml 的文件中。
<definitions xmlns="http://www.omg.org/spec/BPMN/20100524/MODEL"
             xmlns:xsi="http://www.w3.org/2001/XMLSchema-instance"
             xmlns:xsd="http://www.w3.org/2001/XMLSchema"
             xmlns:bpmndi="http://www.omg.org/spec/BPMN/20100524/DI"
             xmlns:omgdc="http://www.omg.org/spec/DD/20100524/DC"
             xmlns:omgdi="http://www.omg.org/spec/DD/20100524/DI"
             xmlns:flowable="http://flowable.org/bpmn"
             typeLanguage="http://www.w3.org/2001/XMLSchema"
             expressionLanguage="http://www.w3.org/1999/XPath"
             targetNamespace="http://www.flowable.org/processdef">

    <process id="holidayRequest" name="Holiday Request" isExecutable="true">

        <startEvent id="startEvent"/>
        <sequenceFlow sourceRef="startEvent" targetRef="approveTask"/>

        <userTask id="approveTask" name="Approve or reject request"/>
        <sequenceFlow sourceRef="approveTask" targetRef="decision"/>

        <exclusiveGateway id="decision"/>
        <sequenceFlow sourceRef="decision" targetRef="externalSystemCall">
            <conditionExpression xsi:type="tFormalExpression">

            conditionExpression>
        sequenceFlow>
        <sequenceFlow  sourceRef="decision" targetRef="sendRejectionMail">
            <conditionExpression xsi:type="tFormalExpression">

            conditionExpression>
        sequenceFlow>

        <serviceTask id="externalSystemCall" name="Enter holidays in external system"
                     flowable:class="org.flowable.CallExternalSystemDelegate"/>
        <sequenceFlow sourceRef="externalSystemCall" targetRef="holidayApprovedTask"/>

        <userTask id="holidayApprovedTask" name="Holiday approved"/>
        <sequenceFlow sourceRef="holidayApprovedTask" targetRef="approveEnd"/>

        <serviceTask id="sendRejectionMail" name="Send out rejection email"
                     flowable:class="org.flowable.SendRejectionMail"/>
        <sequenceFlow sourceRef="sendRejectionMail" targetRef="rejectEnd"/>

        <endEvent id="approveEnd"/>

        <endEvent id="rejectEnd"/>
    process>
definitions>
回到目录…
2.3 部署流程定义
将流程定义部署至 Flowable 引擎,需要使用 RepositoryService,其可以从 ProcessEngine 对象获取。使用 RepositoryService,可以通过 XML 文件的路径创建一个新的部署(Deployment),并调用 deploy() 方法实际执行:
@Resource
private ProcessEngine processEngine;

// 部署流程,即新建流程
@Test
void contextLoads() {
    // 1.获取 RepositoryService
    RepositoryService repositoryService = processEngine.getRepositoryService();
    // 2.完成流程的部署操作
    Deployment deploy = repositoryService.createDeployment()
            .addClasspathResource("holiday-request.bpmn20.xml")
            .name("请假流程")
            .deploy();
    System.out.println("deploy.getId() = " + deploy.getId());
    System.out.println("deploy.getName() = " + deploy.getName());
}
执行结果:
![]()
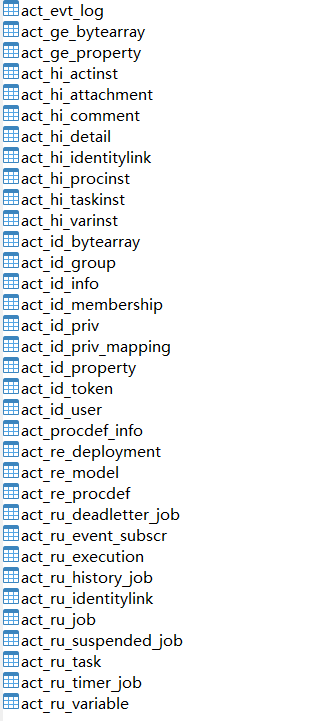
act_re_deployment: 流程定义部署表,每部署一次就增加一条记录。
![]()
act_re_procdef :流程定义表,部署每个新的流程定义都会在这张表中增加一条记录。
![]()
act_ge_bytearray :流程资源表,流程部署的 bpmn文件和png图片会保存在该表中。

2.4 查看、删除流程
我们现在可以通过 RepositoryService 创建的 ProcessDefinitionQuery 对象查询流程定义。
@Test
void test1() {
    RepositoryService repositoryService = processEngine.getRepositoryService();
    ProcessDefinition processDefinition = repositoryService.createProcessDefinitionQuery()
            .deploymentId("35001")
            .singleResult();
    System.out.println("processDefinition.getDeploymentId() = " + processDefinition.getDeploymentId());
    System.out.println("processDefinition.getName() = " + processDefinition.getName());
    System.out.println("processDefinition.getDescription() = " + processDefinition.getDescription());
    System.out.println("processDefinition.getId() = " + processDefinition.getId());
}
执行结果:

有些流程已经没有用了,我们需要删除掉,其实也非常简单。
@Test
void test2() {
    RepositoryService repositoryService = processEngine.getRepositoryService();
    // 根据流程Id删除,第二个参数表示是否级联删除,默认false(即流程启动后就不允许删除了)
    repositoryService.deleteDeployment("45001", true); // true 会将流程下的任务也一并删除
}
2.5 启动流程实例
/**
 * 启动流程, 新建任务
 */
@Test
void test3() {
    // 获取启动流程的服务
    RuntimeService runtimeService = processEngine.getRuntimeService();
    // 构建流程变量
    Map<String, Object> variables = new HashMap<>();
    variables.put("employee", "wsy");
    variables.put("nrOfHolidays", 10);
    variables.put("description", "生病了,去医院");
    // 启动流程
    ProcessInstance holidayRequest = runtimeService.startProcessInstanceByKey("holidayRequest", variables);
    System.out.println("holidayRequest.getProcessDefinitionId() = " + holidayRequest.getProcessDefinitionId());
    System.out.println("holidayRequest.getActivityId() = " + holidayRequest.getActivityId());
    System.out.println("holidayRequest.getId() = " + holidayRequest.getId());
}
执行结果:

启动流程实例涉及到的表结构:
- act_ru_task 任务信息

- act_ru_variable 运行时变量表

- act_ru_execution 流程执行信息

- act_ru_identitylink 流程的参与用户信息

- act_hi_actinst 流程实例执行历史

- act_hi_procinst 流程实例历史信息

- act_hi_taskinst 流程任务历史信息

- act_hi_identitylink 流程的参与用户的历史信息

2.6 查看、完成任务
/**
 * 查看流程的任务
 */
@Test
void test4() {
    TaskService taskService = processEngine.getTaskService();
    List<Task> list = taskService.createTaskQuery()
            .processDefinitionId("holidayRequest:1:45003") // 流程ID
            //.processDefinitionKey("holidayRequest") // 流程key
            .taskAssignee("王经理") // 任务处理人
            .list();
    for(Task task : list) {
        System.out.println("task.getId() = " + task.getId());
        System.out.println("task.getAssignee() = " + task.getAssignee());
        System.out.println("task.getName() = " + task.getName());
        System.out.println("task.getDescription() = " + task.getDescription());
        System.out.println("task.getProcessDefinitionId() = " + task.getProcessDefinitionId());
    }
}
执行结果:

执行任务。如果该流程走完,则会清空 act_ru_* 表的内容。
/**
 * 处理完成任务
 */
@Test
void test5() {
    TaskService taskService = processEngine.getTaskService();
    Task task = taskService.createTaskQuery()
            .processDefinitionKey("holidayRequest")
            .taskAssignee("王经理")
            .singleResult();
    Map<String, Object> map = new HashMap<>();
    map.put("approved", true);
    // 完成任务
    taskService.complete(task.getId(), map);
}
2.7 查看历史信息
/**
 * 获取流程任务的历史数据
 */
@Test
void test6() {
    HistoryService historyService = processEngine.getHistoryService();
    List<HistoricActivityInstance> list = historyService.createHistoricActivityInstanceQuery()
            .processDefinitionId("holidayRequest:1:45003")
            .finished() // 查询的历史记录的状态是已经完成
            .orderByHistoricActivityInstanceEndTime().asc() // 指定按结束时间排序
            .list();
    for(HistoricActivityInstance history : list) {
        System.out.println(history.getActivityName()+":"+history.getAssignee()+"--"+history.getActivityId()+":"+history.getDurationInMillis()+"毫秒");
    }
}
执行结果:

执行任务后的历史记录变化:
- act_hi_taskinst 流程任务历史信息

- act_hi_actinst 流程实例执行历史

回到目录…
三、SpringBoot 整合 Flowable
3.1 添加依赖
<dependency>
    <groupId>org.flowablegroupId>
    <artifactId>flowable-spring-boot-starterartifactId>
    <version>6.6.0version>
dependency>
<dependency>
    <groupId>com.alibabagroupId>
    <artifactId>druidartifactId>
    <version>1.2.16version>
dependency>
<dependency>
    <groupId>junitgroupId>
    <artifactId>junitartifactId>
    <version>4.13.2version>
    <scope>testscope>
dependency>
3.2 yml配置文件
spring:
  datasource:
    type: com.alibaba.druid.pool.DruidDataSource
    driver-class-name: com.mysql.jdbc.Driver
    url: jdbc:mysql://127.0.0.1:3306/flowable-boot?characterEncoding=utf8&useSSL=false&serverTimezone=Asia/Shanghai
    username: root
    password: 123456
    hikari:
      minimum-idle: 5
      idle-timeout: 600000
      maximum-pool-size: 10
      auto-commit: true
      pool-name: MyHikariCP
      max-lifetime: 1800000
      connection-timeout: 30000
      connection-test-query: SELECT 1

flowable:
  async-executor-activate: false # 关闭定时任务
  # 将databaseSchemaUpdate 设置为 true。当Flowable发现库与数据库表结构不一致时,会自动将数据库表结构升级至新版本
  database-schema-update: true
然后直接启动,服务就会自动初始化数据库。可以看到表的数量也多了不少。

并且不需要创建 ProcessEngine 对象,可以直接注入;包括四个模块的服务也可以直接注入。
@Resource
private ProcessEngine processEngine; // // 直接注入ProcessEngine 对象
// 以下四个模块的服务接口可以直接注入使用,也可以通过ProcessEngine获取
@Resource
private RepositoryService repositoryService;
@Resource
private RuntimeService runtimeService;
@Resource
private TaskService taskService;
@Resource
private HistoryService historyService;
回到目录…
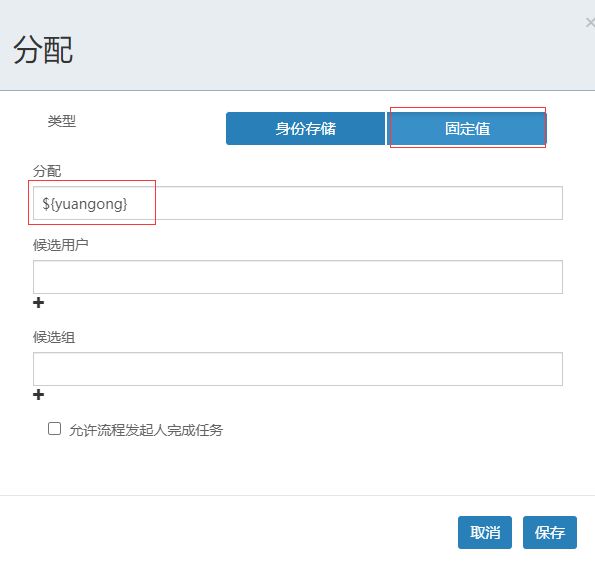
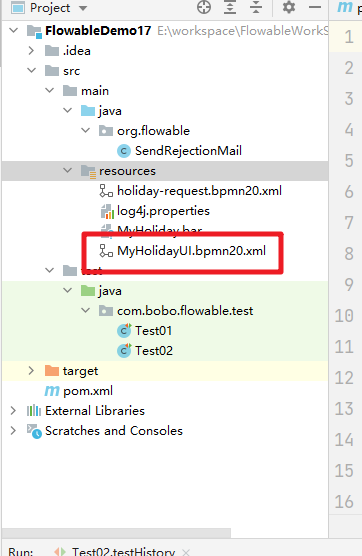
3.3 创建流程图
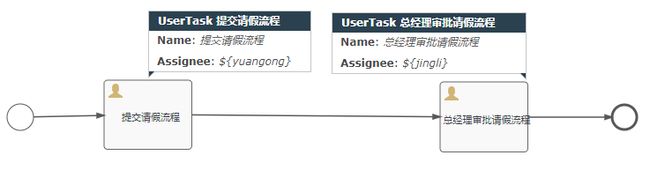
分配用户为固定值。
导出 bpmn20.xml 文件到 resource 目录下。
3.4 部署流程
/**
 * 部署流程,即新建流程
 */
@Test
void test() {
    // 2.获取 RepositoryService
    RepositoryService repositoryService = processEngine.getRepositoryService();
    // 3.完成流程的部署操作
    Deployment deploy = repositoryService.createDeployment()
            .addClasspathResource("MyHolidayUI.bpmn20.xml")
            .name("20230904请假流程")
            .deploy();
    System.out.println("deploy.getId() = " + deploy.getId());
    System.out.println("deploy.getName() = " + deploy.getName());
}

/**
 * 查看流程
 */
@Test
void test1() {
    RepositoryService repositoryService = processEngine.getRepositoryService();
    ProcessDefinition processDefinition = repositoryService.createProcessDefinitionQuery()
            .deploymentId("c0c45c7c-4ac9-11ee-9b96-200db0c7aa5b")
            .singleResult();
    System.out.println("processDefinition.getDeploymentId() = " + processDefinition.getDeploymentId());
    System.out.println("processDefinition.getName() = " + processDefinition.getName());
    System.out.println("processDefinition.getDescription() = " + processDefinition.getDescription());
    System.out.println("processDefinition.getId() = " + processDefinition.getId());
}

/**
 * 删除流程
 */
@Test
void test2() {
    RepositoryService repositoryService = processEngine.getRepositoryService();
    // 根据流程Id删除,第二个参数表示是否级联删除,默认false,即流程启动后就不允许删除了
    repositoryService.deleteDeployment("afe25695-3d78-11ee-8050-200db0c7aa5b", true);
}
此时在流程定义表 act_re_deployment 和流程实例表 act_re_procdef 中可以看到新建的流程了。
3.5 启动流程
/**
 * 启动流程, 新建任务
 */
@Test
void test3() {
    // 构建流程变量
    Map<String, Object> variables = new HashMap<>();
    variables.put("yuangong", "张三");
    variables.put("jingli", "张经理");
    variables.put("dayDate", 3);
    variables.put("description", "生病了,去医院");
    // 启动流程
    ProcessInstance holidayRequest = runtimeService.startProcessInstanceById("MyHolidayUI:1:c0e6154f-4ac9-11ee-9b96-200db0c7aa5b", variables);
    System.out.println("holidayRequest.getProcessDefinitionId() = " + holidayRequest.getProcessDefinitionId());
    System.out.println("holidayRequest.getActivityId() = " + holidayRequest.getActivityId());
    System.out.println("holidayRequest.getId() = " + holidayRequest.getId());
}

/**
 * 查看流程的任务
 */
@Test
void test4() {
    TaskService taskService = processEngine.getTaskService();
    List<Task> list = taskService.createTaskQuery()
            .processDefinitionId("MyHolidayUI:1:c0e6154f-4ac9-11ee-9b96-200db0c7aa5b") // 流程Id
            .taskAssignee("张三") // 任务处理人
            .list();
    for(Task task : list) {
        System.out.println("task.getId() = " + task.getId());
        System.out.println("task.getAssignee() = " + task.getAssignee());
        System.out.println("task.getName() = " + task.getName());
        System.out.println("task.getDescription() = " + task.getDescription());
        System.out.println("task.getProcessDefinitionId() = " + task.getProcessDefinitionId());
    }
}
此时在表 act_ru_task 和 act_ru_variable 中可以看到新建的任务和任务信息了。
3.6 完成流程
/**
 * 处理完成任务
 */
@Test
void test5() {
    TaskService taskService = processEngine.getTaskService();
    Task task = taskService.createTaskQuery()
            .processDefinitionId("MyHolidayUI:1:c0e6154f-4ac9-11ee-9b96-200db0c7aa5b")
            .taskAssignee("张经理")
            .singleResult();
    // 完成任务
    taskService.complete(task.getId());
}

/**
 * 获取流程任务的历史数据
 */
@Test
void test6() {
    HistoryService historyService = processEngine.getHistoryService();
    List<HistoricActivityInstance> list = historyService.createHistoricActivityInstanceQuery()
            .processDefinitionId("MyHolidayUI:1:c0e6154f-4ac9-11ee-9b96-200db0c7aa5b")
            .finished() // 查询的历史记录的状态是已经完成
            .orderByHistoricActivityInstanceEndTime().asc() // 指定按结束时间排序
            .list();
    for(HistoricActivityInstance history : list) {
        System.out.println(history.getActivityName()+":"+history.getAssignee()+"--"+history.getActivityId()+":"+history.getDurationInMillis()+"毫秒");
    }
}
此时在表 act_hi_taskinst 和 act_hi_actinst 中可以看到历史任务和执行流程了。
回到目录…
四、FlowableUI 流程设计器
Flowable 提供了几个 web 应用,用于演示及介绍 Flowable 项目提供的功能:
- Flowable IDM: 身份管理应用。为所有 Flowable UI 应用提供单点登录认证功能,并且为拥有IDM管理员权限的用户提供了管理用户、组与权限的功能。
- Flowable Modeler: 让具有建模权限的用户可以创建流程模型、表单、选择表与应用定义。
- Flowable Task: 运行时任务应用。提供了启动流程实例、编辑任务表单、完成任务,以及查询流程实例与任务的功能。
- Flowable Admin: 管理应用。让具有管理员权限的用户可以查询 BPMN、DMN、Form 及 Content 引擎,并提供了许多选项用于修改流程实例、任务、作业等。管理应用通过 REST API 连接至引擎,并与 Flowable Task 应用及 Flowable REST 应用一同部署。
所有其他的应用都需要 Flowable IDM 提供认证。每个应用的 WAR 文件可以部署在相同的 servlet 容器(如Apache Tomcat)中,也可以部署在不同的容器中。由于每个应用使用相同的 cookie 进行认证,因此应用需要运行在相同的域名下。
4.1 安装部署
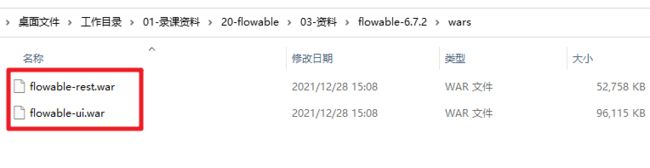
①先下载 FlowableUI 的文件,在 Flowable6.6 之后把 FlowableUI 中提供的四个功能合并到了一起。

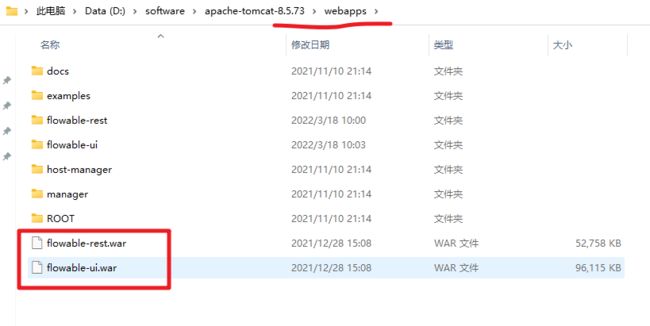
②然后把解压缩后的两个 war 包拷贝到 Tomcat 的解压缩的 webapps 目录下。
③Tomcat 目录下就是这样的:
④启动 Tomcat 服务,执行 startup.bat 文件。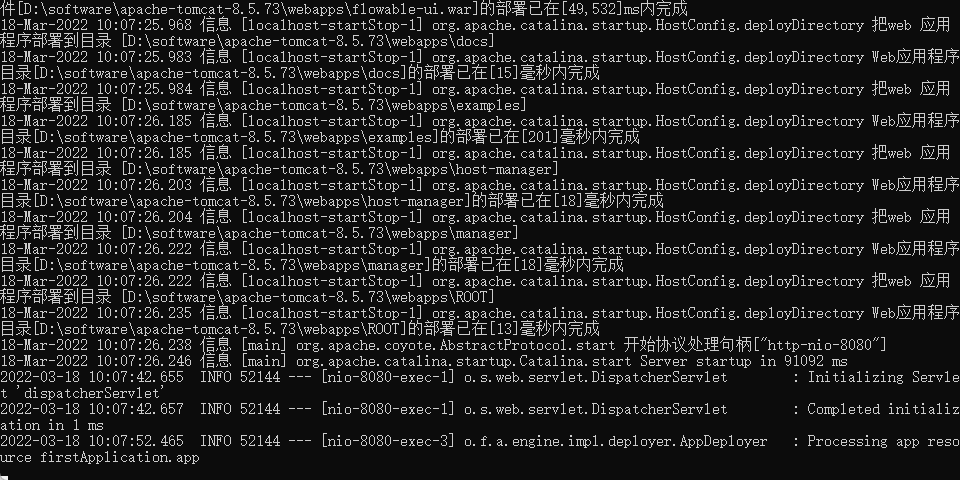
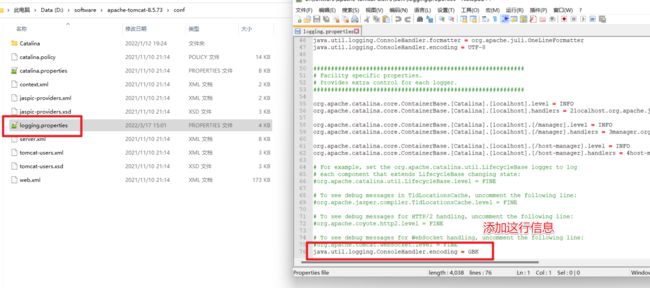
如果启动中出现乱码修改 Tomcat 的 conf 目录下的 logging.properties 文件中的编码。
⑤启动成功后,在浏览器中访问 http://localhost:8080/flowable-ui, 默认的账号密码是 admin/test

回到目录…
4.2 用户管理
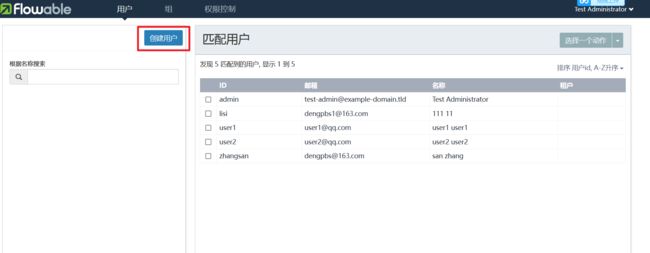
我们先在 身份管理应用程序 中创建用户并授权。

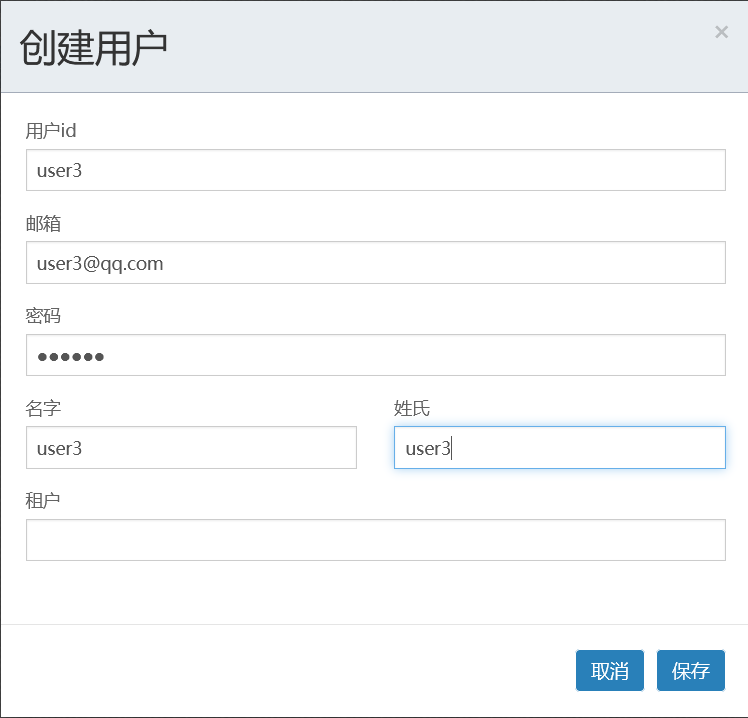
创建用户:
填写详细信息:
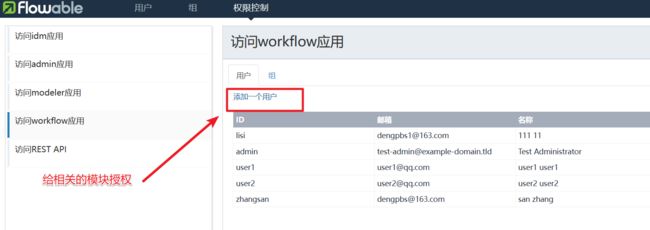
授权管理:
回到目录…
4.3 绘制流程
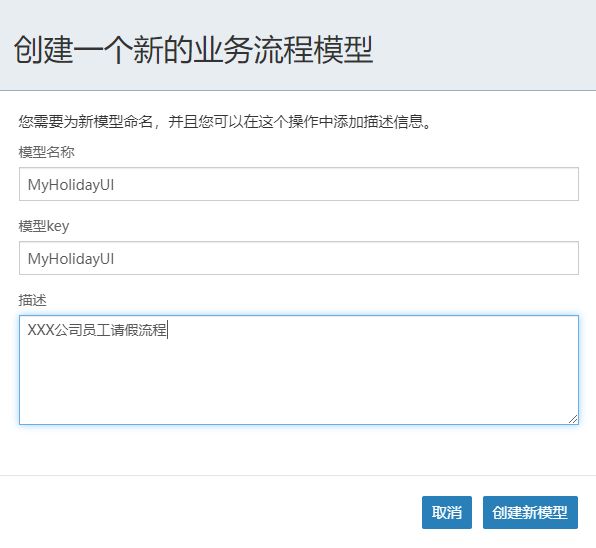
创建新的流程:
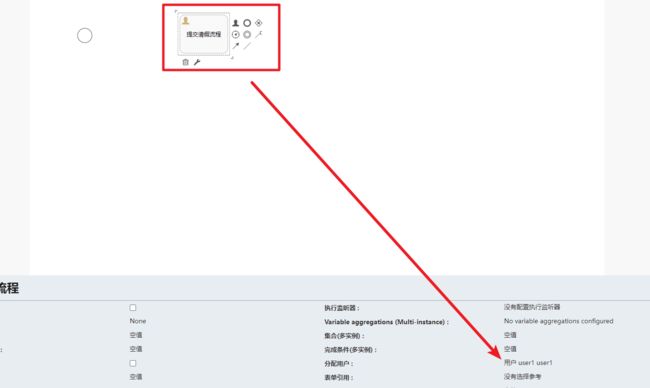
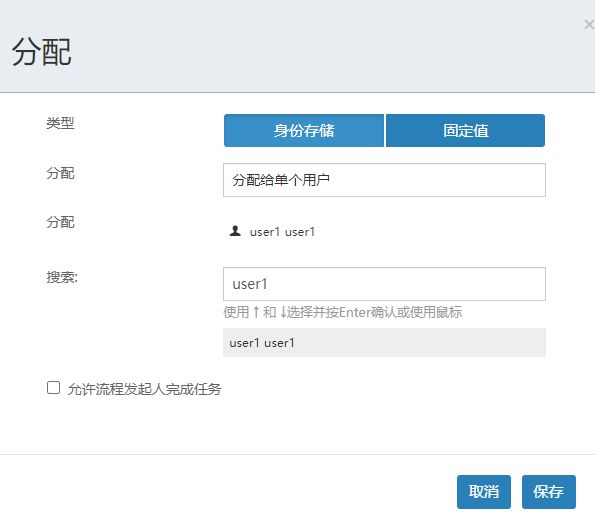
创建流程,分配处理人。
绘制好的流程图,我们只需要一键导出即可。
下载下来后拷贝到项目的 resource 目录下即可。
回到目录…
4.4 FlowableUI 演示
4.4.1 部署流程

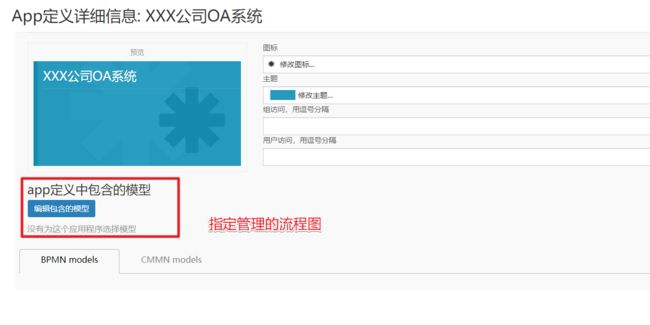
创建一个新的应用程序,并指定相关的信息。

创建应用后需要指定对应的流程图。

发布应用程序。

回到目录…
4.4.2 启动流程
发布了应用程序后我们就可以来启动流程了。

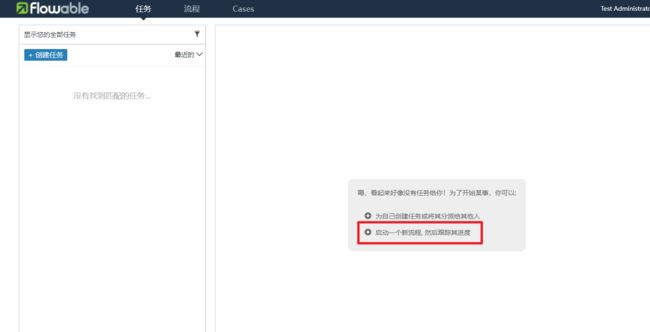
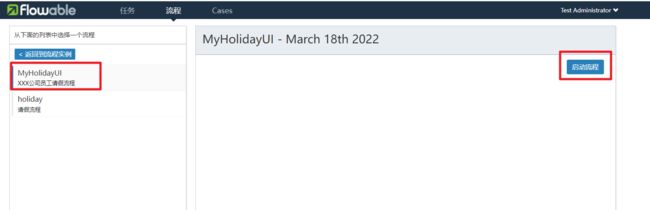

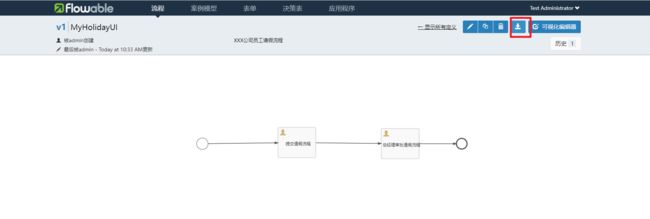
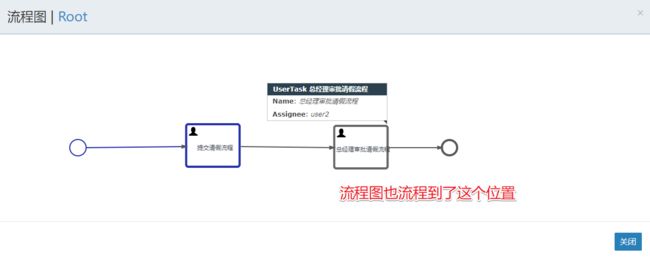
点击显示图:

也就是可以看到当前是user1来处理,user1登录后可以看到要处理的流程,user2登录是看不到的。
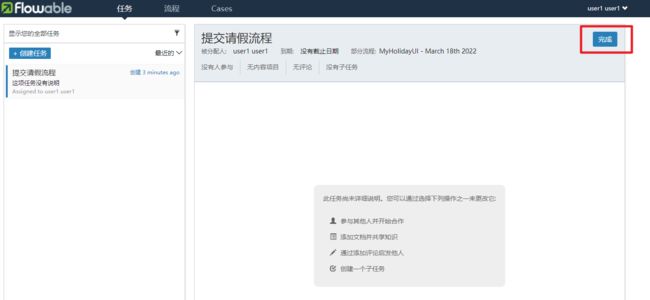
点击完成后流程就向下一步流转了。
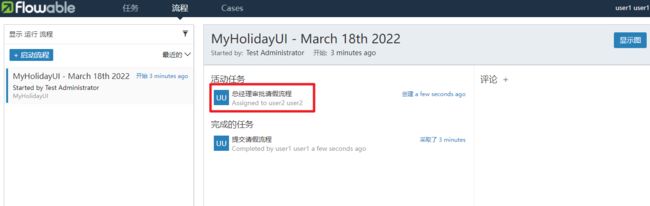
这时再通过user2登录,就可以看到对应的代办的信息。

 然后点击完成,那么整个流程就介绍了。
回到目录…
总结:
提示:这里对文章进行总结:
本文是对Flowable的学习,认识了工作流的用途,学习了flowable部署流程的操作,以及FlowableUI流程设计器的使用。之后的学习内容将持续更新!!!