数据结构之单链表(c++(c语言)通用版)
我们创建一个长度为n的链表时,可以采取头插法创建或者尾插法创建,本篇博客我们采取头插法来创建,(作者只学了头插,尾插等以后来补qwq,补上喽)。
头插原理
我们先来画图来看看头插的创建形式把,会了原理再写代码。
首先是我们的一号和二号节点,我们发现他们是相连的。现在我们使用头插法创建链表要怎么做呢,其实很简单,头插就是把我们新创建的节点放到最前面,我们每次都把创建的节点放到最前面,也就是1好节点的后面。大家注意了,这个一号节点不要存储任何数据或者(这能存储链表的长度信息,)它是我们的头节点。我们创建它只是为了好遍历以后的节点信息。
看图:
我们把一号节点的next地址连接到三号节点,三号的next地址连接到2号节点上,这就是头插。
上代码解释:
头插详细代码
void InitList(LinkedList a,int n){
	int e;
	for(e=0;ea=e;
		b->next=a->next;
		a->next=b;
	}
}
//a号节点是指向节点,我们之后创建的节点都是不断放在a号节点的后面,a号节点只是用来方便遍历。
//我们创建一个b节点,并为他的数据域赋予数值,接着,我们令b号节点链接a号节点链接的节点,并使得a号节点可以连接到b号节点。
//如果是一开始,只有指向a号节点,我们就相当于创建一个尾节点,指向空,令a号节点联系到尾节点
结构体代码:
typedef struct Lnode{
	int a;
	struct Lnode* next;
}Lnode,*LinkedList;//创建结构体,把结构体的别名起为Lnode
//把结构体Lnode的指针起名为LinkedList
//学过Java的同学是不是DNA动了呢qwq
创建指向节点的代码:
void test(){
	LinkedList a=(LinkedList)malloc(sizeof(Lnode));//动态开辟空间

	a->next=NULL;//令指向节点的next指向域为NULL
	int b;
	cin>>b;//输入链表的长度
	InitList(a,b);
	for(int c=0;cnext;
		cout<a<
头插总代码详细代码:
#include
using namespace std;
typedef struct Lnode{
	int a;
	struct Lnode* next;
}Lnode,*LinkedList;
void InitList(LinkedList a,int n){
	int e;
	for(e=0;ea=e;
		b->next=a->next;
		a->next=b;
	}
}
void test(){
	LinkedList a=(LinkedList)malloc(sizeof(Lnode));
	a->next=NULL;
	int b;
	cin>>b;
	InitList(a,b);
	for(int c=0;cnext;
		cout<a<
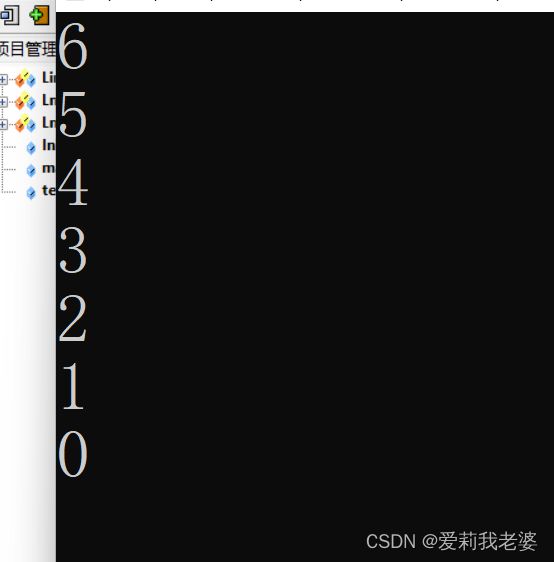
运行结果:
大家可以看到这个6是我输入的,5到0为答案。为什么呢,我们采用头插,会把新创建的节点不断往前安防,而我们赋值又是从0开始,这就使得我们的最后一次赋值5用头插放到最前面了。
按照约定补上尾插:
尾插法原理:
尾插简单多了,顾名思义我们每次都插在最后面即可,别忘记最后一个节点要给他的next域赋值为NULL
尾插代码:
void creatweicha(LinkedList a,int length){
	Lnode* b=a;//创建指向节点来作为我们的指向
	int c=0;
	for(c=1;c<=2length;c++){///从1开始创建节点
		Lnode* p=(Lnode*)malloc(sizeof(Lnode));
		p->shuju=c;//节点存储的值为1到n
		b->next=p;//让指向节点链接到我们创建的节点上
		b=p;//同时移动指向节点让其指向我们创建的节点,以方便以后继续尾插
	}
	b->next=NULL;//别忘记最后一个节点的next域要赋值为NULL
}
在单链表中位置n插入一个元素代码
bool LinkedList_L(LinkedList a,int blocation,int c){
	int d=0;
	Lnode* p=(Lnode*)malloc(sizeof(Lnode));//动态开辟节点p来寻找查询节点的前驱节点
	p=a;
	while(true){
		d++;//d代表着我们这是第几号节点,节点编号从1号开始
		p=p->next;//不断使得p节点往后移动
		if(blocation<=0||p==NULL){//如果位置非法或者插入位置的前驱节点为NULL则代表着不存在前驱
			return false; //节点,返回false代表无法插入
		}
			if(d==blocation-1){
			break;//如果找到前驱节点那么结束循环
		}
	}
	Lnode* n=(Lnode*)malloc(sizeof(Lnode));
	n->shuju=c;//创建节点,并赋予其初始值
	n->next=p->next;//插入节点链接后面的节点
	p->next=n;//链接前驱节点
	return true;

}
附带插入函数的头插建立单链表附带验证的总代码:
#include
using namespace std;
typedef struct Lnode{
	int shuju;
	struct Lnode* next;
}Lnode,*LinkedList;
void InitList(LinkedList a,int b){
	int c;
	for(c=1;c<=b;c++){
		Lnode* p=(Lnode*)malloc(sizeof(Lnode));
		p->shuju=c;
		p->next=a->next;
		a->next=p;
	}
}
bool LinkedList_L(LinkedList a,int blocation,int c){
	int d=0;
	Lnode* p=(Lnode*)malloc(sizeof(Lnode));
	p=a;
	while(true){
		d++;
		p=p->next;
		if(blocation<=0||p==NULL){
			return false;
		}
			if(d==blocation-1){
			break;
		}
	}
	Lnode* n=(Lnode*)malloc(sizeof(Lnode));
	n->shuju=c;
	n->next=p->next;
	p->next=n;
	return true;

}
void testtoucha(){
	LinkedList a=(LinkedList)malloc(sizeof(Lnode));
	a->next=NULL;
	int b;
	cin>>b;
	InitList(a,b);
	Lnode* a1=a;
	for(int c=0;cnext;
		cout<shuju<next;
		if(b1==NULL){
			break;
		}
		else{
			cout<shuju<
我们可以看到,我们头插创建十个节点,在第三个节点处插入数值为100的节点。
删除指定位置的节点
bool shanchu(LinkedList a,int b){
	Lnode* c=a;//创建节点,并把指向节点给与其
	int d=0;
	while(true){
		c=c->next;//不断往后移动节点
		d++;//记录这是第几个节点,下表从1开始
		if(b<=0||c==NULL){//如果删除位置不合法,或者要删除的位置的前驱为空,直接返回删除失败
			return false;
		}
		if(d==b-1){
			break;//找到合法的前驱节点,结束循环
		}
	}
	Lnode* m=c->next;//定义节点m来确定删除的节点
	if(m==NULL){
		return true;//如果m已经为NULL那么就不用管了。
	}
	else{//不为空,则删除节点m
		c->next=m->next;
		free(m);
		return true;
	}
}
带有删除节点函数的尾插创建的单链表验证:
#include
using namespace std;
typedef struct Lnode{
	int shuju;
	struct Lnode* next;
}Lnode,*LinkedList;
bool shanchu(LinkedList a,int b){
	Lnode* c=a;
	int d=0;
	while(true){
		c=c->next;
		d++;
		if(b<=0||c==NULL){
			return false;
		}
		if(d==b-1){
			break;
		}
	}
	Lnode* m=c->next;
	if(m==NULL){
		return true;
	}
	else{
		c->next=m->next;
		free(m);
		return true;
	}
}
void creatweicha(LinkedList a,int length){
	Lnode* b=a;
	int c=0;
	for(c=1;c<=2length;c++){
		Lnode* p=(Lnode*)malloc(sizeof(Lnode));
		p->shuju=c;
		b->next=p;
		b=p;
	}
	b->next=NULL;
}
void test(){
	LinkedList a=(LinkedList)malloc(sizeof(Lnode));
	a->next=NULL;
	int c;
	cin>>c;
	creatweicha(a,c);
	Lnode* p=a;
	while(true){
		p=p->next;
		if(p!=NULL){
			cout<shuju<next;
		if(p1!=NULL){
			cout<shuju<
可以看到我们创建了9个节点,成功删除了第三号节点。
一点小更正:
如果大家要单独写初始化函数的化,那么初始化函数就必须要加引用:
带初始化函数的尾插法:
#include
using namespace std;
typedef struct Lnode{
	int shuju;
	struct Lnode* next;
}Lnode,*LinkedList;
bool shanchu(LinkedList a,int b){
	Lnode* c=a;
	int d=0;
	while(true){
		c=c->next;
		d++;
		if(b<=0||c==NULL){
			return false;
		}
		if(d==b-1){
			break;
		}
	}
	Lnode* m=c->next;
	if(m==NULL){
		return true;
	}
	else{
		c->next=m->next;
		free(m);
		return true;
	}
}
void creatweicha(LinkedList a,int length){
	Lnode* b=a;
	int c=0;
	for(c=1;c<=length;c++){
		Lnode* p=(Lnode*)malloc(sizeof(Lnode));
		p->shuju=c;
		b->next=p;
		b=p;
	}
	b->next=NULL;
}
void chushihua(LinkedList &a){//加引用,不然初始化失败
	a=(LinkedList)malloc(sizeof(Lnode));
	a->next=NULL;

}
void test(){


		LinkedList a;
		 chushihua(a);//=(LinkedList)malloc(sizeof(Lnode));
		//a->next=NULL;
	int c;
	cin>>c;
	creatweicha(a,c);
	Lnode* p=a;
	while(true){
		p=p->next;
		if(p!=NULL){
			cout<shuju<next;
		if(p1!=NULL){
			cout<shuju<
头插亦同理
#include
using namespace std;
typedef struct Lnode{
	int a;
	struct Lnode* next;
}Lnode,*LinkedList;
void InitList(LinkedList a,int n){
	int e;
	for(e=0;ea=e;
		b->next=a->next;
		a->next=b;
	}
}
void chushihua(LinkedList &a){
	a=(LinkedList)malloc(sizeof(Lnode));
	a->next=NULL;
}
void test(){
	LinkedList a;
	chushihua(a);//=(LinkedList)malloc(sizeof(Lnode));
	//a->next=NULL;
	int b;
	cin>>b;
	InitList(a,b);
	for(int c=0;cnext;
cout<a< 


