Django+Nginx+uWSGI+Supervisor实战

大家好,真的是许久没有更新文章了,甚是想念,最近这段时间事情很多,家里的事情、工作的事情,真没有太多时间去码文章,其实已经搁置了些许文章,没有整理,趁着这段时间风平浪静,我还是不忘初心,给大家分享。
唠嗑下网络自动化(NetDevOps):
为什么要讨论这个,其实这段时间我也在求职摸索和对未来职业的思考,在我的粉丝里绝大多数都是网络工程师,主要还是以网工为主,专职网络自动化的极少,咋最多就当个工具来使用。
家事:
-
我是2个孩子的奶爸,早上送娃幼儿园、买菜,中午下班还得炖个汤/做个菜,下午接娃,晚上还得做饭,带娃睡觉。不知不觉已经3年多了,这是我日常的一部分。
-
学习的时间很少,我凌晨才开始码代码,这几年基本精力全部投入学习开发,也许是兴趣驱动着,让我坚持,但忽略了本职技术。
少走一些坑:
-
我也是一名
网络工程师,双IE,华为IE号是4位数(吹下水),python是我的辅助工具。 -
求职路上,发现外面网络自动化岗位(NetDevOps)极少(可以说没有),大家要看看外面的市场,可在招聘平台搜索看看。
-
着重以网工技术/管理为主,千万别陷入网络开发太深,别去深入学习前端框架、深入学习后端django,不要走偏路线(除专职网络自动化方向);
因为学习前端成本太高、费时费精力,容易忽略本职技术方向,后端开发同理。如果你是学霸,请忽略。 -
了解专职网络开发的公司:字节、腾讯、XX银行、唯品、科大讯飞等等,都是专职开发的,很少网络和开发兼并的(专业的事专业的人做)。
-
当前以云计算、SDN网络、SegmentRouting(SR)、SRv6、IB网络及TCP/IP详解等技术学习方向,开发为辅。
-
善用chatGPT,多途径使用AI工具;
有兴趣可以学学开发,但别当真,想想未来市场需要啥,你想要做啥?
时间是宝贵的,把时间花在刀刃上。
好了,就先唠嗑到这,接下来就把下面这篇文章分享给有需求的小伙伴们。
简介
什么是Django?
Django是一个基于Python语言开发的Web框架。它提供了一种高效的方式来设计、开发和部署Web应用程序,使得开发者可以更加专注于业务逻辑的实现而不是底层技术的实现。Django框架提供了很多强大的功能,如ORM(对象关系映射)、模板系统、表单处理等,这些功能可以帮助开发人员更加高效地开发Web应用程序。还有其他开源的web框架如Flask。
什么是Nginx?
Nginx是一个Web服务器,也可以作为反向代理、负载均衡器和HTTP缓存使用。它以高性能、稳定性和低资源消耗著称。Nginx通常用于通过直接提供静态内容和将动态内容传递给应用程序服务器(如uWSGI)来改善Web应用程序的性能和可靠性。
这里可能有人会问了,django的runserver启动后不是可以访问的嘛?还需要nginx做啥?这种在生产环境下是不推荐的,而且并发的效率低,仅在开发环境下使用。
什么是uWSGI?
Web Server Gateway Interface,Web服务器网关接口
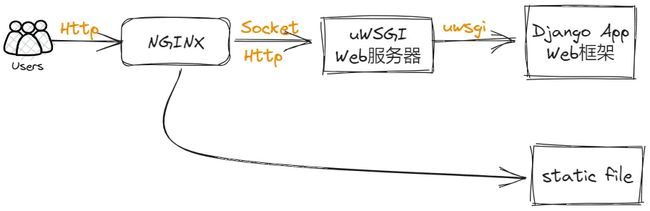
Client(用户)<=>Nginx(Web服务器)<=>uWSGI<=>Django-APP(应用)
WSGI是一种Web服务器网关接口,用于在Web服务器和Web应用程序之间进行通信。uWSGI是一个用于Web服务器和Web应用程序之间进行通信的协议。在使用uWSGI时,Web服务器通过uwsgi协议向uWSGI服务器发送请求,然后uWSGI服务器将请求转发到Web应用程序中,最终,Web应用程序将响应发送回uWSGI服务器,然后再将其发送回Web服务器。因此,可以说uWSGI是一个用于将Web服务器和Web应用程序连接起来的软件(中间的桥梁)。
- Nginx:是面向用户
- uWSGI:Web服务器
- WSGI:Web服务器与Web应用通信的规范
- uwsgi:是WSGI通信规范的一种自有协议
- uWSGI是中间角色,桥接Nginx和APP

什么是Supervisord?
Supervisor是一个用Python编写的进程控制系统。它可以在后台运行和监控多个进程(如ngnix/uwsgi/celery等),并在它们出现故障时重新启动它们。Supervisor还可以提供Web界面访问(默认关闭),方便查看和管理的进程。
温馨提示:supervisord不支持windows环境,supervisor-win可以支持windows环境。
Supervisord官方介绍
如何部署?
Django部署
详细的安装部署参考之前的文章,这里简单罗列以下。
-
安装
# 以版本3.2为安装示例 $ python -m pip install django==3.2 -
新建项目
$ python manage.py startproject <your-project-name> -
新建应用APP
$ python manage.py startapp -
测试启动server
$ python manage.py runserver 0.0.0.0:8080如果刚开始部署,能看到
小火箭就是正常启动的,后面的路由、页面、样式等等,你自己巴拉巴拉搞好。 -
关键的uWSGI配置
先创建文件
uwsgi.ini,放在settings同级目录下,配置如下所示。先给下项目的基本的目录,方便看:
(py389) [netdevops@NetDevOps]$ pwd /home/netdevops/django/NetDevOps # 主要列下settings同级目录的信息 (py389) [netdevops@NetDevOps]$tree NetDevOps NetDevOps/ ├── asgi.py ├── celery.py ├── __init__.py ├── NetDevOps.sock # 自动创建 ├── routing.py ├── settings.py ├── urls.py ├── uwsgi.ini # 我放在settings同级目录下 └── wsgi.py uwsgi.ini的配置
# 创建文件
$ touch uwsgi.ini
$ cat uwsgi.ini
[uwsgi]
# 使用unix socket与nginx通信,仅限于uwsgi和nginx在同一主机上情形
# Nginx配置中uwsgi_pass应指向同一socket文件
# socket表示接收的是uwsgi协议
socket=/home/netdevops/django/NetDevOps/NetDevOps/NetDevOps.sock

# 设置项目虚拟环境,Docker部署时不需要
home=/home/netdevops/django/NetDevOps
# 项目的绝对路径
chdir=/home/netdevops/django/NetDevOps
# wsgi文件位置
module=NetDevOps.wsgi:application

# wsgi的文件,相对路径
wsgi-file=NetDevOps/wsgi.py

# python虚拟环境
virtualenv=/home/netdevops/.pyenv/versions/py389

# socket权限设置
chmod-socket=664
#配置启动的进程数,这个多配无意,按照自己电脑核去配置
processes=4
#配置每个进程的线程数
threads=2
#开启主进程管理模式
master=True

#配置存放主进程的进程号文件,启动uwsgi后**uwsgi.pid文件会自动生成**
pidfile=uwsgi.pid
#后台启动,指定日志文件位置,如使用supervisor管理uwsgi,必须禁用
#daemonize=uwsgi.log
#服务停止时自动移除unix Socket和pid文件
vacuum=True
Nginx部署
-
yum方式安装nginx
# 安装 [netdevops@NetDevOps ~]$ yum install nginx # 查看版本 [netdevops@NetDevOps ~]$ nginx -v nginx version: nginx/1.20.1 -
进入nginx程序目录,测试nginx
[netdevops@NetDevOps ~]$ cd /usr/sbin/ [root@NetDevOps sbin]# ./nginx -t # 显示下面两行则代表可正常运行 nginx: the configuration file /etc/nginx/nginx.conf syntax is ok nginx: configuration file /etc/nginx/nginx.conf test is successful -
配置nginx
nginx的配置参考大江狗的文章,按需调整。
$ cat /etc/nginx/nginx.conf
########################## Global Start ##########################
# 设置用户
user netdevops;
# 进程数,一般设成CPU核数1-2倍
worker_processes auto;
# 错误日志文件
error_log /var/log/nginx/error.log;
# 存放进程ID文件
pid /run/nginx.pid;

# Load dynamic modules. See /usr/share/doc/nginx/README.dynamic.
include /usr/share/nginx/modules/*.conf;

########################## Global End ##########################

########################## Event Start ##########################

events {
    # 使用epoll的I/O 模型处理轮询事件
    # use epoll
    # 工作进程的最大连接数量,默认1024个
    worker_connections 1024;
    # http层面的keep-alive超时时间
    # keepalive_timeout 60;
    # 客户端请求头部的缓冲区大小
    # client_header_buffer_size 2k;
}

########################## Event End ##########################


########################## HTTP Start ##########################
http {
    # 日志格式
    log_format  main  '$remote_addr - $remote_user [$time_local] "$request" '
                      '$status $body_bytes_sent "$http_referer" '
                      '"$http_user_agent" "$http_x_forwarded_for"';
    # access日志路径
    access_log  /var/log/nginx/access.log  main;
    # 允许sendfile方式传输文件,默认为off。
    sendfile            on;
    # sendfile开启时才开启。
    tcp_nopush          on;
    tcp_nodelay         on;
    keepalive_timeout   65;
    types_hash_max_size 4096;

    #  导入文件扩展名与文件类型映射表
    include             /etc/nginx/mime.types;
    # 默认文件类型
    default_type        application/octet-stream;

    include /etc/nginx/conf.d/*.conf;

    # 开启gzip压缩功能
    gzip on;
    # 设置允许压缩的页面最小字节数; 这里表示如果文件小于10k,压缩没有意义.
    gzip_min_length 10k;
    # 设置压缩比率,最小为1,处理速度快,传输速度慢
    # 9为最大压缩比,处理速度慢,传输速度快; 推荐6
    gzip_comp_level 6;
    # 设置压缩缓冲区大小,此处设置为16个8K内存作为压缩结果缓冲
    gzip_buffers 16 8k;
    # 设置哪些文件需要压缩,一般文本,css和js建议压缩。图片视需要压缩
    gzip_types text/plain text/css application/json application/x-javascript text/xml application/xml application/xml+rss text/javascript;

       # 反向代理
    server {
        listen       80;
        listen       [::]:80;
        server_name  localhost;
        root         /usr/share/nginx/html;

        # Load configuration files for the default server block.
        include /etc/nginx/default.d/*.conf;

    # 网站静态文件所在目录
    location /static{
        alias /home/netdevops/django/NetDevOps/static;
	# 静态文件缓存,10天有效
	expires 10d;
    }

    # 上传文件所在目录
    location /media{
        alias /home/netdevops/django/NetDevOps/media;
    }

    # 动态文件交给uwsgi处理
    location / {
        uwsgi_pass  unix:/home/netdevops/django/NetDevOps/NetDevOps/NetDevOps.sock;
        include /etc/nginx/uwsgi_params;

	# 允许内网所有用户访问,按需填写
	allow 10.0.0.0/8;
	# 拒绝所有
	deny all;

    }

        location = /favicon.ico {
	  log_not_found off;
	# 不在access_log记录该项访问
	  access_log off;
              }

        error_page 404 /404.html;
        location = /404.html {
        }

        error_page 500 502 503 504 /50x.html;
        location = /50x.html {
        }
    }
}
########################## HTTP End ##########################
说明:我这里的环境只有HTTP,没有HTTPS。
Supervisor部署:
首先,先简单介绍下Supervisor的四大组成部分:
- supervisord:Supervisor的主进程,它负责启动和停止子进程,并监控它们的状态,如果有子进程异常退出,supervisord会自动重新启动它,记录子进程
stdout和stderr输出。 - supervisorctl:Supervisor的命令行界面,启动、停止、重启子进程,查看进程状态和日志等。
- Web界面:Supervisor提供了一个Web界面,通过Web浏览器查看和管理进程。Web界面提供了与supervisorctl相同的功能,但在Web浏览器中更加直观和易于使用(默认不启用)。
- xml-rpc 接口:提供xml-rpc接口,用于询问和控制管理程序及其他运行的程序。

安装
# pip安装supervisord
$ python -m pip install supervisor
# 查看安装路径
$ which supervisord
/usr/local/bin/supervisord
创建目录及文件
 # 创建目录,用于存放子程序文件 xxxx.ini
 # 示例:nginx.ini、uwsgi.ini、celery.ini
$ mkdir -p /etc/supervisord.d/
$ mkdir -p /etc/supervisord.d/logs/uwsgi
$ mkdir -p /etc/supervisord.d/logs/nginx
$ cd /etc/supervisord.d/
$ touch nginx.ini
$ touch uwsgi.ini
$ ll /etc/supervisord.d/
-rw-r--r-- 1 root root 0 Aug 20 15:52 nginx.ini
-rw-r--r-- 1 root root 0 Aug 20 15:53 uwsgi.ini
生成配置文件
 # 直接执行,可以查看配置
 $ echo_supervisord_conf

 # 生成supervisord.conf文件,以该文件来启动
 $ echo_supervisord_conf > /etc/supervisord.conf
修改配置文件
每个子进程以子进程.ini文件存在/etc/supervisord.d/目录下,方便区分管理
$ vim /etc/supervisord.conf
# 修改成以下内容
[unix_http_server]
chmod=0777  # 允许非root运行

[include]
files = /etc/supervisord.d/*.ini
添加uwsgi的进程
$ vim /etc/supervisord.d/uwsgi.ini
# 添加的程序
[program:uwsgi]
# 所在目录
directory=/home/netdevops/django/NetDevOps/NetDevOps
# 启动uwsgi的执行命令
command=/home/netdevops/.pyenv/versions/py389/bin/uwsgi --ini /home/netdevops/django/NetDevOps/NetDevOps/uwsgi.ini
# 优先级
priority=10
# 进程名称
process_name=%(program_name)s
# 日志级别,默认info
loglevel = info
# 把stderr输入到stdout文件上
redirect_stderr=true
# stdout输出的文件路径
stdout_logfile=/etc/supervisord.d/logs/uwsgi/uwsgi.log
# 每文件最大100MB,默认50MB
stdout_logfile_maxbytes=100MB
# 文件存10份
stdout_logfile_backups=10
# 每文件最大100MB,超出存到新文件
stdout_capture_maxbytes=100MB
# stderr输出的文件路径
stderr_logfile=/etc/supervisord.d/logs/uwsgi/uwsgi_error.log
stderr_logfile_maxbytes=100MB
stderr_logfile_backups=10
stderr_capture_maxbytes=100MB
其他参数:
- autostart:默认
true,supervisor启动,子进程启动。 - startsecs:默认1s,子进程成功启动后需要保持运行的时间。
- autorestart:默认
unexpected,子程序退出自动重启。 - startretries:默认3次,允许失败重启的次数。
- priority:默认999,值小的优先启动。
- redirect_stderr:默认false,如设置
true表示把stderr输入到stdout文件上。 - logfile_backups:备份份数,默认10份;
- loglevel:日志级别有
critical,error,warn,info,debug,trace, orblather,默认是info; - pidfile:进程文件,
$CWD/supervisord.pid
添加nginx的进程
$ vim /etc/supervisord.d/nginx.ini
[program:nginx]
# 所在目录
directory=/usr/sbin
# 以前台方式运行
command=/usr/sbin/nginx -g 'daemon off;'
# 优先级
priority=20
# 进程名称
process_name=%(program_name)s
# 用户
user=root
# 日志级别,默认info
loglevel = info
# 把stderr输入到stdout文件上
redirect_stderr=true
# stdout输出的文件路径
stdout_logfile=/etc/supervisord.d/logs/nginx/nginx.log
# 每文件最大100MB,默认50MB
stdout_logfile_maxbytes=100MB
# 文件存10份
stdout_logfile_backups=10
# 每文件最大100MB,超出存到新文件
stdout_capture_maxbytes=100MB
# stderr输出的文件路径
stderr_logfile=/etc/supervisord.d/logs/nginx/nginx_error.log
stderr_logfile_maxbytes=100MB
stderr_logfile_backups=10
stderr_capture_maxbytes=100MB
临时启动supervisor
先临时启动看下能否管理nginx和uwsgi两个进程,正常后在关闭
# 启动
$ supervisord -c /etc/supervisord.conf

# 关闭
 supervisorctl stop all
查看与操作进程
平时主要使用到如下几个操作命令即可。
-
查看状态
$ supervisorctl status uwsgi RUNNING pid 19835, uptime 1 day, 0:09:14 -
重启所有进程
# 重启所有的子进程 $ supervisorctl reload $ supervisorctl status celery RUNNING pid 122784, uptime 0:00:37 celery_beat RUNNING pid 122785, uptime 0:00:37 uwsgi RUNNING pid 122786, uptime 0:00:37 # 我这里有3个子进程,看uptime时间都是启动不久的 -
暂停与启动
# 暂停某个进程 $ supervisorctl stop uwsgi # 启动某个进程 $ supervisorctl start uwsgi # 查看某个进程状态 $ supervisorctl status uwsgi # 暂停所有进程 $ supervisorctl stop all # 启动所有进程 $ supervisorctl start all # 重新启动所有进程 $ supervisorctl reload -
重新加载配置
# 重新加载配置
$ supervisorctl  update
开机启动
这里就通过systemctl方式来启动supervisord,主机关机重启也会自动激活supervisord。
-
创建supervisord.service文件
$ cat /etc/systemd/system/supervisord.service [Unit] Description=Supervisor process control system for UNIX [Service] Type=forking ExecStart=/usr/local/bin/supervisord -c /etc/supervisord.conf ExecStop=/usr/local/bin/supervisorctl shutdown ExecReload=/usr/bin/supervisorctl reload KillMode=process [Install] WantedBy=multi-user.target -
开启启动
# 开机启动 $ systemctl enable supervisord # 启动supervisord $ sudo systemctl start supervisord $ sudo systemctl status supervisord ● supervisord.service - Supervisor process control system for UNIX Loaded: loaded (/etc/systemd/system/supervisord.service; enabled; vendor preset: disabled) Active: active (running) since Sun 2023-08-20 23:38:41 CST; 23s ago ...省略... # 停止supervisord $ sudo systemctl stop supervisord -
最后验证下supervisorctl的状态
$ supervisorctl status celery RUNNING pid 2298, uptime 0:01:01 celery_beat RUNNING pid 2299, uptime 0:01:01 nginx RUNNING pid 2300, uptime 0:01:01 uwsgi RUNNING pid 2301, uptime 0:01:01温馨提示::主要观察下状态是不是一直保持RUNNING状态,否则需要查看下log的异常问题。
最后,就晒一张效果图吧!!!正常启动.
