卷(一)C++___二刷
Chapter 0_Introduction / Getting Started
0.1 — Introduction to these tutorials
0.2 — Introduction to programming languages
Rules, Best practices, and warnings
As we proceed through these tutorials, we’ll highlight many important points under the following three categories:
Rule
Rules are instructions that you must do, as required by the language. Failure to abide by a rule will generally result in your program not working.
Best practice
Best practices are things that you should do, because that way of doing things is generally considered a standard or highly recommended. That is, either everybody does it that way (and if you do otherwise, you’ll be doing something people don’t expect), or it is superior to the alternatives.
Warning
Warnings are things that you should not do, because they will generally lead to unexpected results.
0.3 — Introduction to C/C++
C and C++’s philosophy
The underlying design philosophy of C and C++ can be summed up as “trust the programmer” – which is both wonderful and dangerous. C++ is designed to allow the programmer a high degree of freedom to do what they want. However, this also means the language often won’t stop you from doing things that don’t make sense, because it will assume you’re doing so for some reason it doesn’t understand. There are quite a few pitfalls that new programmers are likely to fall into if caught unaware. This is one of the primary reasons why knowing what you shouldn’t do in C/C++ is almost as important as knowing what you should do.
0.4 — Introduction to C++ development

Best practice
Name your code files something.cpp, where something is a name of your choosing, and .cpp is the extension that indicates the file is a C++ source file.
0.5 — Introduction to the compiler, linker, and libraries
0.6 — Installing an Integrated Development Environment (IDE)
0.7 — Compiling your first program
Projects
To write a C++ program inside an IDE, we typically start by creating a new project (we’ll show you how to do this in a bit). A project is a container that holds all of your source code files, images, data files, etc… that are needed to produce an executable (or library, website, etc…) that you can run or use. The project also saves various IDE, compiler, and linker settings, as well as remembering where you left off, so that when you reopen the project later, the state of the IDE can be restored to wherever you left off. When you choose to compile your program, all of the .cpp files in the project will get compiled and linked.
Each project corresponds to one program. When you’re ready to create a second program, you’ll either need to create a new project, or overwrite the code in an existing project (if you don’t want to keep it). Project files are generally IDE specific, so a project created for one IDE will need to be recreated in a different IDE.
Best practice
Create a new project for each new program you write.
0.8 — A few common C++ problems
0.9 — Configuring your compiler: Build configurations
Best practice
Use the debug build configuration when developing your programs. When you’re ready to release your executable to others, or want to test performance, use the release build configuration.
0.10 — Configuring your compiler: Compiler extensions
Best practice
Disable compiler extensions to ensure your programs (and coding practices) remain compliant with C++ standards and will work on any system.
0.11 — Configuring your compiler: Warning and error levels
Best practice
Don’t let warnings pile up. Resolve them as you encounter them (as if they were errors). Otherwise a warning about a serious issue may be lost amongst warnings about non-serious issues.
Increasing your warning levels
Best practice
Turn your warning levels up to the maximum, especially while you are learning. It will help you identify possible issues.
Treat warnings as errors
Best practice
Enable “Treat warnings as errors”. This will force you to resolve all issues causing warnings.
0.12 — Configuring your compiler: Choosing a language standard
Chapter 1_C++ Basics
1.1 — Statements and the structure of a program
Functions and the main function
Rule
Every C++ program must have a special function named main (all lower case letters). When the program is run, the statements inside of main are executed in sequential order.
1.2 — Comments
Multi-line comments
Warning
Don’t use multi-line comments inside other multi-line comments. Wrapping single-line comments inside a multi-line comment is okay.
Proper use of comments
Best practice
Comment your code liberally, and write your comments as if speaking to someone who has no idea what the code does. Don’t assume you’ll remember why you made specific choices.
1.3 — Introduction to objects and variables
Defining multiple variables
Best practice
Although the language allows you to do so, avoid defining multiple variables of the same type in a single statement. Instead, define each variable in a separate statement on its own line (and then use a single-line comment to document what it is used for).
1.4 — Variable assignment and initialization
Variable assignment
Warning
One of the most common mistakes that new programmers make is to confuse the assignment operator (=) with the equality operator (). Assignment (=) is used to assign a value to a variable. Equality () is used to test whether two operands are equal in value.
List initialization
Best practice
Favor initialization using braces whenever possible.
Initialize your variables
Best practice
Initialize your variables upon creation.
1.5 — Introduction to iostream: cout, cin, and endl
std::endl
Best practice
Output a newline whenever a line of output is complete.
std::endl vs ‘\n’
Using std::endl can be a bit inefficient, as it actually does two jobs: it moves the cursor to the next line of the console, and it flushes the buffer. When writing text to the console, we typically don’t need to flush the buffer at the end of each line. It’s more efficient to let the system flush itself periodically (which it has been designed to do efficiently).
Because of this, use of the ‘\n’ character is typically preferred instead. The ‘\n’ character moves the cursor to the next line of the console, but doesn’t request a flush, so it will often perform better. The ‘\n’ character also tends to be easier to read since it’s both shorter and can be embedded into existing text.
Best practice
Prefer ‘\n’ over std::endl when outputting text to the console.
Warning
‘\n’ uses a backslash (as do all special characters in C++), not a forward slash. Using a forward slash (e.g. ‘/n’) instead may result in unexpected behavior.
std::cin
Best practice
There’s some debate over whether it’s necessary to initialize a variable immediately before you give it a user provided value via another source (e.g. std::cin), since the user-provided value will just overwrite the initialization value. In line with our previous recommendation that variables should always be initialized, best practice is to initialize the variable first.
1.6 — Uninitialized variables and undefined behavior
Uninitialized variables
Warning
Some compilers, such as Visual Studio, will initialize the contents of memory to some preset value when you’re using a debug build configuration. This will not happen when using a release build configuration. Therefore, if you want to run the above program yourself, make sure you’re using a release build configuration (see lesson 0.9 – Configuring your compiler: Build configurations for a reminder on how to do that). For example, if you run the above program in a Visual Studio debug configuration, it will consistently print -858993460, because that’s the value (interpreted as an integer) that Visual Studio initializes memory with in debug configurations.
Undefined behavior
Rule
Take care to avoid all situations that result in undefined behavior, such as using uninitialized variables.
Question #2
What is undefined behavior, and what can happen if you do something that exhibits undefined behavior?
Undefined behavior is the result of executing code whose behavior is not well defined by the language. The result can be almost anything, including something that behaves correctly.
1.7 — Keywords and naming identifiers
Identifier naming best practices
Best practice
When working in an existing program, use the conventions of that program (even if they don’t conform to modern best practices). Use modern best practices when you’re writing new programs.
1.8 — Whitespace and basic formatting
Basic formatting
Best practice
Your lines should be no longer than 80 chars in length.
If a long line is split with an operator (eg. << or +), the operator should be placed at the beginning of the next line, not the end of the current line
std::cout << 3 + 4
    + 5 + 6
    * 7 * 8;
Easier to read:
cost          = 57;
pricePerItem  = 24;
value         = 5;
numberOfItems = 17;
std::cout << "Hello world!\n";                  // cout lives in the iostream library
std::cout << "It is very nice to meet you!\n";  // these comments are easier to read
std::cout << "Yeah!\n";                         // especially when all lined up
// cout lives in the iostream library
std::cout << "Hello world!\n";

// these comments are easier to read
std::cout << "It is very nice to meet you!\n";

// when separated by whitespace
std::cout << "Yeah!\n";
Automatic formatting
Best practice
Using the automatic formatting feature is highly recommended to keep your code’s formatting style consistent.
1.9 — Introduction to literals and operators
Chaining operators
We’ll talk more about the order in which operators execute when we do a deep dive into the topic of operators. For now, it’s enough to know that the arithmetic operators execute in the same order as they do in standard mathematics: Parenthesis first, then Exponents, then Multiplication & Division, then Addition & Subtraction. This ordering is sometimes abbreviated PEMDAS, or expanded to the mnemonic “Please Excuse My Dear Aunt Sally”.
Return values and side effects
Some operators have additional behaviors. An operator that has some observable effect beyond producing a return value is said to have a side effect.
1.10 — Introduction to expressions
Expressions
An expression is a combination of literals, variables, operators, and function calls that calculates a single value. The process of executing an expression is called evaluation, and the single value produced is called the result of the expression.
Expressions involving operators with side effects are a little more tricky:
x = 5           // has side effect of assigning 5 to x, evaluates to x
x = 2 + 3       // has side effect of assigning 5 to x, evaluates to x
std::cout << x  // has side effect of printing x to console, evaluates to std::cout
Note that expressions do not end in a semicolon, and cannot be compiled by themselves. For example, if you were to try compiling the expression x = 5, your compiler would complain (probably about a missing semicolon). Rather, expressions are always evaluated as part of statements.
For example, take this statement:
int x{ 2 + 3 }; // 2 + 3 is an expression that has no semicolon -- the semicolon is at the end of the statement containing the expression
If you were to break this statement down into its syntax, it would look like this:
type identifier { expression };
ype could be any valid type (we chose int). identifier could be any valid name (we chose x). And expression could be any valid expression (we chose 2 + 3, which uses two literals and an operator).
Key insight
Wherever you can use a single value in C++, you can use a value-producing expression instead, and the expression will be evaluated to produce a single value.
Expression statements
An expression statement is a statement that consists of an expression followed by a semicolon.
Quiz time
Question #1
What is the difference between a statement and an expression?
Statements are used when we want the program to perform an action. Expressions are used when we want the program to calculate a value.
1.11 — Developing your first program
Best practice
New programmers often try to write an entire program all at once, and then get overwhelmed when it produces a lot of errors. A better strategy is to add one piece at a time, make sure it compiles, and test it. Then when you’re sure it’s working, move on to the next piece.
Multiply by 2
The preferred solution
#include This is the preferred solution of the bunch. When std::cout executes, the expression num * 2 will get evaluated, and the result will be double num‘s value. That value will get printed. The value in num itself will not be altered, so we can use it again later if we wish.
This version is our reference solution.
Author’s note
However, there’s a saying I’m fond of: “You have to write a program once to know how you should have written it the first time.” This speaks to the fact that the best solution often isn’t obvious, and that our first solutions to problems are usually not as good as they could be.
Too often new programmers focus on optimizing for performance when they should be optimizing for maintainability.
All of this is really to say: don’t be frustrated if/when your solutions don’t come out wonderfully optimized right out of your brain. That’s normal. Perfection in programming is an iterative process (one requiring repeated passes).
Author’s note
One more thing: You may be thinking, “C++ has so many rules and concepts. How do I remember all of this stuff?”.
Short answer: You don’t. C++ is one part using what you know, and two parts looking up how to do the rest.
As you read through this site for the first time, focus less on memorizing specifics, and more on understanding what’s possible. Then, when you have a need to implement something in a program you’re writing, you can come back here (or to a reference site) and refresh yourself on how to do so.
1.x — Chapter 1 summary and quiz
An expression statement is an expression that has been turned into a statement by placing a semicolon at the end of the expression.
When writing programs, add a few lines or a function, compile, resolve any errors, and make sure it works. Don’t wait until you’ve written an entire program before compiling it for the first time!
Focus on getting your code working. Once you are sure you are going to keep some bit of code, then you can spend time removing (or commenting out) temporary/debugging code, adding comments, handling error cases, formatting your code, ensuring best practices are followed, removing redundant logic, etc…
First-draft programs are often messy and imperfect. Most code requires cleanup and refinement to get to great!
Chapter 2_C++ Basics: Functions and Files
2.1 — Introduction to functions
A function is a reusable sequence of statements designed to do a particular job.
Functions that you write yourself are called user-defined functions.
An example of a user-defined function
Warning
Don’t forget to include parentheses () after the function’s name when making a function call.
As an aside…
“foo” is a meaningless word that is often used as a placeholder name for a function or variable when the name is unimportant to the demonstration of some concept. Such words are called metasyntactic variables (though in common language they’re often called “placeholder names” since nobody can remember the term “metasyntactic variable”). Other common metasyntactic variables in C++ include “bar”, “baz”, and 3-letter words that end in “oo”, such as “goo”, “moo”, and “boo”).
For those interested in etymology (how words evolve), RFC 3092 is an interesting read.
2.2 — Function return values (value-returning functions)
Revisiting main()
Best practice
Your main function should return the value 0 if the program ran normally.
A value-returning function that does not return a value will produce undefined behavior
Best practice
Make sure your functions with non-void return types return a value in all cases.
Failure to return a value from a value-returning function will cause undefined behavior.
Reusing functions
Best practice
Follow the DRY best practice: “don’t repeat yourself”. If you need to do something more than once, consider how to modify your code to remove as much redundancy as possible. Variables can be used to store the results of calculations that need to be used more than once (so we don’t have to repeat the calculation). Functions can be used to define a sequence of statements we want to execute more than once. And loops (which we’ll cover in a later chapter) can be used to execute a statement more than once.
Conclusion
Return values provide a way for functions to return a single value back to the function’s caller.
Functions provide a way to minimize redundancy in our programs.
2.3 — Void functions (non-value returning functions)
Void functions don’t need a return statement
Best practice
Do not put a return statement at the end of a non-value returning function.
What is an early return, and what is its behavior?
An early return is a return statement that occurs before the last line of a function. It causes the function to return to the caller immediately.
2.4 — Introduction to function parameters and arguments
How parameters and arguments work together
When a function is called, all of the parameters of the function are created as variables, and the value of each of the arguments is copied into the matching parameter. This process is called pass by value.
Note that the number of arguments must generally match the number of function parameters, or the compiler will throw an error. The argument passed to a function can be any valid expression (as the argument is essentially just an initializer for the parameter, and initializers can be any valid expression).
Conclusion
Function parameters and return values are the key mechanisms by which functions can be written in a reusable way, as it allows us to write functions that can perform tasks and return retrieved or calculated results back to the caller without knowing what the specific inputs or outputs are ahead of time.
2.5 — Introduction to local scope
Local variables
Function parameters, as well as variables defined inside the function body, are called local variables.
int add(int x, int y) // function parameters x and y are local variables
{
    int z{ x + y }; // z is a local variable too

    return z;
}
Local variable lifetime
Much like a person’s lifetime is defined to be the time between their birth and death, an object’s lifetime is defined to be the time between its creation and destruction. Note that variable creation and destruction happen when the program is running (called runtime), not at compile time. Therefore, lifetime is a runtime property.
Local scope
An identifier’s scope determines where the identifier can be seen and used within the source code. When an identifier can be seen and used, we say it is in scope. When an identifier can not be seen, we can not use it, and we say it is out of scope.Scope is a compile-time property, and trying to use an identifier when it is not in scope will result in a compile error.
“Out of scope” vs “going out of scope”
The terms “out of scope” and “going out of scope” can be confusing to new programmers.
An identifier is out of scope anywhere it cannot be accessed within the code. In the example above, the identifier x is in scope from its point of definition to the end of the main function. The identifier x is out of scope outside of that code region.
The term “going out of scope” is typically applied to objects rather than identifiers. We say an object goes out of scope at the end of the scope (the end curly brace) in which the object was instantiated. In the example above, the object named x goes out of scope at the end of the function main.
A local variable’s lifetime ends at the point where it goes out of scope, so local variables are destroyed at this point.
Note that not all types of variables are destroyed when they go out of scope. We’ll see examples of these in future lessons.
Functional separation
Key insight
Names used for function parameters or variables declared in a function body are only visible within the function that declares them. This means local variables within a function can be named without regard for the names of variables in other functions. This helps keep functions independent.
Where to define local variables
Local variables inside the function body should be defined as close to their first use as reasonable:
#include In the above example, each variable is defined just before it is first used. There’s no need to be strict about this – if you prefer to swap lines 5 and 6, that’s fine.
Best practice
Define your local variables as close to their first use as reasonable.
2.6 — Why functions are useful, and how to use them effectively
Effectively using functions
One of the biggest challenges new programmers encounter (besides learning the language) is understanding when and how to use functions effectively. Here are a few basic guidelines for writing functions:
- Groups of statements that appear more than once in a program should generally be made into a function. For example, if we’re reading input from the user multiple times in the same way, that’s a great candidate for a function. If we output something in the same way in multiple places, that’s also a great candidate for a function.
- Code that has a well-defined set of inputs and outputs is a good candidate for a function, (particularly if it is complicated). For example, if we have a list of items that we want to sort, the code to do the sorting would make a great function, even if it’s only done once. The input is the unsorted list, and the output is the sorted list. Another good prospective function would be code that simulates the roll of a 6-sided dice. Your current program might only use that in one place, but if you turn it into a function, it’s ready to be reused if you later extend your program or in a future program.
- A function should generally perform one (and only one) task.
- When a function becomes too long, too complicated, or hard to understand, it can be split into multiple sub-functions. This is called refactoring. We talk more about refactoring in lesson 3.10 – Finding issues before they become problems.
Typically, when learning C++, you will write a lot of programs that involve 3 subtasks:
- Reading inputs from the user
- Calculating a value from the inputs
- Printing the calculated value
For trivial programs (e.g. less than 20 lines of code), some or all of these can be done in function main. However, for longer programs (or just for practice) each of these is a good candidate for an individual function.
New programmers often combine calculating a value and printing the calculated value into a single function. However, this violates the “one task” rule of thumb for functions. A function that calculates a value should return the value to the caller and let the caller decide what to do with the calculated value (such as call another function to print the value).
2.7 — Forward declarations and definitions
Best practice
When addressing compile errors in your programs, always resolve the first error produced first and then compile again.
Option 2: Use a forward declaration
Best practice
Keep the parameter names in your function declarations.
Tip
You can easily create function declarations by copy/pasting your function’s header and adding a semicolon.
Declarations vs. definitions
The one definition rule (or ODR for short) is a well-known rule in C++. The ODR has three parts:
- Within a given file, a function, variable, type, or template can only have one definition.
- Within a given program, a variable or normal function can only have one definition. This distinction is made because programs can have more than one file (we’ll cover this in the next lesson).
- Types, templates, inline functions, and inline variables are allowed to have identical definitions in different files. We haven’t covered what most of these things are yet, so don’t worry about this for now – we’ll bring it back up when it’s relevant.
Violating part 1 of the ODR will cause the compiler to issue a redefinition error. Violating ODR part 2 will likely cause the linker to issue a redefinition error. Violating ODR part 3 will cause undefined behavior.
A declaration is a statement that tells the compiler about the existence of an identifier and its type information. Here are some examples of declarations:
int add(int x, int y); // tells the compiler about a function named "add" that takes two int parameters and returns an int.  No body!
int x; // tells the compiler about an integer variable named x
A declaration is all that is needed to satisfy the compiler. This is why we can use a forward declaration to tell the compiler about an identifier that isn’t actually defined until later.
In C++, all definitions also serve as declarations. This is why int x appears in our examples for both definitions and declarations. Since int x is a definition, it’s a declaration too. In most cases, a definition serves our purposes, as it satisfies both the compiler and linker. We only need to provide an explicit declaration when we want to use an identifier before it has been defined.
While it is true that all definitions are declarations, the converse is not true: not all declarations are definitions. An example of this is the function declaration – it satisfies the compiler, but not the linker. These declarations that aren’t definitions are called pure declarations.
Author’s note
In common language, the term “declaration” is typically used to mean “a pure declaration”, and “definition” is used to mean “a definition that also serves as a declaration”. Thus, we’d typically call int x; a definition, even though it is both a definition and a declaration.
2.8 — Programs with multiple code files
Adding files to your project
Best practice
When you add new code files to your project, give them a .cpp extension.
A multi-file example
Tip
Because the compiler compiles each code file individually (and then forgets what it has seen), each code file that uses std::cout or std::cin needs to #include .
In the above example, if add.cpp had used std::cout or std::cin, it would have needed to #include .
Summary
When the compiler compiles a multi-file program, it may compile the files in any order. Additionally, it compiles each file individually, with no knowledge of what is in other files.
We will begin working with multiple files a lot once we get into object-oriented programming, so now’s as good a time as any to make sure you understand how to add and compile multiple file projects.
Reminder: Whenever you create a new code (.cpp) file, you will need to add it to your project so that it gets compiled.
2.9 — Naming collisions and an introduction to namespaces
An example of a naming collision
Most naming collisions occur in two cases:
- Two (or more) identically named functions (or global variables) are introduced into separate files belonging to the same program. This will result in a linker error, as shown above.
- Two (or more) identically named functions (or global variables) are introduced into the same file. This will result in a compiler error.
What is a namespace?
Key insight
A name declared in a namespace won’t be mistaken for an identical name declared in another scope.
The global namespace
In C++, any name that is not defined inside a class, function, or a namespace is considered to be part of an implicitly defined namespace called the global namespace (sometimes also called the global scope).
In the example at the top of the lesson, functions main() and both versions of myFcn() are defined inside the global namespace. The naming collision encountered in the example happens because both versions of myFcn() end up inside the global namespace, which violates the rule that all names in the namespace must be unique.
Only declarations and definition statements can appear in the global namespace. This means we can define variables in the global namespace, though this should generally be avoided (we cover global variables in lesson 6.4 – Introduction to global variables). This also means that other types of statements (such as expression statements) cannot be placed in the global namespace (initializers for global variables being an exception):
#include The std namespace
Key insight
When you use an identifier that is defined inside a namespace (such as the std namespace), you have to tell the compiler that the identifier lives inside the namespace.
Explicit namespace qualifier std::
#include The :: symbol is an operator called the scope resolution operator.
Best practice
Use explicit namespace prefixes to access identifiers defined in a namespace.
When an identifier includes a namespace prefix, the identifier is called a qualified name.
Using namespace std (and why to avoid it)
When using a using-directive in this manner, any identifier we define may conflict with any identically named identifier in the std namespace. Even worse, while an identifier name may not conflict today, it may conflict with new identifiers added to the std namespace in future language revisions. This was the whole point of moving all of the identifiers in the standard library into the std namespace in the first place!
Warning
Avoid using-directives (such as using namespace std;) at the top of your program or in header files. They violate the reason why namespaces were added in the first place.
2.10 — Introduction to the preprocessor
As an aside…
Historically, the preprocessor was a separate program from the compiler, but in modern compilers, the preprocessor is typically built right into the compiler itself.
When the preprocessor has finished processing a code file, the result is called a translation unit. This translation unit is what is then compiled by the compiler.
Related content
The entire process of preprocessing, compiling, and linking is called translation.
If you’re curious, here is a list of translation phases. As of the time of writing, preprocessing encompasses phases 1 through 4, and compilation is phases 5 through 7.
Preprocessor directives
As an aside…
Using directives (introduced in lesson 2.9 – Naming collisions and an introduction to namespaces) are not preprocessor directives (and thus are not processed by the preprocessor). So while the term directive usually means a preprocessor directive, this is not always the case.
#Include
Key insight
A translation unit contains both the processed code from the code file, as well as the processed code from all of the #included files.
Object-like macros with substitution text
We recommend avoiding these kinds of macros altogether, as there are better ways to do this kind of thing. We discuss this more in lesson 4.13 – Const variables and symbolic constants.
Conditional compilation
#include #if 0
One more common use of conditional compilation involves using #if 0 to exclude a block of code from being compiled (as if it were inside a comment block):
#include The above code only prints “Joe”, because “Bob” and “Steve” were inside an #if 0 block that the preprocessor will exclude from compilation.
2.11 — Header files
Headers, and their purpose
Key insight
Header files allow us to put declarations in one location and then import them wherever we need them. This can save a lot of typing in multi-file programs.
Using standard library header files
Key insight
When you #include a file, the content of the included file is inserted at the point of inclusion. This provides a useful way to pull in declarations from another file.
Best practice
Header files should generally not contain function and variable definitions, so as not to violate the one definition rule. An exception is made for symbolic constants (which we cover in lesson 4.13 – Const variables and symbolic constants).
Writing your own header files
Best practice
Use a .h suffix when naming your header files.
Best practice
If a header file is paired with a code file (e.g. add.h with add.cpp), they should both have the same base name (add).
Source files should include their paired header
Best practice
Source files should #include their paired header file (if one exists).
Angled brackets vs double quotes
Rule
Use double quotes to include header files that you’ve written or are expected to be found in the current directory. Use angled brackets to include headers that come with your compiler, OS, or third-party libraries you’ve installed elsewhere on your system.
Why doesn’t iostream have a .h extension?
Key insight
The header files with the .h extension define their names in the global namespace, and may optionally define them in the std namespace as well.
The header files without the .h extension will define their names in the std namespace, and may optionally define them in the global namespace as well.
Best practice
When including a header file from the standard library, use the version without the .h extension if it exists. User-defined headers should still use a .h extension.
Including header files from other directories
For Visual Studio users
Right click on your project in the Solution Explorer, and choose Properties, then the VC++ Directories tab. From here, you will see a line called Include Directories. Add the directories you’d like the compiler to search for additional headers there.
The nice thing about this approach is that if you ever change your directory structure, you only have to change a single compiler or IDE setting instead of every code file.
Headers may include other headers
Best practice
Each file should explicitly #include all of the header files it needs to compile. Do not rely on headers included transitively from other headers.
The #include order of header files
Best practice
To maximize the chance that missing includes will be flagged by compiler, order your #includes as follows:
- The paired header file
- Other headers from your project
- 3rd party library headers
- Standard library headers
The headers for each grouping should be sorted alphabetically.
Header file best practices
Here are a few more recommendations for creating and using header files.
- Always include header guards (we’ll cover these next lesson).
- Do not define variables and functions in header files (global constants are an exception – we’ll cover these later)
- Give a header file the same name as the source file it’s associated with (e.g. grades.h is paired with grades.cpp).
- Each header file should have a specific job, and be as independent as possible. For example, you might put all your declarations related to functionality A in A.h and all your declarations related to functionality B in B.h. That way if you only care about A later, you can just include A.h and not get any of the stuff related to B.
- Be mindful of which headers you need to explicitly include for the functionality that you are using in your code files
- Every header you write should compile on its own (it should #include every dependency it needs)
- Only #include what you need (don’t include everything just because you can).
- Do not #include .cpp files.
2.12 — Header guards
Header guards
The good news is that we can avoid the above problem via a mechanism called a header guard (also called an include guard). Header guards are conditional compilation directives that take the following form:
#ifndef SOME_UNIQUE_NAME_HERE
#define SOME_UNIQUE_NAME_HERE

// your declarations (and certain types of definitions) here

#endif
For advanced readers
In large programs, it’s possible to have two separate header files (included from different directories) that end up having the same filename (e.g. directoryA\config.h and directoryB\config.h). If only the filename is used for the include guard (e.g. CONFIG_H), these two files may end up using the same guard name. If that happens, any file that includes (directly or indirectly) both config.h files will not receive the contents of the include file to be included second. This will probably cause a compilation error.
Because of this possibility for guard name conflicts, many developers recommend using a more complex/unique name in your header guards. Some good suggestions are a naming convention of H , H, or _H
Header guards do not prevent a header from being included once into different code files
Note that the goal of header guards is to prevent a code file from receiving more than one copy of a guarded header. By design, header guards do not prevent a given header file from being included (once) into separate code files. This can also cause unexpected problems.
#pragma once
However, because pragmas are not an official part of the C++ language (and may not be supported consistently, or at all on more esoteric platforms), others (such as Google) still recommend sticking with traditional header guards.
For advanced readers
There is one known case where #pragma once will typically fail. If a header file is copied so that it exists in multiple places on the file system, if somehow both copies of the header get included, header guards will successfully de-dupe the identical headers, but #pragma once won’t (because the compiler won’t realize they are actually identical content).
Summary
Header guards are designed to ensure that the contents of a given header file are not copied more than once into any single file, in order to prevent duplicate definitions.
Note that duplicate declarations are fine, since a declaration can be declared multiple times without incident – but even if your header file is composed of all declarations (no definitions) it’s still a best practice to include header guards.
Note that header guards do not prevent the contents of a header file from being copied (once) into separate project files. This is a good thing, because we often need to reference the contents of a given header from different project files.
2.13 — How to design your first programs
Design step 1: Define your goal
In order to write a successful program, you first need to define what your goal is. Ideally, you should be able to state this in a sentence or two. It is often useful to express this as a user-facing outcome. For example:
- Generate randomized dungeons that will produce interesting looking caverns.
Design step 2: Define requirements
Note that your requirements should similarly be focused on the “what”, not the “how”.
For example:
-
The randomized dungeon should always contain a way to get from the entrance to an exit.
-
The program should crash in less than 0.1% of user sessions.
A single problem may yield many requirements, and the solution isn’t “done” until it satisfies all of them.
Design step 3: Define your tools, targets, and backup plan
When you are an experienced programmer, there are many other steps that typically would take place at this point, including:
- Defining what target architecture and/or OS your program will run on.
- Determining what set of tools you will be using.
- Determining whether you will write your program alone or as part of a team.
- Defining your testing/feedback/release strategy.
- Determining how you will back up your code.
Version control systems have the added advantage of not only being able to restore your files, but also to roll them back to a previous version.
Design step 4: Break hard problems down into easy problems
In real life, we often need to perform tasks that are very complex. Trying to figure out how to do these tasks can be very challenging. In such cases, we often make use of the top down method of problem solving. That is, instead of solving a single complex task, we break that task into multiple subtasks, each of which is individually easier to solve. If those subtasks are still too difficult to solve, they can be broken down further. By continuously splitting complex tasks into simpler ones, you can eventually get to a point where each individual task is manageable, if not trivial.
The other way to create a hierarchy of tasks is to do so from the bottom up. In this method, we’ll start from a list of easy tasks, and construct the hierarchy by grouping them.
Design step 5: Figure out the sequence of events
Implementation step 1: Outlining your main function
Implementation step 2: Implement each function
Remember: Don’t implement your entire program in one go. Work on it in steps, testing each step along the way before proceeding.
Implementation step 3: Final testing
Once your program is “finished”, the last step is to test the whole program and ensure it works as intended. If it doesn’t work, fix it.
Words of advice when writing programs
Keep your programs simple to start.
Add features over time.
Focus on one area at a time.
Test each piece of code as you go.
Don’t invest in perfecting early code.
Most new programmers will shortcut many of these steps and suggestions (because it seems like a lot of work and/or it’s not as much fun as writing the code). However, for any non-trivial project, following these steps will definitely save you a lot of time in the long run. A little planning up front saves a lot of debugging at the end.
The good news is that once you become comfortable with all of these concepts, they will start coming more naturally to you. Eventually you will get to the point where you can write entire functions without any pre-planning at all.
2.x — Chapter 2 summary and quiz
Chapter 3_Debugging C++ Programs
3.1 — Syntax and semantic errors
3.2 — The debugging process
3.3 — A strategy for debugging
Homing in on issues
What guessing strategy you want to use is up to you – the best one depends on what type of bug it is, so you’ll likely want to try many different approaches to narrow down the issue. As you gain experience in debugging issues, your intuition will help guide you.
So how do we “make guesses”? There are many ways to do so. We’re going to start with some simple approaches in the next chapter, and then we’ll build on these and explore others in future chapters.
3.4 — Basic debugging tactics
Debugging tactic #1: Commenting out your code
Debugging tactic #2: Validating your code flow
Tip
When printing information for debugging purposes, use std::cerr instead of std::cout. One reason for this is that std::cout may be buffered, which means there may be a pause between when you ask std::cout to output information and when it actually does. If you output using std::cout and then your program crashes immediately afterward, std::cout may or may not have actually output yet. This can mislead you about where the issue is. On the other hand, std::cerr is unbuffered, which means anything you send to it will output immediately. This helps ensure all debug output appears as soon as possible (at the cost of some performance, which we usually don’t care about when debugging).
Using std::cerr also helps make clear that the information being output is for an error case rather than a normal case.
#include Tip
When adding temporary debug statements, it can be helpful to not indent them. This makes them easier to find for removal later.
Debugging tactic #3: Printing values
As an aside…
The third-party library dbg-macro can help make debugging using print statements easier. Check it out if this is something you find yourself doing a lot.
Why using printing statements to debug isn’t great
While adding debug statements to programs for diagnostic purposes is a common rudimentary technique, and a functional one (especially when a debugger is not available for some reason), it’s not that great for a number of reasons:
- Debug statements clutter your code.
- Debug statements clutter the output of your program.
- Debug statements must be removed after you’re done with them, which makes them non-reusable.
- Debug statements require modification of your code to both add and to remove, which can introduce new bugs.
We can do better. We’ll explore how in future lessons.
3.5 — More debugging tactics
Using a logger
While you can write your own code to create log file and send output to them, you’re better off using one of the many existing third-party logging tools available. Which one you use is up to you.
How you include, initialize, and use a logger will vary depending on the specific logger you select.
Note that conditional compilation directives are also not required using this method, as most loggers have a method to reduce/eliminate writing output to the log. This makes the code a lot easier to read, as the conditional compilation lines add a lot of clutter. With plog, logging can be temporarily disabled by changing the init statement to the following:
As an aside…
If you want to compile the above example yourself, or use plog in your own projects, you can follow these instructions to install it:
First, get the latest plog release:
- Visit the plog repo.
- Click the green Code button in the top right corner, and choose “Download zip”
Next, unzip the entire archive to somewhere on your hard drive.
Finally, for each project, set the somewhere\plog-master\include\ directory as an include directory inside your IDE. There are instructions on how to do this for Visual Studio here: A.2 – Using libraries with Visual Studio and Code::Blocks here: A.3 – Using libraries with Code::Blocks.
3.6 — Using an integrated debugger: Stepping
All of this tracked information is called your program state (or just state, for short).
The debugger
While integrated debuggers are highly convenient and recommended for beginners, command line debuggers are well supported and still commonly used in environments that do not support graphical interfaces (e.g. embedded systems).
Tip
Debugger keyboard shortcuts will only work if the IDE/integrated debugger is the active window.
Tip
Don’t neglect learning to use a debugger. As your programs get more complicated, the amount of time you spend learning to use the integrated debugger effectively will pale in comparison to amount of time you save finding and fixing issues.
Warning
Before proceeding with this lesson (and subsequent lessons related to using a debugger), make sure your project is compiled using a debug build configuration (see 0.9 – Configuring your compiler: Build configurations for more information).
If you’re compiling your project using a release configuration instead, the functionality of the debugger may not work correctly (e.g. when you try to step into your program, it will just run the program instead).
Stepping
Stepping is the name for a set of related debugger features that let us execute (step through) our code statement by statement.
Step into
Warning
Because operator<< is implemented as a function, your IDE may step into the implementation of operator<< instead.
If this happens, you’ll see your IDE open a new code file, and the arrow marker will move to the top of a function named operator<< (this is part of the standard library). Close the code file that just opened, then find and execute step out debug command (instructions are below under the “step out” section, if you need help).
Tip
In a prior lesson, we mentioned that std::cout is buffered, which means there may be a delay between when you ask std::cout to print a value, and when it actually does. Because of this, you may not see the value 5 appear at this point. To ensure that all output from std::cout is output immediately, you can temporarily add the following statement to the top of your main() function:
std::cout << std::unitbuf; // enable automatic flushing for std::cout (for debugging)
For performance reasons, this statement should be removed or commented out after debugging.
If you don’t want to continually add/remove/comment/uncomment the above, you can wrap the statement in a conditional compilation preprocessor directive (covered in lesson 2.10 – Introduction to the preprocessor):
#ifdef DEBUG
std::cout << std::unitbuf; // enable automatic flushing for std::cout (for debugging)
#endif
You’ll need to make sure the DEBUG preprocessor macro is defined, either somewhere above this statement, or as part of your compiler settings.
Step over
Like step into, The step over command executes the next statement in the normal execution path of the program.
Step out
Unlike the other two stepping commands, Step out does not just execute the next line of code. Instead, it executes all remaining code in the function currently being executed, and then returns control to you when the function has returned.
3.7 — Using an integrated debugger: Running and breakpoints
Set next statement
There’s one more debugging command that’s used fairly uncommonly, but is still at least worth knowing about, even if you won’t use it very often. The set next statement command allows us to change the point of execution to some other statement (sometimes informally called jumping). This can be used to jump the point of execution forwards and skip some code that would otherwise execute, or backwards and have something that already executed run again.
Warning
The set next statement command will change the point of execution, but will not otherwise change the program state. Your variables will retain whatever values they had before the jump. As a result, jumping may cause your program to produce different values, results, or behaviors than it would otherwise. Use this capability judiciously (especially jumping backwards).
Warning
You should not use set next statement to change the point of execution to a different function. This will result in undefined behavior, and likely a crash.
3.8 — Using an integrated debugger: Watching variables
Warning
In case you are returning, make sure your project is compiled using a debug build configuration (see 0.9 – Configuring your compiler: Build configurations for more information). If you’re compiling your project using a release configuration instead, the functionality of the debugger may not work correctly.
The watch window can evaluate expressions too
Warning
Identifiers in watched expressions will evaluate to their current values. If you want to know what value an expression in your code is actually evaluating to, run to cursor to it first, so that all identifiers have the correct values.
Local watches
Because inspecting the value of local variables inside a function is common while debugging, many debuggers will offer some way to quickly watch the value of all local variables in scope.
3.9 — Using an integrated debugger: The call stack
Tip
The line numbers after the function names show the next line to be executed in each function.
Since the top entry on the call stack represents the currently executing function, the line number here shows the next line that will execute when execution resumes. The remaining entries in the call stack represent functions that will be returned to at some point, so the line number for these represent the next statement that will execute after the function is returned to.
Conclusion
Congratulations, you now know the basics of using an integrated debugger! Using stepping, breakpoints, watches, and the call stack window, you now have the fundamentals to be able to debug almost any problem. Like many things, becoming good at using a debugger takes some practice and some trial and error. But again, we’ll reiterate the point that the time devoted to learning how to use an integrated debugger effectively will be repaid many times over in time saved debugging your programs!
3.10 — Finding issues before they become problems
When you make a semantic error, that error may or may not be immediately noticeable when you run your program. An issue may lurk undetected in your code for a long time before newly introduced code or changed circumstances cause it to manifest as a program malfunction. The longer an error sits in the code base before it is found, the more likely it is to be hard to find, and something that may have been easy to fix originally turns into a debugging adventure that eats up time and energy.
So what can we do about that?
Don’t make errors
Well, the best thing is to not make errors in the first place. Here’s an incomplete list of things that can help avoid making errors:
- Follow best practices
- Don’t program when tired
- Understand where the common pitfalls are in a language (all those things we warn you not to do)
- Keep your programs simple
- Don’t let your functions get too long
- Prefer using the standard library to writing your own code, when possible
- Comment your code liberally
Refactoring your code
Key insight
When making changes to your code, make behavioral changes OR structural changes, and then retest for correctness. Making behavioral and structural changes at the same time tends to lead to more errors as well as errors that are harder to find.
An introduction to defensive programming
Defensive programming is a practice whereby the programmer tries to anticipate all of the ways the software could be misused, either by end-users, or by other developers (including the programmer themselves) using the code. These misuses can often be detected and then mitigated (e.g. by asking a user who entered bad input to try again).
An introduction to testing functions
#include This is a primitive form of unit testing, which is a software testing method by which small units of source code are tested to determine whether they are correct.
Shotgunning for general issues
Best practice
Use a static analysis tool on your programs to help find areas where your code is non-compliant with best practices.
3.x — Chapter 3 summary and quiz
When using print statements, use std::cerr instead of std::cout. But even better, avoid debugging via print statements.
Unit testing is a software testing method by which small units of source code are tested to determine whether they are correct.
Chapter 4_Fundamental Data Types
4.1 — Introduction to fundamental data types
Bits, bytes, and memory addressing
Key insight
In C++, we typically work with “byte-sized” chunks of data.
As an aside…
Some older or non-standard machines may have bytes of a different size (from 1 to 48 bits) – however, we generally need not worry about these, as the modern de-facto standard is that a byte is 8 bits. For these tutorials, we’ll assume a byte is 8 bits.
Fundamental data types
Author’s note
The terms integer and integral are similar, but sometimes have different meanings.
In mathematics, an integer is a number with no decimal or fractional part, including negative and positive numbers and zero.
In C++, the term integer is most often used to refer to the int data type, which holds integer values. However, it is also sometimes used to refer to the broader set of data types that are commonly used to store and display integer values. This includes short, int, long, long long, and their signed and unsigned variants.
The term integral means “like an integer”. Most often, integral is used as part of the term “integral type”, which includes the broader set of types that are stored in memory as integers, even though their behaviors might vary (which we’ll see later in this chapter when we talk about the character types). This includes bool, the integer types, and all the various character types.
As an aside…
Most modern programming languages include a fundamental string type (strings are a data type that lets us hold a sequence of characters, typically used to represent text). In C++, strings aren’t a fundamental type (they’re a compound type). But because basic string usage is straightforward and useful, we’ll introduce strings in this chapter as well (in lesson 4.17 – Introduction to std::string).
The _t suffix
Many of the types defined in newer versions of C++ (e.g. std::nullptr_t) use a _t suffix. This suffix means “type”, and it’s a common nomenclature applied to modern types.
If you see something with a _t suffix, it’s probably a type. But many types don’t have a _t suffix, so this isn’t consistently applied.
4.2 — Void
Deprecated: Functions that do not take parameters
Best practice
Use an empty parameter list instead of void to indicate that a function has no parameters.
4.3 — Object sizes and the sizeof operator
Object sizes
Key insight
New programmers often focus too much on optimizing their code to use as little memory as possible. In most cases, this makes a negligible difference. Focus on writing maintainable code, and optimize only when and where the benefit will be substantive.
Fundamental data type sizes
Best practice
For maximum compatibility, you shouldn’t assume that variables are larger than the specified minimum size.
The sizeof operator
For advanced readers
If you’re wondering what ‘\t’ is in the above program, it’s a special symbol that inserts a tab (in the example, we’re using it to align the output columns). We will cover ‘\t’ and other special symbols in lesson 4.11 – Chars.
Fundamental data type performance
On modern machines, objects of the fundamental data types are fast, so performance while using these types should generally not be a concern.
As an aside…
You might assume that types that use less memory would be faster than types that use more memory. This is not always true. CPUs are often optimized to process data of a certain size (e.g. 32 bits), and types that match that size may be processed quicker. On such a machine, a 32-bit int could be faster than a 16-bit short or an 8-bit char.
4.4 — Signed integers
A reminder
C++ only guarantees that integers will have a certain minimum size, not that they will have a specific size. See lesson 4.3 – Object sizes and the sizeof operator for information on how to determine how large each type is on your machine.
Signed integers
Related content
In binary representation, a single bit (called the sign bit) is used to store the sign of the number. The non-sign bits (called the magnitude bits) determine the magnitude of the number.
We discuss how the sign bit is used when representing numbers in binary in lesson O.4 – Converting between binary and decimal.
Defining signed integers
Best practice
Prefer the shorthand types that do not use the int suffix or signed prefix.
Signed integer ranges
As an aside…
Math time: an 8-bit integer contains 8 bits. 28 is 256, so an 8-bit integer can hold 256 possible values. There are 256 possible values between -128 to 127, inclusive.
7 bits are used to hold the magnitude of the number, and 1 bit is used to hold the sign.
Integer overflow
Warning
Signed integer overflow will result in undefined behavior.
Integer division
Warning
Be careful when using integer division, as you will lose any fractional parts of the quotient. However, if it’s what you want, integer division is safe to use, as the results are predictable.
4.5 — Unsigned integers, and why to avoid them
Unsigned integer range
An n-bit unsigned variable has a range of 0 to (2n)-1.
When no negative numbers are required, unsigned integers are well-suited for networking and systems with little memory, because unsigned integers can store more positive numbers without taking up extra memory.
Unsigned integer overflow
Author’s note
Oddly, the C++ standard explicitly says “a computation involving unsigned operands can never overflow”. This is contrary to general programming consensus that integer overflow encompasses both signed and unsigned use cases (cite). Given that most programmers would consider this overflow, we’ll call this overflow despite C++’s statements to the contrary.
As an aside…
Many notable bugs in video game history happened due to wrap around behavior with unsigned integers. In the arcade game Donkey Kong, it’s not possible to go past level 22 due to an overflow bug that leaves the user with not enough bonus time to complete the level.
In the PC game Civilization, Gandhi was known for often being the first one to use nuclear weapons, which seems contrary to his expected passive nature. Players had a theory that Gandhi’s aggression setting was initially set at 1, but if he chose a democratic government, he’d get a -2 aggression modifier (lowering his current aggression value by 2). This would cause his aggression to overflow to 255, making him maximally aggressive! However, more recently Sid Meier (the game’s author) clarified that this wasn’t actually the case.
The controversy over unsigned numbers
Best practice
Favor signed numbers over unsigned numbers for holding quantities (even quantities that should be non-negative) and mathematical operations. Avoid mixing signed and unsigned numbers.
So when should you use unsigned numbers?
There are still a few cases in C++ where it’s okay / necessary to use unsigned numbers.
First, unsigned numbers are preferred when dealing with bit manipulation .
Second, use of unsigned numbers is still unavoidable in some cases, mainly those having to do with array indexing.
Also note that if you’re developing for an embedded system (e.g. an Arduino) or some other processor/memory limited context, use of unsigned numbers is more common and accepted (and in some cases, unavoidable) for performance reasons.
4.6 — Fixed-width integers and size_t
std::int8_t and std::uint8_t likely behave like chars instead of integers
Warning
The 8-bit fixed-width integer types are often treated like chars instead of integer values (and this may vary per system). Prefer the 16-bit fixed integral types for most cases.
Integral best practices
Best practice
- Prefer int when the size of the integer doesn’t matter (e.g. the number will always fit within the range of a 2-byte signed integer). For example, if you’re asking the user to enter their age, or counting from 1 to 10, it doesn’t matter whether int is 16 or 32 bits (the numbers will fit either way). This will cover the vast majority of the cases you’re likely to run across.
- Prefer std::int#_t when storing a quantity that needs a guaranteed range.
- Prefer std::uint#_t when doing bit manipulation or where well-defined wrap-around behavior is required.
Avoid the following when possible:
- Unsigned types for holding quantities
- The 8-bit fixed-width integer types
- The fast and least fixed-width types
- Any compiler-specific fixed-width integers – for example, Visual Studio defines __int8, __int16, etc…
What is std::size_t?
As an aside…
Some compilers limit the largest creatable object to half the maximum value of std::size_t (a good explanation for this can be found here).
In practice, the largest creatable object may be smaller than this amount (perhaps significantly so), depending on how much contiguous memory your computer has available for allocation.
4.7 — Introduction to scientific notation
How to convert numbers to scientific notation
Here’s the most important thing to understand: The digits in the significand (the part before the ‘e’) are called the significant digits. The number of significant digits defines a number’s precision. The more digits in the significand, the more precise a number is.
4.8 — Floating point numbers
int x{5}; // 5 means integer
double y{5.0}; // 5.0 is a floating point literal (no suffix means double type by default)
float z{5.0f}; // 5.0 is a floating point literal, f suffix means float type
Note that by default, floating point literals default to type double. An f suffix is used to denote a literal of type float.
Best practice
Always make sure the type of your literals match the type of the variables they’re being assigned to or used to initialize. Otherwise an unnecessary conversion will result, possibly with a loss of precision.
Warning
Make sure you don’t use integer literals where floating point literals should be used. This includes when initializing or assigning values to floating point objects, doing floating point arithmetic, and calling functions that expect floating point values.
Floating point precision
Best practice
Favor double over float unless space is at a premium, as the lack of precision in a float will often lead to inaccuracies.
Rounding errors make floating point comparisons tricky
Key insight
Rounding errors occur when a number can’t be stored precisely. This can happen even with simple numbers, like 0.1. Therefore, rounding errors can, and do, happen all the time. Rounding errors aren’t the exception – they’re the rule. Never assume your floating point numbers are exact.
A corollary of this rule is: be wary of using floating point numbers for financial or currency data.
NaN and Inf
INF stands for infinity, and IND stands for indeterminate. Note that the results of printing Inf and NaN are platform specific, so your results may vary.
Best practice
Avoid division by 0 altogether, even if your compiler supports it.
Conclusion
To summarize, the two things you should remember about floating point numbers:
- Floating point numbers are useful for storing very large or very small numbers, including those with fractional components.
- Floating point numbers often have small rounding errors, even when the number has fewer significant digits than the precision. Many times these go unnoticed because they are so small, and because the numbers are truncated for output. However, comparisons of floating point numbers may not give the expected results. Performing mathematical operations on these values will cause the rounding errors to grow larger.
4.9 — Boolean values
Boolean type
Boolean is properly capitalized in the English language because it’s named after its inventor, George Boole.
Printing Boolean values
If you want std::cout to print “true” or “false” instead of 0 or 1, you can use std::boolalpha. Here’s an example:
#include This prints:
1
0
true
false
You can use std::noboolalpha to turn it back off.
4.10 — Introduction to if statements
A condition (also called a conditional expression) is an expression that evaluates to a Boolean value.
A sample program using an if statement
Warning
If statements only conditionally execute a single statement. We talk about how to conditionally execute multiple statements in lesson 7.2 – If statements and blocks.
Quiz time
You never need an if-statement of the form:
if (condition)
  return true;
else
  return false;
This can be replaced by the single statement return condition.
4.11 — Chars
Initializing chars
Warning
Be careful not to mix up character numbers with integer numbers. The following two initializations are not the same:
char ch{5}; // initialize with integer 5 (stored as integer 5)
char ch{'5'}; // initialize with code point for '5' (stored as integer 53)
Character numbers are intended to be used when we want to represent numbers as text, rather than as numbers to apply mathematical operations to.
Escape sequences
Warning
Escape sequences start with a backslash (), not a forward slash (/). If you use a forward slash by accident, it may still compile, but will not yield the desired result.
What’s the difference between putting symbols in single and double quotes?
Best practice
Put stand-alone chars in single quotes (e.g. ‘t’ or ‘\n’, not “t” or “\n”). This helps the compiler optimize more effectively.
Avoid multicharacter literals
Best practice
Avoid multicharacter literals (e.g. ‘56’).
Warning
Make sure that your newlines are using escape sequence ‘\n’ , not multicharacter literal ‘/n’.
What about the other char types, wchar_t, char16_t, and char32_t?
wchar_t should be avoided in almost all cases (except when interfacing with the Windows API). Its size is implementation defined, and is not reliable. It has largely been deprecated.
As an aside…
The term “deprecated” means “still supported, but no longer recommended for use, because it has been replaced by something better or is no longer considered safe”.
Much like ASCII maps the integers 0-127 to American English characters, other character encoding standards exist to map integers (of varying sizes) to characters in other languages. The most well-known mapping outside of ASCII is the Unicode standard, which maps over 144,000 integers to characters in many different languages. Because Unicode contains so many code points, a single Unicode code point needs 32-bits to represent a character (called UTF-32). However, Unicode characters can also be encoded using multiple 16-bit or 8-bit characters (called UTF-16 and UTF-8 respectively).
char16_t and char32_t were added to C++11 to provide explicit support for 16-bit and 32-bit Unicode characters. char8_t has been added in C++20.
You won’t need to use char8_t, char16_t, or char32_t unless you’re planning on making your program Unicode compatible. Unicode and localization are generally outside the scope of these tutorials, so we won’t cover it further.
In the meantime, you should only use ASCII characters when working with characters (and strings). Using characters from other character sets may cause your characters to display incorrectly.
4.12 — Introduction to type conversion and static_cast
Implicit type conversion
When the compiler does type conversion on our behalf without us explicitly asking, we call this implicit type conversion.
Type conversion produces a new value
Key insight
Type conversion produces a new value of the target type from a value of a different type.
Implicit type conversion warnings
Tip
You’ll need to disable “treat warnings as errors” temporarily if you want to compile this example. See lesson 0.11 – Configuring your compiler: Warning and error levels for more information about this setting.
Key insight
Some type conversions are always safe to make (such as int to double), whereas others may result in the value being changed during conversion (such as double to int). Unsafe implicit conversions will typically either generate a compiler warning, or (in the case of brace initialization) an error.
This is one of the primary reasons brace initialization is the preferred initialization form. Brace initialization will ensure we don’t try to initialize a variable with a initializer that will lose value when it is implicitly type converted:
int main()
{
    double d { 5 }; // okay: int to double is safe
    int x { 5.5 }; // error: double to int not safe

    return 0;
}
An introduction to explicit type conversion via the static_cast operator
Key insight
Whenever you see C++ syntax (excluding the preprocessor) that makes use of angled brackets (<>), the thing between the angled brackets will most likely be a type. This is typically how C++ deals with code that need a parameterized type.
Converting unsigned numbers to signed numbers
To convert an unsigned number to a signed number, you can also use the static_cast operator:
#include The static_cast operator doesn’t do any range checking, so if you cast a value to a type whose range doesn’t contain that value, undefined behavior will result. Therefore, the above cast from unsigned int to int will yield unpredictable results if the value of the unsigned int is greater than the maximum value a signed int can hold.
Warning
The static_cast operator will produce undefined behavior if the value being converted doesn’t fit in range of the new type.
std::int8_t and std::uint8_t likely behave like chars instead of integers
In cases where std::int8_t is treated as a char, input from the console can also cause problems:
#include A sample run of this program:
Enter a number between 0 and 127: 35
You entered: 51
Here’s what’s happening. When std::int8_t is treated as a char, the input routines interpret our input as a sequence of characters, not as an integer. So when we enter 35, we’re actually entering two chars, ‘3’ and ‘5’. Because a char object can only hold one character, the ‘3’ is extracted (the ‘5’ is left in the input stream for possible extraction later). Because the char ‘3’ has ASCII code point 51, the value 51 is stored in myint, which we then print later as an int.
4.13 — Const variables and symbolic constants
The const keyword
As an aside…
Due to the way that the compiler parses more complex declarations, some developers prefer placing the const after the type (because it is slightly more consistent). This style is called “east const”. While this style has some advocates (and some reasonable points), it has not caught on significantly.
Best practice
Place const before the type (because it is more idiomatic to do so).
Const variables must be initialized
#include In the above example, we initialize const variable constAge with non-const variable age. Because age is still non-const, we can change its value. However, because constAge is const, we cannot change the value it has after initialization.
Const function parameters
Best practice
Don’t use const when passing by value.
Const return values
Best practice
Don’t use const when returning by value.
For symbolic constants, prefer constant variables to object-like macros
Best practice
Prefer constant variables over object-like macros with substitution text.
Using constant variables throughout a multi-file program
4.14 — Compile-time constants, constant expressions, and constexpr
Constant expressions
Key insight
Evaluating constant expressions at compile-time makes our compilation take longer (because the compiler has to do more work), but such expressions only need to be evaluated once (rather than every time the program is run). The resulting executables are faster and use less memory.
As an aside…
The compiler is only required to evaluate constant expressions at compile time in contexts where a value is actually required at compile-time.
In the variable declaration int x { 3 + 4 };, x is not a constant variable and the initialization value does not need to be known at compile-time, so the constant expression 3 + 4 is not required to be evaluated at compile-time.
Even though it is not strictly required, modern compilers will usually evaluate a constant expression at compile-time because it is an easy optimization and more performant to do so.
Compile-time const
A const variable is a compile-time constant if its initializer is a constant expression.
Runtime const
Any const variable that is initialized with a non-constant expression is a runtime constant. Runtime constants are constants whose initialization values aren’t known until runtime.
The constexpr keyword
A constexpr (which is short for “constant expression”) variable can only be a compile-time constant. If the initialization value of a constexpr variable is not a constant expression, the compiler will error.
For example:
#include Best practice
Any variable that should not be modifiable after initialization and whose initializer is known at compile-time should be declared as constexpr.
Any variable that should not be modifiable after initialization and whose initializer is not known at compile-time should be declared as const.
Related content
C++ does support functions that can be evaluated at compile-time (and thus can be used in constant expressions) – we discuss these in lesson 6.14 – Constexpr and consteval functions.
Constant folding for constant subexpressions
4.15 — Literals
Literals are unnamed values inserted directly into the code.
Literal suffixes
Best practice
Prefer literal suffix L (upper case) over l (lower case).
Floating point literals
By default, floating point literals have a type of double. To make them float literals instead, the f (or F) suffix should be used:
#include New programmers are often confused about why the following causes a compiler warning:
float f { 4.1 }; // warning: 4.1 is a double literal, not a float literal
Because 4.1 has no suffix, the literal has type double, not float. When the compiler determines the type of a literal, it doesn’t care what you’re doing with the literal (e.g. in this case, using it to initialize a float variable). Since the type of the literal (double) doesn’t match the type of the variable it is being used to initialize (float), the literal value must be converted to a float so it can then be used to initialize variable f. Converting a value from a double to a float can result in a loss of precision, so the compiler will issue a warning.
The solution here is one of the following:
float f { 4.1f }; // use 'f' suffix so the literal is a float and matches variable type of float
double d { 4.1 }; // change variable to type double so it matches the literal type double
Scientific notation for floating point literals
There are two different ways to declare floating-point literals:
double pi { 3.14159 }; // 3.14159 is a double literal in standard notation
double avogadro { 6.02e23 }; // 6.02 x 10^23 is a double literal in scientific notation
In the second form, the number after the exponent can be negative:
double electronCharge { 1.6e-19 }; // charge on an electron is 1.6 x 10^-19
Magic numbers
A magic number is a literal (usually a number) that either has an unclear meaning or may need to be changed later.
Note that magic numbers aren’t always numbers – they can also be text (e.g. names) or other types.
Best practice
Avoid magic numbers in your code (use constexpr variables instead).
4.16 — Numeral systems (decimal, binary, hexadecimal, and octal)
Binary literals
Prior to C++14, there is no support for binary literals. However, hexadecimal literals provide us with a useful workaround (that you may still see in existing code bases):
#include In C++14, we can use binary literals by using the 0b prefix:
#include Digit separators
Because long literals can be hard to read, C++14 also adds the ability to use a quotation mark (‘) as a digit separator.
#include Also note that the separator can not occur before the first digit of the value:
int bin { 0b'1011'0010 }; // error: ' used before first digit of value
Digit separators are purely visual and do not impact the literal value in any way.
Outputting values in decimal, octal, or hexadecimal
By default, C++ outputs values in decimal. However, you can change the output format via use of the std::dec, std::oct, and std::hex I/O manipulators:
#include This prints:
12
c
c
14
12
12
Note that once applied, the I/O manipulator remains set for future output until it is changed again.
Outputting values in binary
#include This prints:
11000101
11000101
1010
4.17 — Introduction to std::string
Fortunately, C++ has introduced two additional string types into the language that are much easier and safer to work with: std::string and std::string_view (C++17).Although std::string and std::string_view aren’t fundamental types, they’re straightforward and useful enough that we’ll introduce them here rather than wait until the chapter on compound types (chapter 9).
String input with std::cin
Using strings with std::cin may yield some surprises! Consider the following example:
#include Here’s the results from a sample run of this program:
Enter your full name: John Doe
Enter your age: Your name is John and your age is Doe
Hmmm, that isn’t right! What happened? It turns out that when using operator>> to extract a string from std::cin, operator>> only returns characters up to the first whitespace it encounters. Any other characters are left inside std::cin, waiting for the next extraction.
So when we used operator>> to extract input into variable name, only “John” was extracted, leaving " Doe" inside std::cin. When we then used operator>> to get extract input into variable age, it extracted “Doe” instead of waiting for us to input an age. Then the program ends.
Use std::getline() to input text
#include Now our program works as expected:
Enter your full name: John Doe
Enter your age: 23
Your name is John Doe and your age is 23
What the heck is std::ws?
Best practice
If using std::getline() to read strings, use std::cin >> std::ws input manipulator to ignore leading whitespace.
Key insight
Using the extraction operator (>>) with std::cin ignores leading whitespace.
std::getline() does not ignore leading whitespace unless you use input manipulator std::ws.
String length
Also note that std::string::length() returns an unsigned integral value (most likely of type size_t). If you want to assign the length to an int variable, you should static_cast it to avoid compiler warnings about signed/unsigned conversions:
int length { static_cast<int>(name.length()) };
In C++20, you can also use the std::ssize() function to get the length of a std::string as a signed integer:
#include Key insight
With normal functions, we call function(object). With member functions, we call object.function().
std::string can be expensive to initialize and copy
Best practice
Do not pass std::string by value, as making copies of std::string is expensive. Prefer std::string_view parameters.
Literals for std::string
Double-quoted string literals (like “Hello, world!”) are C-style strings by default (and thus, have a strange type).
We can create string literals with type std::string by using a s suffix after the double-quoted string literal.
#include Tip
The “s” suffix lives in the namespace std::literals::string_literals. The easiest way to access the literal suffixes is via using directive using namespace std::literals. We discuss using directives in lesson 6.12 – Using declarations and using directives. This is one of the exception cases where using an entire namespace is okay, because the suffixes defined within are unlikely to collide with any of your code.
You probably won’t need to use std::string literals very often (as it’s fine to initialize a std::string object with a C-style string literal), but we’ll see a few cases in future lessons where using std::string literals instead of C-style string literals makes things easier.
Constexpr strings
If you try to define a constexpr std::string, your compiler will probably generate an error:
#include This happens because constexpr std::string isn’t supported in C++17 or earlier, and only has minimal support in C++20. If you need constexpr strings, use std::string_view instead (discussed in lesson 4.18 – Introduction to std::string_view.
Conclusion
std::string is complex, leveraging many language features that we haven’t covered yet. Fortunately, you don’t need to understand these complexities to use std::string for simple tasks, like basic string input and output. We encourage you to start experimenting with strings now, and we’ll cover additional string capabilities later.
4.18 — Introduction to std::string_view
std::string_view C++17
#include Best practice
Prefer std::string_view over std::string when you need a read-only string, especially for function parameters.
Converting a std::string to a std::string_view
Converting a std::string_view to a std::string
Literals for std::string_view
Tip
The “sv” suffix lives in the namespace std::literals::string_view_literals. The easiest way to access the literal suffixes is via using directive using namespace std::literals. We discuss using directives in lesson 6.12 – Using declarations and using directives. This is one of the exception cases where using an entire namespace is okay.
Do not return a std::string_view
4.x — Chapter 4 summary and quiz
Angled brackets are typically used in C++ to represent something that needs a parameterizable type. This is used with static_cast to determine what data type the argument should be converted to (e.g. static_cast will convert x to an int).
A symbolic constant is a name given to a constant value. Constant variables are one type of symbolic constant, as are object-like macros with substitution text.
Chapter 5_Operators
5.1 — Operator precedence and associativity
Parenthesization
Best practice
Use parentheses to make it clear how a non-trivial expression should evaluate (even if they are technically unnecessary).
Best practice
Expressions with a single assignment operator do not need to have the right operand of the assignment wrapped in parenthesis.
The order of evaluation of expressions and function arguments is mostly unspecified
Warning
In many cases, the operands in a compound expression may evaluate in any order. This includes function calls and the arguments to those function calls.
Best practice
Outside of the operator precedence and associativity rules, assume that the parts of an expression could evaluate in any order. Ensure that the expressions you write are not dependent on the order of evaluation of those parts.
5.2 — Arithmetic operators
Unary arithmetic operators
For readability, both of these operators should be placed immediately preceding the operand (e.g. -x, not - x).
5.3 — Modulus and Exponentiation
Where’s the exponent operator?
Warning
In the vast majority of cases, integer exponentiation will overflow the integral type. This is likely why such a function wasn’t included in the standard library in the first place.
5.4 — Increment/decrement operators, and side effects
Incrementing and decrementing variables
Best practice
Strongly favor the prefix version of the increment and decrement operators, as they are generally more performant, and you’re less likely to run into strange issues with them.
Side effects can cause undefined behavior
However, side effects can also lead to unexpected results:
#include The C++ standard does not define the order in which function arguments are evaluated. If the left argument is evaluated first, this becomes a call to add(5, 6), which equals 11. If the right argument is evaluated first, this becomes a call to add(6, 6), which equals 12! Note that this is only a problem because one of the arguments to function add() has a side effect.
As an aside…
The C++ standard intentionally does not define these things so that compilers can do whatever is most natural (and thus most performant) for a given architecture.
The C++ standard also does not define the order in which the operands of operators are evaluated. Thus x + ++x will exhibit the same issue as add(x, ++x) above.
There are other cases where the C++ standard does not specify evaluation order, so different compilers may exhibit different behaviors. Even when the C++ standard does make it clear how things should be evaluated, historically this has been an area where there have been many compiler bugs. These problems can generally all be avoided by ensuring that any variable that has a side-effect applied is used no more than once in a given statement.
Warning
C++ does not define the order of evaluation for function arguments or the operands of operators.
Warning
Don’t use a variable that has a side effect applied to it more than once in a given statement. If you do, the result may be undefined.
5.5 — Comma and conditional operators
The comma operator
The comma operator (,) allows you to evaluate multiple expressions wherever a single expression is allowed. The comma operator evaluates the left operand, then the right operand, and then returns the result of the right operand.
z = (a, b); // evaluate (a, b) first to get result of b, then assign that value to variable z.
z = a, b; // evaluates as "(z = a), b", so z gets assigned the value of a, and b is evaluated and discarded.
Best practice
Avoid using the comma operator, except within for loops.
Comma as a separator
In C++, the comma symbol is often used as a separator, and these uses do not invoke the comma operator. Some examples of separator commas:
void foo(int x, int y) // Comma used to separate parameters in function definition
{
    add(x, y); // Comma used to separate arguments in function call
    constexpr int z{ 3 }, w{ 5 }; // Comma used to separate multiple variables being defined on the same line (don't do this)
}
There is no need to avoid separator commas (except when declaring multiple variables, which you should not do).
The conditional operator
The conditional operator (? (also sometimes called the “arithmetic if” operator) is a ternary operator (it takes 3 operands). Because it has historically been C++’s only ternary operator, it’s also sometimes referred to as “the ternary operator”.
Parenthesization of the conditional operator
Because the << operator has higher precedence than the ?: operator, the statement:
std::cout << (x > y) ? x : y << '\n';
would evaluate as:
(std::cout << (x > y)) ? x : y << '\n';
That would print 1 (true) if x > y, or 0 (false) otherwise!
Best practice
Always parenthesize the conditional part of the conditional operator, and consider parenthesizing the whole thing as well.
The conditional operator evaluates as an expression
#include The type of the expressions must match or be convertible
#include So when should you use the conditional operator?
Best practice
Only use the conditional operator for simple conditionals where you use the result and where it enhances readability.
5.6 — Relational operators and floating point comparisons
Boolean conditional values
Best practice
Don’t add unnecessary == or != to conditions. It makes them harder to read without offering any additional value.
Floating point equality
Warning
Avoid using operator== and operator!= to compare floating point values if there is any chance those values have been calculated.
constexpr gravity { 9.8 }
if (gravity == 9.8) // okay if gravity was initialized with a literal
    // we're on earth
Tip
It is okay to compare a low-precision (few significant digits) floating point literal to the same literal value of the same type.
Comparing floating point numbers (advanced / optional reading)
Here’s our previous code testing both algorithms:
#include 1
0
1
1
You can see that approximatelyEqualAbsRel() handles the small inputs correctly.
Comparison of floating point numbers is a difficult topic, and there’s no “one size fits all” algorithm that works for every case. However, the approximatelyEqualAbsRel() with an absEpsilon of 1e-12 and a relEpsilon of 1e-8 should be good enough to handle most cases you’ll encounter.
5.7 — Logical operators
Logical NOT
Best practice
If logical NOT is intended to operate on the result of other operators, the other operators and their operands need to be enclosed in parentheses.
Short circuit evaluation
Warning
Short circuit evaluation may cause Logical OR and Logical AND to not evaluate one operand. Avoid using expressions with side effects in conjunction with these operators.
Key insight
The Logical OR and logical AND operators are an exception to the rule that the operands may evaluate in any order, as the standard explicitly states that the left operand must evaluate first.
For advanced readers
Only the built-in versions of these operators perform short-circuit evaluation. If you overload these operators to make them work with your own types, those overloaded operators will not perform short-circuit evaluation.
Mixing ANDs and ORs
Best practice
When mixing logical AND and logical OR in a single expression, explicitly parenthesize each operation to ensure they evaluate how you intend.
De Morgan’s law
!(x && y) is equivalent to !x || !y
!(x || y) is equivalent to !x && !y
Where’s the logical exclusive or (XOR) operator?
For advanced readers
If you need a form of logical XOR that works with non-Boolean operands, you can static_cast your operands to bool:
if (static_cast<bool>(a) != static_cast<bool>(b) != static_cast<bool>(c) != static_cast<bool>(d)) ... // a XOR b XOR c XOR d, for any type that can be converted to bool
The following trick (which makes use of the fact that operator! implicitly converts its operand to bool) also works and is a bit more concise:
if (!!a != !!b != !!c != !!d)
Neither of these are very intuitive, so document them well if you use them.
5.x — Chapter 5 summary and quiz
Question #3
Why should you never do the following:
a) int y{ foo(++x, x) };
Because operator++ applies a side effect to x, we should not use x again in the same expression. In this case, the parameters to function foo() can be evaluated in any order, so it’s indeterminate whether x or ++x gets evaluated first. Because ++x changes the value of x, it’s unclear what values will be passed into the function.
b) double x{ 0.1 + 0.1 + 0.1 }; return (x == 0.3);
Floating point rounding errors will cause this to evaluate as false even though it looks like it should be true.
c) int x{ 3 / 0 };
Division by 0 causes undefined behavior, which is likely expressed in a crash.
Chapter O_Bit Manipulation (optional chapter)
O.1 — Bit flags and bit manipulation via std::bitset
Modifying individual bits within an object is called bit manipulation.
Bit manipulation is also useful in encryption and compression algorithms.
Best practice
Bit manipulation is one of the few times when you should unambiguously use unsigned integers (or std::bitset).
Manipulating bits via std::bitset
#include This prints:
All the bits: 00001101
Bit 3 has value: 1
Bit 4 has value: 0
What if we want to get or set multiple bits at once
std::bitset doesn’t make this easy. In order to do this, or if we want to use unsigned integer bit flags instead of std::bitset, we need to turn to more traditional methods. We’ll cover these in the next couple of lessons.
The size of std::bitset
One potential surprise is that std::bitset is optimized for speed, not memory savings. The size of a std::bitset is typically the number of bytes needed to hold the bits, rounded up to the nearest sizeof(size_t), which is 4 bytes on 32-bit machines, and 8-bytes on 64-bit machines.
Thus, a std::bitset<8> will typically use either 4 or 8 bytes of memory, even though it technically only needs 1 byte to store 8 bits. Thus, std::bitset is most useful when we desire convenience, not memory savings.
O.2 — Bitwise operators
The bitwise operators
Best practice
To avoid surprises, use the bitwise operators with unsigned operands or std::bitset.
What!? Aren’t operator<< and operator>> used for input and output?
Note that if you’re using operator << for both output and left shift, parenthesization is required:
#include This prints:
01101
1100
Bitwise XOR
The last operator is the bitwise XOR (^), also known as exclusive or.
When evaluating two operands, XOR evaluates to true (1) if one and only one of its operands is true (1). If neither or both are true, it evaluates to 0.
Bitwise assignment operators
As an aside…
There is no bitwise NOT assignment operator. This is because the other bitwise operators are binary, but bitwise NOT is unary (so what would go on the right-hand side of a ~= operator?). If you want to flip all of the bits, you can use normal assignment here: x = ~x;
Summary
Summarizing how to evaluate bitwise operations utilizing the column method:
When evaluating bitwise OR, if any bit in a column is 1, the result for that column is 1.
When evaluating bitwise AND, if all bits in a column are 1, the result for that column is 1.
When evaluating bitwise XOR, if there are an odd number of 1 bits in a column, the result for that column is 1.
In the next lesson, we’ll explore how these operators can be used in conjunction with bit masks to facilitate bit manipulation.
Quiz time
Question #2
A bitwise rotation is like a bitwise shift, except that any bits shifted off one end are added back to the other end. For example 0b1001u << 1 would be 0b0010u, but a left rotate by 1 would result in 0b0011u instead. Implement a function that does a left rotate on a std::bitset<4>. For this one, it’s okay to use test() and set().
O.3 — Bit manipulation with bitwise operators and bit masks
Bit masks
A bit mask is a predefined set of bits that is used to select which specific bits will be modified by subsequent operations.
A bit mask essentially performs the same function for bits – the bit mask blocks the bitwise operators from touching bits we don’t want modified, and allows access to the ones we do want modified.
Resetting a bit
As an aside…
Some compilers may complain about a sign conversion with this line:
flags &= ~mask2;
Because the type of mask2 is smaller than int, operator~ causes operand mask2 to undergo integral promotion to type int. Then the compiler complains that we’re trying to use operator&= where the left operand is unsigned and the right operand is signed.
If this is the case, try the following:
flags &= static_cast<std::uint8_t>(~mask2);
We discuss integral promotion in lesson 8.2 – Floating-point and integral promotion.
Bit masks and std::bitset
Why would you want to? The functions only allow you to modify individual bits. The bitwise operators allow you to modify multiple bits at once.
When are bit flags most useful?
Instead, if you defined the function using bit flags like this:
void someFunction(std::bitset<32> options);
Then you could use bit flags to pass in only the options you wanted:
someFunction(option10 | option32);
Not only is this much more readable, it’s likely to be more performant as well, since it only involves 2 operations (one Bitwise OR and one parameter copy).
This is one of the reasons OpenGL, a well regarded 3d graphic library, opted to use bit flag parameters instead of many consecutive Boolean parameters.
Here’s a sample function call from OpenGL:
glClear(GL_COLOR_BUFFER_BIT | GL_DEPTH_BUFFER_BIT); // clear the color and the depth buffer
GL_COLOR_BUFFER_BIT and GL_DEPTH_BUFFER_BIT are bit masks defined as follows (in gl2.h):
#define GL_DEPTH_BUFFER_BIT               0x00000100
#define GL_STENCIL_BUFFER_BIT             0x00000400
#define GL_COLOR_BUFFER_BIT               0x00004000
Summary
Summarizing how to set, clear, toggle, and query bit flags:
To query bit states, we use bitwise AND:
if (flags & option4) ... // if option4 is set, do something
To set bits (turn on), we use bitwise OR:
flags |= option4; // turn option 4 on.
flags |= (option4 | option5); // turn options 4 and 5 on.
To clear bits (turn off), we use bitwise AND with bitwise NOT:
flags &= ~option4; // turn option 4 off
flags &= ~(option4 | option5); // turn options 4 and 5 off
To flip bit states, we use bitwise XOR:
flags ^= option4; // flip option4 from on to off, or vice versa
flags ^= (option4 | option5); // flip options 4 and 5
O.4 — Converting between binary and decimal
Quiz time
Question #6
Write a program that asks the user to input a number between 0 and 255. Print this number as an 8-bit binary number (of the form #### ####). Don’t use any bitwise operators. Don’t use std::bitset.
#include Chapter 6_Scope, Duration, and Linkage
6.1 — Compound statements (blocks)
Block nesting levels
Best practice
Keep the nesting level of your functions to 3 or less. If your function has a need for more nested levels, consider refactoring your function into sub-functions.
6.2 — User-defined namespaces and the scope resolution operator
Multiple namespace blocks are allowed
Warning
Do not add custom functionality to the std namespace.
When you should use namespaces
In applications, namespaces can be used to separate application-specific code from code that might be reusable later (e.g. math functions). For example, physical and math functions could go into one namespace (e.g. math:. Language and localization functions in another (e.g. lang:.
When you write a library or code that you want to distribute to others, always place your code inside a namespace. The code your library is used in may not follow best practices – in such a case, if your library’s declarations aren’t in a namespace, there’s an elevated chance for naming conflicts to occur. As an additional advantage, placing library code inside a namespace also allows the user to see the contents of your library by using their editor’s auto-complete and suggestion feature.
6.3 — Local variables
Local variables have no linkage
Identifiers have another property named linkage. An identifier’s linkage determines whether other declarations of that name refer to the same object or not.
Local variables have no linkage, which means that each declaration refers to a unique object. For example:
int main()
{
    int x { 2 }; // local variable, no linkage

    {
        int x { 3 }; // this identifier x refers to a different object than the previous x
    }

    return 0;
}
Scope and linkage may seem somewhat similar. However, scope defines where a single declaration can be seen and used. Linkage defines whether multiple declarations refer to the same object or not.
Variables should be defined in the most limited scope
New developers sometimes wonder whether it’s worth creating a nested block just to intentionally limit a variable’s scope (and force it to go out of scope / be destroyed early). Doing so makes that variable simpler, but the overall function becomes longer and more complex as a result. The tradeoff generally isn’t worth it. If creating a nested block seems useful to intentionally limit the scope of a chunk of code, that code might be better to put in a separate function instead.
Best practice
Define variables in the most limited existing scope. Avoid creating new blocks whose only purpose is to limit the scope of variables.
6.4 — Introduction to global variables
Declaring and naming global variables
Best practice
Consider using a “g” or “g_” prefix when naming non-const global variables, to help differentiate them from local variables and function parameters.
Global variables have file scope and static duration
Global variables are created when the program starts, and destroyed when it ends. This is called static duration. Variables with static duration are sometimes called static variables.
A word of caution about (non-constant) global variables
New programmers are often tempted to use lots of global variables, because they can be used without having to explicitly pass them to every function that needs them. However, use of non-constant global variables should generally be avoided altogether! We’ll discuss why in upcoming lesson 6.8 – Why (non-const) global variables are evil.
Quick Summary
// Non-constant global variables
int g_x;                 // defines non-initialized global variable (zero initialized by default)
int g_x {};              // defines explicitly zero-initialized global variable
int g_x { 1 };           // defines explicitly initialized global variable

// Const global variables
const int g_y;           // error: const variables must be initialized
const int g_y { 2 };     // defines initialized global constant

// Constexpr global variables
constexpr int g_y;       // error: constexpr variables must be initialized
constexpr int g_y { 3 }; // defines initialized global const
6.5 — Variable shadowing (name hiding)
Avoid variable shadowing
Shadowing of local variables should generally be avoided, as it can lead to inadvertent errors where the wrong variable is used or modified. Some compilers will issue a warning when a variable is shadowed.
For the same reason that we recommend avoiding shadowing local variables, we recommend avoiding shadowing global variables as well. This is trivially avoidable if all of your global names use a “g_” prefix.
Best practice
Avoid variable shadowing.
6.6 — Internal linkage
In lesson 6.3 – Local variables, we said, “An identifier’s linkage determines whether other declarations of that name refer to the same object or not”, and we discussed how local variables have no linkage.
Global variable and functions identifiers can have either internal linkage or external linkage. We’ll cover the internal linkage case in this lesson, and the external linkage case in lesson 6.7 – External linkage and variable forward declarations.
An identifier with internal linkage can be seen and used within a single file, but it is not accessible from other files (that is, it is not exposed to the linker). This means that if two files have identically named identifiers with internal linkage, those identifiers will be treated as independent.
Global variables with internal linkage
Global variables with internal linkage
Global variables with internal linkage are sometimes called internal variables.
To make a non-constant global variable internal, we use the static keyword.
#include For advanced readers
The use of the static keyword above is an example of a storage class specifier, which sets both the name’s linkage and its storage duration (but not its scope). The most commonly used storage class specifiers are static, extern, and mutable. The term storage class specifier is mostly used in technical documentations.
Quick Summary
// Internal global variables definitions:
static int g_x;          // defines non-initialized internal global variable (zero initialized by default)
static int g_x{ 1 };     // defines initialized internal global variable

const int g_y { 2 };     // defines initialized internal global const variable
constexpr int g_y { 3 }; // defines initialized internal global constexpr variable

// Internal function definitions:
static int foo() {};     // defines internal function
We provide a comprehensive summary in lesson 6.11 – Scope, duration, and linkage summary.
6.7 — External linkage and variable forward declarations
Global variables with external linkage
Global variables with external linkage are sometimes called external variables. To make a global variable external (and thus accessible by other files), we can use the extern keyword to do so:
int g_x { 2 }; // non-constant globals are external by default

extern const int g_y { 3 }; // const globals can be defined as extern, making them external
extern constexpr int g_z { 3 }; // constexpr globals can be defined as extern, making them external (but this is useless, see the note in the next section)

int main()
{
    return 0;
}
Non-const global variables are external by default (if used, the extern keyword will be ignored).
Variable forward declarations via the extern keyword
Warning
If you want to define an uninitialized non-const global variable, do not use the extern keyword, otherwise C++ will think you’re trying to make a forward declaration for the variable.
Warning
Although constexpr variables can be given external linkage via the extern keyword, they can not be forward declared, so there is no value in giving them external linkage.
This is because the compiler needs to know the value of the constexpr variable (at compile time). If that value is defined in some other file, the compiler has no visibility on what value was defined in that other file.
Variables forward declarations do need the extern keyword to help differentiate variables definitions from variable forward declarations (they look otherwise identical):
// non-constant
int g_x; // variable definition (can have initializer if desired)
extern int g_x; // forward declaration (no initializer)

// constant
extern const int g_y { 1 }; // variable definition (const requires initializers)
extern const int g_y; // forward declaration (no initializer)
File scope vs. global scope
However, informally, the term “file scope” is more often applied to global variables with internal linkage, and “global scope” to global variables with external linkage (since they can be used across the whole program, with the appropriate forward declarations).
Quick summary
// External global variable definitions:
int g_x;                       // defines non-initialized external global variable (zero initialized by default)
extern const int g_x{ 1 };     // defines initialized const external global variable
extern constexpr int g_x{ 2 }; // defines initialized constexpr external global variable

// Forward declarations
extern int g_y;                // forward declaration for non-constant global variable
extern const int g_y;          // forward declaration for const global variable
extern constexpr int g_y;      // not allowed: constexpr variables can't be forward declared
We provide a comprehensive summary in lesson 6.11 – Scope, duration, and linkage summary.
6.8 — Why (non-const) global variables are evil
Why (non-const) global variables are evil
Best practice
Use local variables instead of global variables whenever possible.
The initialization order problem of global variables
Warning
Dynamic initialization of global variables causes a lot of problems in C++. Avoid dynamic initialization whenever possible.
So what are very good reasons to use non-const global variables?
There aren’t many.
As a rule of thumb, any use of a global variable should meet at least the following two criteria: There should only ever be one of the thing the variable represents in your program, and its use should be ubiquitous throughout your program.
Protecting yourself from global destruction
If you do find a good use for a non-const global variable, a few useful bits of advice will minimize the amount of trouble you can get into. This advice isn’t only for non-const global variables, but can help with all global variables.
First, prefix all non-namespaced global variables with “g” or “g_”, or better yet, put them in a namespace (discussed in lesson 6.2 – User-defined namespaces and the scope resolution operator), to reduce the chance of naming collisions.
namespace constants
{
    constexpr double gravity { 9.8 };
}

int main()
{
    return 0;
}
Second, instead of allowing direct access to the global variable, it’s a better practice to “encapsulate” the variable. Make sure the variable can only be accessed from within the file it’s declared in, e.g. by making the variable static or const, then provide external global “access functions” to work with the variable. These functions can ensure proper usage is maintained (e.g. do input validation, range checking, etc…). Also, if you ever decide to change the underlying implementation (e.g. move from one database to another), you only have to update the access functions instead of every piece of code that uses the global variable directly.
For example, instead of:
namespace constants
{
    extern const double gravity { 9.8 }; // has external linkage, is directly accessible by other files
}
Do this:
namespace constants
{
    constexpr double gravity { 9.8 }; // has internal linkage, is accessible only by this file
}

double getGravity() // this function can be exported to other files to access the global outside of this file
{
    // We could add logic here if needed later
    // or change the implementation transparently to the callers
    return constants::gravity;
}
A reminder
Global const variables have internal linkage by default, gravity doesn’t need to be static.
Third, when writing an otherwise standalone function that uses the global variable, don’t use the variable directly in your function body. Pass it in as an argument instead. That way, if your function ever needs to use a different value for some circumstance, you can simply vary the argument. This helps maintain modularity.
Instead of:
#include Do this:
#include A joke
What’s the best naming prefix for a global variable?
Answer: //
C++ jokes are the best.
6.9 — Sharing global constants across multiple files (using inline variables)
Global constants as internal variables
As an aside…
The term “optimizing away” refers to any process where the compiler optimizes the performance of your program by removing things in a way that doesn’t affect the output of your program. For example, lets say you have some const variable x that’s initialized to value 4. Wherever your code references variable x, the compiler can just replace x with 4 (since x is const, we know it won’t ever change to a different value) and avoid having to create and initialize a variable altogether.
Global constants as external variables
Author’s note
We use const instead of constexpr in this method because constexpr variables can’t be forward declared, even if they have external linkage. This is because the compiler needs to know the value of the variable at compile time, and a forward declaration does not provide this information.
constants.cpp:
#include "constants.h"

namespace constants
{
    // actual global variables
    extern const double pi { 3.14159 };
    extern const double avogadro { 6.0221413e23 };
    extern const double myGravity { 9.2 }; // m/s^2 -- gravity is light on this planet
}
constants.h:
#ifndef CONSTANTS_H
#define CONSTANTS_H

namespace constants
{
    // since the actual variables are inside a namespace, the forward declarations need to be inside a namespace as well
    extern const double pi;
    extern const double avogadro;
    extern const double myGravity;
}

#endif
Use in the code file stays the same:
main.cpp:
#include "constants.h" // include all the forward declarations
#include Because global symbolic constants should be namespaced (to avoid naming conflicts with other identifiers in the global namespace), the use of a “g_” naming prefix is not necessary.
Now the symbolic constants will get instantiated only once (in constants.cpp) instead of in each code file where constants.h is #included, and all uses of these constants will be linked to the version instantiated in constants.cpp. Any changes made to constants.cpp will require recompiling only constants.cpp.
Key insight
In order for variables to be usable in compile-time contexts, such as array sizes, the compiler has to see the variable’s definition (not just a forward declaration).
Given the above downsides, prefer defining your constants in a header file (either per the prior section, or per the next section). If you find that the values for your constants are changing a lot (e.g. because you are tuning the program) and this is leading to long compilation times, you can move just the offending constants into a .cpp file as needed.
Global constants as inline variables C++17
C++17 introduced a new concept called inline variables. In C++, the term inline has evolved to mean “multiple definitions are allowed”. Thus, an inline variable is one that is allowed to be defined in multiple files without violating the one definition rule. Inline global variables have external linkage by default.
Inline variables have two primary restrictions that must be obeyed:
- All definitions of the inline variable must be identical (otherwise, undefined behavior will result).
- The inline variable definition (not a forward declaration) must be present in any file that uses the variable.
With this, we can go back to defining our globals in a header file without the downside of duplicated variables:
constants.h:
#ifndef CONSTANTS_H
#define CONSTANTS_H

// define your own namespace to hold constants
namespace constants
{
    inline constexpr double pi { 3.14159 }; // note: now inline constexpr
    inline constexpr double avogadro { 6.0221413e23 };
    inline constexpr double myGravity { 9.2 }; // m/s^2 -- gravity is light on this planet
    // ... other related constants
}
#endif
main.cpp:
#include "constants.h"
#include We can include constants.h into as many code files as we want, but these variables will only be instantiated once and shared across all code files.
This method does retain the downside of requiring every file that includes the constants header be recompiled if any constant value is changed.
Best practice
If you need global constants and your compiler is C++17 capable, prefer defining inline constexpr global variables in a header file.
A reminder
Use std::string_view for constexpr strings. We cover this in lesson 4.18 – Introduction to std::string_view.
6.10 — Static local variables
Static local variables
Best practice
Initialize your static local variables. Static local variables are only initialized the first time the code is executed, not on subsequent calls.
Static local constants
Static local variables can be made const (or constexpr).
With a const/constexpr static local variable, you can create and initialize the expensive object once, and then reuse it whenever the function is called.
Don’t use static local variables to alter flow
Static local variables should only be used if in your entire program and in the foreseeable future of your program, the variable is unique and it wouldn’t make sense to reset the variable.
Best practice
Avoid static local variables unless the variable never needs to be reset.
6.11 — Scope, duration, and linkage summary
What the heck is a storage class specifier?
When used as part of an identifier declaration, the static and extern keywords are called storage class specifiers. In this context, they set the storage duration and linkage of the identifier.
| Specifier | Meaning | Note |
|---|---|---|
| extern | static (or thread_local) storage duration and external linkage | |
| static | static (or thread_local) storage duration and internal linkage | |
| thread_local | thread storage duration | |
| mutable | object allowed to be modified even if containing class is const | |
| auto | automatic storage duration | Deprecated in C++11 |
| register | automatic storage duration and hint to the compiler to place in a register | Deprecated in C++17 |
The term storage class specifier is typically only used in formal documentation.
6.12 — Using declarations and using directives
You’ve probably seen this program in a lot of textbooks and tutorials:
#include Some older IDEs will also auto-populate new C++ projects with a similar program (so you can compile something immediately, rather than starting from a blank file).
If you see this, run. Your textbook, tutorial, or compiler are probably out of date. In this lesson, we’ll explore why.
A short history lesson
In 1995, namespaces were standardized, and all of the functionality from the standard library was moved out of the global namespace and into namespace std. This change broke older code that was still using names without std::.
Fast forward to today – if you’re using the standard library a lot, typing std:: before everything you use from the standard library can become repetitive, and in some cases, can make your code harder to read.
C++ provides some solutions to both of these problems, in the form of using statements.
But first, let’s define two terms.
Qualified and unqualified names
For advanced readers
A name can also be qualified by a class name using the scope resolution operator (:, or by a class object using the member selection operators (. or ->). For example:
class C; // some class

C::s_member; // s_member is qualified by class C
obj.x; // x is qualified by class object obj
ptr->y; // y is qualified by pointer to class object ptr
Using declarations
A using declaration allows us to use an unqualified name (with no scope) as an alias for a qualified name.
#include Although this method is less explicit than using the std:: prefix, it’s generally considered safe and acceptable (when used inside a function).
Using directives
For advanced readers
For technical reasons, using directives do not actually import names into the current scope – instead they import the names into an outer scope (more details about which outer scope is picked can be found here. However, these names are not accessible from the outer scope – they are only accessible via unqualified (non-prefixed) lookup from the scope of the using directive (or a nested scope).
The practical effect is that (outside of some weird edge cases involving multiple using directives inside nested namespaces), using directives behave as if the names had been imported into the current scope. To keep things simple, we will proceed under the simplification that the names are imported into the current scope.
#include Problems with using directives (a.k.a. why you should avoid “using namespace std;”)
In modern C++, using directives generally offer little benefit (saving some typing) compared to the risk. Because using directives import all of the names from a namespace (potentially including lots of names you’ll never use), the possibility for naming collisions to occur increases significantly (especially if you import the std namespace).
The scope of using declarations and directives
If a using declaration or using directive is used within a block, the names are applicable to just that block (it follows normal block scoping rules). This is a good thing, as it reduces the chances for naming collisions to occur to just within that block.
If a using declaration or using directive is used in the global namespace, the names are applicable to the entire rest of the file (they have file scope).
Cancelling or replacing a using statement
Of course, all of this headache can be avoided by explicitly using the scope resolution operator (: in the first place.
Best practices for using statements
Avoid using directives (particularly using namespace std;), except in specific circumstances (such as using namespace std::literals to access the s and sv literal suffixes). Using declarations are generally considered safe to use inside blocks. Limit their use in the global namespace of a code file, and never use them in the global namespace of a header file.
Best practice
Prefer explicit namespaces over using statements. Avoid using directives whenever possible. Using declarations are okay to use inside blocks.
Related content
The using keyword is also used to define type aliases, which are unrelated to using statements. We cover type aliases in lesson 8.6 – Typedefs and type aliases.
6.13 — Inline functions
When inline expansion occurs
A function that is eligible to have its function calls expanded is called an inline function.
Tip
Modern optimizing compilers make the decision about when functions should be expanded inline.
For advanced readers
Some types of functions are implicitly treated as inline functions. These include:
- Functions defined inside a class, struct, or union type definition.
- Constexpr / consteval functions (6.14 – Constexpr and consteval functions)
The inline keyword, historically
Best practice
Do not use the inline keyword to request inline expansion for your functions.
The inline keyword, modernly
In lesson 6.9 – Sharing global constants across multiple files (using inline variables), we noted that in modern C++, the inline concept has evolved to have a new meaning: multiple definitions are allowed in the program. This is true for functions as well as variables. Thus, if we mark a function as inline, then that function is allowed to have multiple definitions (in different files), as long as those definitions are identical.
Key insight
The compiler needs to be able to see the full definition of an inline function wherever it is called.
For the most part, you should not mark your functions as inline, but we’ll see examples in the future where this is useful.
Best practice
Avoid the use of the inline keyword for functions unless you have a specific, compelling reason to do so.
6.14 — Constexpr and consteval functions
Constexpr functions can be evaluated at compile-time
A constexpr function is a function whose return value may be computed at compile-time. To make a function a constexpr function, we simply use the constexpr keyword in front of the return type. Here’s a similar program to the one above, using a constexpr function:
#include So in our example, the call to greater(x, y) will be replaced by the result of the function call, which is the integer value 6. In other words, the compiler will compile this:
#include To be eligible for compile-time evaluation, a function must have a constexpr return type and not call any non-constexpr functions. Additionally, a call to the function must have constexpr arguments (e.g. constexpr variables or literals).
Author’s note
We’ll use the term “eligible for compile-time evaluation” later in the article, so remember this definition.
ur greater() function definition and function call in the above example meets these requirements, so it is eligible for compile-time evaluation.
Best practice
Use a constexpr return type for functions that need to return a compile-time constant.
Constexpr functions are implicitly inline
Rule
The compiler must be able to see the full definition of a constexpr function, not just a forward declaration.
Best practice
Constexpr functions used in a single source file (.cpp) can be defined in the source file above where they are used.
Constexpr functions used in multiple source files should be defined in a header file so they can be included into each source file.
Constexpr functions can also be evaluated at runtime
Key insight
Allowing functions with a constexpr return type to be evaluated at either compile-time or runtime was allowed so that a single function can serve both cases.
Otherwise, you’d need to have separate functions (a function with a constexpr return type, and a function with a non-constexpr return type). This would not only require duplicate code, the two functions would also need to have different names!
A constexpr function is not allowed to call a non-constexpr function. If this were allowed, the constexpr function wouldn’t be able to evaluate at compile-time, which defeats the point of constexpr. Trying to do so will cause the compiler to produce a compilation error.
So when is a constexpr function evaluated at compile-time?
#include Note that your compiler’s optimization level setting may have an impact on whether it decides to evaluate a function at compile-time or runtime. This also means that your compiler may make different choices for debug vs. release builds (as debug builds typically have optimizations turned off).
Key insight
A constexpr function that is eligible to be evaluated at compile-time will only be evaluated at compile-time if the return value is used where a constant expression is required. Otherwise, compile-time evaluation is not guaranteed.
Thus, a constexpr function is better thought of as “can be used in a constant expression”, not “will be evaluated at compile-time”.
Determining if a constexpr function call is evaluating at compile-time or runtime
Prior to C++20, there are no standard language tools available to do this.
In C++20, std::is_constant_evaluated() (defined in the
#include
constexpr int someFunction()
{
    if (std::is_constant_evaluated()) // if compile-time evaluation
        // do something
    else // runtime evaluation
        // do something else
}
Used cleverly, you can have your function produce some observable difference (such as returning a special value) when evaluated at compile-time, and then infer how it evaluated from that result.
Forcing a constexpr function to be evaluated at compile-time
However, in C++20, there is a better workaround to this issue, which we’ll present in a moment.
Consteval C++20
C++20 introduces the keyword consteval, which is used to indicate that a function must evaluate at compile-time, otherwise a compile error will result. Such functions are called immediate functions.
#include Just like constexpr functions, consteval functions are implicitly inline.
Best practice
Use consteval if you have a function that must run at compile-time for some reason (e.g. performance).
Using consteval to make constexpr execute at compile-time C++20
6.15 — Unnamed and inline namespaces
An unnamed namespace (also called an anonymous namespace) is a namespace that is defined without a name, like so:
#include For functions, this is effectively the same as defining all functions in the unnamed namespace as static functions. The following program is effectively identical to the one above:
#include Unnamed namespaces are typically used when you have a lot of content that you want to ensure stays local to a given file, as it’s easier to cluster such content in an unnamed namespace than individually mark all declarations as static. Unnamed namespaces will also keep user-defined types (something we’ll discuss in a later lesson) local to the file, something for which there is no alternative equivalent mechanism to do.
Inline namespaces
An inline namespace is a namespace that is typically used to version content. Much like an unnamed namespace, anything declared inside an inline namespace is considered part of the parent namespace. However, inline namespaces don’t give everything internal linkage.
#include This prints:
v1
v2
v1
In the above example, callers to doSomething will get the v1 (the inline version) of doSomething. Callers who want to use the newer version can explicitly call v2::dosomething(). This preserves the function of existing programs while allowing newer programs to take advantage of newer/better variations.
6.x — Chapter 6 summary and quiz
Avoid non-const global variables whenever possible. Const globals are generally seen as acceptable. Use inline variables for global constants if your compiler is C++17 capable.
Local variables can be given static duration via the static keyword.
A qualified name is a name that includes an associated scope (e.g. std::string). An unqualified name is a name that does not include a scoping qualifier (e.g. string).
Inline functions were originally designed as a way to request that the compiler replace your function call with inline expansion of the function code. You should not need to use the inline keyword for this purpose because the compiler will generally determine this for you. In modern C++, the inline keyword is used to exempt a function from the one-definition rule, allowing its definition to be imported into multiple code files. Inline functions are typically defined in header files so they can be #included into any code files that needs them.
C++20 introduces the keyword consteval, which is used to indicate that a function must evaluate at compile-time, otherwise a compile error will result. Such functions are called immediate functions.
Finally, C++ supports unnamed namespaces, which implicitly treat all contents of the namespace as if it had internal linkage. C++ also supports inline namespaces, which provide some primitive versioning capabilities for namespaces.
Chapter 7_Control Flow and Error Handling
7.1 — Control flow introduction
The specific sequence of statements that the CPU executes is called the program’s execution path (or path, for short).
Straight-line programs take the same path (execute the same statements in the same order) every time they are run.
When a control flow statement causes point of execution to change to a non-sequential statement, this is called branching.
Categories of flow control statements
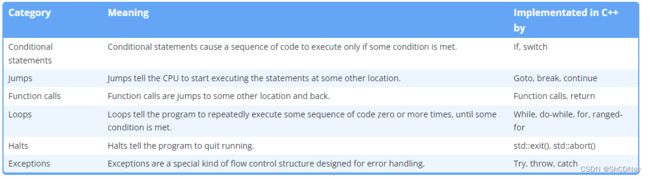
This is where the real fun begins. So let’s get to it!
7.2 — If statements and blocks
To block or not to block single statements
Best practice
Consider putting single statements associated with an if or else in blocks (particularly while you are learning). More experienced C++ developers sometimes disregard this practice in favor of tighter vertical spacing.
A middle-ground alternative is to put single-lines on the same line as the if or else:
if (age >= 21) purchaseBeer();
This avoids both of the above downsides mentioned above at some minor cost to readability.
Implicit blocks
If the programmer does not declare a block in the statement portion of an if statement or else statement, the compiler will implicitly declare one. Thus:
if (condition)
    true_statement;
else
    false_statement;
is actually the equivalent of:
if (condition)
{
    true_statement;
}
else
{
    false_statement;
}
7.3 — Common if statement problems
Nested if statements and the dangling else problem
Flattening nested if statements
Null statements
A null statement is an expression statement that consists of just a semicolon:
if (x > 10)
    ; // this is a null statement
Warning
Be careful not to “terminate” your if statement with a semicolon, otherwise your conditional statement(s) will execute unconditionally (even if they are inside a block).
Operator== vs Operator= inside the conditional
7.4 — Switch statement basics
Because testing a variable or expression for equality against a set of different values is common, C++ provides an alternative conditional statement called a switch statement that is specialized for this purpose.
Best practice
Prefer switch statements over if-else chains when there is a choice.
Starting a switch
The one restriction is that the condition must evaluate to an integral type or an enumerated type , or be convertible to one.Expressions that evaluate to floating point types, strings, and most other non-integral types may not be used here.
For advanced readers
Why does the switch type only allow for integral (or enumerated) types? The answer is because switch statements are designed to be highly optimized. Historically, the most common way for compilers to implement switch statements is via Jump tables – and jump tables only work with integral values.
For those of you already familiar with arrays, a jump table works much like an array, an integral value is used as the array index to “jump” directly to a result. This can be much more efficient than doing a bunch of sequential comparisons.
Of course, compilers don’t have to implement switches using jump tables, and sometimes they don’t. There is technically no reason that C++ couldn’t relax the restriction so that other types could be used as well, they just haven’t done so yet (as of C++20).
Case labels
#include switch (x)
{
case 54:
case 54: // error: already used value 54!
case '6': // error: '6' converts to integer value 54, which is already used
}
If the conditional expression does not match any of the case labels, no cases are executed. We’ll show an example of this shortly.
The default label
The default label is optional, and there can only be one default label per switch statement. By convention, the default case is placed last in the switch block.
Best practice
Place the default case last in the switch block.
Taking a break
#include Best practice
Each set of statements underneath a label should end in a break statement or a return statement. This includes the statements underneath the last label in the switch.
7.5 — Switch fallthrough and scoping
Fallthrough
This is probably not what we wanted! When execution flows from a statement underneath a label into statements underneath a subsequent label, this is called fallthrough.
Warning
Once the statements underneath a case or default label have started executing, they will overflow (fallthrough) into subsequent cases. Break or return statements are typically used to prevent this.
The [[fallthrough]] attribute
The [[fallthrough]] attribute modifies a null statement to indicate that fallthrough is intentional (and no warnings should be triggered):
#include This program prints:
2
3
Best practice
Use the [[fallthrough]] attribute (along with a null statement) to indicate intentional fallthrough.
Sequential case labels
You can use the logical OR operator to combine multiple tests into a single statement:
bool isVowel(char c)
{
    return (c=='a' || c=='e' || c=='i' || c=='o' || c=='u' ||
        c=='A' || c=='E' || c=='I' || c=='O' || c=='U');
}
This suffers …
You can do something similar using switch statements by placing multiple case labels in sequence:
bool isVowel(char c)
{
    switch (c)
    {
        case 'a': // if c is 'a'
        case 'e': // or if c is 'e'
        case 'i': // or if c is 'i'
        case 'o': // or if c is 'o'
        case 'u': // or if c is 'u'
        case 'A': // or if c is 'A'
        case 'E': // or if c is 'E'
        case 'I': // or if c is 'I'
        case 'O': // or if c is 'O'
        case 'U': // or if c is 'U'
            return true;
        default:
            return false;
    }
}
Thus, we can “stack” case labels to make all of those case labels share the same set of statements afterward. This is not considered fallthrough behavior, so use of comments or [[fallthrough]] is not needed here.
Switch case scoping
However, with switch statements, the statements after labels are all scoped to the switch block. No implicit blocks are created.
switch (1)
{
    case 1: // does not create an implicit block
        foo(); // this is part of the switch scope, not an implicit block to case 1
        break; // this is part of the switch scope, not an implicit block to case 1
    default:
        std::cout << "default case\n";
        break;
}
In the above example, the 2 statements between the case 1 and the default label are scoped as part of the switch block, not a block implicit to case 1.
Variable declaration and initialization inside case statements
If a case needs to define and/or initialize a new variable, the best practice is to do so inside an explicit block underneath the case statement:
switch (1)
{
    case 1:
    { // note addition of explicit block here
        int x{ 4 }; // okay, variables can be initialized inside a block inside a case
        std::cout << x;
        break;
    }
    default:
        std::cout << "default case\n";
        break;
}
Best practice
If defining variables used in a case statement, do so in a block inside the case.
7.6 — Goto statements
Avoid using goto
One notable exception is when you need to exit a nested loop but not the entire function – in such a case, a goto to just beyond the loops is probably the cleanest solution.
Best practice
Avoid goto statements (unless the alternatives are significantly worse for code readability).
7.7 — Introduction to loops and while statements
Intentional infinite loops
Best practice
Favor while(true) for intentional infinite loops.
Loop variables
Often, we want a loop to execute a certain number of times. To do this, it is common to use a loop variable, often called a counter.
Loop variables should be signed
Best practice
Loop variables should be of type (signed) int.
Doing something every N iterations
Each time a loop executes, it is called an iteration.
Nested loops
It is also possible to nest loops inside of other loops. In the following example, the nested loop (which we’re calling the inner loop) and the outer loop each have their own counters. Note that the loop expression for the inner loop makes use of the outer loop’s counter as well!
#include This program prints:
1
1 2
1 2 3
1 2 3 4
1 2 3 4 5
Quiz time
Question #4
Now make the numbers print like this:
        1
      2 1
    3 2 1
  4 3 2 1
5 4 3 2 1
7.8 — Do while statements
A do while statement is a looping construct that works just like a while loop, except the statement always executes at least once.
In practice, do-while loops aren’t commonly used. Having the condition at the bottom of the loop obscures the loop condition, which can lead to errors. Many developers recommend avoiding do-while loops altogether as a result. We’ll take a softer stance and advocate for preferring while loops over do-while when given an equal choice.
Best practice
Favor while loops over do-while when given an equal choice.
7.9 — For statements
The perils of operator!= in for-loop conditions
Best practice
Avoid operator!= when doing numeric comparisons in the for-loop condition.
Off-by-one errors
Off-by-one errors occur when the loop iterates one too many or one too few times to produce the desired result.
Omitted expressions
Although you do not see it very often, it is worth noting that the following example produces an infinite loop:
for (;;)
    statement;
The above example is equivalent to:
while (true)
    statement;
This might be a little unexpected, as you’d probably expect an omitted condition-expression to be treated as false. However, the C++ standard explicitly (and inconsistently) defines that an omitted condition-expression in a for loop should be treated as true.
We recommend avoiding this form of the for loop altogether and using while(true) instead.
For loops with multiple counters
Best practice
Defining multiple variables (in the init-statement) and using the comma operator (in the end-expression) is acceptable inside a for statement.
Conclusion
Best practice
Prefer for loops over while loops when there is an obvious loop variable.
Prefer while loops over for loops when there is no obvious loop variable.
7.10 — Break and continue
The debate over use of break and continue
Many textbooks caution readers not to use break and continue in loops, both because it causes the execution flow to jump around, and because it can make the flow of logic harder to follow. For example, a break in the middle of a complicated piece of logic could either be missed, or it may not be obvious under what conditions it should be triggered.
However, used judiciously, break and continue can help make loops more readable by keeping the number of nested blocks down and reducing the need for complicated looping logic.
For example, consider the following program:
#include This program uses a boolean variable to control whether the loop continues or not, as well as a nested block that only runs if the user doesn’t exit.
Here’s a version that’s easier to understand, using a break statement:
#include In this version, by using a single break statement, we’ve avoided the use of a Boolean variable (and having to understand both what its intended use is, and where its value is changed), an else statement, and a nested block.
Minimizing the number of variables used and keeping the number of nested blocks down both improve code comprehensibility more than a break or continue harms it. For that reason, we believe judicious use of break or continue is acceptable.
Best practice
Use break and continue when they simplify your loop logic.
The debate over use of early returns
Our stance is that early returns are more helpful than harmful, but we recognize that there is a bit of art to the practice.
Best practice
Use early returns when they simplify your function’s logic.
7.11 — Halts (exiting your program early)
The last category of flow control statement we’ll cover in this chapter is the halt. A halt is a flow control statement that terminates the program. In C++, halts are implemented as functions (rather than keywords), so our halt statements will be function calls.
The std::exit() function
std::exit() is a function that causes the program to terminate normally. Normal termination means the program has exited in an expected way. Note that the term normal termination does not imply anything about whether the program was successful (that’s what the status code is for). For example, let’s say you were writing a program where you expected the user to type in a filename to process. If the user typed in an invalid filename, your program would probably return a non-zero status code to indicate the failure state, but it would still have a normal termination.
std::exit() performs a number of cleanup functions. First, objects with static storage duration are destroyed. Then some other miscellaneous file cleanup is done if any files were used. Finally, control is returned back to the OS, with the argument passed to std::exit() used as the status code.
Calling std::exit() explicitly
Warning
The std::exit() function does not clean up local variables in the current function or up the call stack.
std::atexit
Because std::exit() terminates the program immediately, you may want to manually do some cleanup before terminating. In this context, cleanup means things like closing database or network connections, deallocating any memory you have allocated, writing information to a log file, etc…
In the above example, we called function cleanup() to handle our cleanup tasks. However, remembering to manually call a cleanup function before calling every call to exit() adds burden to the programmer.
To assist with this, C++ offers the std::atexit() function, which allows you to specify a function that will automatically be called on program termination via std::exit().
#include For advanced readers
In multi-threaded programs, calling std::exit() can cause your program to crash (because the thread calling std::exit() will cleanup static objects that may still be accessed by other threads). For this reason, C++ has introduced another pair of functions that work similarly to std::exit() and std::atexit() called std::quick_exit() and std::at_quick_exit(). std::quick_exit() terminates the program normally, but does not clean up static objects, and may or may not do other types of cleanup. std::at_quick_exit() performs the same role as std::atexit() for programs terminated with std::quick_exit().
std::abort and std::terminate
C++ contains two other halt-related functions.
The std::abort() function causes your program to terminate abnormally.
The std::terminate() function is typically used in conjunction with exceptions (we’ll cover exceptions in a later chapter). Although std::terminate can be called explicitly, it is more often called implicitly when an exception isn’t handled (and in a few other exception-related cases). By default, std::terminate() calls std::abort().
When should you use a halt?
The short answer is “almost never”. Destroying local objects is an important part of C++ (particularly when we get into classes), and none of the above-mentioned functions clean up local variables. Exceptions are a better and safer mechanism for handling error cases.
Best practice
Only use a halt if there is no safe way to return normally from the main function. If you haven’t disabled exceptions, prefer using exceptions for handling errors safely.
7.12 — Introduction to testing your code
Just because your program worked for one set of inputs doesn’t mean it’s going to work correctly in all cases.
Software testing (also called software validation) is the process of determining whether or not the software actually works as expected.
The testing challenge
There’s a lot that can be written about testing methodologies – in fact, we could write a whole chapter on it. But since it’s not a C++ specific topic, we’ll stick to a brief and informal introduction, covered from the point of view of you (as the developer) testing your own code. In the next few subsections, we’ll talk about some practical things you should be thinking about as you test your code.
Test your programs in small pieces
Testing a small part of your code in isolation to ensure that “unit” of code is correct is called unit testing. Each unit test is designed to ensure that a particular behavior of the unit is correct.
Best practice
Write your program in small, well defined units (functions or classes), compile often, and test your code as you go.
Informal testing
Preserving your tests
#include As you create more tests, you can simply add them to the testVowel() function.
Automating your test functions
We can do better by writing a test function that contains both the tests AND the expected answers and compares them so we don’t have to.
#include Now, you can call testVowel() at any time to re-prove that you haven’t broken anything, and the test routine will do all the work for you, returning either an “all good” signal (return value 0), or the test number that didn’t pass, so you can investigate why it broke. This is particularly useful when going back and modifying old code, to ensure you haven’t accidentally broken anything!
Unit testing frameworks
Because writing functions to exercise other functions is so common and useful, there are entire frameworks (called unit testing frameworks) that are designed to help simplify the process of writing, maintaining, and executing unit tests. Since these involve third party software, we won’t cover them here, but you should be aware they exist.
Integration testing
Once each of your units has been tested in isolation, they can be integrated into your program and retested to make sure they were integrated properly. This is called an integration test. Integration testing tends to be more complicated – for now, running your program a few times and spot checking the behavior of the integrated unit will suffice.
7.13 — Code coverage
Code coverage
The term code coverage is used to describe how much of the source code of a program is executed while testing. There are many different metrics used for code coverage. We’ll cover a few of the more useful and popular ones in the following sections.
Statement coverage
The term statement coverage refers to the percentage of statements in your code that have been exercised by your testing routines.
For our isLowerVowel() function:
bool isLowerVowel(char c)
{
    switch (c) // statement 1
    {
    case 'a':
    case 'e':
    case 'i':
    case 'o':
    case 'u':
        return true; // statement 2
    default:
        return false; // statement 3
    }
}
This function will require two calls to test all of the statements, as there is no way to reach statement 2 and 3 in the same function call.
While aiming for 100% statement coverage is good, it’s not enough to ensure correctness.
Branch coverage
Branch coverage refers to the percentage of branches that have been executed, each possible branch counted separately.
Best practice
Aim for 100% branch coverage of your code.
Loop coverage
Loop coverage (informally called the 0, 1, 2 test) says that if you have a loop in your code, you should ensure it works properly when it iterates 0 times, 1 time, and 2 times.
Best practice
Use the 0, 1, 2 test to ensure your loops work correctly with different number of iterations.
Testing different categories of input
Best practice
Test different categories of input values to make sure your unit handles them properly.
7.14 — Common semantic errors in C++
Incorrect operator precedence
From lesson 5.7 – Logical operators, the following program makes an operator precedence mistake:
#include Because logical NOT has higher precedence than operator>, the conditional evaluates as if it was written (!x) > y, which isn’t what the programmer intended.
As a result, this program prints:
5 is greater than 7
This can also happen when mixing Logical OR and Logical AND in the same expression (Logical AND takes precedence over Logical OR). Use explicit parenthesization to avoid these kinds of errors.
Precision issues with floating point types
The following floating point variable doesn’t have enough precision to store the entire number:
#include Because of this lack of precision, the number is rounded slightly:
0.123457
In lesson 5.6 – Relational operators and floating point comparisons, we talked about how using operator== and operator!= can be problematic with floating point numbers due to small rounding errors (as well as what to do about it). Here’s an example:
#include This program prints:
not equal
The more arithmetic you do with a floating point number, the more it will accumulate small rounding errors.
Accidental null statements
In lesson 7.3 – Common if statement problems, we covered null statements, which are statements that do nothing.
In the below program, we only want to blow up the world if we have the user’s permission:
#include However, because of an accidental null statement, the function call to blowUpWorld() is always executed, so we blow it up regardless:
Should we blow up the world again? (y/n): n
Kaboom!
7.15 — Detecting and handling errors
Handling errors in functions
Functions may fail for any number of reasons – the caller may have passed in an argument with an invalid value, or something may fail within the body of the function. For example, a function that opens a file for reading might fail if the file cannot be found.
When this happens, you have quite a few options at your disposal. There is no best way to handle an error – it really depends on the nature of the problem and whether the problem can be fixed or not.
There are 4 general strategies that can be used:
- Handle the error within the function
- Pass the error back to the caller to deal with
- Halt the program
- Throw an exception
Fatal errors
If the error is so bad that the program can not continue to operate properly, this is called a non-recoverable error (also called a fatal error). In such cases, the best thing to do is terminate the program. If your code is in main() or a function called directly from main(), the best thing to do is let main() return a non-zero status code. However, if you’re deep in some nested subfunction, it may not be convenient or possible to propagate the error all the way back to main(). In such a case, a halt statement (such as std::exit()) can be used.
For example:
double doDivision(int x, int y)
{
    if (y == 0)
    {
        std::cerr << "Error: Could not divide by zero\n";
        std::exit(1);
    }
    return static_cast<double>(x) / y;
}
Exceptions
Because returning an error from a function back to the caller is complicated (and the many different ways to do so leads to inconsistency, and inconsistency leads to mistakes), C++ offers an entirely separate way to pass errors back to the caller: exceptions.
The basic idea is that when an error occurs, an exception is “thrown”. If the current function does not “catch” the error, the caller of the function has a chance to catch the error. If the caller does not catch the error, the caller’s caller has a chance to catch the error. The error progressively moves up the call stack until it is either caught and handled (at which point execution continues normally), or until main() fails to handle the error (at which point the program is terminated with an exception error).
We cover exception handling in chapter 20 of this tutorial series.
7.16 — std::cin and handling invalid input
A program that handles error cases well is said to be robust.
std::cin, buffers, and extraction
Extraction fails if the input data does not match the type of the variable being extracted to. For example:
int x{};
std::cin >> x;
If the user were to enter ‘b’, extraction would fail because ‘b’ can not be extracted to an integer variable.
Types of invalid text input
Error case 1: Extraction succeeds but input is meaningless
char getOperator()
{
    while (true) // Loop until user enters a valid input
    {
        std::cout << "Enter one of the following: +, -, *, or /: ";
        char operation{};
        std::cin >> operation;

        // Check whether the user entered meaningful input
        switch (operation)
        {
        case '+':
        case '-':
        case '*':
        case '/':
            return operation; // return it to the caller
        default: // otherwise tell the user what went wrong
            std::cerr << "Oops, that input is invalid.  Please try again.\n";
        }
    } // and try again
}
Error case 2: Extraction succeeds but with extraneous input
Although the above program works, the execution is messy. It would be better if any extraneous characters entered were simply ignored. Fortunately, it’s easy to ignore characters:
std::cin.ignore(100, '\n'); // clear up to 100 characters out of the buffer, or until a '\n' character is removed
This call would remove up to 100 characters, but if the user entered more than 100 characters we’ll get messy output again. To ignore all characters up to the next ‘\n’, we can pass std::numeric_limitsstd::streamsize::max() to std::cin.ignore(). std::numeric_limitsstd::streamsize::max() returns the largest value that can be stored in a variable of type std::streamsize. Passing this value to std::cin.ignore() causes it to disable the count check.
To ignore everything up to and including the next ‘\n’ character, we call
std::cin.ignore(std::numeric_limits<std::streamsize>::max(), '\n');
Because this line is quite long for what it does, it’s handy to wrap it in a function which can be called in place of std::cin.ignore().
#include Since the last character the user entered must be a ‘\n’, we can tell std::cin to ignore buffered characters until it finds a newline character (which is removed as well).
Let’s update our getDouble() function to ignore any extraneous input:
double getDouble()
{
    std::cout << "Enter a double value: ";
    double x{};
    std::cin >> x;
    ignoreLine();
    return x;
}
Now our program will work as expected, even if we enter “5*7” for the first input – the 5 will be extracted, and the rest of the characters will be removed from the input buffer. Since the input buffer is now empty, the user will be properly asked for input the next time an extraction operation is performed!
Author’s note
Some lessons still pass 32767 to std::cin.ignore(). This is a magic number with no special meaning to std::cin.ignore() and should be avoided. If you see such an occurrence, feel free to point it out.
Error case 3: Extraction fails
When the user enters ‘a’, that character is placed in the buffer. Then operator>> tries to extract ‘a’ to variable x, which is of type double. Since ‘a’ can’t be converted to a double, operator>> can’t do the extraction. Two things happen at this point: ‘a’ is left in the buffer, and std::cin goes into “failure mode”.
Once in “failure mode”, future requests for input extraction will silently fail. Thus in our calculator program, the output prompts still print, but any requests for further extraction are ignored. This means that instead waiting for us to enter an operation, the input prompt is skipped, and we get stuck in an infinite loop because there is no way to reach one of the valid cases.
Fortunately, we can detect whether an extraction has failed:
if (std::cin.fail()) // has a previous extraction failed?
{
    // yep, so let's handle the failure
    std::cin.clear(); // put us back in 'normal' operation mode
    ignoreLine(); // and remove the bad input
}
Because std::cin has a Boolean conversion indicating whether the last input succeeded, it’s more idiomatic to write the above as following:
if (!std::cin) // has a previous extraction failed?
{
    // yep, so let's handle the failure
    std::cin.clear(); // put us back in 'normal' operation mode
    ignoreLine(); // and remove the bad input
}
Let’s integrate that into our getDouble() function:
double getDouble()
{
    while (true) // Loop until user enters a valid input
    {
        std::cout << "Enter a double value: ";
        double x{};
        std::cin >> x;

        if (!std::cin) // has a previous extraction failed?
        {
            // yep, so let's handle the failure
            std::cin.clear(); // put us back in 'normal' operation mode
            ignoreLine(); // and remove the bad input
        }
        else // else our extraction succeeded
        {
            ignoreLine();
            return x; // so return the value we extracted
        }
    }
}
A failed extraction due to invalid input will cause the variable to be zero-initialized. Zero initialization means the variable is set to 0, 0.0, “”, or whatever value 0 converts to for that type.
Error case 4: Extraction succeeds but the user overflows a numeric value
#include What happens if the user enters a number that is too large (e.g. 40000)?
Enter a number between -32768 and 32767: 40000
Enter another number between -32768 and 32767: The sum is: 32767
In the above case, std::cin goes immediately into “failure mode”, but also assigns the closest in-range value to the variable. Consequently, x is left with the assigned value of 32767. Additional inputs are skipped, leaving y with the initialized value of 0. We can handle this kind of error in the same way as a failed extraction.
Putting it all together
Here’s our example calculator, updated with a few additional bits of error checking:
#include Conclusion
As you write your programs, consider how users will misuse your program, especially around text input. For each point of text input, consider:
- Could extraction fail?
- Could the user enter more input than expected?
- Could the user enter meaningless input?
- Could the user overflow an input?
You can use if statements and boolean logic to test whether input is expected and meaningful.
The following code will clear any extraneous input:
std::cin.ignore(std::numeric_limits<std::streamsize>::max(), '\n');
The following code will test for and fix failed extractions or overflow:
if (!std::cin) // has a previous extraction failed or overflowed?
{
    // yep, so let's handle the failure
    std::cin.clear(); // put us back in 'normal' operation mode
    std::cin.ignore(std::numeric_limits<std::streamsize>::max(), '\n'); // and remove the bad input
}
Finally, use loops to ask the user to re-enter input if the original input was invalid.
Author’s note
Input validation is important and useful, but it also tends to make examples more complicated and harder to follow. Accordingly, in future lessons, we will generally not do any kind of input validation unless it’s relevant to something we’re trying to teach.
7.17 — Assert and static_assert
If the program terminates (via std::exit) then we will have lost our call stack and any debugging information that might help us isolate the problem. std::abort is a better option for such cases, as typically the developer will be given the option to start debugging at the point where the program aborted.
Preconditions, invariants, and postconditions
In programming, a precondition is any condition that must always be true prior to the execution of component of code. Our check of y is a precondition that ensures y has a valid value before the function continues.
It’s more common for functions with preconditions to be written like this:
void printDivision(int x, int y)
{
    if (y == 0)
    {
        std::cerr << "Error: Could not divide by zero\n";
        return;
    }

    std::cout << static_cast<double>(x) / y;
}
An invariant is a condition that must be true while some component is executing.
Similarly, a postcondition is something that must be true after the execution of some component of code. Our function doesn’t have any postconditions.
Assertions
An assertion is an expression that will be true unless there is a bug in the program.
Key insight
When an assertion evaluates to false, your program is immediately stopped. This gives you an opportunity to use debugging tools to examine the state of your program and determine why the assertion failed. Working backwards, you can then find and fix the issue.
Without an assertion to detect an error and fail, such an error would likely cause your program to malfunction later. In such cases, it can be very difficult to determine where things are going wrong, or what the root cause of the issue actually is.
In C++, runtime assertions are implemented via the assert preprocessor macro, which lives in the header.
#include When the program calls calculateTimeUntilObjectHitsGround(100.0, -9.8), assert(gravity > 0.0) will evaluate to false, which will trigger the assert. That will print a message similar to this:
dropsimulator: src/main.cpp:6: double calculateTimeUntilObjectHitsGround(double, double): Assertion 'gravity > 0.0' failed.
The actual message varies depending on which compiler you use.
Although asserts are most often used to validate function parameters, they can be used anywhere you would like to validate that something is true.
Although we told you previously to avoid preprocessor macros, asserts are one of the few preprocessor macros that are considered acceptable to use. We encourage you to use assert statements liberally throughout your code.
Making your assert statements more descriptive
Simply add a string literal joined by a logical AND:
assert(found && "Car could not be found in database");
However, when the assert triggers, the string literal will be included in the assert message:
Assertion failed: found && "Car could not be found in database", file C:\\VCProjects\\Test.cpp, line 34
That gives you some additional context as to what went wrong.
Asserts vs error handling
Best practice
Use assertions to document cases that should be logically impossible.
NDEBUG
The assert macro comes with a small performance cost that is incurred each time the assert condition is checked. Furthermore, asserts should (ideally) never be encountered in production code (because your code should already be thoroughly tested). Consequently, many developers prefer that asserts are only active in debug builds. C++ comes with a way to turn off asserts in production code. If the macro NDEBUG is defined, the assert macro gets disabled.
static_assert
C++ also has another type of assert called static_assert. A static_assert is an assertion that is checked at compile-time rather than at runtime, with a failing static_assert causing a compile error. Unlike assert, which is declared in the header, static_assert is a keyword, so no header needs to be included to use it.
A static_assert takes the following form:
static_assert(condition, diagnostic_message)
If the condition is not true, the diagnostic message is printed. Here’s an example of using static_assert to ensure types have a certain size:
static_assert(sizeof(long) == 8, "long must be 8 bytes");
static_assert(sizeof(int) == 4, "int must be 4 bytes");

int main()
{
	return 0;
}
On the author’s machine, when compiled, the compiler errors:
1>c:\consoleapplication1\main.cpp(19): error C2338: long must be 8 bytes
Because static_assert is evaluated by the compiler, the condition must be able to be evaluated at compile time. Also, unlike normal assert (which is evaluated at runtime), static_assert can be placed anywhere in the code file (even in the global namespace).
Prior to C++17, the diagnostic message must be supplied as the second parameter. Since C++17, providing a diagnostic message is optional.
7.18 — Introduction to random number generation
Algorithms and state
An algorithm is a finite sequence of instructions that can be followed to solve some problem or produce some useful result.
An algorithm is considered to be stateful if it retains some information across calls. Conversely, a stateless algorithm does not store any information (and must be given all the information it needs to work with when it is called).
When applied to algorithms, the term state refers to the current values held in stateful variables.
Pseudo-random number generators (PRNGs)
It’s easy to write a basic PRNG algorithm. Here’s a short PRNG example that generates 100 16-bit pseudo-random numbers:
#include As it turns out, this particular algorithm isn’t very good as a random number generator. But most PRNGs work similarly to LCG16() – they just typically use more state variables and more complex mathematical operations in order to generate better quality results.
Seeding a PRNG
Key insight
All of the values that a PRNG will produce are deterministically calculated from the seed value(s).
There are many different kinds of PRNG algorithms
Over the years, many different kinds of PRNG algorithms have been developed (Wikipedia has a good list here). Every PRNG algorithm has strengths and weaknesses that might make it more or less suitable for a particular applications, so selecting the right algorithm for your application is important.
Many PRNGs are now considered relatively poor by modern standards – and there’s no reason to use a PRNG that doesn’t perform well when it’s just as easy to use one that does.
Randomization in C++
The randomization capabilities in C++ are accessible via the header of the standard library. Within the random library, there are 6 PRNG families available for use (as of C++20):

There is zero reason to use knuth_b, default_random_engine, or rand() (which is a random number generator provided for compatibility with C).
As of C++20, the Mersenne Twister algorithm is the only PRNG that ships with C++ that has both decent performance and quality.
For advanced readers
A test called PracRand is often used to assess the performance and quality of PRNGs (to determine whether they have different kinds of biases). You may also see references to SmallCrush, Crush or BigCrush – these are other tests that are sometimes used for the same purpose.
If you want to see what the output of Pracrand looks like, this website has output for all of the PRNGs that C++ supports as of C++20.
So we should use Mersenne Twister, right?
Probably. For most applications, Mersenne Twister is fine, both in terms of performance and quality.
However, it’s worth noting that by modern PRNG standards, Mersenne Twister is a bit outdated. The biggest issue with Mersenne Twister is that its results can be predicted after seeing 624 generated numbers, making it non-suitable for any application that requires non-predictability.
If you are developing an application that requires the highest quality random results (e.g. a statistical simulation), the fastest results, or one where non-predictability is important (e.g. cryptography), you’ll need to use a 3rd party library.
7.19 — Generating random numbers using Mersenne Twister
Generating random numbers in C++ using Mersenne Twister
The Mersenne Twister PRNG, besides having a great name, is probably the most popular PRNG across all programming languages. Although it is a bit old by today’s standards, it generally produces quality results and has decent performance. The random library has support for two Mersenne Twister types:
- mt19937 is a Mersenne Twister that generates 32-bit unsigned integers
- mt19937_64 is a Mersenne Twister that generates 64-bit unsigned integers
Using Mersenne Twister is straightforward:
#include Tip
Since mt is a variable, you may be wondering what mt() means.
In lesson 4.17 – Introduction to std::string, we showed an example where we called the function name.length(), which invoked the length() function on std::string variable name.
mt() is a concise syntax for calling the function mt.operator(), which for these PRNG types has been defined to return the next random result in the sequence. The advantage of using operator() instead of a named function is that we don’t need to remember the function’s name, and the concise syntax is less typing.
Rolling a dice using Mersenne Twister
The random library has many random numbers distributions, most of which you will never use unless you’re doing some kind of statistical analysis. But there’s one random number distribution that’s extremely useful: a uniform distribution is a random number distribution that produces outputs between two numbers X and Y (inclusive) with equal probability.
Here’s a similar program to the one above, using a uniform distribution to simulate the roll of a 6-sided dice:
#include There are only two noteworthy differences in this example compared to the previous one. First, we’ve created a uniform distribution variable (named die6) to generate numbers between 1 and 6. Second, instead of calling mt() to generate 32-bit unsigned integer random numbers, we’re now calling die6(mt) to generate a value between 1 and 6.
The above program isn’t as random as it seems
It turns out, we really don’t need our seed to be a random number – we just need to pick something that changes each time the program is run. Then we can use our PRNG to generate a unique sequence of pseudo-random numbers from that seed.
There are two methods that are commonly used to do this:
- Use the system clock
- Use the system’s random device
Seeding with the system clock
#include Tip
std::chrono::high_resolution_clock is a popular choice instead of std::chrono::steady_clock. std::chrono::high_resolution_clock is the clock that uses the most granular unit of time, but it may use the system clock for the current time, which can be changed or rolled back by users. std::chrono::steady_clock may have a less granular tick time, but is the only clock with a guarantee that users can not adjust it.
Seeding with the random device
#include Best practice
Use std::random_device to seed your PRNGs (unless it’s not implemented properly for your target compiler/architecture).
Q: What does std::random_device{}() mean?
std::random_device{} creates a value-initialized temporary object of type std::random_device. The () then calls operator() on that temporary object, which returns a randomized value (which we use as an initializer for our Mersenne Twister)
It’s the equivalent of the calling the following function, which uses a syntax you should be more familiar with:
unsigned int getRandomDeviceValue()
{
   std::random_device rd{}; // create a value initialized std::random_device object
   return rd(); // return the result of operator() to the caller
}
Using std::random_device{}() allows us to get the same result without creating a named function or named variable, so it’s much more concise.
Q: If std::random_device is random itself, why don’t we just use that instead of Mersenne Twister?
Because std::random_device is implementation defined, we can’t assume much about it. It may be expensive to access or it may cause our program to pause while waiting for more random numbers to become available. The pool of numbers that it draws from may also be depleted quickly, which would impact the random results for other applications requesting random numbers via the same method. For this reason, std::random_device is better used to seed other PRNGs rather than as a PRNG itself.
Only seed a PRNG once
Best practice
Only seed a given pseudo-random number generator once, and do not reseed it.
Here’s an example of a common mistake that new programmers make:
#include In the getCard() function, the random number generator is being created and seeded every time the function is called. This is inefficient at best, and will likely cause poor random results.
Mersenne Twister and underseeding issues
So if you initialize std::seed_seq with a single 32-bit integer (e.g. from std::random_device) and then initialize a Mersenne Twister with the std::seed_seq object, std::seed_seq will generate 620 bytes of additional seed data. The results won’t be amazingly high quality, but it’s better than nothing.
#include This is pretty straightforward so there isn’t much reason not to do this at a minimum.
Q: Why not give std::seed_seq 156 integers (624 bytes) from std::random_device?
You can! However, this may be slow, and risks depleting the pool of random numbers that std::random_device uses.
Warming up a PRNG
The seed_seq initialization used by std::mt19937 performs a warm up, so we don’t need to explicitly warm up std::mt19937 objects.
As an aside…
Visual Studio’s implementation of rand() had (or still has?) a bug where the first generated result would not be sufficiently randomized. You may see older programs that use rand() discard a single result as a way to avoid this issue.
Random numbers across multiple functions or files (Random.h)
What we really want is a single PRNG object that we can share and access anywhere, across all of our functions and files. The best option here is to create a global random number generator object (inside a namespace!). Remember how we told you to avoid non-const global variables? This is an exception.
Here’s a simple, header-only solution that you can #include in any code file that needs access to a randomized, self-seeded std::mt19937:
Random.h:
#ifndef RANDOM_MT_H
#define RANDOM_MT_H
#include And a sample program showing how it is used:
main.cpp:
#include Debugging programs that use random numbers
Programs that use random numbers can be difficult to debug because the program may exhibit different behaviors each time it is run. Sometimes it may work, and sometimes it may not. When debugging, it’s helpful to ensure your program executes the same (incorrect) way each time. That way, you can run the program as many times as needed to isolate where the error is.
For this reason, when debugging, it’s a useful technique to seed your PRNG with a specific value (e.g. 5) that causes the erroneous behavior to occur. This will ensure your program generates the same results each time, making debugging easier. Once you’ve found the error, you can use your normal seeding method to start generating randomized results again.
7.x — Chapter 7 summary and quiz
Halts allow us to terminate our program. Normal termination means the program has exited in an expected way (and the status code will indicate whether it succeeded or not). std::exit() is automatically called at the end of main, or it can be called explicitly to terminate the program. It does some cleanup, but does not cleanup any local variables, or unwind the call stack.
Scope creep occurs when a project’s capabilities grow beyond what was originally intended at the start of the project or project phase.
A pseudo-random number generator (PRNG) is an algorithm that generates a sequence of numbers whose properties simulate a sequence of random numbers. When a PRNG is instantiated, an initial value (or set of values) called a random seed (or seed for short) can be provided to initialize the state of the PRNG. When a PRNG has been initialized with a seed, we say it has been seeded. The size of the seed value can be smaller than the size of the state of the PRNG. When this happens, we say the PRNG has been underseeded. The length of the sequence before a PRNG begins to repeat itself is known as the period.
A random number distribution converts the output of a PRNG into some other distribution of numbers. A uniform distribution is a random number distribution that produces outputs between two numbers X and Y (inclusive) with equal probability.
Quiz time
Question #4
#include