uniapp自定义水印相机
uniapp自定义水印相机
- 背景
- 实现
-
- UI实现
- 功能实现
- 全部实现代码
- 尾巴
背景
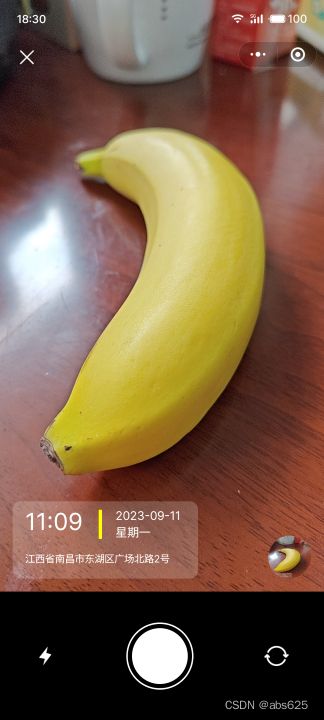
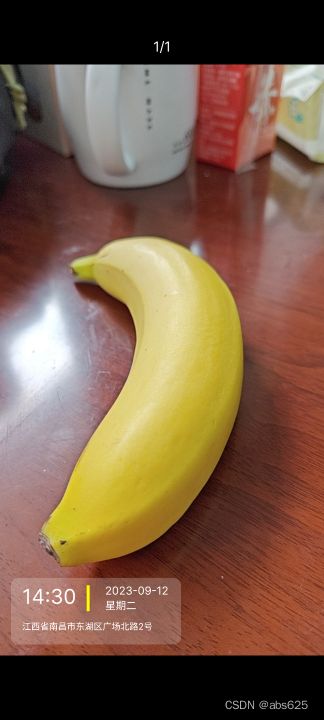
上一篇文章实现了uniapp中给页面添加水印,今天我们实现一个自定义水印相机(最近跟水印杠上了,哈哈)。主要使用了camera组件来实现取景框预览,最后用canvas将自定义水印绘制到拍好的照片上面,先上图镇楼。


实现
页面分为取景框和拍照完成后预览
UI实现
1、我们首先打开微信,哈哈哈哈,没错就是打开微信,这个取景框页面参考微信拍照界面UI。
2、取景界面分为上下两个部分,上部分为camera取景框组件,下部分为操作区域。
取景框组件上的关闭和水印,以及拍完照片后的略缩图展示需要通过cover-view和cover-image来展示。
代码如下:
<camera :device-position="position"
        :flash="flash"
        @error="error"
        class="camera"
        :style="'height:'+cHei+'px;'">
        <cover-image
            class="close-img active"
            @click="close"
            src="/static/miniprogram/custom-camera/close.png"/>
        <cover-view class="water-marker">
            <cover-view class="time">11:09</cover-view>
            <cover-view class="div"></cover-view>
            <cover-view class="date">2023-09-11</cover-view>
            <cover-view class="week">星期一</cover-view>
            <cover-view class="address">江西省南昌市东湖区广场北路2号</cover-view>
        </cover-view>
        <cover-image
            class="result"
            @click="handlePre"
            :src="photo"
            v-show="photo"/>
    </camera>
下半部分操作区域包含左边闪光灯控制按钮,中间拍照按钮(通过css实现同心圆)以及右边切换摄像头按钮。
实现代码如下:
<view class="bottom layout-row less-center">
        <image :src="'/static/miniprogram/custom-camera/light-'+(flash == 'off' ? 'on' : 'off')+'.png'"
            :class="'light-img active '+(position == 'front' ? 'hidden' : '')"
            @click="handleLight"/>
        <view class="layout-row center cicle-outside">
            <view class="cicle-inside active"
            @click="doTakePhoto"/>
        </view>
        <image src="/static/miniprogram/custom-camera/switch.png"
            class="switch-img active"
            @click="handlePosition"/>
    </view>
这波操作过后,取景页面就是开头你看到的效果了。
功能实现
先定义好控制变量
...
const position = ref('back')//摄像头
const flash = ref('off')//闪光灯
const photo = ref('')//拍完后的图片
const canvasW = ref(0)//绘制水印的canvas宽度
const canvasH = ref(0)//绘制水印的canvas高度
const fristTimedraw = ref(true)//是否为首次绘制
const working = ref(false)//是否正在生成水印
...
关闭按钮事件
...
const close = () => {
        uni.navigateBack({
            delta: 1
        })
    }
...
摄像头切换事件
...
const handlePosition = () => {
        if(working.value){
            return
        }
        if(position.value == 'back'){
            position.value = 'front'
            //切换成前置摄像头关闭闪光灯
            flash.value = 'off'
        }else {
            position.value = 'back'
        }
    }
...
闪光灯事件
...
const handleLight = () => {
        if(working.value){
            return
        }
        if(flash.value == 'off'){
            flash.value = 'on'
        }else {
            flash.value = 'off'
        }
    }
...
拍完后预览
...
const handlePre = () => {
        if(working.value){
            return
        }
        uni.previewImage({
            current: 0,
            urls: [photo.value],
            success: (res) => {
                console.log(res);
            },
        });
    }
...
最终要的拍照功能来了,因为我们camera组件拍出的照片本身是不带水印的, 所以我们需要在界面上放一个canvas组件,后期将水印和图片都绘制到canvas里面,再通过canvas来生成图片。
先在界面上添加一个canvas,且此canvas在界面不可见
...
<canvas canvas-id="firstCanvas"
        class="canvas"
        :style="'width:'+canvasW+'px;height: '+canvasH+'px'"/>
...
全部实现代码
然后就是拍照之后,将照片和水印相关内容绘制到canvas上面,这里包括绘制矩形,文字等,canvas绘图可参考我之前文章canvas绘图API。绘制好了之后通过uni.canvasToTempFilePath将canvas生成位图片。
我知道的,谁愿意看你瞎BB这么多,有没有能一键复制的全部代码?哎,别走啊,必须安排!!!
接下来就是全部实现代码
<template>
  <view class="layout-column">
    <camera :device-position="position"
        :flash="flash"
        @error="error"
        class="camera"
        :style="'height:'+cHei+'px;'">
        <cover-image
            class="close-img active"
            @click="close"
            src="/static/miniprogram/custom-camera/close.png"/>
        <cover-view class="water-marker">
            <cover-view class="time">11:09</cover-view>
            <cover-view class="div"></cover-view>
            <cover-view class="date">2023-09-11</cover-view>
            <cover-view class="week">星期一</cover-view>
            <cover-view class="address">江西省南昌市东湖区广场北路2号</cover-view>
        </cover-view>
        <cover-image
            class="result"
            @click="handlePre"
            :src="photo"
            v-show="photo"/>
    </camera>
    <view class="bottom layout-row less-center">
        <image :src="'/static/miniprogram/custom-camera/light-'+(flash == 'off' ? 'on' : 'off')+'.png'"
            :class="'light-img active '+(position == 'front' ? 'hidden' : '')"
            @click="handleLight"/>
        <view class="layout-row center cicle-outside">
            <view class="cicle-inside active"
            @click="doTakePhoto"/>
        </view>
        <image src="/static/miniprogram/custom-camera/switch.png"
            class="switch-img active"
            @click="handlePosition"/>
    </view>
    <canvas canvas-id="firstCanvas"
        class="canvas"
        :style="'width:'+canvasW+'px;height: '+canvasH+'px'"/>
  </view>
</template>

<script setup lang="ts">
    import {
        onLoad
    } from "@dcloudio/uni-app";
    import {
        ref
    } from 'vue'
    const cHei = ref(0)
    const position = ref('back')
    const flash = ref('off')
    const photo = ref('')
    const canvasW = ref(0)
    const canvasH = ref(0)
    const fristTimedraw = ref(true)
    //是否正在生成水印
    const working = ref(false)
    onLoad(() => {
        cHei.value = uni.getSystemInfoSync().windowHeight - uni.upx2px(300)
    })
    const close = () => {
        uni.navigateBack({
            delta: 1
        })
    }
    const error = (e) => {
        console.log('camera error',e)
    }
    const takePhoto = () => {
        const ctx = uni.createCameraContext();
        ctx.takePhoto({
            quality: 'high',
            success: (res) => {
                console.log('takePhoto success',res)
                drawPhoto(res.tempImagePath)
            }
        });
    }
    const doTakePhoto = () => {
        working.value = true
        takePhoto()
        //这里真机上面第一次绘制水印图片可能需要很久,所以延迟500毫秒再执行一次
        if(fristTimedraw.value){
            setTimeout(()=>{
                takePhoto()
                fristTimedraw.value = false
            },500)
        }
    }
    const drawPhoto = (path) => {
        uni.getImageInfo({
            src: path,
            success: res => {
                let ctx = uni.createCanvasContext('firstCanvas');
                //设置画布宽高
                canvasW.value = res.width
                canvasH.value = res.height
                ctx.drawImage(path, 0, 0, res.width, res.height)
                //水印框的大小
                let w = 460
                let h = 180
                //水印框左上角坐标
                let x = 30
                let y = res.height - 210
                //圆角半径
                let r = 20
                let time = "14:30"
                let date = "2023-09-12"
                let week = "星期二"
                let address = "江西省南昌市东湖区广场北路2号"
                ctx.beginPath()
                // 因为边缘描边存在锯齿,最好指定使用 transparent 填充
                ctx.setFillStyle('transparent')
                // 左上角
                ctx.arc(x + r, y + r, r, Math.PI, Math.PI * 1.5)

                // border-top
                ctx.moveTo(x + r, y)
                ctx.lineTo(x + w - r, y)
                ctx.lineTo(x + w, y + r)
                // 右上角
                ctx.arc(x + w - r, y + r, r, Math.PI * 1.5, Math.PI * 2)

                // border-right
                ctx.lineTo(x + w, y + h - r)
                ctx.lineTo(x + w - r, y + h)
                // 右下角
                ctx.arc(x + w - r, y + h - r, r, 0, Math.PI * 0.5)

                // border-bottom
                ctx.lineTo(x + r, y + h)
                ctx.lineTo(x, y + h - r)
                // 左下角
                ctx.arc(x + r, y + h - r, r, Math.PI * 0.5, Math.PI)

                // border-left
                ctx.lineTo(x, y + r)
                ctx.lineTo(x + r, y)

                // 这里是使用 fill 或者 stroke都可以
                ctx.fill()
                // ctx.stroke()
                ctx.closePath()
                // 剪切
                ctx.clip()
                ctx.setFillStyle('rgba(255, 255, 255, 0.2)')
                ctx.fillRect(x, y, w, h)

                //字体加粗真机不起作用?
                //ctx.font = "normal bold 50px Arial"
                ctx.setFontSize(55); // 设置字体大小
                ctx.setFillStyle('#FFFFFF'); // 设置颜色为白色
                ctx.fillText(time, x+30, y+70);

                let timeW = ctx.measureText(time).width
                ctx.setFillStyle('#FFFF00'); // 设置颜色为
                ctx.fillRect(x+30+timeW+30, y+20, 8, 70)

                ctx.setFontSize(30); // 设置字体大小
                ctx.setFillStyle('#FFFFFF'); // 设置颜色为白色
                ctx.fillText(date, x+30+timeW+30+50, y+45);

                ctx.setFontSize(28); // 设置字体大小
                ctx.setFillStyle('#FFFFFF'); // 设置颜色为白色
                ctx.fillText(week, x+30+timeW+30+50, y+85);

                ctx.setFontSize(24); // 设置字体大小
                ctx.fillText(address, 60, y+140);

                ctx.draw(false, () => {
                    uni.showLoading({
                        title: '正在生成水印照片'
                    })
                    uni.canvasToTempFilePath({
                        canvasId: 'firstCanvas',
                        destWidth: canvasW.value*2,   //展示图片尺寸=画布尺寸1*像素比2
                        destHeight: canvasH.value*2,
                        success: res1 => {
                            working.value = false
                            uni.hideLoading()
                            photo.value = res1.tempFilePath
                        }
                    });
                })
            }
        })
    }
    //照片保存到相册
    const savePhoto = (path) => {
        uni.saveImageToPhotosAlbum({
			filePath: path,
			success: res=> {
				uni.showToast({
                    title: '照片已保存到相册',
                    icon: 'none',
                    duration: 2000
                });
			}
		})
    }
    const handleLight = () => {
        if(working.value){
            return
        }
        if(flash.value == 'off'){
            flash.value = 'on'
        }else {
            flash.value = 'off'
        }
    }
    const handlePosition = () => {
        if(working.value){
            return
        }
        if(position.value == 'back'){
            position.value = 'front'
            //切换成前置摄像头关闭闪光灯
            flash.value = 'off'
        }else {
            position.value = 'back'
        }
    }
    const handlePre = () => {
        if(working.value){
            return
        }
        uni.previewImage({
            current: 0,
            urls: [photo.value],
            success: (res) => {
                console.log(res);
            },
        });
    }
</script>

<style scoped lang="scss">
    page {
        width: 100%;
        height: 100%;
    }
    .camera {
        width: 100%;
        background: #999999;
    }
    .close-img {
        width: 48rpx;
        height: 48rpx;
        margin-top: 110rpx;
        margin-left: 40rpx;
    }
    .light-img {
        width: 48rpx;
        height: 48rpx;
    }
    .switch-img {
        width: 57rpx;
        height: 48rpx;
    }
    .bottom {
        width: 100%;
        height: 300rpx;
        background: black;
        justify-content: space-around;
    }
    .cicle-outside {
        width: 150rpx;
        height: 150rpx;
        border: 5rpx solid #fff;
        border-radius: 50%;
    }
    .cicle-inside {
        width: 130rpx;
        height: 130rpx;
        border-radius: 50%;
        background: #fff;
    }
    .hidden {
        visibility: hidden;
    }
    .water-marker {
        position: absolute;
        left: 30rpx;
        bottom: 30rpx;
        width: 430rpx;
        height: 180rpx;
        background: rgba($color: #ffffff, $alpha: 0.2);
        border-radius: 20rpx;
    }
    .time {
        font-size: 55rpx;
        color: white;
        position: absolute;
        top: 20rpx;
        left: 30rpx;
    }
    .div {
        border-radius: 3rpx;
        width: 8rpx;
        height: 70rpx;
        background: yellow;
        position: absolute;
        top: 20rpx;
        left: 200rpx;
    }
    .date {
        font-size: 28rpx;
        color: white;
        position: absolute;
        top: 20rpx;
        left: 240rpx;
        width: 180rpx;
    }
    .week {
        font-size: 28rpx;
        color: white;
        position: absolute;
        top: 60rpx;
        left: 240rpx
    }
    .address {
        font-size: 24rpx;
        color: white;
        position: absolute;
        top: 120rpx;
        left: 30rpx;
        bottom: 30rpx;
        word-break: break-all;
		word-wrap: break-word;
		white-space: pre-line;
    }
    .canvas {
        position: absolute;
        top: -999999rpx;
        width: 100%;
    }
    .result{
        width: 100rpx;
        height:100rpx;
        position: absolute;
        right:30rpx;
        bottom:30rpx;
        background:white;
        border-radius: 50%;
    }
</style>
里面有些样式是全局实现了引用的,其实就是flex布局然后row或者column,自己实现即可。目前为止,所有功能就已经实现了。
尾巴
页面上用到的图标是从阿里巴巴iconfont图标库下载。
今天的文章就到这里了,希望能给大家帮助,如果喜欢我的文章,欢迎给我点赞,评论,关注,谢谢大家!
