FasterTransform Decoder 指导
简介
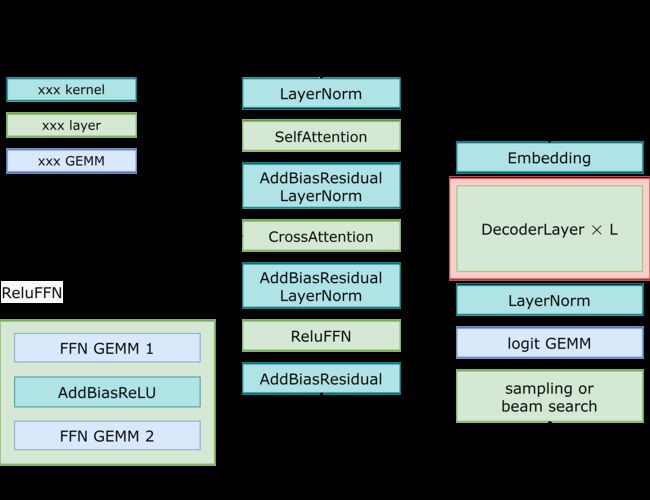
这篇文章描述了FasterTransformer为Decoder/Decoding提供了什么支持,解释工作流和优化。我们也提供了一个引导来帮助用户在FasterTransformer上运行Decoder/Decoding模型。最后,我们提供了基准测试来证明FasterTransformer在Decoder/Decoding的速度。这篇文章中,Decoder指的是transformer解码器模块,其包含了2个注意力块和一个前馈网络。在图1中红色块的单元是指解码块。另外,Decoding引用了整个翻译过程,包括位置编码,嵌入查找,少量层是解码器和beam搜索,或者采样方法来选择token。图1展示了包含beam查找的解码和采样的区别。
尽管大多数方式的解码步骤是相识的,我们仍然发现有很多不同的方式来计算概率和实现beam查找。所以,如果你选择的beam搜索算法是不同于我们实现的,而且你很难修改beam搜索核心,使用FasterTransformer解码器的TensorFlow/PyTorch解码是推荐选择。然而,使用FasterTransformer解码器的TensorFlow/PyTorch解码性能比FasterTransformer解码的性能更差,特别是在小批量的规模上。
模型架构
工作流
图1表示了FasterTransformer解码器和解码的工作流。交叉注意力输入后,他们将从编码器收到一些结果,使用起始的ids或者 之前步骤生成ids 作为 解码输入 而且生成各自的输出ids作为响应。
接下来的样例展示了如何运行多GPU和多节点GPU模型。
examples/cpp/decoding.cc: 一个样例在C++中运行随机的权重和输入的解码。examples/tensorflow/decoding/translate_example.py: 一个样例在Tensorflow中运行用FasterTransformer编码器/编码 端到端的翻译任务,我们在这个样例中也使用FasterTransform编码器算子
解码器
源码在src/fastertransformer/models/decoder/Decoder.cc, 参数,输入和输出:
- 参数:
- 最大batch大小。
- 头数量
- 每个头大小
- 中间数量。前馈网络的中间数量。经常被设置为 4 * head_num * size_per_head.
- 解码器的层数。
- CUDA 流。
- cuBLAS包裹的指针,被定义在
src/fastertransformer/utils/cublasMMWrapper.h. - 申请内存的指针,被定义在
src/fastertransformer/utils/allocator.h - “is_free_buffer_after_forward” 标记。如果被设置为true,FasterTransformer在前导之前将申请缓存,并在前导之后释放缓存。如果内存是由内存池控制而且申请/释放内存的消耗很小,设置标志为true将能节省内存。
- 输入:
- 解码的特征: 特征向量是从嵌入表查找获取到的,或者之前的解码结果。形状为[请求batch大小, 隐层维度]
- 编码器的输出特征:编码的输出。形状为 [请求的batch大小,编码输出的最长序列长度,编码隐层维度]
- 编码序列长度:编码输入的序列长度。形状是[请求的batch大小]
- 完成缓存:记录一个句子是否完成。形状是[请求的batch大小]
- 步:当前步,被用于注意力层。形状是[1]。这是CPU上的指针。
- 序列长度:解码句子的长度。形状是[请求的batch大小]
- 输出:
- 解码输出的特征:形状为[请求batch大小, 隐层维度]
- 关键缓存:存储之前步骤中的自注意力的关键的缓存区。形状是[解码层数量,请求batch大小,头数量,每头大小 // x, 最长序列长度, x], 其中的x是:FP32时是4,FP14时是8。
- 值缓存:存在之前步骤中的自注意的值的缓存区。形状为[解码层数量,请求的batch大小,头数量,最长序列长度,每头大小]
- 关键记忆缓存:存储之前步骤中的交叉注意力的关键的缓存区。大小是[解码层数量,请求batch大小, 编码器输出的最长序列长度,隐层维度]
- 值记忆缓存:存在之前步骤中的交叉注意力的值的缓存区。大小是[解码层数,请求batch大小,编码器输出的最长序列长度,隐层维度]
解码
源码放在了src/fastertransformer/models/decoding/Decoding.cc。代码的参数,输入和输出是:
- 参数:
- 最大batch大小
- 最大序列长度
- 编码器输出的最大序列长度
- beam搜索的beam宽度,如果设置为1,我们不使用beam搜索而是采样。
- 头数量
- 每头大小
- 中间大小。前馈网络的中间大小。经常被设置为 4头数量每头大小
- 解码层的数量
- 词汇大小。
- 词汇表的起始id
- 词汇表的结束id
- beam搜索的丰富度。simple diverse decoding 的 一个超级超参 。
- 前k采样的top_k值。
- 前p采样的top_p值。
- 对数温度。如果不想应用温度,设置为1.0。
- 对数长度惩罚。如果不想应用长度惩罚,设置为1.0。
- 对数重复惩罚。如果不想应用长度惩罚,设置为1.0。
- CUDA 流。
- cuBLAS包裹的指针,定义在``
- 内存申请指针,定义在``
- “is_free_buffer_after_forward” 标。如果设置为true,FasterTransformer将会在前导之前申请内存,在前后之后释放内存。如果内存被内存池控制着,而且申请/释放内存的消耗很小,把标设置为true将能节约内存。
- CUDA设备的特性指针,用于获取硬件的特性,像共享内存的大小。
- 输入:
- 编码的输出。形状是[请求batch大小*beam宽度, 记忆序列长度, 编码隐层维度]
- 源句子序列长度。形状是[请求batch大小*beam宽度]
- 输出
- 输出ids: 形状是[最大序列长度,batch大小,beam宽度]
- 父ids. 用于在beam搜索中查找最优路径。现在废弃了。
- 序列长度。形状是[batch大小*beam宽度]。记录全部句子的最终长度。
尽管这里很多参数,但大部分是固定的。比如参数5~11是模型的超参数,当确定模型的超参数后是固定的。参数18, 19, 20 和 22 是关于CUDA的一些设置,在进程中是固定的。
优化
- 内核优化:第一,一旦
SelfAttention和CrossAttention的请求中的序列长度总是1,我们用自定义的混合多头注意力内核来优化。第二,我们融合很多小岛算子到一个内核中。比如,AddBiasResidualLayerNorm结合了加偏置、加前模块残差、和计算层的归一化到一个内核中。第三,我们优化前k操作和采样来加速beam搜索和采样。最后,为了阻止重新计算前k和前v,我们申请了一个缓存区来存在他们的每一步。尽管消耗了额外的内存,我们节约了重计算的消耗、每一步都申请缓存区、一系列的消耗。 - 内存优化:不同于传统的模型例如 BERT, GPT-3有175b的参数,即使保存半进度模型也需要350GB。所以,我们必须为了其它部分来降低内存使用。在FasterTransformer里,我们在不同的解码层重用内存缓存区。自从GPT-3的层数为96,我们只需要1/96的内存。
设置
接下来章节列出了使用FasterTransformer的依赖。
依赖:
- Tensorflow需要CMake >= 3.8, PyTorch需要CMake >= 3.13
- CUDA 11.0 或 新版本。
- 推荐Python 3,因为python 2不支持一些特性。
- Tensorflow: 验证了1.15, 1.13 和 1.14 可用.
- PyTorch: 验证了1.8.0, >= 1.5.0 可用.
这些组件在以下的NGC TensorFlow Docker镜像中很容易获取到。
确保你有以下组件:
- 推荐NVIDIA Docker and NGC 容器
- GPU:NVIDIA Pascal 或 Volta 或 Turing 或 Ampere
关于如何使用NGC容器的更多信息,看以下来自NVIDIA GPU云文档和深度学习文档的章节:
- Getting Started Using NVIDIA GPU Cloud
- Accessing And Pulling From The NGC Container Registry
- Running TensorFlow
- Running PyTorch
那些不能使用NGC容器的,配置需要的环境或创建自己的容器,可以看 NVIDIA容器支持的版本矩阵。
编译FasterTransformer
准备
你可以选择你期望的tensorflow版本和python版本。这里,我们列出了一些可能的镜像:
为了实现最优性能,我们建议使用最新的镜像。比如,运行镜像nvcr.io/nvidia/tensorflow:22.09-tf1-py3 通过命令:
nvidia-docker run -ti --shm-size 5g --rm nvcr.io/nvidia/tensorflow:22.09-tf1-py3 bash
git clone https://github.com/NVIDIA/FasterTransformer.git
mkdir -p FasterTransformer/build
cd FasterTransformer/build
git submodule init && git submodule update
编译项目
- 注意:
-DSM=xx中的xx,在以下脚本意味着你的GPU能力。比如60 (P40) 或 61 (P4) 或 70 (V100) 或 75(T4) 或 80 (A100)。默认设置包含 70, 75, 80 and 86.
- C++编译
cmake -DSM=xx -DCMAKE_BUILD_TYPE=Release .. make -j12 - TensorFlow编译
使用时需要设置TensorFlow路径。比如,如果我们用nvcr.io/nvidia/tensorflow:22.09-tf1-py3,那就cmake -DSM=xx -DCMAKE_BUILD_TYPE=Release -DBUILD_TF=ON -DTF_PATH=/usr/local/lib/python3.8/dist-packages/tensorflow_core/ .. make -j12 - PyTorch编译
这将编译TorchScript自定义类。请确保cmake -DSM=xx -DCMAKE_BUILD_TYPE=Release -DBUILD_PYT=ON .. make -j12PyTorch >= 1.5.0。
怎么用
解码器和解码过程
- 在C++上运行FasterTransformer解码
1.1 生成gemm_config.in文件
1.2 在C++上运行FP32解码
1.3 在C++上运行FP16/BF16解码 - 在Tensorflow上运行
2.1 在Tensorflow上运行FP32FasterTransformer解码器
2.2 在Tensorflow上运行FP16FasterTransformer解码器
2.3 在Tensorflow上运行FP32FasterTransformer解码
2.4 在Tensorflow上运行FP16FasterTransformer解码 - 在PyTroch上运行FasterTransformer解码器/解码
请在运行样例前先安装 OpenNMT-py
3.1 生成pip install opennmt-py==1.1.1gemm_config.in文件
数据类型 = 0(FP32) 或 1(FP16) 或2(BF16)./bin/decoding_gemm./bin/decoding_gemm 8 4 8 64 2048 31538 32 512 1
如果想在别的目录使用这个库,请依据你的配置生成这个文件并拷贝到你的工作目录。
3.2 运行PyTorch解码样例:
输出应该像下面这样:python ../examples/pytorch/decoder/decoder_example.py<--data_type fp32/fp16/bf16> <--time> python ../examples/pytorch/decoder/decoder_example.py 8 6 32 8 64 --data_type fp16 --time
注意的是相关区别会非常大。是由于随机初始化权重和输入,而且它不影响翻译的结果。step: 30 Mean relative diff: 0.01395416259765625 Max relative diff: 1.38671875 Min relative diff: 0.0 step: 31 Mean relative diff: 0.0148468017578125 Max relative diff: 2.880859375 Min relative diff: 0.0 [INFO] ONMTDecoder time costs: 218.37 ms [INFO] FTDecoder time costs: 25.15 ms
3.3 运行PyTorch解码样例:
输出应该如下:python pytorch/decoding_sample.py<--data_type fp32/fp16/bf16> <--time> python ../examples/pytorch/decoding/decoding_example.py 8 6 32 8 64 4 31538 --data_type fp16 --time
随机初始化参数可能导致不同的结果。你可以根据接下来的指导下载预训练模型,并加上[INFO] TorchDecoding time costs: 289.08 ms [INFO] TorchDecoding (with FTDecoder) time costs: 104.15 ms [INFO] FTDecoding time costs: 30.57 ms--use_pretrained,然后你就能得到相同的结果。
翻译过程
- 在TensorFlow上用FasterTransformer翻译
- 在PyTorch上用FasterTransformer翻译
我们有一个翻译En-De的翻译样例。
你首先需要下载预训练模型:
然后你可以运行样例:bash ../examples/pytorch/decoding/utils/download_model.sh
你也可以使用python ../examples/pytorch/decoding/translate_example.py --batch_size--beam_size --model_type --data_type --output_file --input_file设置输入文件来翻译。
decoding_ext: 使用我们的FasterTransformer解码单元torch_decoding:使用FasterTransformer解码方式的PyTorch版本解码torch_decoding_with_decoder_ext:使用FasterTransformer解码方式的PyTorch版本解码,但是用FasterTransformer解码器替换了其解码器。
fp32或fp16或bf16
如果你不指定输出文件,将只打印标准输出。
如果你想评估BLEU分数,请先覆盖BPE:
我们模型中的python ../examples/pytorch/decoding/utils/recover_bpe.pypython ../examples/pytorch/decoding/utils/recover_bpe.py pytorch/translation/data/test.de,translate_example.py的输出。
然后你就可以评估BLEU分数,比如,通过sacrebleu:
下面的脚本在FP32下运行翻译,并得到bleu分数:pip install sacrebleu cat| sacrebleu ./bin/decoding_gemm 128 4 8 64 2048 31538 100 512 0 python ../examples/pytorch/decoding/translate_example.py --batch_size 128 --beam_size 4 --model_type decoding_ext --data_type fp32 --output_file output.txt python ../examples/pytorch/decoding/utils/recover_bpe.py ../examples/pytorch/decoding/utils/translation/test.de debpe_ref.txt python ../examples/pytorch/decoding/utils/recover_bpe.py output.txt debpe_output.txt pip install sacrebleu cat debpe_output.txt | sacrebleu debpe_ref.txt
性能
硬件配置:
- CPU: Intel® Xeon® Gold 6132 CPU @ 2.60GHz
- T4 (with mclk 5000MHz, pclk 1590MHz) with Intel® Xeon® CPU E5-2603 v4 @ 1.70GHz
- V100 (with mclk 877MHz, pclk 1380MHz) with Intel® Xeon® CPU E5-2698 v4 @ 2.20GHz (dgx-1 server)
为了运行下面的基准,我们需要安装unix计算工具"bc":
apt-get install bc
为了明确真实应用里的提速,在这个基准测试中,我们同时在TensorFlow和PyTorch上使用了真正的端到端模型和任务。很难直接比较 v3.1 and v4.0 的基准性能。但是我们的测试,对比 v3.1 v4.0带来了至多50%的加速,特别是在大batch上。
TensorFlow 端到端翻译性能
PyTorch 端到端翻译性能
我们演示了端到端翻译中PyTorch、FT解码器和FT解码的吞吐量。这里,PyTorch意味着程序完全运行在PyTorch上。FT解码器意味着我们用FasterTransformer替换了解码器翻译层。FT解码意味着我们用FasterTransformer完整的替换了解码器。
我们也跳过BLEU分数,因为PyTorch, FT Decoder and FT Decoding 的分数被关了。
同时,所有方法的bleu分数都关了,结果可能有点不同,生成的token数量也不相同。所以我们使用吞吐量而不是延时来展示基准的性能。
可以获取这个基准,通过运行这个:../sample/pytorch/scripts/profile_decoder_decoding.sh
这里的基准,我们更新了以下参数:
- head_num = 8 for both encoder and decoder
- size_per_head = 64 for both encoder and decoder
- num_layers = 6 for both encoder and decoder
- vocabulary_size = 31538
- max_seq_len = 128
在A100和PyTorch上的Beam搜索性能:
- 在FP32上的性能
用户可以使用export NVIDIA_TF32_OVERRIDE=0来强制程序运行在FP32下。
