Maven知识概括
Maven知识概括
- Maven介绍
- 构建简介
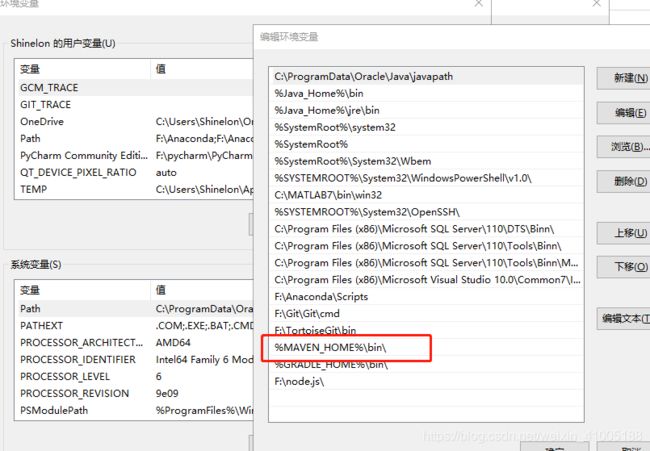
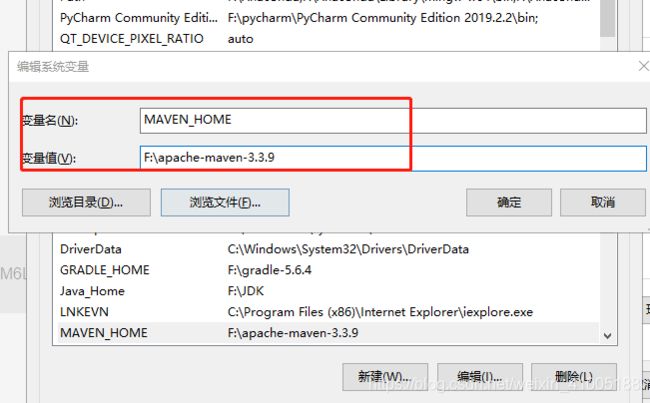
- 配置Maven环境变量
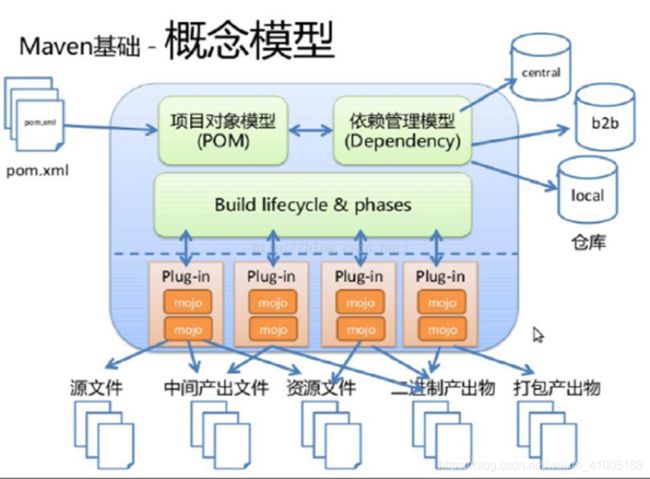
- Maven 核心概念
-
- 依赖
- 生命周期
- maven面板使用
- maven冲突
- Maven单测插件
- maven属性(${} properties)
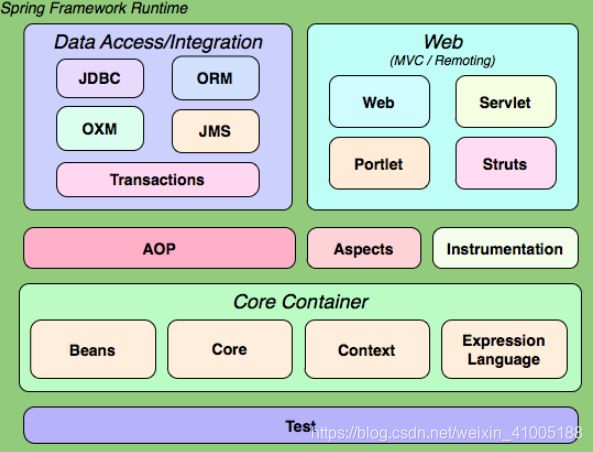
- spring体系结构及内部各模块jar之间的maven依赖关系
- Maven-archetype说明
- maven命令
- pom.xml和setting.xml
- Maven总结
Maven介绍
为什么需要Maven?
添加第三方 jar包
①在今天的 JavaEE 开发领域,有大量的第三方框架和工具可以供我们使用。要使用这些 jar 包最简单的方法就是复制粘贴到 WEB-INF/lib 目录下。但是这会导致每次创建一个新的工程就需要将 jar 包重复复制到 lib 目录下,从而造成工作区中存在大量重复的文件,让我们的工程显得很臃肿。而使用 Maven 后每个 jar 包本身只在本地仓库中保存一份,需要 jar 包的工程只需要以坐标的方式简单的引用一下就可以了。不仅极大的节约了存储空间,让项目更轻巧,更避免了重复文件太多而造成的混乱。jar 包之间的依赖关系
①jar 包往往不是孤立存在的,很多 jar 包都需要在其他 jar 包的支持下才能够正常工作,我们称之为
jar 包之间的依赖关系。最典型的例子是:commons-fileupload-1.3.jar 依赖于 commons-io-2.0.1.jar,如果没有 IO 包,FileUpload 包就不能正常工作。
②那么问题来了,你知道你所使用的所有 jar 包的依赖关系吗?当你拿到一个新的从未使用过的 jar包,你如何得知他需要哪些 jar 包的支持呢?如果不了解这个情况,导入的 jar 包不够,那么现有的程序将不能正常工作。再进一步,当你的项目中需要用到上百个 jar 包时,你还会人为的,手工的逐一确认它们依赖的其他 jar 包吗?这简直是不可想象的。
③而引入 Maven 后,Maven 就可以替我们自动的将当前 jar 包所依赖的其他所有 jar 包全部导入进来,无需人工参与,节约了我们大量的时间和精力。用实际例子来说明就是:通过 Maven 导入
commons-fileupload-1.3.jar 后,commons-io-2.0.1.jar 会被自动导入,程序员不必了解这个依赖关系。
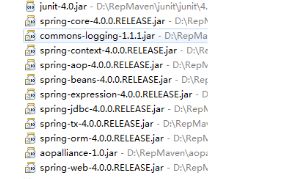
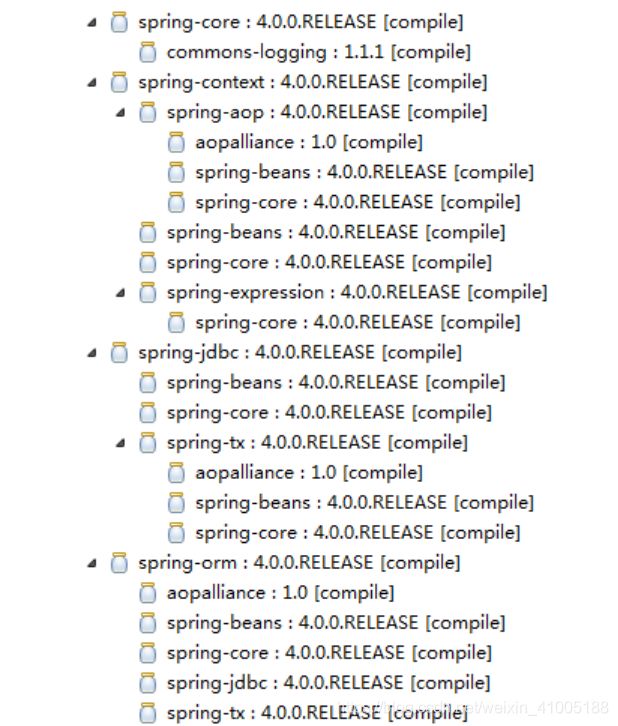
④下图是 Spring 所需 jar 包的部分依赖关系:
获取第三方 jar 包
①JavaEE 开发中需要使用到的 jar 包种类繁多,几乎每个 jar 包在其本身的官网上的获取方式都不尽相同。为了查找一个 jar 包找遍互联网,身心俱疲,没有经历过的人或许体会不到这种折磨。不仅如此,费劲心血找的 jar 包里有的时候并没有你需要的那个类,又或者又同名的类没有你要的方法——以不规范的方式获取的 jar 包也往往是不规范的。
②使用 Maven 我们可以享受到一个完全统一规范的 jar 包管理体系。你只需要在你的项目中以坐标的方式依赖一个 jar 包,Maven 就会自动从中央仓库进行下载,并同时下载这个 jar 包所依赖的其他 jar 包——规范、完整、准确!一次性解决所有问题!
③Tips:在这里我们顺便说一下,统一的规范几乎可以说成是程序员的最高信仰。如果没有统一的规范,就意味着每个具体的技术都各自为政,需要以诸多不同的特殊的方式加入到项目中;好不容易加入进来还会和其他技术格格不入,最终受苦的是我们。而任何一个领域的统一规范都能够极大的降低程序员的工作难度,减少工作量。例如:USB 接口可以外接各种设备,如果每个设备都有自己独特的接口,那么不仅制造商需要维护各个接口的设计方案,使用者也需要详细了解每个设备对应的接口,无疑是非常繁琐的。将项目拆分成多个工程模块
①随着 JavaEE 项目的规模越来越庞大,开发团队的规模也与日俱增。一个项目上千人的团队持续开发很多年对于 JavaEE 项目来说再正常不过。那么我们想象一下:几百上千的人开发的项目是同一个 Web工程。那么架构师、项目经理该如何划分项目的模块、如何分工呢?这么大的项目已经不可能通过package 结构来划分模块,必须将项目拆分成多个工程协同开发。多个模块工程中有的是 Java 工程,有的是 Web 工程。
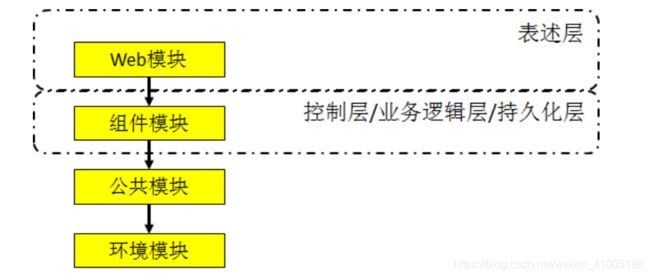
②那么工程拆分后又如何进行互相调用和访问呢?这就需要用到 Maven 的依赖管理机制。大家请看 我们的 Survey 调查项目拆分的情况:
<1>上层模块依赖下层,所以下层模块中定义的 API 都可以为上层所调用和访问。
什么是Maven:
- Maven 是 Apache 软件基金会组织维护的一款自动化构建工具,专注服务于 Java 平台的项目构建和 依赖管理。Maven这个单词的本意是:专家,内行。
市场流行构建工具:Make→Ant→Maven→Gradle
构建简介
构建简介:
构建并不是创建,创建一个工程并不等于构建一个项目。要了解构建的含义我们应该由浅入深的从 以下三个层面来看:纯 Java 代码:
①大家都知道,我们 Java 是一门编译型语言,.java 扩展名的源文件需要编译成.class 扩展名的字节码文件才能够执行。所以编写任何 Java 代码想要执行的话就必须经过编译得到对应的.class 文件。Web 工程:
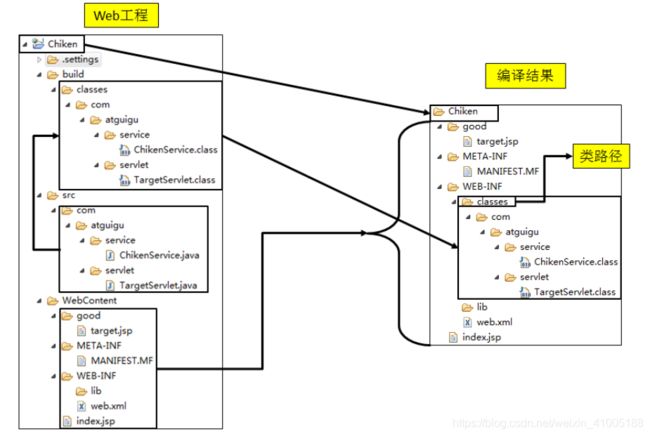
①当我们需要通过浏览器访问 Java 程序时就必须将包含 Java 程序的 Web 工程编译的结果“拿”到服务器上的指定目录下,并启动服务器才行。这个“拿”的过程我们叫部署。
②我们可以将未编译的 Web 工程比喻为一只生的鸡,编译好的 Web 工程是一只煮熟的鸡,编译部署的过程就是将鸡炖熟。
③Web 工程和其编译结果的目录结构对比见下图:
实际项目:
①在实际项目中整合第三方框架,Web 工程中除了 Java 程序和 JSP 页面、图片等静态资源之外,还包括第三方框架的 jar 包以及各种各样的配置文件。所有这些资源都必须按照正确的目录结构部署到服务器上,项目才可以运行。- 所以综上所述:
构建就是以我们编写的 Java 代码、框架配置文件、国际化等其他资源文件、JSP 页面和图片等静态资源作为“原材料”,去“生产”出一个可以运行的项目的过程。
构建过程各个环节简述:
- 清理:删除以前的编译结果,为重新编译做好准备。
- 编译:将 Java 源程序编译为字节码文件。
- 测试:针对项目中的关键点进行测试,确保项目在迭代开发过程中关键点的正确性。
- 报告:在每一次测试后以标准的格式记录和展示测试结果。
- 打包:将一个包含诸多文件的工程封装为一个压缩文件用于安装或部署。Java 工程对应 jar 包,Web 工程对应 war 包。
- 安装:在 Maven 环境下特指将打包的结果——jar 包或 war 包安装到本地仓库中。
①在本地repository中安装jar(包含mvn compile,mvn package,然后上传到本地仓库) - 部署:将打包的结果部署到远程仓库或将 war 包部署到服务器上运行。
①上传到私服(包含mvn install,然后,上传到私服)
自动化构建:
- 就是将上述的编译,测试,报告,打包,安装,部署这些工作交给机器完成。
项目为什么要使用jar或war进行打包发布?区别是什么?
- 在做项目时,通常对即将要发布的项目打成两种类型的包:
①jar
②war - 一般将项目分为两层:
服务层和表现层(视图层)。
①把服务层打包成jar包,
②把视图层的包打成war包。 - 通过仔细对比可以发现:
①jar包中包含了你写程序的所有服务或者第三方类库,它通常是作为幕后工作者,为视图层用户与之交换数据处理的一个服务者,jar文件格式以Zip文件格式为基础,与Zip不同的是,它可以被发布,而且还能用于部署,它封装了库、组件和插件程序,并且可以被编译器和jvm使用,在jar中还包含特殊的文件,如mainfests和部署的应用描述,用于指示工具如何处理特定的jar。
②一个war文件可以看成一个web应用程序。与jar封装不同的是:它内聚了很多页面,如html、jsp,Servlet,js,css,icon图片文件等等,当然还包括组成web应用的其他组件,这些文件基本没有复杂业务逻辑的处理,基本上仅仅是用来当做程序的门户负责与使用者交互,仅此而已。 - 这样做有什么好处呢?
①这样做使代码的层次分明,前后端分离;
②便于划清前后端的职责,加快开发进度并且利于维护;
③对于靠后期维护的项目来说,比如业务复杂多变而又琐碎的项目,如果仅仅是改变前端的样式或者进行调整,我不必把服务也关掉,只需要停掉web,做完修改后能够马上部署上线。
<1>针对我写过的项目来说,直接调用接口给到的返回结果可以根据需要只在页面进行调用就能够显示,而服务端代码一点都不需要变化,极大方便了开发。
<2>使用了springboot后,项目都会被打包成jar,或者打包成war部署在外部容器中也可以。 - 以上都是从实际中出发看出的最明显的区别,如果从内部看可以看到:
①war包中的目录结构中包括WEB-INF,而war是一个可以直接运行的web模块,做好一个web项目后,需要打包部署到容器中,一般放置在tomcat的\webapps\目录下,当启动tomcat时,这个包将被解压,即相当于发布了。
②jar中一般都是些class文件,声明了Main_cass后就可以用java命令去运行它。
③所有的包都是用jar打的,只不过目标文件的扩展名不一样。与jar类似,war也是许多文件的一个压缩包。这个包中的文件按一定目录结构来组织:通常其根目录下包含之前所说的有Html和Jsp文件或者包含这两种文件的目录,另外还会有一个WEB-INF目录,通常在WEB-INF目录下有一个web.xml文件和一个classes目录,web.xml是这个应用的配置文件,而classes目录下则包含编译好的Servlet类和Jsp或Servlet所依赖的其它类(如JavaBean)。
④通常这些所依赖的类也可以打包成JAR放到WEB-INF下的lib目录下,当然也可以放到系统的CLASSPATH中,但那样移植和管理起来不方便。
配置Maven环境变量
简述:
Maven 核心概念
约定的目录结构简述:
- 约定的目录结构对于 Maven 实现自动化构建而言是必不可少的一环,就拿自动编译来说,Maven 必须 能找到 Java源文件,下一步才能编译,而编译之后也必须有一个准确的位置保持编译得到的字节码文件。
- 我们在开发中如果需要让第三方工具或框架知道我们自己创建的资源在哪,那么基本上就是两种方式:
①通过配置的形式明确告诉它
②基于第三方工具或框架的约定 Maven 对工程目录结构的要求就属于后面的一种。
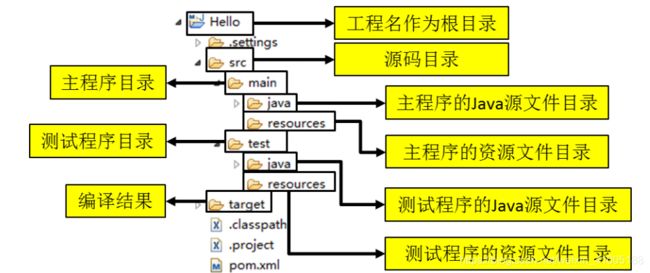
- 现在 JavaEE开发领域普遍认同一个观点:约定>配置>编码。意思就是能用配置解决的问题就不编码,能基于约定的就不进行配置。而 Maven正是因为指定了特定文件保存的目录才能够对我们的 Java 工程进行自动化构建。
Maven项目和Java项目本质上没区别,且Maven项目里的子父项目无区别,本质上都是通过Jar包引用。
常用的Maven命令简述:
- 注意:执行与构建过程相关的Maven命令。必须进入pom.xml所在的目录。
- 常用命令:
①mvn clean:清理,将根目录下生成的target文件移除。
②mvn compile:编译主程序
③mvn test-compile :编译测试程序
④mvn test:执行测试
⑤mvn package:编译代码并打包
⑥mvn install:编译代码并打包、将打好的包放置到本地仓库中(如果还是同一个版本默认会覆盖之前安装的包)
⑦mvn site:生成站点,用户可以让Maven自动生成一个Web站点,以Web的形式发布如项目描述、版本控制系统地址、缺陷跟踪系统地址等,更便捷、更快速地为团队提供项目当前的状态信息。
Maven联网的问题简述:
Maven的核心程序中仅仅定义了抽象的生命周期。但是具体的工作必须由特点的插件来完成。而插件本身并不包含在Maven的核心程序中。- 当我们执行的Maven命令需要用到某些插件时,Maven核心程序会首先到本地仓库中查询。
- 本地仓库的默认位置:[系统中当前用户的家目录].m2\repository
例如:C:\Users[登录当前系统的用户名].m2\repository - Maven核心程序如果在本地仓库找不到需要的插件,那么它会自动连接外网到中央仓库去下载。
- 如果此时无法连接外网,则构建失败。
- 修改默认的本地仓库的位置可以让Maven核心程序到我们事先准备好的目录下去查找插件。
①找到Maven解压目录\conf\setting.xml
②在setting.xml文件中找到localRepostiory
③将/path/to/local/repo 从注释中取出
④将标签体内容修改为已经准备好的Maven仓库目录。
例如:D:\RepMaven
POM简述:
Project Object Model:项目对象模型。将 Java 工程的相关信息封装为对象作为便于操作和管理的模型。- Maven 工程的核心配置。
可以说学习 Maven 就是学习 pom.xml 文件中的配置。
Maven坐标:
- 几何中的坐标:
①在一个平面中使用 x、y 两个向量可以唯一的确定平面中的一个点。
②在空间中使用 x、y、z 三个向量可以唯一的确定空间中的一个点 - Maven 的坐标:
①使用如下三个向量在 Maven 的仓库中唯一的确定一个 Maven 工程。
<1>groupid:公司或组织的域名倒序+当前项目名称:>com.atguigu.maven >
<2>artifactId:当前项目的模块名称:Hello
<3>version:当前模块的版本:0.0.1-SNAPSHOT
Snapshot版本和release版本区别:
- 一般来说snapshots版本代表正在开发中的版本,release代表比较稳定的发布版本.
- 比如我们新建一个maven项目,默认版本是这样的:
<groupId>com.example</groupId>
	<artifactId>demo</artifactId>
	<version>0.0.1-SNAPSHOT</version>
	<name>demo</name>
<description>Demo project</description>
- 上面0.0.1表示项目的版本号,表示这次迭代我要开发的所有主要功能都是属于这个版本的;
- -SNAPSHOT表示该版本是快照版本,一般处于开发阶段,0.0.1版本还有功能没有完成,或还有bug还要修复,所以这个阶段一般代码更新比较频繁,开发人员写完代码会直接提交到代码仓库,这样之前依赖0.0.1-SNAPSHOT版本的开发人员也可以马上更新代码.
- -Release表示是稳定版的,这次迭代的所有功能都已经完成,并且通过了测试之后,就可以发布为0.0.1-Release版本,Release版的一旦发布,就不要再改变代码了,所以如果之后在0.0.1-Release这个版本上发现了bug,需要修复,那么我们应该将0.0.1-Release版本改为0.0.2-SNAPSHOT,然后再修改bug并测试,没问题之后将0.0.2-SNAPSHOT改为0.0.2-Release发布.
- 使用maven的时候maven会根据pom文件中的version中是否带有-SNAPSHOT来判断是否是快照版本。如果是快照版本,在maven deploy时会发布到快照版本库中,依赖该版本的项目在编译打包时,maven会自动从maven仓库下载新的快照版本。如果是正式发布版本,deploy时会自动发布到正式版本库中,依赖该版本的项目在编译打包时如果本地已经存在该版本的工程默认不会从maven仓库下载新的版本.
- 所以如果现在开发的项目依赖了另外一个项目,如果不希望出现本来运行的好好地,过了一会儿因为依赖项目的更新突然不能运行了,那么可以选择依赖一个Release版本(如果有的话).
仓库简介:
- 仓库分类:
①本地仓库:为当前本机电脑上的所有 Maven 工程服务。
②远程仓库:
<1>私服:架设在当前局域网环境下,为当前局域网范围内的所有 Maven 工程服务。
1、我们在实际的项目中通常使用私服来间接访问中央仓库,项目通常不直接访问中央仓库。
2、在私服中我们以nexus为主
<2>中央仓库:架设在 Internet 上,为全世界所有 Maven 工程服务。
<3>中央仓库的镜像:架设在各个大洲,为中央仓库分担流量。减轻中央仓库的压力,同时更快的响应用户请求。 - 仓库中的文件:
①Maven 的插件
②我们自己开发的项目的模块
③第三方框架或工具的 jar 包 - 注意:
①不管是什么样的 jar 包,在仓库中都是按照坐标生成目录结构,所以可以通过统一的方式查询或依赖。
②我们自己的 Maven 工程必须执行安装操作才会进入仓库。
<1>安装的命令是:mvn install
依赖
依赖的目的是什么:
- 当 A jar 包用到了 B jar 包中的某些类时,A 就对 B 产生了依赖,这是概念上的描述。在项目中使用 dependency标签指定被依赖 jar 包的坐标的方式引入一个我们需要的 jar 包。
<dependency>
	<groupId>com.mavengroupId>
	<artifactId>HelloartifactId>
	<version>0.0.1-SNAPSHOTversion>
	<scope>compilescope>
	<optional>trueoptional>
dependency>
依赖的寻找方式:
-
当引入父项目时:
①Maven首先在构建当前项目的地方寻找父项目的pom。
②其次在文件系统的这个位置(relativePath位置)。
③然后在本地仓库。
④最后在远程仓库寻找父项目的pom。 -
当引入普通项目时:
①首先在构建当前项目的地方寻找项目的jar或者war包。(注意:只有加入maven project的才算)
②其次在然后在本地仓库寻找。
③最后在远程仓库寻找。
依赖的范围:
- 依赖信息中除了目标 jar 包的坐标还有一个 scope 设置,这是依赖的范围。依赖的范围有compile、test、provided三个。
compile范围依赖:
①对主程序是否有效:有效
②对测试程序是否有效:有效
③是否参与打包:参与
④是否参与部署:参与
⑤例如:spring-coretest范围依赖:
①对主程序是否有效:无效
②对测试程序是否有效:有效
③是否参与打包:不参与
④是否参与部署:不参与
⑤例如:junitprovided范围依赖:provided意味着打包的时候可以不用包进去,别的设施(Web Container)会提供。
①对主程序是否有效:有效
②对测试程序是否有效:有效
③是否参与打包:不参与
④是否参与部署:不参与
⑤例如:servlet-api.jar,jsp-api.jar
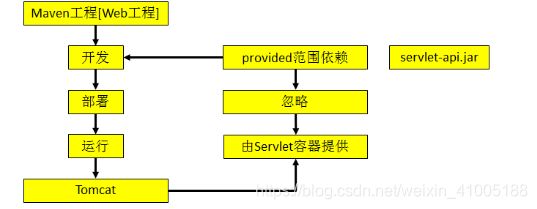
runntime范围依赖:runntime表示被依赖项目无需参与项目的编译,不过后期的测试和运行周期需要其参与,与compile相比,跳过编译而已。比如你可能在编译的时候只需要JDBC API JAR,而只有在运行的时候才需要JDBC驱动实现。
①对主程序是否有效:无效
②对测试程序是否有效:有效
③是否参与打包:参与
④是否参与部署:参与
Maven依赖的optional元素:
假如你的Project A的某个依赖D添加了:true 当别人通过pom依赖ProjectA的时候,D不会被传递依赖进来- 当你依赖某各工程很庞大或很可能与其他工程的jar包冲突的时候建议加上该选项,可以节省开销,同时减少依赖冲突
默认为不去除:
①在项目中设optional为false
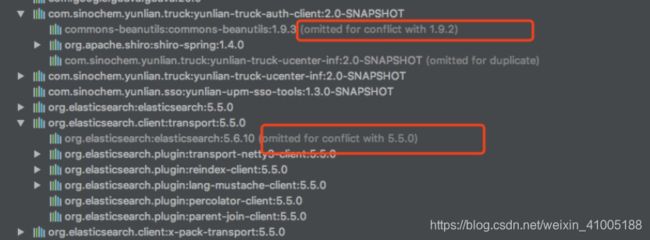
②去除optionalmaven面板冲突的特征:
依赖传递性:
- 好处:可以传递的依赖不必在每个模块中都重复声明,在“最下面”的工程中依赖一次即可。
- 注意:
非complie范围的依赖不能传递,所以在各个工程模块中,如果有需要就得重复声明依赖。`

- 链接:Maven依赖规则和依赖范围
依赖排除:
<exclusions>
	<exclusion>
		<groupId>commons-logginggroupId>
		<artifactId>commons-loggingartifactId>
	exclusion>
exclusions>
依赖的原则:
统一管理所依赖的版本:
一、使用properties标签呃逆使用自定义标签统一声明版本号。
<properties>
	<spring-version>4.0.0.RELEASEspring-version>
properties>

二、在需要统一版本的位置,使用$()引用声明的版本号。
<version>$(spring-version)version>
- 其实properties标签配合自定义标签生命数据的配置并不只是用于声明依赖的版本号,凡是需要统一声明后再引用的场合都可以使用。
继承简介:
- 为什么需要继承机制:
①由于非 compile 范围的依赖信息是不能在“依赖链”中传递的,所以有需要的工程只能单独配置。
②此时如果项目需要将各个模块的版本统一为某个版本,那么到各个工程中手动修改无疑是非常麻烦的。
③使用继承机制就可以将这样的依赖信息统一提取到父工程模块中进行统一管理。 - 此外在多层继承中若中间的pom设置了某个jar包的版本号则会覆盖其父链pom的版本号,类似java中的继承重写。
dependency management标签:
dependencyManagement不会引入依赖只会对继承pom有效,对于dependency方式依赖该工程的工程不会起作用- 这个标签的作用是管理依赖的版本,当项目中使用dependencyManagement标签管理大量依赖时,并不会在项目中直接使用依赖.而是当你使用到其中的某些依赖时,不需要添加版本号.
- 这个标签用的最多的还是在父工程中实现依赖的版本管理,从而子工程不会强制使用这些依赖,只会继承依赖管理中的版本号,这样可以留给子工程选择的空间
Maven多继承:
- maven的多项目结构中,可以使用parent定义起父项目,从而从父项目中继承依赖等属性。但是美中不足,maven只能单继承,即一个项目只能使用parent标签定一个父级项目。
- 问题解决:
import scope依赖 - 注意:
依赖只能放在dependencyManagement中,如果需要被多继承的话。
<dependencyManagement>
	<dependencies>
		<dependency>
			<groupId>com.xuzimian.global.demogroupId>
			<artifactId>spring-coreartifactId>
			<version>1.0-SNAPSHOTversion>
			<type>pomtype>
			<scope>importscope>
		dependency>
	dependencies>
dependencyManagement>
type为pom的理解:
- dependency中type默认为jar即引入一个特定的jar包。
- 当我们需要引入很多jar包的时候会导致pom.xml过大,我们可以想到的一种解决方案是定义一个父项目,但是父项目只有一个,也有可能导致父项目的pom.xml文件过大。
这个时候我们引进来一个type为pom,意味着我们可以将所有的jar包打包成一个pom,然后我们依赖了pom,即可以下载下来所有依赖的jar包- 注意:
①type为pom的依赖一般命名为XX-dependencies-XX。
②此外对于父项目也必须为pom,以及多继承也必须为pom。
继承操作步骤:
- 创建一个Maven工程为父工程。
①pom用在父级工程或聚合工程中。用来做jar包的版本控制。
②必须指明这个聚合工程的打包方式为pom
<1>pom格式的意思就是只生成一个pom.xml文件,而不生成其他任何jar,zip文件。
<groupId>com.mavengroupId>
<artifactId>parentartifactId>
<version>0.1.1-SNAPSHOTversion>
<packaging>pompackaging>
- 在子工程中声明对父工程的引用。
①指定父工程
<1>: ../pom.xml。
<parent>
	<groupId>com.mavengroupId>
	<artifactId>parentartifactId>
	<version>0.1.1-SNAPSHOTversion>

	<relativePath>../parent/pom.xmlrelativePath>
parent>
- 将子工程的坐标与父工程中重复的内容删除
<groupId>com.mavengroupId>
- 在父工程中统一管理依赖
<dependencyManagement>
	<dependencies>
		<dependency>
			<groupId>junitgroupId>
			<artifactId>junitartifactId>
			<version>4.9version>
			<scope>testscope>
		dependency>
	dependencies>
dependencyManagement>
- 在子工程中删除依赖的版本号
<version>4.0/version>
聚合简介:
- 作用:
①将多个工程拆分为模块后,需要手动逐个安装到仓库后依赖才能够生效。修改源码后也需要逐个手动进行 clean 操作。
②而使用了聚合之后就可以批量进行 Maven 工程的安装、清理工作。 - 配置方式:
①在一个“总的聚合工程“”中使用 modules/module 标签组合,指定模块工程的相对路径即可
<modules>
	<module>../Hello</module>
	<module>../HelloFriend</module>
	<module>../MakeFriends</module>
</modules>
生命周期
Maven 的生命周期:
- Maven 生命周期定义了各个构建环节的执行顺序,有了这个清单,Maven 就可以自动化的执行构建命令了。
Maven 有三套相互独立的生命周期:
-
Clean Lifecycle 在进行真正的构建之前进行一些清理工作:Clean 生命周期一共包含了三个阶段:
①pre-clean 执行一些需要在 clean 之前完成的工作
②clean 移除所有上一次构建生成的文件
③post-clean 执行一些需要在 clean 之后立刻完成的工作 -
Site Lifecycle 生成项目报告,站点,发布站点:Site 生命周期一共包含了四个阶段:
①pre-site 执行一些需要在生成站点文档之前完成的工作
②site 生成项目的站点文档
③post-site 执行一些需要在生成站点文档之后完成的工作,并且为部署做准备
④site-deploy 将生成的站点文档部署到特定的服务器上
<1>这里经常用到的是 site 阶段和 site-deploy 阶段,用以生成和发布 Maven 站点,这可是 Maven 相当强大的功能,Manager 比较喜欢,文档及统计数据自动生成,很好看。 -
Default Lifecycle 构建的核心部分,编译,测试,打包,安装,部署等等。
①Default 生命周期是 Maven 生命周期中最重要的一个,绝大部分工作都发生在这个生命周期中。这里只解释一些比较重要和常用的阶段:
validate
generate-sources
process-sources
generate-resources
process-resources 复制并处理资源文件,至目标目录,准备打包。
compile 编译项目的源代码。
process-classes
generate-test-sources
process-test-sources
generate-test-resources
process-test-resources 复制并处理资源文件,至目标测试目录。
test-compile 编译测试源代码。
process-test-classes
test 使用合适的单元测试框架运行测试。这些测试代码不会被打包或部署。
prepare-package
package 接受编译好的代码,打包成可发布的格式,如 JAR。
pre-integration-test
integration-test
post-integration-test
verify
install 将包安装至本地仓库,以让其它项目依赖。
deploy 将最终的包复制到远程的仓库,以让其它开发人员与项目共享或部署到服务器上运行。
总结:
- 它们是相互独立的,你可以仅仅调用 clean 来清理工作目录,仅仅调用 site 来生成站点。当然你也可以直接运行 mvn clean install site 运行所有这三套生命周期。
- 每套生命周期都由一组阶段(Phase)组成,我们平时在命令行输入的命令总会对应于一个特定的阶段。比如,运行 mvn clean,这个clean 是 Clean 生命周期的一个阶段。有 Clean 生命周期,也有 clean 阶段。
生命周期与自动化构建:
- 运行任何一个阶段的时候,它前面的所有阶段都会被运行,例如我们运行 mvn install 的时候,代码会 被编译,测试,打包。
- 这就是 Maven 为什么能够自动执行构建过程的各个环节的原因。
- 此外,Maven 的插 件机制是完全依赖 Maven 的生命周期的,因此理解生命周期至关重要。
插件和目标:
- Maven 的核心仅仅定义了抽象的生命周期,具体的任务都是交由插件完成的。
- 每个插件都能实现多个功能,每个功能就是一个插件目标。
- Maven 的生命周期与插件目标相互绑定,以完成某个具体的构建任务。
例如:compile 就是插件 maven-compiler-plugin 的一个目标;pre-clean 是插件 maven-clean-plugin 的一个目标。
| 生命周期阶段 | 插件目标 | 插件 |
|---|---|---|
| compile | compile | maven-compile-plugin |
| test-compile | test-compile | maven-compile-plugin |
- 可以将目标看作“调用插件功能的命令”。
maven之build标签概述:
- 链接:maven之build标签
- 使用maven构建的项目可以直接使用maven build完成项目的编译、测试、打包,无需额外配置。
①build标签描述了如何编译及打包项目,具体的编译和打包工作是通过其中的plugin配置来实现的。当然plugin不是必须的,即使不添加默认也会引入以下插件: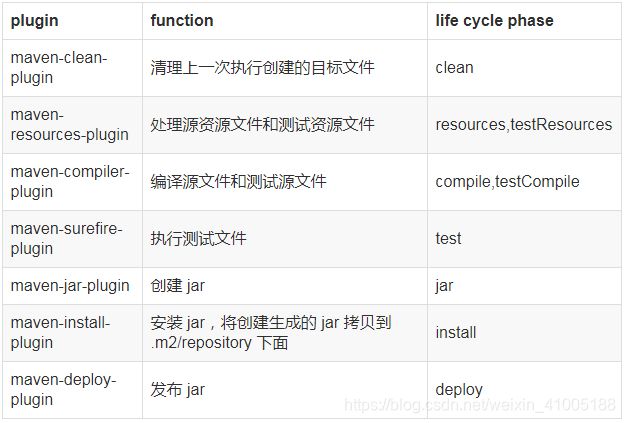
- 存在如下两种
①全局配置(project build):针对整个项目的所有情况都有效
②配置(profile build):`针对不同的profile配置
<project xmlns="http://maven.apache.org/POM/4.0.0"
  xmlns:xsi="http://www.w3.org/2001/XMLSchema-instance"
  xsi:schemaLocation="http://maven.apache.org/POM/4.0.0
                      http://maven.apache.org/maven-v4_0_0.xsd">
  …
  <!– "Project Build" contains more elements than just the BaseBuild set –>
  <build>…build>
  <profiles>
    <profile>
      <!– "Profile Build" contains a subset of "Project Build"s elements –>
      <build>…build>
    profile>
  profiles>
基本元素:
①defaultGoal:执行build任务时,如果没有指定目标,将使用的默认值。
<1> 如上配置:在命令行中执行mvn,则相当于执行mvn install
②directory:build目标文件的存放目录,默认在${basedir}/target目录
③finalName:build目标文件的名称,默认情况为${artifactId}-${version}
④filter:定义*.properties文件,包含一个properties列表,该列表会应用到支持filter的resources中。也就是说定义在filter的文件中的name=value键值对,会在build时代替${name}值应用到resources中。maven的默认filter文件夹为${basedir}/src/main/filters。
<build>
  <defaultGoal>installdefaultGoal>
  <directory>${basedir}/targetdirectory>
  <finalName>${artifactId}-${version}finalName>
  <filters>
   <filter>filters/filter1.propertiesfilter>
  filters>
  ...
build>
plugins标签: 用于指定使用的插件
①GAV:指定插件的标准坐标
②extensions:是否加载plugin的extensions,默认为false
③inherited:true/false,这个plugin是否应用到该pom的孩子pom,默认为true。(继承)
④configuration:配置该plugin期望得到的properties
⑤dependencies:作为plugin的依赖
⑥executions:plugin可以有多个目标,每一个目标都可以有一个分开的配置,可以将一个plugin绑定到不同的阶段,假如绑定antrun:run目标到verify阶段。
<build>
    ...
    <plugins>
        <plugin>
            <groupId>org.apache.maven.pluginsgroupId>
            <artifactId>maven-jar-pluginartifactId>
            <version>2.0version>
            <extensions>falseextensions>
            <inherited>trueinherited>
            <configuration>
                <classifier>testclassifier>
            configuration>
            <dependencies>...dependencies>
            <executions>...executions>
        plugin>
    plugins>
build>

---------------------------编译插件示例:---------------------------
<<build>
	<plugins>
		<plugin>
			<groupId>org.apache.maven.pluginsgroupId>
			<artifactId>maven-compiler-pluginartifactId>
			<version>2.3.2version>
			<configuraation>
				<source>1.7source>
				<target>1.7target>
			configuraation>
		plugin>
	plugins>
<build>
pluginManagement配置:pluginManagement的配置和plugins的配置是一样的,只是用于继承,使得可以在孩子pom中使用。resources标签:主要用于打包资源文件
①resources: 一个resources元素的列表。每一个都描述与项目关联的文件是什么和在哪里
②targetPath:指定build后的resource存放的文件夹,默认是basedir。通常被打包在jar中的resources的目标路径是META-INF
③filtering:true/false,表示为这个resource,filter是否激活
④directory:定义resource文件所在的文件夹,默认为${basedir}/src/main/resources
⑤includes:指定哪些文件将被匹配,以*作为通配符
⑥excludes:指定哪些文件将被忽略
⑦testResources:定义和resource类似,只不过在test时使用
<build>
        ...
       <resources>
          <resource>
             <targetPath>META-INF/plexustargetPath>
             <filtering>truefiltering>
            <directory>${basedir}/src/main/plexusdirectory>
            <includes>
                <include>configuration.xmlinclude>
            includes>
            <excludes>
                <exclude>**/*.propertiesexclude>
            excludes>
         resource>
    resources>
    <testResources>
        ...
    testResources>
    ...
build>
resources标签举例:
①默认情况下maven只打包src/main/resource下的资源,通过以下自定义要打包的资源:
<1>设置build_resources。
<2>使用build-helper-maven-plugin插件。
<3>使用maven-resources-plugin插件。
②一般情况下我们用到的资源文件(各种xml,properties,xsd文件)都放在src/main/resources下面,利用maven打包时,maven能把这些资源文件打包到相应的jar或者war里。
<1>比如mybatis的mapper.xml文件,我们习惯把它和Mapper.java放在一起,都在src/main/java下面,这样利用maven打包时,就需要修改pom.xml文件,来把mapper.xml文件一起打包进jar或者war里了,否则,这些文件不会被打包的。(maven认为src/main/java只是java的源代码路径)
<2>链接:maven之详细介绍
<4>案例:
<build>
    <finalName>testfinalName>

    <resources>
        <resource>
            <directory>src/main/resourcesdirectory>
            <includes>
                <include>**/*.propertiesinclude>
                <include>**/*.xmlinclude>
                <include>**/*.tldinclude>
            includes>
            <filtering>falsefiltering>
        resource>
        <resource>
            <directory>src/main/javadirectory>
            <includes>
                <include>**/*.propertiesinclude>
                <include>**/*.xmlinclude>
                <include>**/*.tldinclude>
            includes>
            <filtering>falsefiltering>
        resource>
    resources>
build>
maven面板使用
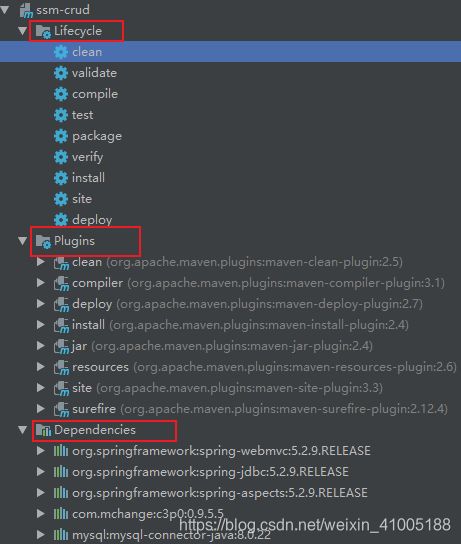
maven上侧面板使用:
maven下侧面板使用:
maven右侧选项按钮:
- add maven dependency:添加maven依赖进来
(project或module中已经有了此依赖)
①延伸出Maven artifacts Search:
<1>search for artifacts
<2>search for class - add dependency on module:添加依赖到模块中
(模块中没有此依赖,需要在pom文件中引入) - Show Dependencies:在IDEA中快速找到某个类的Maven依赖:
①右键pom.xml->Maven->Show Dependencies
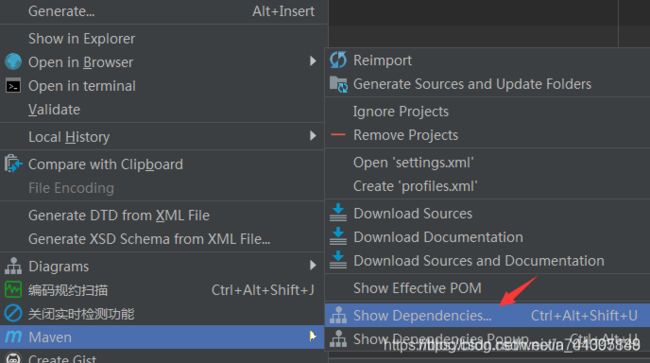
②在这个所有依赖的界面搜索,:按crtl + f 然后输入字符。 - Ignore a Maven project:
①您可以使用忽略项目选项停用 Maven 项目。在这种情况下,IntelliJ IDEA 将忽略的 Maven 项目和子项目保留在Maven工具窗口中,但停止将它们(模块、内容根、目标等)导入到项目中。但是,IntelliJ IDEA 会将忽略的项目与当前项目同步。当您处理具有多个子项目并需要跳过不相关的项目时,这可能会有所帮助。
<1>在Maven工具窗口中,右键单击要忽略的项目。
<2>从上下文菜单中,选择忽略项目。
<3>在打开的窗口中,如果要从“项目”工具窗口中删除项目,请单击“是”。
②如果要激活 Maven 项目或子项目,请从上下文菜单中选择Unignore Projects。
③忽略项目就是还在IDEA中显示但是不导入。 - 链接(Link a Maven project)与取消链接(Unlink a Maven project)项目:
①链接 Maven 项目
<1>打开Maven工具窗口。
<2>在Maven工具窗口中,单击链接 Maven 项目图标附加一个 Maven 项目。
<3>在打开的对话框中,选择所需的pom.xml文件,然后单击OK。该项目已链接。在Maven的工具窗口显示的工具栏和Maven实体的树视图。
②取消链接 Maven 项目:当您取消链接 Maven 项目时,IntelliJ IDEA 会删除所有相关项目和内容根,从Maven工具窗口和项目工具窗口中删除 Maven 项目,并停止其同步。如果您需要从当前的 IntelliJ IDEA 项目中完全删除之前链接的 Maven 项目,这可能会有所帮助。
<1>在Maven工具窗口中,右键单击链接的项目。
<2>从上下文菜单中,选择取消链接 Maven 项目( Delete)。或者,您可以选择链接的项目并单击删除图标工具窗口的工具栏。
③链接与取消链接等同于加入与移除。 - 链接:
①IDEA中的Maven面板操作
②IDEA中的Maven选项操作
maven冲突
冲突的本质:
- Google了半天也没找到一个让人满意的完整定义。其实,我们可以从Jar包冲突产生的结果来总结,在这里给出如下定义:Java应用程序因某种因素,加载不到正确的类而导致其行为跟预期不一致。
- 具体来说可分为两种情况:
①同一个Jar包出现了多个不同版本:应用程序依赖的同一个Jar包出现了多个不同版本,并选择了错误的版本而导致JVM加载不到需要的类或加载了错误版本的类,为了叙述的方便,笔者称之为第一类Jar包冲突问题。
②同一个类出现在多个不同Jar包中:同样的类(类的全限定名完全一样)出现在多个不同的依赖Jar包中,即该类有多个版本,并由于Jar包加载的先后顺序导致JVM加载了错误版本的类,称之为第二类Jar包问题。 - 这两种情况所导致的结果其实是一样的,都会使应用程序加载不到正确的类,那其行为自然会跟预期不一致了,以下对这两种类型进行详细分析。
冲突的表象:
- Jar包冲突可能会导致哪些问题?通常发生在编译或运行时,主要分为两类问题:一类是比较直观的也是最为常见的错误是抛出各种运行时异常,还有一类就是比较隐晦的问题,它不会报错,其表现形式是应用程序的行为跟预期不一致,分条罗列如下:
①java.lang.ClassNotFoundException
②java.lang.NoSuchMethodError
③java.lang.NoClassDefFoundError,java.lang.LinkageError等
④没有报错异常,但应用的行为跟预期不一致
问题排查和解决:
- 如果有异常堆栈信息,根据错误信息即可定位导致冲突的类名,然后在eclipse中CTRL+SHIFT+T或者在idea中CTRL+N就可发现该类存在于多个依赖Jar包中
- 若步骤1无法定位冲突的类来自哪个Jar包,可在应用程序启动时加上JVM参数-verbose:class或者-XX:+TraceClassLoading,日志里会打印出每个类的加载信息,如来自哪个Jar包
- 定位了冲突类的Jar包之后,通过mvn dependency:tree -Dverbose-Dincludes=:查看是哪些地方引入的Jar包的这个版本
- 确定Jar包来源之后,如果是第一类Jar包冲突,则可用排除不需要的Jar包版本或者在依赖管理中申明版本;若是第二类Jar包冲突,如果可排除,则用排掉不需要的那个Jar包,若不能排,则需考虑Jar包的升级或换个别的Jar包。当然,除了这些方法,还可以从类加载器的角度来解决该问题,可参考博文——如果jar包冲突不可避免,如何实现jar包隔离,其思路值得借鉴。
- 链接:Jar包冲突问题及解决方案!
Maven单测插件
简介:
- Maven本身并不是一个单元测试框架,Java世界中主流的单元测试框架为JUnit和TestNG。Maven所做的只是在构建执行到特定生命周期阶段的时候,通过插件来执行JUnit或者TestNG的测试用例。这一插件就是maven-surefire-plugin,可以称之为测试运行器(Test Runner),他能很好的兼容JUnit 3、JUnit 4以及TestNG。
- 我们知道,生命周期阶段需要绑定到某个插件的目标才能完成真正的工作,test阶段正是与maven-surefire-plugin的test目标相绑定了,这是一个内置的绑定。
①执行 mvn test 命令
②点击maven面板的test按钮 - 在默认情况下,maven-surefire-plugin的test目标会自动执行测试源码路径(默认为src/test/java/)下所有符合一组命名模式的测试类。这组模式为:
①/Test*.java:任何子目录所有命名以Test开头的Java类。
②/*Test.java:任何子目录下所有命名以Test结尾的Java类。
③/*TestCase.java:任何子目录下所有命名以TestCase结尾的Java类。 - 只要将测试类按上述模式命名,Maven就能自动运行他们,用户也就不再需要定义测试集合(TestSuite)来聚合测试用例(TestCase)。关于模式需要注意的是,以Test结尾的测试类是不会得以自动执行的。
- 当然,如果有需要,可以自己定义要运行测试类的模式。此外,maven-surefire-plugin还支持更高级的TestNG测试集合xml文件。同时为了能够运行测试,Maven需要在项目中引入测试框架的依赖。
<plugin>
    <groupId>org.apache.maven.pluginsgroupId>
    <artifactId>maven-surefire-pluginartifactId>
    <version>2.19version>
    <configuration>
	    <excludes>

	      <exclude>**/TestConstants.javaexclude>
	    excludes>

	    <forkMode>alwaysforkMode>
	    <parallel>methodsparallel>
	    <threadCount>4threadCount>
     configuration>

plugin>
maven属性(${} properties)
Maven属性事实上有六种类型的Maven属性:
内置属性:
${basedir}表示项目的根路径,即包含pom.xml文件的目录
${version}表示项目版本
${project.basedir}同${basedir}
${project.baseUri}表示项目文件地址
${maven.build.timestamp}表示项目构建开始时间
${maven.build.timestamp.format}表示${maven.build.timestamp}的展示格式,默认值为yyyyMMdd-HHmmPOM属性:pom中对应元素的值。例如${project.artifactId}对应了元素的值,常用的POM属性包括:
${project.build.sourceDirectory}:项目的主源码目录,默认为src/main/java/.
${project.build.testSourceDirectory}:项目的测试源码目录,默认为/src/test/java/.
${project.build.directory}:项目构建输出目录,默认为target/.
${project.build.outputDirectory}:项目主代码编译输出目录,默认为target/classes/.
${project.build.testOutputDirectory}:项目测试代码编译输出目录,默认为target/testclasses/.
${project.groupId}:项目的groupId.
${project.artifactId}:项目的artifactId.
${project.version}:项目的version,于${version}等价
${project.build.finalName}:项目打包输出文件的名称,默认为${project.artifactId}${project.version}.自定义属性:在pom中元素下自定义的Maven属性。例如
<project>
    <properties>
        <my.prop>hello</my.prop>
    </properties>
</project>
Settings属性:与POM属性同理。如${settings.localRepository}指向用户本地仓库的地址。Java系统属性:所有Java系统属性都可以使用Maven属性引用,例如${user.home}指向了用户目录。可以通过命令行mvn help:system查看所有的Java系统属性环境变量属性:所有环境变量都可以使用以env.开头的Maven属性引用。例如${env.JAVA_HOME}指代了JAVA_HOME环境变量的值。也可以通过命令行mvn help:system查看所有环境变量。
spring体系结构及内部各模块jar之间的maven依赖关系
简述:
- 详细链接: springframework体系结构及内部各模块jar之间的maven依赖关系
- 要在普通java工程使用spring框架,需要哪些jar呢?只要一个依赖
<dependency>
    <groupId>org.springframework</groupId>
    <artifactId>spring-context</artifactId>
    <version>3.2.17.RELEASE</version>
</dependency>
- 那要在web工程中引入spring mvc和spring呢?也只要配置一个依赖
<dependency>
    <groupId>org.springframework</groupId>
    <artifactId>spring-webmvc</artifactId>
    <version>3.2.17.RELEASE</version>
</dependency>
- 如果使用
Aspects则引入spring-aspects(spring-aop无需单独引入) - 如果使用
jdbc api则引入spring-jdbc(包含spring-tx) - 如果使用
orm则引入spring-orm(包含spring-tx) - 如果使用
tx则引入spring-tx
Maven-archetype说明
简介:
- 新建Maven project项目时,需要选择archetype。
archetype的意思就是模板原型的意思,原型是一个Maven项目模板工具包。
①一个原型被定义为从其中相同类型的所有其它事情是由一个原始图案或模型。名称配合,因为我们正在努力提供一种系统,该系统提供了一种生成Maven项目的一致的手段。
②原型将帮助作者为用户创建Maven项目模板,并为用户提供了手段,产生的这些项目模板参数化的版本。- 建立Maven项目时,建议的分别是
①cocoon-22-archetype-webapp
②maven-archetype-quickstart
③maven-archetype-webapp - cocoon-22-archetype-webapp建好项目后,项目的结构如下:
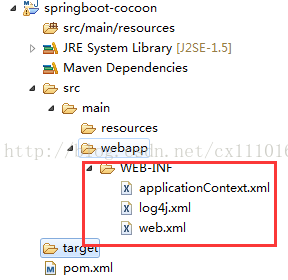
- maven-archetype-quickstart建好项目后,项目的结构如下:
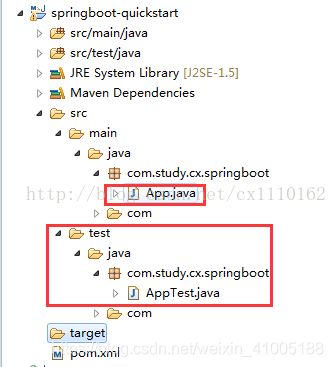
maven-archetype-webapp(一般使用这个)建好项目后,项目的结构如下:
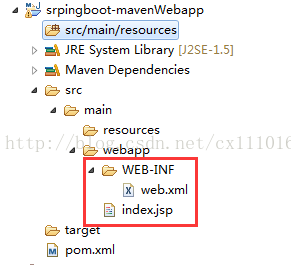
maven命令
Maven 命令深度理解:
- Maven 命令看起来简单,一学即会 。其实,Maven 命令底层是插件的执行过程。
- 了解插件和插件目标才有助于深刻的理解 Maven命令。
- Maven 提供了两种类型的命令:
①一种必须在项目中运行,视为项目命令;
②另外一种则不需要,视为全局命令。 - Maven命令是以一个module为一个单位的,所以涉及路径的问题一般是以该module为根目录。
插件与命令的关系:
- Maven本质上是一个插件框架,它的核心并不执行任何具体的构建任务,所有这些任务都交给插件来完成。
Maven 实际上是一个依赖插件执行的框架,每个任务实际上是由插件完成。所以,Maven 命令都是由插件来执行的。
Maven 命令格式解读:
- Maven 命令都是由插件来执行的,其语法格式如下所示:
mvn [plugin-name]:[goal-name]
- 例如下面的命令:
这个命令采用了缩写的形式:
mvn help:effective-pom

其全称是这样的:
org.apache.maven.plugins:maven-help-plugin:2.2:effective-pom

总结:
此命令以分号为分隔符,包含了 groupId,artifactId,version,goal 四部分。若 groupId 为
org.apache.maven.plugins 则可以使用上述的简写形式。
- 两个命令都是执行了 maven-help-plugin 这个 plugin 中的 effective-pom 这个goal。每次都要敲这么长一串命令是很繁琐的,因此才有了上述的简写的形式。
- 在idea的maven命令行中可以不写mvn,则该命令可以写成:
help:effective-pom
命令详解:
mvn archetype:create 创建Maven项目
mvn compile 编译源代码
mvn test-compile 编译测试代码
mvn test 运行测试
mvn site 生成项目相关信息的网站
mvn clean 清除项目的生成结果
mvn package 打包项目生成jar/war文件
mvn install 安装jar至本地库
mvn deploy 上传至私服
mvn eclipse:eclipse 生成Eclipse项目文件
mvn ieda:ieda 生成IDEA项目文件
mvn archetype:generate 反向生成maven项目的骨架
mvn -Dtest package 只打包不测试
mvn jar:jar 只打jar包
mvn test -skipping compile -skipping test-compile 只测试不编译也不编译测试
mvn eclipse:clean 清除eclipse的一些系统设置
mvn dependency:list 查看当前项目已被解析的依赖
mvn clean install -U 强制检查更新
mvn source:jar 打包源码
mvn jetty:run 运行项目于jetty上
mvn tomcat:run 运行项目于tomcat上
mvn -e 显示详细错误 信息:
mvn validate 验证工程是否正确,所有需要的资源是否可用
mvn integration-test 在集成测试可以运行的环境中处理和发布包
mvn verify 运行任何检查,验证包是否有效且达到质量标准
mvn generate-sources 产生应用需要的任何额外的源代码
mvn help:describe -Dplugin=help 输出Maven Help插件的信息
mvn help:describe -Dplugin=help -Dfull 输出完整的带有参数的目标列
mvn help:describe -Dplugin=compiler -Dmojo=compile -Dfull 获取单个目标的信息
mvn help:describe -Dplugin=exec -Dfull 列出所有Maven Exec插件可用的目标
mvn help:effective-pom 查看Maven的默认设置
mvn install -X 想要查看完整的依赖踪迹,打开 Maven 的调试标记运行
mvn install assembly:assembly 构建装配Maven Assembly
mvn dependency:resolve 打印已解决依赖的列表
mvn dependency:tree 打印整个依赖树
mvn dependency:sources 获取依赖源代码
-Dmaven.test.skip=true 跳过测试
-Dmaven.tomcat.port=9090 指定端口
-Dmaven.test.failure.ignore=true 忽略测试失败
常用打包命令:
mvn clean  install package -Dmaven.test.skip=true #清理之前项目生成结果并构建然后将依赖包安装到本地仓库跳过测试
mvn clean deploy package  -Dmaven.test.skip=true #构建并将依赖放入私有仓库
mvn --settings /data/settings.xml clean package -Dmaven.test.skip=true #指定maven配置文件构建
pom.xml和setting.xml
maven仓库设置 settings.xml与pom.xml 优先级:
- maven自动下载依赖时,会涉级读取三个配置文件,分别是项目下的pom.xml 文件 、家目录下的.m2/settings.xml 与maven 全局配置settings.xml ,
- 后面两者不难理解,就像linux下的用户一样,有一个/etc/profile ,用户用目录下还有一个.bash_profile文件是一样的,用户自定义配置会覆盖全局配置。
三者的级先是 pom.xml > /home_dir/.m2/settings.xml >/maven_dir/conf/settings.xml 。
MAVEN最常用的远程仓库:
- 阿里云:http://maven.aliyun.com/nexus/content/groups/public/
| 仓库名称 | 阿里云仓库地址 | 阿里云仓库地址(老版) | 源地址 |
|---|---|---|---|
central |
https://maven.aliyun.com/repository/central | https://maven.aliyun.com/nexus/content/repositories/central | https://repo1.maven.org/maven2/ |
jcenter |
https://maven.aliyun.com/repository/public | https://maven.aliyun.com/nexus/content/repositories/jcenter | http://jcenter.bintray.com/ |
public |
https://maven.aliyun.com/repository/public | https://maven.aliyun.com/nexus/content/groups/public | central仓和jcenter仓的聚合仓 |
google |
https://maven.aliyun.com/repository/google | https://maven.aliyun.com/nexus/content/repositories/google | https://maven.google.com/ |
| gradle-plugin | https://maven.aliyun.com/repository/gradle-plugin | https://maven.aliyun.com/nexus/content/repositories/gradle-plugin | https://plugins.gradle.org/m2/ |
| spring | https://maven.aliyun.com/repository/spring | https://maven.aliyun.com/nexus/content/repositories/spring | http://repo.spring.io/libs-milestone/ |
| spring-plugin | https://maven.aliyun.com/repository/spring-plugin | https://maven.aliyun.com/nexus/content/repositories/spring-plugin | http://repo.spring.io/plugins-release/ |
| grails-core | https://maven.aliyun.com/repository/grails-core | https://maven.aliyun.com/nexus/content/repositories/grails-core | https://repo.grails.org/grails/core |
| apache snapshots | https://maven.aliyun.com/repository/apache-snapshots | https://maven.aliyun.com/nexus/content/repositories/apache-snapshots | https://repository.apache.org/snapshots/ |
- spring官方:https://repo.spring.io/libs-milestone
- maven官方:http://repo2.maven.org/maven2/
- JBoss:http://repository.jboss.org/nexus/content/groups/public
pom.xml简介:
<project xmlns="http://maven.apache.org/POM/4.0.0" xmlns:xsi="http://www.w3.org/2001/XMLSchema-instance"
xsi:schemaLocation="http://maven.apache.org/POM/4.0.0http://maven.apache.org/maven-v4_0_0.xsd">
<parent>
<artifactId />
<groupId />
<version />
<relativePath />
parent>
<modelVersion>4.0.0modelVersion>
<groupId>asia.banseongroupId>
<artifactId>banseon-maven2artifactId>
<packaging>jarpackaging>
<version>1.0-SNAPSHOTversion>
<name>banseon-mavenname>
<url>http://www.baidu.com/banseonurl>
<description>A maven project to study maven.description>
<prerequisites>
<maven />
prerequisites>
<issueManagement>
<system>jirasystem>
<url>http://jira.baidu.com/banseonurl>
issueManagement>
<ciManagement>
<system />
<url />
<notifiers>
<notifier>
<type />
<sendOnError />
<sendOnFailure />
<sendOnSuccess />
<sendOnWarning />
<address />
<configuration />
notifier>
notifiers>
ciManagement>
<inceptionYear />
<mailingLists>
<mailingList>
<name>Demoname>
<post>[email protected]post>
<subscribe>[email protected]subscribe>
<unsubscribe>[email protected]unsubscribe>
<archive>http:/hi.baidu.com/banseon/demo/dev/archive>
mailingList>
mailingLists>
<developers>
<developer>
<id>HELLO WORLDid>
<name>banseonname>
<email>[email protected]email>
<url />
<roles>
<role>Project Managerrole>
<role>Architectrole>
roles>
<organization>demoorganization>
<organizationUrl>http://hi.baidu.com/banseonorganizationUrl>
<properties>
<dept>Nodept>
properties>
<timezone>-5timezone>
developer>
developers>
<contributors>
<contributor>
<name />
<email />
<url />
<organization />
<organizationUrl />
<roles />
<timezone />
<properties />
contributor>
contributors>
<licenses>
<license>
<name>Apache 2name>
<url>http://www.baidu.com/banseon/LICENSE-2.0.txturl>
<distribution>repodistribution>
<comments>A business-friendly OSS licensecomments>
license>
licenses>
<scm>
<connection>
scm:svn:http://svn.baidu.com/banseon/maven/banseon/banseon-maven2-trunk(dao-trunk)
connection>
<developerConnection>
scm:svn:http://svn.baidu.com/banseon/maven/banseon/dao-trunk
developerConnection>
<tag />
<url>http://svn.baidu.com/banseonurl>
scm>
<organization>
<name>demoname>
<url>http://www.baidu.com/banseonurl>
organization>
<build>
<sourceDirectory />
<scriptSourceDirectory />
<testSourceDirectory />
<outputDirectory />
<testOutputDirectory />
<extensions>
<extension>
<groupId />
<artifactId />
<version />
extension>
extensions>
<defaultGoal />
<resources>
<resource>
<targetPath />
<filtering />
<directory />
<includes />
<excludes />
resource>
resources>
<testResources>
<testResource>
<targetPath />
<filtering />
<directory />
<includes />
<excludes />
testResource>
testResources>
<directory />
<finalName />
<filters />
<pluginManagement>
<plugins>
<plugin>
<groupId />
<artifactId />
<version />
<extensions />
<executions>
<execution>
<id />
<phase />
<goals />
<inherited />
<configuration />
execution>
executions>
<dependencies>
<dependency>
......
dependency>
dependencies>
<inherited />
<configuration />
plugin>
plugins>
pluginManagement>
<plugins>
<plugin>
<groupId />
<artifactId />
<version />
<extensions />
<executions>
<execution>
<id />
<phase />
<goals />
<inherited />
<configuration />
execution>
executions>
<dependencies>
<dependency>
......
dependency>
dependencies>
<goals />
<inherited />
<configuration />
plugin>
plugins>
build>
<profiles>
<profile>
<id />
<activation>
<activeByDefault />
<jdk />
<os>
<name>Windows XPname>
<family>Windowsfamily>
<arch>x86arch>
<version>5.1.2600version>
os>
<property>
<name>mavenVersionname>
<value>2.0.3value>
property>
<file>
<exists>/usr/local/hudson/hudson-home/jobs/maven-guide-zh-to-production/workspace/
exists>
<missing>/usr/local/hudson/hudson-home/jobs/maven-guide-zh-to-production/workspace/
missing>
file>
activation>
<build>
<defaultGoal />
<resources>
<resource>
<targetPath />
<filtering />
<directory />
<includes />
<excludes />
resource>
resources>
<testResources>
<testResource>
<targetPath />
<filtering />
<directory />
<includes />
<excludes />
testResource>
testResources>
<directory />
<finalName />
<filters />
<pluginManagement>
<plugins>
<plugin>
<groupId />
<artifactId />
<version />
<extensions />
<executions>
<execution>
<id />
<phase />
<goals />
<inherited />
<configuration />
execution>
executions>
<dependencies>
<dependency>
......
dependency>
dependencies>
<goals />
<inherited />
<configuration />
plugin>
plugins>
pluginManagement>
<plugins>
<plugin>
<groupId />
<artifactId />
<version />
<extensions />
<executions>
<execution>
<id />
<phase />
<goals />
<inherited />
<configuration />
execution>
executions>
<dependencies>
<dependency>
......
dependency>
dependencies>
<goals />
<inherited />
<configuration />
plugin>
plugins>
build>
<modules />
<repositories>
<repository>
<releases>
<enabled />
<updatePolicy />
<checksumPolicy />
releases>
<snapshots>
<enabled />
<updatePolicy />
<checksumPolicy />
snapshots>
<id />
<name />
<url />
<layout />
repository>
repositories>
<pluginRepositories>
<pluginRepository>
<releases>
<enabled />
<updatePolicy />
<checksumPolicy />
releases>
<snapshots>
<enabled />
<updatePolicy />
<checksumPolicy />
snapshots>
<id />
<name />
<url />
<layout />
pluginRepository>
pluginRepositories>
<dependencies>
<dependency>
......
dependency>
dependencies>
<reports />
<reporting>
......
reporting>
<dependencyManagement>
<dependencies>
<dependency>
......
dependency>
dependencies>
dependencyManagement>
<distributionManagement>
......
distributionManagement>
<properties />
profile>
profiles>
<modules />
<repositories>
<repository>
<releases>
<enabled />
<updatePolicy />
<checksumPolicy />
releases>
<snapshots>
<enabled />
<updatePolicy />
<checksumPolicy />
snapshots>
<id>banseon-repository-proxyid>
<name>banseon-repository-proxyname>
<url>http://192.168.1.169:9999/repository/url>
<layout>defaultlayout>
repository>
repositories>
<pluginRepositories>
<pluginRepository>
......
pluginRepository>
pluginRepositories>
<dependencies>
<dependency>
<groupId>org.apache.mavengroupId>
<artifactId>maven-artifactartifactId>
<version>3.8.1version>
<type>jartype>
<classifier>classifier>
<scope>testscope>
<systemPath>systemPath>
<exclusions>
<exclusion>
<artifactId>spring-coreartifactId>
<groupId>org.springframeworkgroupId>
exclusion>
exclusions>
<optional>trueoptional>
dependency>
dependencies>
<reports>reports>
<reporting>
<excludeDefaults />
<outputDirectory />
<plugins>
<plugin>
<groupId />
<artifactId />
<version />
<inherited />
<configuration />
<reportSets>
<reportSet>
<id />
<configuration />
<inherited />
<reports />
reportSet>
reportSets>
plugin>
plugins>
reporting>
<dependencyManagement>
<dependencies>
<dependency>
......
dependency>
dependencies>
dependencyManagement>
<distributionManagement>
<repository>
<uniqueVersion />
<id>banseon-maven2id>
<name>banseon maven2name>
<url>file://${basedir}/target/deployurl>
<layout />
repository>
<snapshotRepository>
<uniqueVersion />
<id>banseon-maven2id>
<name>Banseon-maven2 Snapshot Repositoryname>
<url>scp://svn.baidu.com/banseon:/usr/local/maven-snapshoturl>
<layout />
snapshotRepository>
<site>
<id>banseon-siteid>
<name>business api websitename>
<url>
scp://svn.baidu.com/banseon:/var/www/localhost/banseon-web
url>
site>
<downloadUrl />
<relocation>
<groupId />
<artifactId />
<version />
<message />
relocation>
<status />
distributionManagement>
<properties />
project>
settings.xml文件元素详解:
- 链接:settings.xml文件元素详解
LocalRepository:该值表示构建系统本地仓库的路径。
①其默认值:~/.m2/repository。InteractiveMode:表示maven是否需要和用户交互以获得输入。
①如果maven需要和用户交互以获得输入,则设置成true,反之则应为false。默认为true。UsePluginRegistry:maven是否需要使用plugin-registry.xml文件来管理插件版本。
①如果需要让maven使用文件~/.m2/plugin-registry.xml来管理插件版本,则设为true。默认为false。Offline:这个属性表示在Maven进行项目编译和部署等操作时是否允许Maven进行联网来下载所需要的信息。
①如果构建系统需要在离线模式下运行,则为true,默认为false。
②当由于网络设置原因或者安全因素,构建服务器不能连接远程仓库的时候,该配置就十分有用。PluginGroups:在pluginGroups元素下面可以定义一系列的pluginGroup元素。
①表示当通过plugin的前缀来解析plugin的时候到哪里寻找。pluginGroup元素指定的是plugin的groupId。默认情况下,Maven会自动把org.apache.maven.plugins 和 org.codehaus.mojo 添加到pluginGroups下。
<localRepository>${user.home}/.m2/repositorylocalRepository>

<interactiveMode>trueinteractiveMode>

<usePluginRegistry>falseusePluginRegistry>

<offline>falseoffline>

<pluginGroups>

  <pluginGroup>org.codehaus.mojopluginGroup>
pluginGroups>
Servers:一般情况时仓库的下载和部署是在pom.xml文件中的repositories 和distributionManagement 元素中定义的。
①然而一般类似用户名、密码(有些仓库访问是需要安全认证的)等信息不应该在pom.xml文件中配置,这些信息可以配置在 settings.xml 中。
<servers>

  <server>

    <id>server001id>

    <username>my_loginusername>

    <password>my_passwordpassword>

    <privateKey>${usr.home}/.ssh/id_dsaprivateKey>

    <passphrase>some_passphrasepassphrase>

    <filePermissions>664filePermissions>

    <directoryPermissions>775directoryPermissions>
  server>
servers>
Mirrors:用于定义一系列的远程仓库的镜像。
①mirror相当于一个拦截器,它会拦截maven对remote repository的相关请求,把请求里的remote repository地址,重定向到mirror里配置的地址。
②我们可以在pom中定义一个下载工件的时候所使用的远程仓库。但是有时候这个远程仓库会比较忙,所以这个时候人们就想着给它创建镜像以缓解远程仓库的压力,也就是说会把对远程仓库的请求转换到对其镜像地址的请求。每个远程仓库都会有一个id,这样我们就可以创建自己的mirror来关联到该仓库,那么以后需要从远程仓库下载工件的时候Maven就可以从我们定义好的mirror站点来下载,这可以很好的缓解我们远程仓库的压力。在我们定义的mirror中每个远程仓库都只能有一个mirror与它关联,也就是说你不能同时配置多个mirror的mirrorOf指向同一个repositoryId。
③我们知道,默认情况下配置多个mirror的情况下,只有第一个生效。那么我们可以将最后一个作为默认值,前面配置的使用环境变量动态切换。
<mirrors>

  <mirror>

    <id>mirrorIdid>

    <name>PlanetMirror Australianame>

    <url>http://downloads.planetmirror.com/pub/maven2url>

    <mirrorOf>repositoryIdmirrorOf>
  mirror>


  <mirror>
      <id>alimavenid>
      <name>aliyun mavenname>
      <url>http://maven.aliyun.com/nexus/content/groups/public/url>
      <mirrorOf>centralmirrorOf>
	mirror>
mirrors>
Proxies:用来配置不同的代理。
<proxies>

  <proxy>

    <id>myproxyid>

    <active>trueactive>

    <protocol>httpprotocol>

    <host>proxy.somewhere.comhost>

    <port>8080port>

    <username>proxyuserusername>

    <password>somepasswordpassword>

    <nonProxyHosts>*.google.com|ibiblio.orgnonProxyHosts>
  proxy>
proxies>
Profiles:根据环境参数来调整构建配置的列表。
①settings.xml中的profile元素是pom.xml中profile元素的裁剪版本。它包含了id、activation、repositories、pluginRepositories和 properties元素。这里的profile元素只包含这五个子元素是因为这里只关心构建系统这个整体(这正是settings.xml文件的角色定位),而非单独的项目对象模型设置。如果一个settings.xml中的profile被激活,它的值会覆盖任何其它定义在pom.xml中带有相同id的profile。当所有的约束条件都满足的时候就会激活这个profile。
<profiles>
    <profile>

        <id>testid>

        <activation>
            <activeByDefault>falseactiveByDefault>
            <jdk>1.6jdk>
            <os>
                <name>Windows 7name>
                <family>Windowsfamily>
                <arch>x86arch>
                <version>5.1.2600version>
            os>
            <property>
                <name>mavenVersionname>
                <value>2.0.3value>
            property>
            <file>
                <exists>${basedir}/file2.propertiesexists>
                <missing>${basedir}/file1.propertiesmissing>
            file>
        activation>

        <properties />

        <repositories />

        <pluginRepositories />
      ...
    profile>
profiles>
ActiveProfiles:手动激活profiles的列表,按照profile被应用的顺序定义activeProfile。
①该元素包含了一组activeProfile元素,每个activeProfile都含有一个profile id。任何在activeProfile中定义的profile id,不论环境设置如何,其对应的 profile都会被激活。如果没有匹配的profile,则什么都不会发生。
<activeProfiles>

   <activeProfile>env-testactiveProfile>
activeProfiles>
Maven总结
Maven的jar包报错问题:
首先在任何报错问题前先clean一下,再查看控制台报的错误。或者打开Project structure的Module的Dependencies,再edit某个依赖然后:
①Reload All Maven Projects或者Reload Project
②pom中删掉对应的依赖,再重新添加并reimport
③设置maven的工作模式为work-online(把work-offline勾掉)
④删掉仓库中的_remote_repository文件夹
⑤运行mvn install命令手动导入 jar到maven仓库
⑥重启IDEA
⑦删除本地仓库.m2文件夹
<1>在Windows资源管理器中的地址栏中输入%homepath%然后回车即可进入当前用户的家目录。
<2>Maven缺省的本地仓库路径为${user.home}/.m2/repository- java文件中jar包解析不了(问题本质是lib没有添加到类路径):
①在java文件中add对应的library to classpath。
②或者在Project Structure的Module的Dependencies中进行添加。 - Event Log窗口中报Unable to import Maven project错的问题:
①Maven 新老版本兼容有问题:
<1>当前 Maven 最新版本 Maven 3.6.2 有可能与最新版的 IDEA 有冲突或兼容问题
<2>当前 Maven 最新版本 Maven 3.6.2 本身存在兼容问题
<3>下载并使用 Maven 3.6.1 与 Intellij IDEA 2019.2.2 搭配。 - Idea项目的External Libraries包为空的问题(和lib没有添加到类路径的问题一样):
①进入到.idea/misc.xm文件中,删除option元素中set元素中的全部内容。
②删除之后单击右键maven工程 点击Reimport会自动加入模块。
③链接:解决iDEA pom.xml依赖了jar但是External Libraries包为空 - springboot工程maven打包时,如果有依赖工程总是报找不到:
①项目分了很多模块,并且模块之间还存在一定的依赖,比如说一个项目common是提供各项目通用的工具类,公共的类等
②因此需要将依赖的模块先安装到本地库。具体步骤:直接clean并install父模块(父模块聚合了其他子模块)。 Maven在下载仓库中找不到相应资源时,会生成一个.lastUpdated为后缀的文件:
①在项目路径下使用mvn -U compile命令即可!-U的作用是强制让Maven检查所有依赖更新。
②注意检查版本号和jar包名称是否写错。提供一个小工具,只要运行可以自动检测删除你下载未完整的依赖文件:首先创建一个txt文档,复制一下代码,记得路径修改为你自己所在依赖包的位置,然后把.txt文件后缀改为.bat ,双击运行即可跳出窗口去自动删除。
set REPOSITORY_PATH=E:\repository
rem 正在搜索...
for /f "delims=" %%i in ('dir /b /s "%REPOSITORY_PATH%\*lastUpdated*"') do (
    del /s /q %%i
)
rem 搜索完毕
pause
- -source 1.5 中不支持 lambda 表达式:
①Maven Compiler 插件默认会加 -source 1.5 及 -target 1.5 参数来编译(估计是为了兼容一些比较老的Linux 服务器操作系统,它们通常只有 JDK 5)
②所以在pom.xml中添加了配置
<build>
    <plugins>
      <plugin>
        <groupId>org.apache.maven.pluginsgroupId>
        <artifactId>maven-compiler-pluginartifactId>
        <configuration>
          <source>1.8source>
          <target>1.8target>
        configuration>
      plugin>
    plugins>
  build>
- 链接:
①本地maven仓库存在jar包,项目无法引用
②解决Maven下载lastUpdated文件却无法获取jar包的方法
③idea Cannot Resolve Symbol 问题解决
Maven 酷站:
- 我们可以到Maven 酷站搜索需要的 jar 包的依赖信息
