2021-11-04 Spring
Spring学习
测试代码和jar包
https://pan.baidu.com/s/1nheX6YZEYsEoWxXgnMiMg
提取码:cwpu
文章目录
-
- Spring学习
- Spring简介
-
- 1、Spring介绍
- 2、Spring的四种关键策略
- 3、Spring特点
- 4、Spring的体系结构
-
- 4.1 Data Access/Integration(数据访问/集成)
- 4.2 Web
- 4.3 Core Container(核心容器)
- 4.4 其他模块
- 5、jar包下载
- SpringIOC容器
-
- 1、SpringIOC容器简介
-
- 1.1 IOC思想
- 1.2 IOC容器概念
- 1.3 Bean的概念
- 2、SpringIOC容器类型
-
- 2.1 BeanFactory
- 2.2 ApplicationContext
- 3、SpringIOC容器的使用
-
- 3.1 搭建环境
- 3.2 通过IoC容器管理Bean对象
- 3.3 使用IoC容器创建Bean对象的三种方式
-
- 3.3.1 通过构造方法创建
- 3.3.2 使用静态工厂方法创建
- 3.3.3 使用动态工厂方法创建
- 3.4 在IoC容器中获取Bean对象的方式
-
- 3.4.1 通过id或name获取
- 3.4.2 通过类型获取
- 3.4.3 通过id或name与类型获取Bean对象
- 3.5 实例化Bean对象的策略
-
- 3.5.1 实例化对象策略
- 3.5.2 Bean对象的作用域
- DI 依赖注入
-
- 1、什么是依赖注入
-
- 类的关系
- 2、为什么使用依赖注入
-
- 2.1 开闭原则
- 2.2 高内聚,低耦合
- 3、依赖注入的方式
-
- 3.1 通过Set方法注入
- 3.2 通过构造方法注入
- 3.3 自动注入
- 4、依赖注入的数据类型
-
- 4.1 注入Bean对象
- 4.2 注入基本数据类型和字符串
- 4.3 注入List
- 4.4 注入Set
- 4.5 注入Map
- 4.6 注入Properties
- Spring整合持久层技术
-
- 1、Spring整合JDBC
-
- 1、搭建环境
- 2、配置Spring
- 3、配置数据源
- 4、配置JDBCTemplate
- 5、配置其他Bean对象的依赖注入
- 6、JDBCTemplate的使用
-
- 1、指定单条DML语句
- 2、批量执行DML语句
- 3、查询返回单条数据
- 4、查询返回多条数据
- 5、查询多条数据简化版
- 7、JdbcDaoSupport的使用
- 2、Spring整合Mybatis
-
- 1、jar包介绍
- 2、搭建环境
- 4、实现添加用户业务
- 5、实现查询用户业务
- 6、SqlSessionDaoSupport的使用
- 7、MapperScannerConfigurer对象的使用
- 代理模式
-
- 1、什么是代理模式
- 2、为什么要使用代理模式
- 3、代理模式的实现
-
- 3.1 静态代理
- 3.2 通过JDK的Proxy类实现动态代理
-
- 3.2.1 使用JDK的Proxy类实现动态代理
- 3.2.2 使用CGLIB实现动态代理
- AOP编程
-
- 1、简介
- 2、AOP术语
- 3、Spring AOP模块
-
- 3.1 通知类型
- 3.2 使用
-
- 3.2.1 一般使用
- 3.2.2 使用案例
- 4、AspectJ框架
-
- 4.1 AspectJ框架简介
-
- 4.1.1 AspectJ框架的通知类型
- 4.1.2 Spring整合AspectJ框架所依赖的jar包
- 4.1.3 AspectJ框架配置AOP方式
- 4.2 AspectJ框架的使用
-
- 4.2.1 XML方式
-
- 4.2.1.1 通过AspectJ配置方式
- 4.2.2 Schema_based配置方式
- 4.2.2 注解方式
- Spring事务管理
-
- 1、简介
- 2、原理
- 3、数据库事务的特性
-
- 3.1 什么是事务
- 3.2 事务的作用
- 3.3 事务的ACID特性
- 3.4 事务的隔离性
-
- 3.4.1 不考虑隔离性可能导致的三个问题
- 3.4.2 解决办法——四种隔离级别
- 4、Spring事务管理器
-
- 4.1 Spring事务管理接口
- 4.2 Spring中的事务管理器
- 5、事务的传播行为
- 6、Spring声明式事务管理
-
- 6.1 jar包依赖
- 6.2 XML方式实现声明式事务管理
- 6.3 声明式事务管理中的属性解释
- 6.4 使用注解式实现声明式事务管理
-
- 6.4.1 Transactional介绍
- 6.4.2 Transactional的使用
- Spring基于注解装配Bean对象
-
- 1、jar包依赖
- 2、在Spring的配置文件中开启注解扫描
- 3、注册Bean对象使用的注解
-
- 使用测试
- 4、依赖注入使用的注解
-
- 使用测试
- 5、Spring配置相关注解
-
- 使用测试
- Junit的使用
-
- 1、简介
- 2、Junit注解
- 3、Junit断言介绍
- 4、Junit的使用
-
- 4.1 简单的使用
- 4.2 Junit断言的使用
- Spring整合Junit
-
- 1、所依赖的jar包
- 2、测试案例
- Spring整合Servlet
-
- 1、所依赖的jar包
- 2、测试案例
Spring简介
1、Spring介绍
Spring是一个开源框架,最早由Rod Johnson’发起。Spring为简化企业级开发而生,使用Spring 开发可以将Bean对象交给Spring容器来管理,使得很多复杂的代码在Spring中开发会变得非常的优雅和简洁,有效的降低代码的耦合度,极大的方便项目的后期维护、升级和扩展。
2、Spring的四种关键策略
- 基于POJO的轻量级和最小侵入性编程
- 通过依赖注入和面向接口实现松耦合
- 基于切面和惯例进行声明式编程
- 通过切面和模板减少样板式代码
3、Spring特点
-
非侵入式:基于Spring 开发的应用中的对象可以不依赖于Spring的APl
-
容器:Spring是一个容器,因为它包含并且管理应用对象的生命周期
-
控制反转:IOC (Inversion of Control),指的是将对象的创建权交给Spring去创建
使用Spring之前,对象的创建都是由我们自己在代码中new创建。而使用Spring之后。对象的创建都是由给了Spring框架
-
依赖注入:DI (Dependency lnjection),是指依赖的对象不需要手动调用setXx方法去设置,而是通过配置赋值
-
面向切面编程:Aspect Oriented Programming——AOP
-
组件化:Spring 实现了使用简单的组件配置组合成一个复杂的应用。在Spring 中可以使用XML和Java注解组合这些对象
-
一站式:在IOC和AOP的基础上可以整合各种企业应用的开源框架和优秀的第三方类库
4、Spring的体系结构
Spring框架采用分层架构,根据不同的功能被划分成了多个模块:DataAccess/Integration、Web、AOP、Aspects、Messaging、Instrumentation、Core Container和Test。

Spring 框架的这些模块可以满足一切企业级应用开发的需求,在开发过程中可以根据需求有选择性地使用所需要的模块。
4.1 Data Access/Integration(数据访问/集成)
- JDBC模块:提供了一个JDBC的抽象层,大幅度减少了在开发过程中对数据库操作的编码
- ORM模块:对流行的对象关系映射API,包括JPA、JDO、Hibernate和 MyBatis 提供了的集成
- OXM模块:提供了一个支持对象/XML映射的抽象层实现
- JMS模块:指Java消息服务,包含的消息生产和消费的处理
- Transactions事务模块:支持编程和声明式事务处理
4.2 Web
- Spring-web模块:提供了基本的 Web开发集成特性,例如多文件上传功能、使用的Servlet监听器的loC容器初始化以及Web 应用上下文
- Spring-webmvc模块:也称为web-Servlet模块,包含用于web应用程序的Spring MVC和REST Web Services实现。Spring MVC框架提供了领域模型代码和web表单之间的清晰分离,并与Spring Framework的所有其他功能集成
- Spring-websocket模块:Spring4.0以后新增的模块,它提供了WebSocket和SocketJS的实现
- Spring-webflux模块:是一个新的非堵塞函数式Reactive Web 框架,可以用来建立异步的,非阻塞,事件驱动的服务,并且扩展性非常好
4.3 Core Container(核心容器)
- Beans模块:提供了BeanFactory,是工厂模式的经典实现,Spring 将管理对象称为Bean
- Core核心模块:提供了Spring 框架的基本组成部分,包括loC和DI功能。
- Context上下文模块:建立在核心和Beans模块的基础之上,是访问定义和配置任何对象的媒介,ApplicationContext接口是上下文模块的焦点
- Expression Language模块:是运行时查询和操作对象图的强大的表达式语言。是对JSP2.1规范中规定的统一表达式语言(Unified EL)的扩展
4.4 其他模块
- AOP模块:提供了面向切面编程实现,允许定义方法拦截器和切入点,将代码按照功能进行分离,以降低耦合性
- Aspects模块:提供与AspectJ的集成,是一个功能强大且成熟的面向切面编程(AOP)框架
- Instrumentation模块:提供了类工具的支持和类加载器的实现,可以在特定的应用服务器中使用
- Test模块:支持Spring 组件,使用JUnit或TestNG框架的测试
5、jar包下载
下载地址
- -dist后缀表示该文件夹下存放的是 jar包,文档和xsd文件
- -docs后缀表示该文件夹下存放相关文档、开发指南和API
- -schema里存放了Spring所用的xsd文件
libs目录文件说明:
- .RELEASE.jar:开发时需要引用的jar
- .RELEASE-javadoc. jar:文档
- .RELEASE-sources.jar:源码
SpringIOC容器
1、SpringIOC容器简介
1.1 IOC思想
IOC (Inversion of Control)是指在程序开发中,对象实例的创建不再由调用者管理,而是由Spring容器创建。Spring容器会负责控制程序之间的关系,而不是由程序代码直接控制,因此,控制权由程序代码转移到了Spring容器中,控制权发生了反转,这就是Spring 的Ioc思想。
1.2 IOC容器概念
IOC容器就是具有依赖注入功能的容器,lOC容器负责实例化、定位、配置应用程序中的对象及建立这些对象间的依赖。应用程序无需直接在代码中new相关的对象,应用程序由IOc容器进行组装。在Spring 中 BeanFactory是Ioc容器的实际代表者。
1.3 Bean的概念
在Spring中,被Spring容器所管理的对象称之为"Bean”对象。一个Spring的 Bean对象可以是任何形式的POJO。
2、SpringIOC容器类型
Spring提供了两种loC容器,分别为BeanFactory和 ApplicationContext。
2.1 BeanFactory
BeanFactory是基础类型的loC容器。
它由org.springframework.beans.facytory.BeanFactory 接口定义,并提供了完整的loC服务支持。简单来说,BeanFactory 就是一个管理Bean的工厂,它主要负责初始化各种Bean,并调用它们的生命周期方法。
2.2 ApplicationContext
ApplicationContext是 BeanFactory 的子接口,也被称为应用上下文。该接口的全路径为org.springframework.context.ApplicationContext,它不仅提供了 BeanFactory 的所有功能,还添加了对国际化、资源访问、事件传播等方面的良好支持。
ApplicationContext接口有两个常用的实现类:
-
ClassPathXmlApplicationContext
该类从类路径ClassPath中寻找指定的 XML配置文件,找到并装载完成ApplicationContext的实例化工作。Ap plicationContext applicationContext = new ClassPathXmlApplicationContext(String configLocation);FileconfigLocation参数用于指定Spring 配置文件的名称和位置。
-
SystemXmlApplicationContext
该类从指定的文件系统路径中寻找指定的 XML配置文件,找到并装载完成ApplicationContext的实例化工作。ApplicationContext applicationContext = new FileSystemXmIApplicationContext(String configLocation)它与ClassPathXmIApplicationContext的区别是∶在读取Spring 的配置文件时,FileSystemXmlApplicationContext 不再从类路径中读取配置件,而是通过参数指定配置文件的位置,它可以获取类路径之外的资源,如"F:/workspaces/applicationContext.xml";
3、SpringIOC容器的使用
3.1 搭建环境
创建项目
添加jar包
添加spring配置文件 applicationContext.xml
<beans xmlns-="http://www.springframework.org/schema/beans"
       xmlns:xsi="http://www.w3.org/2001/XMLSchema-instance"
       xsi:schemaLocation="http://www.springframework.org/schema/beans http://www.springframework.org/schema/beans/spring-beanx.xsd">

beans>
3.2 通过IoC容器管理Bean对象
创建UsersService接口与实现类
public interface UsersService {
    void addUsers();
}
public class UsersServiceImpl implements UsersService {
    @Override
    public void addUsers() {
        System.out.println("UsersService addUsers...");
    }
}
修改配置文件
<bean id="usersService" class="com.bjsxt.service.impl.UsersServiceImpl"/>
获取IoC容器中的对象
// 启动spring IoC容器
ApplicationContext applicationContext = new ClassPathXmlApplicationContext("applicationContext.xml");
// 从IoC容器中获取对象
UsersService usersService = (UsersService) applicationContext.getBean("usersService");
usersService.addUsers();
3.3 使用IoC容器创建Bean对象的三种方式
3.3.1 通过构造方法创建
public UsersServiceImpl(UsersDao usersDao) {
    this.usersDao = usersDao;
}
<bean id="usersDao" class="com.bjsxt.dao.impl.UsersDaoImplMybatis"/>

<bean id="usersService" class="com.bjsxt.service.impl.UsersServiceImpl">
    <constructor-arg name="usersDao">
        <ref bean="usersDao2"/>
    constructor-arg>
bean>
3.3.2 使用静态工厂方法创建
创建静态工厂方法
public class ObjectFactory {
    public static UsersService getInstance(){
        return new UsersServiceImpl();
    }
}
修改配置文件
<bean id="usersService2" class="com.bjsxt.factory.ObjectFactory" factory-method="getInstance"/>
创建测试类
public class ObjectFactoryTest {
    public static void main(String[] args) {
        ApplicationContext applicationContext = new ClassPathXmlApplicationContext("applicationContext.xml");

        // 为什么构造方法会执行两次?
        UsersService usersService = (UsersService) applicationContext.getBean("usersService2");
        usersService.addUsers();
    }
}
3.3.3 使用动态工厂方法创建
创建静态工厂方法
public class DynamicObjectFactory {
    public UsersService getInstance(){
        return new UsersServiceImpl();
    }
}
修改配置文件
<bean id="dynamicObjectFactory" class="com.bjsxt.factory.DynamicObjectFactory"/>
<bean id="usersService3" factory-bean="dynamicObjectFactory" factory-method="getInstance"/>
创建测试类
public class DynamicObjectFactoryTest {
    public static void main(String[] args) {
        ApplicationContext applicationcontext = new ClassPathXmlApplicationContext("applicationContext.xml");

        // 为什么构造方法会执行三次?启动Spring会把配置文件中bean标签代表的对象全部实例化
        UsersService usersService = (UsersService)applicationcontext.getBean("usersService3");
        usersService.addUsers();
    }
}
3.4 在IoC容器中获取Bean对象的方式
3.4.1 通过id或name获取
applicationContext.getBean(id|name);
配置文件
<bean id="usersService" name="name1,name2,name3" class="com.bjsxt.service.impl.UsersServiceImpl"/>
获取bean对象
UsersService usersService = (UsersService) applicationContext.getBean("name3");
usersService.addUsers();
3.4.2 通过类型获取
// 要求类型必须是唯一的
applicationContext.getBean(Class clazz);
获取bean对象
// 通过类型获取Bean对象
UsersService UsersService = applicationContext.getBean(UsersServiceImpl.class);
UsersService.addUsers();
3.4.3 通过id或name与类型获取Bean对象
在SpringlOC容器中,通过类型获取对象时,如果同一类型存在多个对象,我们可以使用id或name来识别需要获取的对象。
// 方式一:通过id|name区别获取Bean对象
/*UsersService UsersService = applicationContext.getBean("usersService",UsersServiceImpl.class);
UsersService.addUsers();*/

// 方式二:先获取所有bean的id,在选择获取Bean对象的那个Id
String[] beanDefinitionNames = applicationContext.getBeanDefinitionNames();
for(String beanId:beanDefinitionNames){
    System.out.println(beanId);
}
UsersService usersService = (UsersServiceImpl)applicationContext.getBean(beanDefinitionNames[0]);
usersService.addUsers();
3.5 实例化Bean对象的策略
3.5.1 实例化对象策略
Spring lOC容器在启动时默认的会将在配置文件中所配置的所有Bean对象立即进行实例化,并保存在IOC容器中。我们可以通过bean标签lazy-init属性的实现延迟实例化对象。
注意:lazy-init="false"只对scope属性为singleton才有效,如果scope属性为pototype时,无论lazy-init的属性值是什么,都只在调用getbean()方法时才进行实例化。
立即创建
lazy-init=“false”(默认)
在Spring lOc容器启动时会实例化配置文件中的所有Bean对象。
延迟创建
lazy-init=“true”
当调用getBean方法是创建对象。
修改配置文件
<bean id="usersService" name="name1,name2,name3" class="com.bjsxt.service.impl.UsersServiceImpl" lazy-init="true"/>


<bean id="usersService2" class="com.bjsxt.factory.ObjectFactory" factory-method="getInstance"/>
创建测试类
public class LazyInitTest {
    public static void main(String[] args) {
        ApplicationContext applicationContext = new ClassPathXmlApplicationContext("applicationContext.xml");
        System.out.println("-------------");
        applicationContext.getBean("usersService");
    }
}
3.5.2 Bean对象的作用域
作用域:作用域限定了Spring Bean的作用范围,在Spring配置文件定义Bean时,通过声明scope配置项,可以灵活定义Bean的作用范围。
scope属性的值:
- singleton
- prototype
singleton(单例)
singleton为scope属性的默认值。当scope属性的值为singleton时,Spring lOC容器启动时会立即实例化一次Bean对象,并一直被Spring lOC容器所缓存,所以生命周期较长。
singleton特点:
- Spring lOC容器启动时会创建Bean对象
- 每次调用getBean都返回spring容器中的唯一的对象
[外链图片转存失败,源站可能有防盗链机制,建议将图片保存下来直接上传(img-b2mp7fgj-1635998772940)(C:\Users\86150\AppData\Roaming\Typora\typora-user-images\image-20211101105408187.png)]
prototype(多例)
当scope属性的值为prototype时,每次调用调用getBean方法时都会返回一个新的Bean对象,Spring lOC容器并不会缓存该对象,所以就不再负责管理它的生命周期。
prototype特点:
- Spring loc容器启动时不会创建Bean对象。
- 每次调用getBean都会创建一个新Bean对象。
DI 依赖注入
对于Spring lOC容器而言我们更多的是使用它的依赖注入。Spring创建对象的过程叫做IOC,创建对象时给对象属性赋值叫做DI,所以我们可以认为IOC和DI是同一个事情。
1、什么是依赖注入
DI (Dependency lnjection):依赖注入是指在Spring IOC容器创建对象的过程中,将所依赖的对象通过配置进行注入。我们可以通过依赖注入的方式来降低对象间的耦合度。
在软件工程中,对象之间的耦合度就是对象之间的依赖性。对象之间的耦合越高,维护成本越高,因此对象的设计应使对象之间的耦合越小越好。
类的关系
继承 实现 依赖 组合 聚合 关联
依赖关系
【依赖关系】∶是一种使用的关系,即一个类的实现需要另一个类的协助,所以要尽量不使用双向的互相依赖
【代码表现】︰局部变量、方法的参数或者对静态方法的调用
【箭头及指向】∶带箭头的虚线,指向被使用者
聚合(Aggregation)
【聚合关系】∶是整体与部分的关系,如车和轮胎是整体和部分的关系;聚合关系是关联关系的一种,是强的关联 关系;关联和聚合在语法上无法区分,必须考察具体的逻辑关系。
【代码体现】∶成员变量
【箭头及指向】︰带空心菱形的实心线,菱形指向整体
关系强度
继承 = 实现 > 组合 > 聚合 > 关联 > 依赖
2、为什么使用依赖注入
2.1 开闭原则
定义
oCP(Open Close Principle):软件本身应该是可扩展的,而不可修改的。也就是,对扩展开放,对修改封闭的。
开闭原则优点
- 易扩展。开闭原则的定义就要求对扩展开放
- 易维护。软件开发中,对现有代码的修改是一件很有风险的事情,符合开闭原则的设计在扩展时无需修改现有代码,规避了这个风险,大大提交了可维护性
2.2 高内聚,低耦合
- 高内聚是指相关度比较高的部分尽可能的集中,不要分散
- 低耦合就是说两个相关的模块尽可以能把依赖的部分降低到最小,不要产生强依赖。
- 面向接口编程,高可扩展性
修改配置文件
<bean id="usersDao1" class="com.bjsxt.dao.impl.UsersDaoImplJDBC"/>
<bean id="usersDao2" class="com.bjsxt.dao.impl.UsersDaoImplMybatis"/>
<bean id="usersService" name="name1,name2,name3" class="com.bjsxt.service.impl.UsersServiceImpl">
    <property name="usersDao">
        <ref bean="usersDao2"/>
    property>
bean>
修改UsersServiceImpl
添加成员变量、添加相应的get、set方法
public class UsersServiceImpl implements UsersService {
    private UsersDao usersDao;

    public UsersDao getUsersDao() {
        return usersDao;
    }

    public void setUsersDao(UsersDao usersDao) {
        this.usersDao = usersDao;
    }

    public UsersServiceImpl() {
        System.out.println("UsersServiceImpl init...");
    }

    @Override
    public void addUsers() {
        usersDao.insertUsers();
        // System.out.println("UsersService addUsers...");
    }
}
创建测试类
public class DITest {
    public static void main(String[] args) {
        ApplicationContext applicationcontext = new ClassPathXmlApplicationContext("applicationContext.xml");
        UsersService usersService = (UsersService)applicationcontext.getBean("name1");
        usersService.addUsers();
    }
}
3、依赖注入的方式
在使用依赖注入时,如果注入的是Bean对象,那么要求注入的Bean对象与被注入的Bean对象都需要Sring IOc容器来实例化。
3.1 通过Set方法注入
需要为注入的成员变量提供set方法。
配置文件
<bean id="usersDao2" class="com.bjsxt.dao.impl.UsersDaoImplMybatis"/>
<bean id="usersService" name="name1,name2,name3" class="com.bjsxt.service.impl.UsersServiceImpl">
    <property name="usersDao" ref="UsersDaoImplMybatis"/>
bean>
3.2 通过构造方法注入
Bean对象中需要提供有参的构造方法
配置文件
<bean id="usersDao1" class="com.bjsxt.dao.impl.UsersDaoImplJDBC"/>
<bean id="usersDao2" class="com.bjsxt.dao.impl.UsersDaoImplMybatis"/>


<bean id="usersService" name="name1,name2,name3" class="com.bjsxt.service.impl.UsersServiceImpl">


    <constructor-arg type="com.bjsxt.dao.UsersDao" ref="usersDao2"/>
bean>
3.3 自动注入
自动注入的方式有两种,一种是全局配置自动注入,另一种是局部配置自动注入。无论全局配置或局部单独配置,都有5个值可以选择:
- no:当autowire设置为no的时候,Spring就不会进行自动注入。
- byName:在Spring容器中查找id与属性名相同的bean,并进行注入。需要提供set方法
- byType:在Spring容器中查找类型与属性名的类型相同的bean,并进行注入。需要提供set方法
- constructor:仍旧是使用byName方式,只不过注入的时候,使用构造方式进行注入
- default:全局配置的default相当于no,局部的default表示使用全局配置设置
【注意】
byName 要注入的对象的属性名和配置文件中的id必须一致
byType 类型满足要求即可,不能同时有多个
局部自动注入
通过bean标签中的autowier属性配置自动注入。
有效范围:仅针对当前bean标签生效。
<bean id="usersService" name="name1,name2,name3" class="com.bjsxt.service.impl.UsersServiceImpl" autowire="byType">
全局自动注入
通过beans标签中的default-autowire属性配置自动注入。
<beans xmlns="http://www.springframework.org/schema/beans"
       xmlns:xsi="http://www.w3.org/2001/XMLSchema-instance"
       xsi:schemaLocation="http://www.springframework.org/schema/beans
       http://www.springframework.org/schema/beans/spring-beans.xsd"
       default-autowire="byName">
    <bean id="usersDao" class="com.bjsxt.dao.impl.UsersDaoImplMybatis"/>
beans>
4、依赖注入的数据类型
4.1 注入Bean对象
方式一
<property name="FieldName">
    <ref bean="BeanID"/>
property>
方式二
<property name="FieldName" ref="BeanID"/>
4.2 注入基本数据类型和字符串
方式一
<property name="FieldName">
    <value>contentvalue>
property>
方式二
<property name="FieldName" value="Content" />
测试
<bean id="usersService" name="name1,name2,name3" class="com.bjsxt.service.impl.UsersServiceImpl">
    <property name="usersDao" ref="usersDao"/>
    <property name="username">
        <value>oldluvalue>
    property>
    <property name="userage" value="25"/>
bean>
4.3 注入List
<property name="FieldName">
    <list>
        <value/>或者<bean/>或者<ref/> ......
    list>
property>
测试
<bean id="usersService" name="name1,name2,name3" class="com.bjsxt.service.impl.UsersServiceImpl">
      <property name="list">
          <list>
              <value>bjsxtvalue>
              <value>oldluvalue>
              <value>gaoqivalue>
          list>
      property>
      <property name="users">
          <list>
              <bean class="com.bjsxt.pojo.Users">
                  <property name="username" value="admin"/>
                  <property name="userage" value="20"/>
              bean>
              <bean class="com.bjsxt.pojo.Users">
                  <property name="username" value="meimei"/>
                  <property name="userage" value="16"/>
              bean>
          list>
      property>
  bean>
4.4 注入Set
<property name="FieldName">
    <set>
        <value/>或者<bean/>或者<ref/>......
    set>
property>
4.5 注入Map
方式一
<property name="FieldName">
    <map>
        <entry key="KeyName " value="Content"/>
    map>
property>
方式二
<bean id="" name="" class="">
    <property name="FieldName ">
        <map>
            <entry key="key1" value-ref="users1"/>
            <entry key="key2" value-ref="users2"/>
        map>
    property>
bean>

<bean id="users1" class="com.bjsxt.pojo.Users">
    <property name="username" value="admin-map"/>
    <property name="userage" value="20"/>
bean>
<bean id="users2" class="com.bjsxt.pojo.Users">
    <property name="username" value="meimei-map"/>
    <property name="userage" value="16"/>
bean>
4.6 注入Properties
<property name="FieldName">
    <props>
        <prop key="KeyName ">Contentprop>props>
property>
<property name="properties">
    <props>
        <prop key="pro1">001prop>
        <prop key="pro2">002prop>
    props>
property>
Spring整合持久层技术
1、Spring整合JDBC
Spring为了提供对JDBC的支持,在JDBC API的基础上封装了一套实现用于简化JDBC操作的模板。
JDBC模板的设计目的是为不同类型的JDBC操作提供模板方法,每个模板方法都能控制整个过程,通过这种方式,可以在尽可能保留灵活性的情况下,将数据库存取的工作量降到最低。
1、搭建环境
创建项目

添加jar包

创建配置文件 applicationContext.xml
<beans xmlns="http://www.springframework.org/schema/beans"
       xmlns:xsi="http://www.w3.org/2001/XMLSchema-instance"
       xsi:schemaLocation="http://www.springframework.org/schema/beans
       http://www.springframework.org/schema/beans/spring-beans.xsd">
beans>
创建实体类
package com.bjsxt.pojo;

public class Users {
    private int userid;
    private String username;
    private String usersex;

    public int getUserid() {
        return userid;
    }

    public void setUserid(int userid) {
        this.userid = userid;
    }

    public String getUsername() {
        return username;
    }

    public void setUsername(String username) {
        this.username = username;
    }

    public String getUsersex() {
        return usersex;
    }

    public void setUsersex(String usersex) {
        this.usersex = usersex;
    }

    @Override
    public String toString() {
        return "Users{" +
                "userid=" + userid +
                ", username='" + username + '\'' +
                ", usersex='" + usersex + '\'' +
                '}';
    }
}
创建持久层
public interface UsersDao {
}
public class UsersDaoImpl implements UsersDao {
}
创建业务层
public interface UsersService {
}
public class UsersServiceImpl implements UsersService {
    private UsersDao usersDao;

    public UsersDao getUsersDao() {
        return usersDao;
    }

    public void setUsersDao(UsersDao usersDao) {
        this.usersDao = usersDao;
    }
}
2、配置Spring
配置解析properties文件
添加db.properties文件
jdbc.driver=com.mysql.jdbc.Driver
jdbc.url=jdbc:mysql://localhost:3306/bjsxt?useSSL=false
jdbc.username=root
jdbc.password=1615
修改spring配置文件 添加context命名空间
xmlns:context="http://www.springframework.org/schema/context"

http://www.springframework.org/schema/context
http://www.springframework.org/schema/context/spring-context.xsd
<beans xmlns="http://www.springframework.org/schema/beans"
       xmlns:xsi="http://www.w3.org/2001/XMLSchema-instance"

    <context:property-placeholder location="db.properties"/>
beans>
3、配置数据源
什么是数据源
JDBC2.0提供了javax.sql.DataSource接口,在接口中定义获取Connection对象的标准。
数据源的作用是负责建立与数据库的连接,当在应用程序中访问数据库时不必编写数据库连接代码,直接引用DataSource获取操作数据库的Connection对象即可。
添加数据源配置
<bean id="dataSource" class="org.springframework.jdbc.datasource.DriverManagerDataSource">
    <property name="driverClassName" value="${jdbc.driver}"/>
    <property name="url" value="${jdbc.url}"/>
    <property name="username" value="${jdbc.username}"/>
    <property name="password" value="${jdbc.password}"/>
bean>
4、配置JDBCTemplate
<bean id="jdbcTemplate" class="org.springframework.jdbc.core.JdbcTemplate">
    <property name="dataSource" ref="dataSource"/>
bean>
5、配置其他Bean对象的依赖注入
配置持久层
<bean id="usersDao" class="com.bjsxt.dao.impl.UsersDaoImpl">
    <property name="jdbcTemplate" ref="jdbcTemplate"/>
bean>
配置业务层
<bean id="usersService" class="com.bjsxt.service.impl.UsersServiceImpl">
    <property name="usersDao" ref="usersDao"/>
bean>
6、JDBCTemplate的使用
1、指定单条DML语句
修改持久层
public interface UsersDao {
    int insertUsers(Users users);
}
/**
 * 添加用户
 * @param users
 * @return
 */
@Override
public int insertUsers(Users users) {
    String sql = "insert into users values(default,?,?)";
    Object[] params = new Object[]{users.getUsername(),users.getUsersex()};
    return this.jdbcTemplate.update(sql,params);
}
修改业务层
public interface UsersService {
    int addUsers(Users users);
}
/**
 * 添加用户
 * @param users
 * @return
 */
@Override
public int addUsers(Users users) {
    return this.usersDao.insertUsers(users);
}
创建测试类
public class AddUsersTest {
    public static void main(String[] args) {
        ApplicationContext applicationContext = new ClassPathXmlApplicationContext("applicationContext.xml");
        UsersService usersService = (UsersService)applicationContext.getBean("usersService");

        Users users = new Users();
        users.setUsername("spring-1");
        users.setUsersex("compute");
        int i = usersService.addUsers(users);
        System.out.println(i);
    }
}
2、批量执行DML语句
修改持久层
int[] BatchInsertUsers(List<Users> users);
/**
 * 批量添加用户
 * @param users
 * @return
 */
@Override
public int[] BatchInsertUsers(List<Users> users) {
    String sql = "insert into users values(default,?,?)";

    // BatchPreparedStatementSetter是一个接口,使用匿名内部类new一个
    BatchPreparedStatementSetter setter = new BatchPreparedStatementSetter() {

        // 设置预编译对象的参数,提供了List的迭代因子 int i
        @Override
        public void setValues(PreparedStatement preparedStatement, int i) throws SQLException {
            Users temp = users.get(i);
            preparedStatement.setObject(1,temp.getUsername());
            preparedStatement.setObject(2,temp.getUsersex());
        }

        // 返回值为批量操作的总数
        @Override
        public int getBatchSize() {
            return users.size();
        }
    };
    this.jdbcTemplate.batchUpdate(sql,setter);
    return new int[0];
}
修改业务层
int[] addUsers(List<Users>users);
/**
 * 批量添加用户
 * @param users
 * @return
 */
@Override
public int[] addUsers(List<Users> users) {
    return this.usersDao.BatchInsertUsers(users);
}
创建测试类
public class BatchAddUsersTest {
    public static void main(String[] args) {
        ApplicationContext applicationContext = new ClassPathXmlApplicationContext("applicationContext.xml");
        UsersService usersService = (UsersService)applicationContext.getBean("usersService");

        Users users1 = new Users();
        users1.setUsername("suibian-1");
        users1.setUsersex("c-1");

        Users users2= new Users();
        users2.setUsername("suibian-2");
        users2.setUsersex("c-2");

        List<Users> list = new ArrayList<>();
        list.add(users1);
        list.add(users2);
        int[] ints = usersService.addUsers(list);
        System.out.println(ints);
    }
}
3、查询返回单条数据
修改持久层
Users selectUsersById(int userid);
/**
 * 根据ID查询用户
 * @param userid
 * @return
 */
@Override
public Users selectUsersById(int userid) {
    String sql = "select * from users where userid = ?";
    Object[] params = new Object[]{userid};
    Users user = new Users();
    // jdbc没有ORM,无法处理查询返回的结果集
    // 通过匿名内部类实现RowCallbackHandler接口建立对象关系映射
    this.jdbcTemplate.query(sql, params, new RowCallbackHandler() {
        @Override
        public void processRow(ResultSet resultSet) throws SQLException {
            user.setUserid(resultSet.getInt("userid"));
            user.setUsername(resultSet.getString("username"));
            user.setUsersex(resultSet.getString("usersex"));
        }
    });
    return user;
}
修改业务层
Users findUsersById(int userid);
/**
 * 根据ID查询用户
 * @param userid
 * @return
 */
@Override
public Users findUsersById(int userid) {
    return this.usersDao.selectUsersById(userid);
}
创建测试类
public class FindUsersByIdTest {
    public static void main(String[] args) {
        ApplicationContext applicationContext = new ClassPathXmlApplicationContext("applicationContext.xml");
        UsersService usersService = (UsersService)applicationContext.getBean("usersService");
        Users user = usersService.findUsersById(55);
        System.out.println(user);
    }
}
4、查询返回多条数据
修改持久层
List<Users> selectUsersByName(String username);
/**
 * 查询返回多条数据 按姓名
 * 使用匿名内部类的方式实现RowMapper接口,完成结果集和pojo类的映射
 * @param username
 * @return
 */
@Override
public List<Users> selectUsersByName(String username) {
    String sql = "select * from users where username = ?";
    Object[] params = new Object[]{username};

    return this.jdbcTemplate.query(sql, params, new RowMapper<Users>() {
        @Override
        public Users mapRow(ResultSet resultSet, int i) throws SQLException {
            Users user = new Users();
            user.setUserid(resultSet.getInt("userid"));
            user.setUsername(resultSet.getString("username"));
            user.setUsersex(resultSet.getString("usersex"));
            return user;
        }
    });
}
修改业务层
List<Users> findUsersByName(String username);
/**
 * 根据姓名查询用户 返回多条数据
 * @param username
 * @return
 */
@Override
public List<Users> findUsersByName(String username) {
    return this.usersDao.selectUsersByName(username);
}
创建测试类
public class FindUsersByNameTest {
    public static void main(String[] args) {
        ApplicationContext applicationContext = new ClassPathXmlApplicationContext("applicationContext.xml");
        UsersService usersService = (UsersService)applicationContext.getBean("usersService");
        List<Users> users = usersService.findUsersByName("xi_tu");
        users.forEach(System.out::println);
    }
}
5、查询多条数据简化版
通过BeanPropertyRowMapper完成对象的映射处理
修改持久层
List<Users> selectUsersByName1(String username);
/**
 * 查询返回多条数据 简化版,增加映射关系
 * @param username
 * @return
 */
@Override
public List<Users> selectUsersByName1(String username) {
    String sql = "select * from users where username = ?";
    Object[] params = new Object[]{username};
    return this.jdbcTemplate.query(sql,params,new BeanPropertyRowMapper<>(Users.class));
}
修改业务层
List<Users> findUsersByName1(String username);
/**
 * 根据姓名查询用户 返回多条数据简化版
 * @param username
 * @return
 */
@Override
public List<Users> findUsersByName1(String username) {
    return this.usersDao.selectUsersByName1(username);
}
创建测试类
public class FindUsersByName1Test {
    public static void main(String[] args) {
        ApplicationContext applicationContext = new ClassPathXmlApplicationContext("applicationContext.xml");
        UsersService usersService = (UsersService)applicationContext.getBean("usersService");
        List<Users> users = usersService.findUsersByName1("xi_tu");
        users.forEach(System.out::println);
    }
}
7、JdbcDaoSupport的使用
创建持久层
作用:封装了JdbcTemplate对象,可以直接调用;这样持久层就不要手动添加JdbcTemplate属性了
public class UsersDaoImplSupport extends JdbcDaoSupport implements UsersDao {
    @Override
    public int insertUsers(Users users) {
        return 0;
    }

    @Override
    public int[] BatchInsertUsers(List<Users> users) {
        return new int[0];
    }

    @Override
    public Users selectUsersById(int userid) {
        return null;
    }

    @Override
    public List<Users> selectUsersByName(String username) {
        return null;
    }

    @Override
    public List<Users> selectUsersByName1(String username) {
        String sql = "select * from users where username = ?";
        Object[] params = new Object[]{username};
        return this.getJdbcTemplate().query(sql,params,new BeanPropertyRowMapper<>(Users.class));
    }
}
修改配置文件
<bean id="usersService" class="com.bjsxt.service.impl.UsersServiceImpl">
    <property name="usersDao" ref="usersDaoSupport"/>
bean>


<bean id="usersDaoSupport" class="com.bjsxt.dao.impl.UsersDaoImplSupport">
    <property name="dataSource" ref="dataSource"/>
bean>
【注意】UsersDaoImplSupport继承的超类JdbcDaoSupport,JdbcDaoSupport有一个setDataSource()的方法,需要传入dataSource数据源参数。
2、Spring整合Mybatis
1、jar包介绍
- Mybatis的jar包
- Spring的jar包
- Spring整合Mybatis的jar包
- 数据库驱动jar包
2、搭建环境
创建项目、添加jar包
创建配置文件
<beans xmlns="http://www.springframework.org/schema/beans"
       xmlns:xsi="http://www.w3.org/2001/XMLSchema-instance"
       xsi:schemaLocation="http://www.springframework.org/schema/beans
       http://www.springframework.org/schema/beans/spring-beans.xsd">
beans>
添加log4j.properties文件
log4j.rootLogger=debug,console,logfile

### appender.console输出到控制台 ###
log4j.appender.console=org.apache.log4j.ConsoleAppender
log4j.appender.console.layout=org.apache.log4j.PatternLayout
log4j.appender.console.layout.ConversionPattern=<%d> %5p (%F:%L) [%t] (%c) - %m%n
log4j.appender.console.Target=System.out

### appender.logfile输出到日志文件 ###
log4j.appender.logfile=org.apache.log4j.RollingFileAppender
log4j.appender.logfile.File=SysLog.log
log4j.appender.logfile.MaxFileSize=500KB
log4j.appender.logfile.MaxBackupIndex=7
log4j.appender.logfile.layout=org.apache.log4j.PatternLayout
log4j.appender.logfile.layout.ConversionPattern=<%d> %p (%F:%L) [%t] %c - %m%n
创建映射配置文件与接口
创建实体类

创建业务层
public interface UsersService {
}
public class UsersServiceImpl implements UsersService {
}
解析配置properties文件
1、添加db.properties文件
jdbc.driver=com.mysql.jdbc.Driver
jdbc.url=jdbc:mysql://localhost:3306/bjsxt?useSSL=false
jdbc.username=root
jdbc.password=1615
2、修改Spring配置文件
xmlns:context="http://www.springframework.org/schema/context"

http://www.springframework.org/schema/context
http://www.springframework.org/schema/context/spring-context.xsd
添加命名空间
配置解析properties文件的工具类
<beans xmlns="http://www.springframework.org/schema/beans"
       xmlns:xsi="http://www.w3.org/2001/XMLSchema-instance"

    <context:property-placeholder location="db.properties"/>
beans>
配置数据源
<bean id="dataSource" class="org.springframework.jdbc.datasource.DriverManagerDataSource">
    <property name="driverClassName" value="${jdbc.driver}"/>
    <property name="url" value="${jdbc.url}"/>
    <property name="username" value="${jdbc.username}"/>
    <property name="password" value="${jdbc.password}"/>
bean>
配置SqlSessionFactoryBean
SqlSessionFactoryBean是初始化 Mybatis框架的Bean对象。它是生产SqlSessionFactory的一种工厂Bean。在Spring 整合Mybatis 中,我们可以不需要 Mybatis 的配置文件,在该Bean对象中可以完成对Mybatis框架的配置。如果需要在Mybatis 的配置文件中配置Mybatis框架时,仍然可以使用Mybatis 的配置文件,但是需要在SqlSessionFactoryBean对象的configLocation属性中指定Mybatis 的配置文件的路径和名称。
<bean id="sqlSessionFactoryBean" class="org.mybatis.spring.SqlSessionFactoryBean">

    <property name="dataSource" ref="dataSource"/>

    <property name="typeAliasesPackage" value="com.bjsxt.pojo"/>

    <property name="mapperLocations" value="com/bjsxt/mapper/UsersMapper.xml"/>

bean>
配置SqlSessionTemplate
<bean id="sqlSessionTemplate" class="org.mybatis.spring.SqlSessionTemplate">

    <constructor-arg name="sqlSessionFactory" ref="sqlSessionFactoryBean"/>
bean>
配置业务层的依赖注入
接口实现类
public class UsersServiceImpl implements UsersService {
    private SqlSessionTemplate sqlSessionTemplate;

    public void setSqlSessionTemplate(SqlSessionTemplate sqlSessionTemplate) {
        this.sqlSessionTemplate = sqlSessionTemplate;
    }
}
配置文件
<bean id="usersService" class="com.bjsxt.service.impl.UsersServiceImpl">
    <property name="sqlSessionTemplate" ref="sqlSessionTemplate"/>
bean>
4、实现添加用户业务
修改业务层
void addUsers(Users users);
/**
 * 添加用户
 * @param users
 */
@Override
public void addUsers(Users users) {
    UsersMapper mapper = this.sqlSessionTemplate.getMapper(UsersMapper.class);
    mapper.insertSelective(users);
}
创建测试类
public class AddUsersTest {
    public static void main(String[] args) {
        ApplicationContext applicationContext = new ClassPathXmlApplicationContext("applicationContext.xml");
        UsersService usersService = (UsersService)applicationContext.getBean("usersService");
        Users users = new Users();
        users.setUsername("aa");
        users.setUsersex("aa-1");
        usersService.addUsers(users);
    }
}
5、实现查询用户业务
修改业务层
List<Users> selectUsersAll();
/**
 * 查询所有用户
 * @return
 */
@Override
public List<Users> selectUsersAll() {
    UsersMapper mapper = this.sqlSessionTemplate.getMapper(UsersMapper.class);
    UsersExample usersExample = new UsersExample();
    List<Users> list = mapper.selectByExample(usersExample);
    return list;
}
创建测试类
public class SelectUsersAllTest {
    public static void main(String[] args) {
        ApplicationContext applicationContext = new ClassPathXmlApplicationContext("applicationContext.xml");
        UsersService usersService = (UsersService)applicationContext.getBean("usersService");
        List<Users> list = usersService.selectUsersAll();
        list.forEach(System.out::println);
    }
}
6、SqlSessionDaoSupport的使用
创建业务层
public class UsersServiceImpl2 extends SqlSessionDaoSupport implements UsersService {
    @Override
    public void addUsers(Users users) {

    }

    @Override
    public List<Users> selectUsersAll() {
        UsersMapper mapper = this.getSqlSessionTemplate().getMapper(UsersMapper.class);
        UsersExample usersExample = new UsersExample();
        List<Users> list = mapper.selectByExample(usersExample);
        return list;
    }
}
修改配置文件
<bean id="usersService2" class="com.bjsxt.service.impl.UsersServiceImpl2">

    <property name="sqlSessionFactory" ref="sqlSessionFactoryBean"/>
bean>
创建测试类
public class SelectUsersAllTest {
    public static void main(String[] args) {
        ApplicationContext applicationContext = new ClassPathXmlApplicationContext("applicationContext.xml");
        UsersService usersService = (UsersService)applicationContext.getBean("usersService2");
        List<Users> list = usersService.selectUsersAll();
        list.forEach(System.out::println);
    }
}
7、MapperScannerConfigurer对象的使用
用于以自动扫描形式来配置MyBatis 中映射器对象,可以通过配置包路径来自动扫描包接口生成映射器对象。
创建业务层
public class UsersServiceImpl3 implements UsersService {
    private UsersMapper usersMapper;

    public void setUsersMapper(UsersMapper usersMapper) {
        this.usersMapper = usersMapper;
    }

    @Override
    public void addUsers(Users users) {

    }

    @Override
    public List<Users> selectUsersAll() {
        UsersExample usersExample = new UsersExample();
        List<Users> list = this.usersMapper.selectByExample(usersExample);
        return list;
    }
}
修改配置文件
<bean id="mapperScannerConfigurer" class="org.mybatis.spring.mapper.MapperScannerConfigurer">
    <property name="basePackage" value="com.bjsxt.mapper"/>
bean>
<bean id="UsersService3" class="com.bjsxt.service.impl.UsersServiceImpl3">
    <property name="usersMapper" ref="usersMapper"/>
bean>
创建测试类
public class SelectUsersAll2Test {
    public static void main(String[] args) {
        ApplicationContext applicationContext = new ClassPathXmlApplicationContext("applicationContext2.xml");
        UsersService usersService = (UsersService)applicationContext.getBean("usersService3");
        List<Users> list = usersService.selectUsersAll();
        list.forEach(System.out::println);
    }
}
【异常信息】不能解析com.bjsxt.mapper.UsersMapper???JDK版本问题,JDK17改为JDK1.8问题解决。
Failed to read candidate component class: file [F:\Java_Codes\springMybatisdemo\out\production\springMybatisdemo\com\bjsxt\mapper\UsersMapper.class]; nested exception is org.springframework.core.NestedIOException: ASM ClassReader failed to parse class file - probably due to a new Java class file version that isn't supported yet: file [F:\Java_Codes\springMybatisdemo\out\production\springMybatisdemo\com\bjsxt\mapper\UsersMapper.class]; nested exception is java.lang.IllegalArgumentException: Unsupported class file major version 61
代理模式
1、什么是代理模式
代理模式(Proxy Pattern)∶代理模式是Java常见的设计模式之一。所谓代理模式是指客户端并不直接调用实际的对象,而是通过调用代理对象,来间接的调用实际的对象。通俗的来讲代理模式就是我们生活中常见的中介。
2、为什么要使用代理模式
隔离作用:在某些情况下,一个客户类不想或者不能直接引用一个委托对象,而代理类对象可以在客户类和委托对象之间起到中介的作用,其特征是代理类和委托类实现相同的接口。
开闭原则:代理类除了是客户类和委托类的中介之外,我们还可以通过给代理类增加额外的功能来扩展委托类的功能,这样做我们只需要修改代理类而不需要再修改委托类,符合代码设计的开闭原则。
代理模式的优点
- 代理模式能将代理对象与真实对象被调用的目标对象分离
- —定程度上降低了系统的耦合度,扩展性好
- 保护目标对象
- 增强目标对象
代理模式的缺点
- 代理模式会造成系统设计中类的数目的增加
- 在客户端和目标对象增加一个代理对象,会造成请求处理速度变慢
- 增加了系统的复杂度
3、代理模式的实现
静态代理 动态代理
3.1 静态代理
静态代理由三部分组成:
- 一个公共接口
- 一个被代理角色
- 一个代理角色
创建公共接口
public interface Rent {
    void renting();
}
创建被代理角色
public class OldLu implements Rent{
    @Override
    public void renting() {
        System.out.println("OldLu有房出租");
    }
}
创建代理角色
public class StaticProxyRent implements Rent{
    private Rent rent;

    public StaticProxyRent(Rent rent) {
        this.rent = rent;
    }

    @Override
    public void renting() {
        System.out.println("向租客出租房屋");
        this.rent.renting();
        System.out.println("完成售后服务");
    }
}
创建测试类
public class StaticProxyTest {
    public static void main(String[] args) {
        Rent rent = new OldLu();
        StaticProxyRent staticProxyRent = new StaticProxyRent(rent);
        staticProxyRent.renting();
    }
}
3.2 通过JDK的Proxy类实现动态代理
在动态代理中分为两种实现方式:
- 使用JDK的Proxy类实现动态代理
- 使用CGLIB实现动态代理
3.2.1 使用JDK的Proxy类实现动态代理
创建公共接口
public interface JDKProxyRent {
    void renting();
}
创建被代理对象
public class JDKProxyOldLu implements JDKProxyRent {
    @Override
    public void renting() {
        System.out.println("OldLu有房出租");
    }
}
创建增强目标对象的切面类
public class MyAspect {
    public void before(){
        System.out.println("带领房客看房。。。签订租房协议");
    };
    public void after(){
        System.out.println("售后服务");
    }
}
创建生成代理对象的工厂类
public class JDKProxyFactory {
    /**
     * 动态生成代理对象
     */
    public static Object getProxyBean(Object target){
        MyAspect myAspect = new MyAspect();
        Class<?> clazz = target.getClass();
        /**
        * Proxy.newProxyInstance()方法,需要三个参数
        * 目标对象的类加载器、目标对象的接口、InvocationHandler接口实现(用于唤醒目标对象的方法)
        */
        return Proxy.newProxyInstance(clazz.getClassLoader(), clazz.getInterfaces(), new InvocationHandler() {
            /**
             * 对不同的代理对象,动态地生成方法
             * @param proxy 被代理对象
             * @param method 被代理对象的方法
             * @param args 传递到被代理对象方法的参数列表
             * @return
             * @throws Throwable
             */
            @Override
            public Object invoke(Object proxy, Method method, Object[] args) throws Throwable {
                myAspect.before();
                Object obj = method.invoke(target, args);
                myAspect.after();
                return obj;
            }
        });
    }
}
创建测试类
public class JDKProxyTest {
    public static void main(String[] args) {
        JDKProxyRent jdkProxyRent = new JDKProxyOldLu();
        JDKProxyRent jdkProxyRent1 = (JDKProxyRent)JDKProxyFactory.getProxyBean(jdkProxyRent);
        jdkProxyRent1.renting();
    }
}
3.2.2 使用CGLIB实现动态代理
CGLIB (Code Generation Library)是一个高性能开源的代码生成包,它被许多框架所使用,其底层是通过使用一个小而快的字节码处理框架ASM (Java字节码操控框架)转换字节码并生成新的类。因此 CGLIB要依赖于ASM的包。
JDK的动态代理机制只能代理实现了接口的类,而对于没有实现接口的类就不能使用JDK的Proxy类生成代理对象,cglib是针对类来实现代理的,他的原理是对指定的目标类生成一个子类并通过回调的方式来实现增强,但因为采用的是继承,所以不能对final修饰的类进行代理。
需要添加的jar包
- cglib.jar
- asm.jar
创建业务接口
public interface CGLIBProxyRent {
    void renting();
}
创建接口实现类
public class CGLIBProxyOldLu implements CGLIBProxyRent {
    @Override
    public void renting() {
        System.out.println("OldLu有房出租");
    }
}
创建生成代理对象的工厂
关键点:
- Enhancer对象
- 给Enhancer对象设置超类
- 调用Enhancer对象的setCallback()方法,参数为MethodInterceptor接口实现
public class CGLIBProxyBeanFactory {
    /**
     * 动态生成代理对象的方法
     */
    public static Object getProxyBean(CGLIBProxyRent rent){
        CGLIBMyAspect cglibMyAspect = new CGLIBMyAspect();
        Enhancer enhancer = new Enhancer();
        // 继承被代理对象,成为其子类
        enhancer.setSuperclass(rent.getClass());
        // 设置回调信息
        enhancer.setCallback(new MethodInterceptor() {
            /**
             *
             * @param o
             * @param method 被代理对象的方法
             * @param objects 传递到被代理对象方法的参数列表
             * @param methodProxy 被代理对象方法的代理对象(方法)
             * @return
             * @throws Throwable
             */
            @Override
            public Object intercept(Object o, Method method, Object[] objects, MethodProxy methodProxy) throws Throwable {
                cglibMyAspect.before();
                Object obj = method.invoke(rent, objects);
                cglibMyAspect.after();
                return obj;
            }
        });
        // 创建并返回代理对象
        return enhancer.create();
    }
}
创建切面
public class CGLIBMyAspect {
    public void before(){
        System.out.println("带客户看房子,签协议");
    }
    public void after(){
        System.out.println("售后服务");
    }
}
创建测试类
public class CBLIBProxyTest {
    public static void main(String[] args) {
        CGLIBProxyRent rent = new CGLIBProxyOldLu();
        CGLIBProxyRent rent1 = (CGLIBProxyRent)CGLIBProxyBeanFactory.getProxyBean(rent);
        rent1.renting();
    }
}
【一个未解决的异常信息】
java.lang.reflect.InaccessibleObjectException
Unable to make protected final java.lang.Class java.lang.ClassLoader.defineClass(java.lang.String,byte[],int,int,java.security.ProtectionDomain) throws java.lang.ClassFormatError accessible: module java.base does not "opens java.lang" to unnamed module @15327b79
	at java.base/java.lang.reflect.AccessibleObject.checkCanSetAccessible(AccessibleObject.java:354)
AOP编程
1、简介
什么是AOP
AOP的全称是Aspect Oriented Programming,即面向切面编程,它将业务逻辑的各个部分进行隔离,使开发人员在编写业务逻辑时可以专心于核心业务,从而提高了开发效率。AOP采取横向抽取机制,取代了传统纵向继承体系的重复性代码,其应用主要体现在事务处理、日志管理、权限控制、异常处理等方面。
目前最流行的AOP技术有两个,分别为Spring框架的AOP和AspectJ框架。
什么是面向切面编程
把一个个的横切关注点放到某个模块中去,称之为切面。每个切面影响业务的一种功能,切面的目的就是为了功能增强,将需要增强的方法做成切面,实现对业务的增强,就是面向切面编程。
面向切面编程的目的:将与业务本身无关,却被业务模块所共同调用的功能代码封装成切面,以减少系统的重复代码,降低耦合,提高可扩展性。
面向切面编程的优势:把多个方法前/后的共同代码抽离出来,使用动态代理机制来控制,先执行抽离出来的代码,再执行每一个真实方法。
2、AOP术语

3、Spring AOP模块
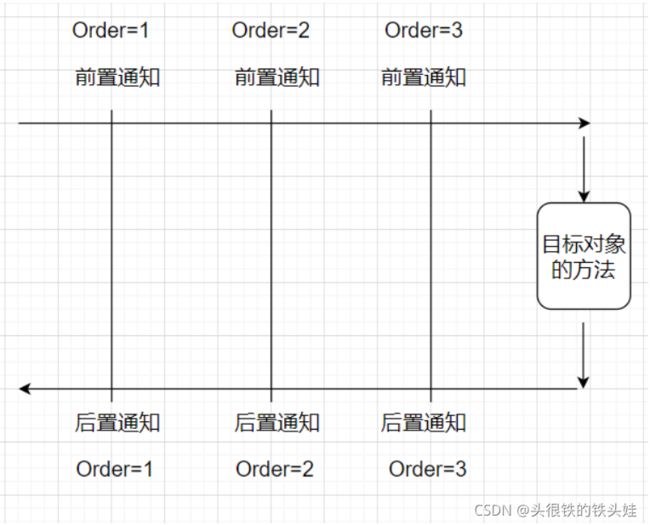
3.1 通知类型

3.2 使用
需要添加的jar包
-
核心容器的jar包
- spring-beans-5.2.7.RELEASE.jar
- spring-context-5.2.7.RELEASE.jar
- spring-core-5.2.7.RELEASE.jar
- spring-expression-5.2.7.RELEASE.jar
- spring-aop-5.2.7.RELEASE.jar
- spring-aspects-5.2.7.RELEASE.jar
-
AOP的jar包
- aspectjweaver-1.9.5.jar
-
日志jar包
common-logging-1.2.jar
切面类需要实现的接口
- 实现MethodBeforeAdvice接口,前置通知
- 实现AfterReturningAdvice接口,后置通知
- 实现 MethodInterceptor接口,环绕通知
- 实现ThrowsAdvice接口,异常通知
【注意】ThrowsAdvice接口是一个标识接口,没有任何抽象方法。如果通知类型定义为异常通知,那么除了要实现ThrowsAdvice 以外,还需要在切面中添加下面4个方法中的一个,并在该方法中实现具体的增强处理。
- public void afterThrowing(Exception ex)
- public void afterThrowing(RemoteException)
- public void afterThrowing(Method method, Object[] args, Object target, Exception ex)
- public void afterThrowing(Method method,Object[] args, Object target, ServletException ex)
一般的操作步骤
- 搭建环境,包括创建项目、导入jar包、添加applicationContext.xml文件
- 创建业务层(目标对象)
- 创建MyAspect切面类
- 在applicationContext.xml中添加命名空间
- 在applicationContext.xml中配置目标对象
- 在applicationContext.xml中配置切面对象
- 在applicationContext.xml中配置切面,关联目标对象和切面对象
- 创建测试类
3.2.1 一般使用
创建applicationContext.xml文件,添加AOP命名空间
<beans xmlns="http://www.springframework.org/schema/beans"
       xmlns:xsi="http://www.w3.org/2001/XMLSchema-instance"
       xmlns:aop="http://www.springframework.org/schema/aop"
       xsi:schemaLocation="http://www.springframework.org/schema/beans
       http://www.springframework.org/schema/beans/spring-beans.xsd http://www.springframework.org/schema/aop http://www.springframework.org/schema/aop/spring-aop.xsd">

beans>
创建切面
// 注意包名org.aopalliance
public class MyAspect implements MethodBeforeAdvice, AfterReturningAdvice, MethodInterceptor, ThrowsAdvice {
    /**
     * 前置通知
     * @param method 目标方法对象
     * @param objects 目标方法的参数列表
     * @param o 目标对象
     * @throws Throwable
     */
    @Override
    public void before(Method method, Object[] objects, Object o) throws Throwable {
        System.out.println("Before "+method.getName());
    }

    /**
     * 后置通知
     * @param o 目标方法的返回值
     * @param method 目标方法对象
     * @param objects 目标方法的参数列表
     * @param o1 目标对象
     * @throws Throwable
     */
    @Override
    public void afterReturning(Object o, Method method, Object[] objects, Object o1) throws Throwable {
        System.out.println("After "+method.getName());
    }

    /**
     * 环绕通知
     * @param methodInvocation 目标方法对象
     * @return
     * @throws Throwable
     */
    @Override
    public Object invoke(MethodInvocation methodInvocation) throws Throwable {
        System.out.println("Around...before "+methodInvocation.getMethod().getName());
        // 执行目标方法
        Object obj = methodInvocation.proceed();
        System.out.println("Around...After "+methodInvocation.getMethod().getName());
        return obj;
    }

    /**
     * 异常通知
     * @param e
     */
    public void afterThrowing(Exception e){
        System.out.println(e.getMessage());
    }
}
创建目标对象
public interface UsersService {
    void addUsers();
}

public class UsersServiceImpl implements UsersService {
    @Override
    public void addUsers() {
        System.out.println("addUsers...");
    }
}
配置ProxyFactoryBean(代理)对象
- 目标对象实现的接口 proxyInterface属性
- 目标对象 target属性
- 切面对象 interceptorNames属性,String[]
<bean id="usersService" class="com.bjsxt.service.impl.UsersServiceImpl"/>


<bean id="myAspect" class="com.bjsxt.aop.MyAspect"/>


<bean id="usersServiceProxy" class="org.springframework.aop.framework.ProxyFactoryBean">

    <property name="proxyInterfaces" value="com.bjsxt.service.UsersService"/>

    <property name="target" ref="usersService"/>


    <property name="interceptorNames">
        <list>
            <value>myAspectvalue>
        list>
    property>

    <property name="proxyTargetClass" value="true"/>
bean>
创建测试类
【注意】getBean()方法中传入的是代理对象,不是目标对象
public class Test {
    public static void main(String[] args) {
        ApplicationContext applicationContext = new ClassPathXmlApplicationContext("applicationContext.xml");
        // 传入代理对象,而不是目标对象
        UsersService usersService = (UsersService) applicationContext.getBean("usersServiceProxy");
        usersService.addUsers();
    }
}
3.2.2 使用案例
需求:在业务层的updateUsers操作之前,将UserName参数转为大写。
修改业务层
void updateUsers(String username);

@Override
public void updateUsers(String username) {
    System.out.println("updateUsers "+username);
}
创建切面类
- 实现MethodInterceptor接口
- 重写invoke()方法
public class ToUpperCaseAspect implements MethodInterceptor {

    @Override
    public Object invoke(MethodInvocation methodInvocation) throws Throwable {
        // 将username转为大写,先获得参数列表
        Object[] args = methodInvocation.getArguments();
        // toUpperCase()方法的返回值是一个新的字符串,将其放回参数列表数组中
        args[0] = ((String)args[0]).toUpperCase();

        Object obj = methodInvocation.proceed();
        return obj;
    }
}
配置切面
<bean id="toUpperCaseAspect" class="com.bjsxt.aop.ToUpperCaseAspect"/>

<bean id="usersServiceProxy" class="org.springframework.aop.framework.ProxyFactoryBean">

    <property name="proxyInterfaces" value="com.bjsxt.service.UsersService"/>

    <property name="target" ref="usersService"/>

    <property name="interceptorNames">
        <list>
            <value>myAspectvalue>
            <value>toUpperCaseAspectvalue>
        list>
    property>

    <property name="proxyTargetClass" value="true"/>
bean>
4、AspectJ框架
4.1 AspectJ框架简介
AspectJ是一个基于Java语言的AOP框架。在Spring 2.0以后,新增了对AspectJ框架的支持。在Spring框架中建议使用AspectJ框架开发AOP。
4.1.1 AspectJ框架的通知类型

4.1.2 Spring整合AspectJ框架所依赖的jar包
-
AspectJ框架jar包
aspectjweaver-1.9.5.jar
-
Spring框架jar包
spring-beans-5.2.7.RELEASE.jar
spring-context-5.2.7.RELEASE.jar
spring-core-5.2.7.RELEASE.jar
spring-expression-5.2.7.RELEASE.jarspring-aop-5.2.7.RELEASE.jar
spring-aspects-5.2.7.RELEASE.jarcommons-logging-1.2.jar
4.1.3 AspectJ框架配置AOP方式
-
通过XML文件配置
- 通过AspectJ配置方式
- 通过Spring的Schema_based方式
-
通过注解配置
4.2 AspectJ框架的使用
4.2.1 XML方式
4.2.1.1 通过AspectJ配置方式
AspectJ配置方式是指使用AspectJ框架的配置方式来配置切面。在使用AspectJ配置切面时,切面不需要实现一些特定的接口。
创建切面类
public class MyAspect {
    public void myBefore(JoinPoint joinPoint){
        // joinPoint.getTarget(); 获取目标对象
        // joinPoint.getSignature().getName(); 获取目标方法名
        // joinPoint.getArgs(); 获取目标方法参数列表
        // joinPoint.getThis(); 获取代理对象
        System.out.println("Before "+ joinPoint.getSignature().getName());
    }

    public void myAfterReturning(JoinPoint joinPoint){
        System.out.println("After "+ joinPoint.getSignature().getName());
    }

    public Object MyAround(ProceedingJoinPoint proceedingJoinPoint) throws Throwable {
        System.out.println("Around Before "+proceedingJoinPoint.getSignature().getName());
        Object obj = proceedingJoinPoint.proceed();
        System.out.println("Around After "+proceedingJoinPoint.getSignature().getName());
        return obj;
    }

    public void myAfterThrowing(Exception e){
        System.out.println("Exception "+e);
    }

    public void myAfter(){
        System.out.println("最终通知");
    }
}
【Execution表达式】用于配置切点
execution(public * com.bjsxt.service..*.*(..))
表示public修饰的,返回值类型为*的com.bjsxt.service包和其子孙包中的所有类的全部有参数方法

创建目标对象
public interface UsersService {
    void addUsers(String username);
}
public class UsersServiceImpl implements UsersService {
    @Override
    public void addUsers(String username) {
        System.out.println("addUsers "+username);
    }
}
开启AOP命名空间
配置目标对象、配置切面、配置切点
xmlns:aop="http://www.springframework.org/schema/aop"

http://www.springframework.org/schema/aop
http://www.springframework.org/schema/aop/spring-aop.xsd
<beans xmlns="http://www.springframework.org/schema/beans"
       xmlns:xsi="http://www.w3.org/2001/XMLSchema-instance"
       xmlns:aop="http://www.springframework.org/schema/aop"
       xsi:schemaLocation="http://www.springframework.org/schema/beans
       http://www.springframework.org/schema/beans/spring-beans.xsd http://www.springframework.org/schema/aop http://www.springframework.org/schema/aop/spring-aop.xsd">


    <bean id="usersService" class="com.bjsxt.aspectJ.service.impl.UsersServiceImple"/>


    <bean id="myAspect" class="com.bjsxt.aspectJ.aop.MyAspect"/>


    <aop:config>
        <aop:aspect ref="myAspect">

            <aop:pointcut id="myPointcut" expression="execution(* com.bjsxt.aspectJ.service.*.*(..))"/>


            <aop:before method="myBefore" pointcut-ref="myPointcut"/>

            <aop:after-returning method="myAfterReturning" pointcut-ref="myPointcut"/>

            <aop:around method="MyAround" pointcut-ref="myPointcut"/>

            <aop:after-throwing method="myAfterThrowing" pointcut-ref="myPointcut" throwing="e"/>

            <aop:after method="myAfter" pointcut-ref="myPointcut"/>
        aop:aspect>
    aop:config>
beans>
由于粗心将schema写成了shema,得到的一个让人又好气又好笑的异常
通配符的匹配很全面, 但无法找到元素 'aop:config' 的声明。
添加一个新的切面
public class MyAspect2 {
    // 添加一个前置通知
    public void myBefore(JoinPoint joinPoint){
        System.out.println("Aspect2 Before "+joinPoint.getSignature().getName());
    }
}
配置多切面及其顺序 通过order属性指定顺序
<bean id="usersService" class="com.bjsxt.aspectJ.service.impl.UsersServiceImpl"/>


<bean id="myAspect" class="com.bjsxt.aspectJ.aop.MyAspect"/>


<bean id="myAspect2" class="com.bjsxt.aspectJ.aop.MyAspect2"/>


<aop:config>
    <aop:aspect id="my1" ref="myAspect" order="2">

        <aop:pointcut id="myPointcut" expression="execution(* com.bjsxt.aspectJ.service.*.*(..))"/>

        <aop:before method="myBefore" pointcut-ref="myPointcut"/>

        <aop:after-returning method="myAfterReturning" pointcut-ref="myPointcut"/>

        <aop:around method="MyAround" pointcut-ref="myPointcut"/>

        <aop:after-throwing method="myAfterThrowing" pointcut-ref="myPointcut" throwing="e"/>

        <aop:after method="myAfter" pointcut-ref="myPointcut"/>
    aop:aspect>
    <aop:aspect id="my2" ref="myAspect2" order="1">
        <aop:pointcut id="mypointcut2" expression="execution(* com.bjsxt.aspectJ.service.*.*(..))"/>
        <aop:before method="myBefore" pointcut-ref="myPointcut2"/>
    aop:aspect>
aop:config>
测试类执行结果

【疑惑】第二个切面没有配置切点貌似也可以正常执行!
【结论】并不是一个切面执行完毕再执行另一个切面,还取决于通知的类型。最终通知类型在环绕通知类型之前。
4.2.2 Schema_based配置方式
Schema_based(基础模式)配置方式是指使用Spring AOP模块来定义切面并在AspectJ框架中对该切面进行配置。要求切面在定义通知类型时,需要实现特定接口。
创建切面
public class BasedMyAspect implements MethodBeforeAdvice, AfterReturningAdvice, MethodInterceptor, ThrowsAdvice {
    @Override
    public Object invoke(MethodInvocation methodInvocation) throws Throwable {
        System.out.println("around before");
        Object obj = methodInvocation.proceed();
        System.out.println("around after");
        return obj;
    }

    @Override
    public void afterReturning(Object o, Method method, Object[] objects, Object o1) throws Throwable {
        System.out.println("afterReturning");
    }

    @Override
    public void before(Method method, Object[] objects, Object o) throws Throwable {
        System.out.println("before");
    }

    public void afterThrowing(Exception e){
        System.out.println("Exception: "+e);
    }
}
配置切面 同样需要先开启AOP命名空间
<bean id="usersService" class="com.bjsxt.aspectJ.service.impl.UsersServiceImpl"/>


<bean id="basedMyAspect" class="com.bjsxt.aspectJ.aop.based.BasedMyAspect"/>


<aop:config>

   <aop:pointcut id="basedPointcut" expression="execution(* com.bjsxt.aspectJ.service.*.*(..))"/>

   <aop:advisor advice-ref="basedMyAspect" pointcut-ref="basedPointcut" />
aop:config>
不需要重复创建业务层代码,因为开启Spring读取的xml文件已经更改为applicationContextBased.xml,所以applicationContextAspectJ.xml中的切面就不会执行了。
配置多切面
- aop:advisor标签,配置多个切面
- order属性,指定执行顺序
创建另一个切面
public class BasedMyAspect2 implements MethodBeforeAdvice, AfterReturningAdvice, MethodInterceptor, ThrowsAdvice {
    @Override
    public void before(Method method, Object[] objects, Object o) throws Throwable {
        System.out.println("before2");
    }

    public void afterThrowing(Exception e){
        System.out.println("Exception2: "+e);
    }
}
配置切面
<bean id="basedMyAspect" class="com.bjsxt.aspectJ.aop.based.BasedMyAspect"/>


<bean id="basedMyAspect2" class="com.bjsxt.aspectJ.aop.based.BasedMyAspect2"/>


<aop:config>

    <aop:pointcut id="basedPointcut" expression="execution(* com.bjsxt.aspectJ.service.*.*(..))"/>

    <aop:advisor advice-ref="basedMyAspect" pointcut-ref="basedPointcut" order="2" />
    <aop:advisor advice-ref="basedMyAspect2" pointcut-ref="basedPointcut" order="1" />
aop:config>
4.2.2 注解方式
常用注解:

创建目标对象即业务层
public interface UsersService {
    void addUsers(String username);
}
public class UsersServiceImpl implements UsersService {
    @Override
    public void addUsers(String username) {
        System.out.println("UsersService...addUsers...");
    }
}
创建切面
@Aspect
public class MyAspect {

    /**
     * 一个空的方法,用于提供切点
     */
    @Pointcut("execution(* com.bjsxt.service.*.*(..))")
    public void pointCut(){}

    /**
     * 前置通知
     * @param joinPoint
     */
    // @Before(value="execution(* com.bjsxt.service.*.*(..))")
    @Before("pointCut()")
    public void before(JoinPoint joinPoint){
        System.out.println("aop before...");
    }

    /**
     * 后置通知
     * @param joinPoint
     */
    // @AfterReturning("execution(* com.bjsxt.service.*.*(..))")
    @AfterReturning("pointCut()")
    public void afterReturning(JoinPoint joinPoint){
        System.out.println("aop after-returning...");
    }

    /**
     * 环绕通知
     * @param proceedingJoinPoint
     * @return
     * @throws Throwable
     */
    // @Around("execution(* com.bjsxt.service.*.*(..))")
    @Around("pointCut()")
    public Object around(ProceedingJoinPoint proceedingJoinPoint) throws Throwable {
        System.out.println("aop around before...");
        Object obj = proceedingJoinPoint.proceed();
        System.out.println("aop around after...");
        return obj;
    }

    /**
     * 最终通知
     * @param joinPoint
     */
    // @After("execution(* com.bjsxt.service.*.*(..))")
    @After("pointCut()")
    public void after(JoinPoint joinPoint){
        System.out.println("aop after...");
    }

    /**
     * 异常通知
     * @param e
     */
    // @AfterThrowing(value="execution(* com.bjsxt.service.*.*(..))",throwing = "e")
    @AfterThrowing(value=("pointCut()"),throwing = "e")
    public void afterThrowing(Exception e){
        System.out.println("aop Exception "+e);
    }
}
(先开启命名空间) 配置目标对象 配置切面
<bean id="usersService" class="com.bjsxt.service.impl.UsersServiceImpl"/>

<bean id="myAspect" class="com.bjsxt.aop.MyAspect"/>


<aop:aspectj-autoproxy proxy-target-class="false"/>
创建测试类
public class Test {
    public static void main(String[] args) {
        ApplicationContext applicationContext = new ClassPathXmlApplicationContext("applicationContext.xml");
        UsersService usersService = (UsersService) applicationContext.getBean("usersService");
        usersService.addUsers("0101");
    }
}
配置多切面、执行顺序
在切面类中添加@Order注解,指定执行顺序。
<bean id="myAspect2" class="com.bjsxt.aop.MyAspect2"/>
Spring事务管理
1、简介
在Spring框架中事务管理有两种方式:一种是传统的编程式事务管理,即通过编写代码实现的事务管理:另一种是基于AOP技术实现的声明式事务管理。由于在Spring框架中,编程式事务管理很少使用,所以我们只对Spring 的声明式事务管理进行详细讲解。
Spring 的声明式事务管理在底层采用了AOP技术,其最大的优点在于无须通过编程的方式管理事务,只需要在配置文件中进行相关的规则声明,就可以将事务规则应用到业务逻辑中。
Spring实现声明式事务管理主要有两种方式:
- 基于XML文件方式的声明式事务管理
- 通过Annotation注解方式的声明式事务管理
2、原理
图太糊,不贴了
3、数据库事务的特性
3.1 什么是事务
事务是作为一个逻辑单元执行的一系列操作。一个事务必须有四个特性:原子性、一致性、隔离性、持久性。
3.2 事务的作用
事务对于数据库的作用是对数据的一系列操作,要么全部成功,要么全部失败,防止中间状态的出现,以确保数据库中的数据始终处于正确的状态。
3.3 事务的ACID特性
数据库的事务的ACID特性由数据库的事务管理系统来保证的。
一致性是事务的最终目的,原子性、隔离性、持久性都是为了实现一致性。
- 原子性(Atomicity):事务中的所有操作,作为一个整体像原子一样不可分割,要么全部成功,要么全部失败。
- 一致性(Consistency):事务的执行不能破坏数据库数据的完整性和一致性,一个事务在执行之前和执行之后,数据库都必须处于一致性状态。如果数据库系统在运行过程中发生故障,有些事务尚未完成就被迫中断,这些未完成的事务对数据库所作的修改有一部分已写入物理数据库,这时数据库就处于一种不正确的状态,也就是不一致的状态。
- 隔离性(Isolation):并发执行的事务不会相互影响,其对数据库的影响和它们串行执行时一样. HY如多个用户同时往一个账户转账,最后账户的结里应该和他们按先后次序转账的结果一样。
- 持久性(Durability):事务一旦提交,其对数据库的更新就是持久的。任何事务或系统故障都不会导致数据丢失。
3.4 事务的隔离性
3.4.1 不考虑隔离性可能导致的三个问题
脏读:指在一个事务处理过程里读取了另一个未提交的事务中的数据。
不可重复读:是指A事务读取到了B事务已经提交的更改数据,在同个时间段内,两次查询的结果不一致。
幻读(虚读)∶A事务读取到B事务提交的新增数据,幻象读一般发生在数据统计事务中。
3.4.2 解决办法——四种隔离级别

注意:
- 大多数数据库默认的事务隔离级别是Read committed,比如Sql Server , Oracle。
- Mysql的默认隔离级别是Repeatable read。
- 隔离级别的设置只对当前链接有效。对于使用MySQL命令窗口而言,一个窗口就相当于一个链接,当前窗口设置的隔离级别只对当前窗口中的事务有效;对于JDBC操作数据库来说,一个Connection对象相当于一个链接,而对于Connection对象设置的隔离级别只对该Connection对象有效,与其他链接Connection对象无关。
4、Spring事务管理器
在Spring框架中提供了多种事务管理器来进行事务管理。Spring 的事务管理器是基于AOP实现的。在Spring的事务管理器中包含了配置事务传播行为、隔离级别、只读和超时属性,这些属性提供了事务应用的方法和描述策略。
在Java EE项目开发经常会使用分层模式,Spring 的事务处理位于业务逻辑层,它提供了针对事务的解决方案。
4.1 Spring事务管理接口
在Spring的事务模块(spring-tx-5.2.7.RELEASE.jar)中包括事务管理的三个核心接口。
PlatformTransactionManager接口
PlatformTransactionManager接口是Spring 提供的事务管理器接口,用于管理事务。
Spring 将事务的配置详细信息封装到TransactionDefinition对象中,然后通过事务管理器的getTransaction()方法获得事务的状态(TransactionStatus),并对事务进行下一步的操作。
该接口中提供了三个事务操作方法,具体如下:
- TransactionStatus getTransaction (TransactionDefinition definition):用于获取事务状态信息
- void commit (TransactionStatus status):用于提交事务
- void rollback ( TransactionStatus status):用于回滚事务
TransactionDefinition接口
TransactionDefinition接口是事务定义的对象,提供了事务相关信息获取的方法,其中包括五个操作,具体如下:
- String getName():获取事务对象名称
- int getlsolationLevel():获取事务的隔离级别
- int getPropagationBehavior():获取事务的传播行为
- int getTimeout():获取事务的超时时间
- boolean isReadOnly():获取事务是否只读
TransactionStatus接口
TransactionStatus接口是事务的状态,它描述了某一时间点上事务的状态信息。其中包括六个操作,具体如下:
- void flush():刷新事务
- boolean hasSavepoint():获取是否存在保存点
- boolean isCompleted():获取事务是否完成
- boolean isNewTransaction():获取是否是新事务
- boolean isRollbackOnly():获取是否回滚
- void setRollbackOnly():设置事务回滚
4.2 Spring中的事务管理器
不同的事务管理器就是对上述三个接口做了不同的实现的切面。
| 事务管理器 | 作用 |
|---|---|
| org.springframework.jdbc.datasource.DataSourceTransactionManager | 针对JDBC技术提供的事务管理器,适用于:JDBC、Mybatis |
| org.springframework.orm.hibernate3.HibernateTransactionManager | 针对Hibernate框架提供的事务管理器 |
| org.springframework.orm.jpa.JpaTransactionManager | 针对JPA技术提供的事务管理器 |
| org.springframework.transaction.jta.JtaTransactionManager | 跨越多个事务管理源,使用于分布式事务管理 |
5、事务的传播行为
事务传播行为是指:多个含有事务的方法相互调用时,事务如何在这些方法间传播。

6、Spring声明式事务管理
两种实现方式:
- XML
- 注解式
6.1 jar包依赖
-
Spring核心容器模块
- spring-beans-5.2.7.RELEASE.jar
- spring-context-5.2.7.RELEASE.jar
- spring-core-5.2.7.RELEASE.jar
- spring-expression-5.2.7.RELEASE.jar
-
Spring JDBC模块
- spring-jdbc-5.2.7.RELEASE.jar
-
Spring事务模块
- spring-tx-5.2.7.RELEASE.jar
-
Spring AOP模块
- spring-aop-5.2.7.RELEASE.jar
-
AspectJ框架
- aspectjweaver-1.9.5.jar
-
Spring整合AspectJ框架模块
- spring-aspects-5.2.7.RELEASE.jar
-
Commons-Loggin日志
- commons-logging-1.2.jar
-
数据库驱动
- mysql-connector-java-5.1.48.jar
6.2 XML方式实现声明式事务管理
搭建环境
- 创建项目
- 导入jar包
- 在src目录添加applicationContext.xml文件,添加context命名空间
- 在src目录添加db.properties文件
- 新建dao、pojo、service、test等包

<beans xmlns="http://www.springframework.org/schema/beans"
       xmlns:xsi="http://www.w3.org/2001/XMLSchema-instance"
       xmlns:context="http://www.springframework.org/schema/context"
       xsi:schemaLocation="http://www.springframework.org/schema/beans http://www.springframework.org/schema/beans/spring-beans.xsd
       http://www.springframework.org/schema/context http://www.springframework.org/schema/context/spring-context.xsd">

beans>
创建实体类、持久层、业务层
package com.bjsxt.pojo;

public class Users {
    private int userid;
    private String username;
    private String usersex;

    public int getUserid() {
        return userid;
    }

    public void setUserid(int userid) {
        this.userid = userid;
    }

    public String getUsername() {
        return username;
    }

    public void setUsername(String username) {
        this.username = username;
    }

    public String getUsersex() {
        return usersex;
    }

    public void setUsersex(String usersex) {
        this.usersex = usersex;
    }

    @Override
    public String toString() {
        return "Users{" +
                "userid=" + userid +
                ", username='" + username + '\'' +
                ", usersex='" + usersex + '\'' +
                '}';
    }
}
package com.bjsxt.pojo;

public class Orders {
    private int orderid;
    private double orderprice;

    public int getOrderid() {
        return orderid;
    }

    public void setOrderid(int orderid) {
        this.orderid = orderid;
    }

    public double getOrderprice() {
        return orderprice;
    }

    public void setOrderprice(double orderprice) {
        this.orderprice = orderprice;
    }

    @Override
    public String toString() {
        return "Orders{" +
                "orderid=" + orderid +
                ", orderprice=" + orderprice +
                '}';
    }
}
package com.bjsxt.dao;

public interface UsersDao {
}
package com.bjsxt.dao.impl;

import com.bjsxt.dao.UsersDao;
import org.springframework.jdbc.core.JdbcTemplate;

public class UsersDaoImpl implements UsersDao {
    private JdbcTemplate jdbcTemplate;

    public void setJdbcTemplate(JdbcTemplate jdbcTemplate) {
        this.jdbcTemplate = jdbcTemplate;
    }
}
package com.bjsxt.service;

public interface UsersService {
}
package com.bjsxt.service.impl;

import com.bjsxt.dao.UsersDao;
import com.bjsxt.service.UsersService;

public class UsersServiceImpl implements UsersService {
    private UsersDao usersDao;

    public void setUsersDao(UsersDao usersDao) {
        this.usersDao = usersDao;
    }
}
配置JDBC
- 配置解析db.properties的工具类
- 配置数据源
- 配置jdbcTemplate
- 配置持久层
- 配置业务层
<beans xmlns="http://www.springframework.org/schema/beans"
       xmlns:xsi="http://www.w3.org/2001/XMLSchema-instance"
       xmlns:context="http://www.springframework.org/schema/context"
       xsi:schemaLocation="http://www.springframework.org/schema/beans http://www.springframework.org/schema/beans/spring-beans.xsd
       http://www.springframework.org/schema/context http://www.springframework.org/schema/context/spring-context.xsd">


    <context:property-placeholder location="db.properties"/>


    <bean id="dataSource" class="org.springframework.jdbc.datasource.DriverManagerDataSource">
        <property name="driverClassName" value="${jdbc.driver}"/>
        <property name="url" value="${jdbc.url}"/>
        <property name="username" value="${jdbc.username}"/>
        <property name="password" value="${jdbc.urpasswordl}"/>
    bean>


    <bean id="jdbcTemplate" class="org.springframework.jdbc.core.JdbcTemplate">
        <property name="dataSource" ref="dataSource"/>
    bean>


    <bean id="usersDao" class="com.bjsxt.dao.impl.UsersDaoImpl">
        <property name="jdbcTemplate" ref="jdbcTemplate"/>
    bean>

    <bean id="usersService" class="com.bjsxt.service.impl.UsersServiceImpl">
        <property name="usersDao" ref="usersDao"/>
    bean>
beans>
实现业务案例
需求:添加用户的同时添加一个订单
修改持久层
package com.bjsxt.dao;

import com.bjsxt.pojo.Orders;
import com.bjsxt.pojo.Users;

public interface UsersDao {
    void insertUsers(Users users);
    void insertOrders(Orders orders);
}
package com.bjsxt.dao.impl;

import com.bjsxt.dao.UsersDao;
import com.bjsxt.pojo.Orders;
import com.bjsxt.pojo.Users;
import org.springframework.jdbc.core.JdbcTemplate;

public class UsersDaoImpl implements UsersDao {
    private JdbcTemplate jdbcTemplate;

    public void setJdbcTemplate(JdbcTemplate jdbcTemplate) {
        this.jdbcTemplate = jdbcTemplate;
    }

    @Override
    public void insertUsers(Users users) {
        String sql = "insert into users values(default,?,?)";
        Object[] params = new Object[]{users.getUsername(),users.getUsersex()};
        int update = this.jdbcTemplate.update(sql, params);
    }

    @Override
    public void insertOrders(Orders orders) {
        String sql = "insert into orders values(default,?,null)";
        Object[] params = new Object[]{orders.getOrderprice()};
        int update = this.jdbcTemplate.update(sql, params);
    }
}
修改业务层
package com.bjsxt.service;

import com.bjsxt.pojo.Orders;
import com.bjsxt.pojo.Users;

public interface UsersService {
    void addUsersAndOrders(Users users, Orders orders);
}
package com.bjsxt.service.impl;

import com.bjsxt.dao.UsersDao;
import com.bjsxt.pojo.Orders;
import com.bjsxt.pojo.Users;
import com.bjsxt.service.UsersService;

public class UsersServiceImpl implements UsersService {
    private UsersDao usersDao;

    public void setUsersDao(UsersDao usersDao) {
        this.usersDao = usersDao;
    }

    @Override
    public void addUsersAndOrders(Users users, Orders orders) {
        this.usersDao.insertUsers(users);
        this.usersDao.insertOrders(orders);
    }
}
创建测试类
package com.bjsxt.test;

import com.bjsxt.pojo.Orders;
import com.bjsxt.pojo.Users;
import com.bjsxt.service.UsersService;
import org.springframework.context.ApplicationContext;
import org.springframework.context.support.ClassPathXmlApplicationContext;

public class Test {
    public static void main(String[] args) {
        ApplicationContext applicationContext = new ClassPathXmlApplicationContext("applicationContext-service.xml");
        UsersService usersService = (UsersService)applicationContext.getBean("usersService");

        Users users = new Users();
        users.setUsername("suibian11");
        users.setUsersex("male");

        Orders orders = new Orders();
        orders.setOrderprice(720);

        usersService.addUsersAndOrders(users,orders);
    }
}
【分析】mysql默认是自动提交事务的;我们想要的效果是用户和订单要么同时添加成功、要么同时添加失败,现在可以实现用户和订单的同时添加,但是在用户或订单添加失败时另一个仍然能够添加成功,显然不能保证事务的一致性。接下来是解决办法。
配置Spring声明式事务管理
新建applicationContext-tx.xml文件,单独存放事务相关配置
- 配置事务管理器切面对象
- 配置管理器属性
- 以schema based方式配置切点切面
-
开启AOP命名空间
xmlns:aop="http://www.springframework.org/schema/aop"http://www.springframework.org/schema/aop http://www.springframework.org/schema/aop/spring-aop.xsd -
开启TX命名空间
xmlns:tx="http://www.springframework.org/schema/tx"http://www.springframework.org/schema/tx http://www.springframework.org/schema/tx/spring-tx.xtd
<beans xmlns="http://www.springframework.org/schema/beans"
xmlns:xsi="http://www.w3.org/2001/XMLSchema-instance"
xmlns:aop="http://www.springframework.org/schema/aop"
xmlns:tx="http://www.springframework.org/schema/tx"
xsi:schemaLocation="http://www.springframework.org/schema/beans http://www.springframework.org/schema/beans/spring-beans.xsd
http://www.springframework.org/schema/aop
http://www.springframework.org/schema/aop/spring-aop.xsd
http://www.springframework.org/schema/tx http://www.springframework.org/schema/tx/spring-tx.xsd">
<import resource="applicationContext-service.xml"/>
<bean id="transactionManager" class="org.springframework.jdbc.datasource.DataSourceTransactionManager">
<property name="dataSource" ref="dataSource"/>
bean>
<tx:advice id="txAdvice">
<tx:attributes>
<tx:method name="add*" propagation="REQUIRED" isolation="DEFAULT"/>
tx:attributes>
tx:advice>
<aop:config>
<aop:pointcut id="tx_pointcut" expression="execution(* com.bjsxt.service.*.*(..))"/>
<aop:advisor advice-ref="txAdvice" pointcut-ref="tx_pointcut"/>
aop:config>
beans>
【异常】
- 读取xml文件失败,原因:拼写错误
- context initialization exception,原因:事务管理器的id必须是transactionManager!为什么啊?
6.3 声明式事务管理中的属性解释
-
name
指定受事务管理的方法
-
propagation
传播行为
-
isolation
隔离级别
-
readonly
设置事务只读,在查询操作中指定为true,可提高性能。
-
timeout
设置事务管理的超时时间,单位秒。
-
rollback-for
Spring默认对runtimeException类型异常进行事务回滚,Exception类型异常则不回滚;可通过rollback-for属性指定;需要注意的是:如果在业务层代码中异常被try-catch了,事务就不回滚了,如果想让事务回滚必须再抛出一个异常。
-
no-rollback-for
指定出现什么异常时不回滚事务。
6.4 使用注解式实现声明式事务管理
6.4.1 Transactional介绍
@Transactional注解可以作用于接口、接口方法、类以及类方法上。当作用于类上时,该类的所有public方法将都具有该类型的事务属性,同时,我们也可以在方法级别使用该注解来覆盖类级别的定义。
虽然@Transactional注解可以作用于接口、接口方法、类以及类方法上,但是Spring 建议不要在接口或者接口方法上使用该注解,因为这只有在使用基于接口的代理时它才会生效。另外, @Transactional注解应该只被应用到 public方法上,这是由Spring AOP的本质决定的。如果你在 protected、private或者默认可见性的方法上使用@Transactional注解,这将被忽略,也不会抛出任何异常。
6.4.2 Transactional的使用
使用@Transactional实现事务控制
配置事务管理器 + 注册事务管理驱动
<beans xmlns="http://www.springframework.org/schema/beans"
       xmlns:xsi="http://www.w3.org/2001/XMLSchema-instance"
       xmlns:aop="http://www.springframework.org/schema/aop"
       xmlns:tx="http://www.springframework.org/schema/tx"
       xsi:schemaLocation="http://www.springframework.org/schema/beans http://www.springframework.org/schema/beans/spring-beans.xsd
       http://www.springframework.org/schema/aop http://www.springframework.org/schema/aop/spring-aop.xsd
       http://www.springframework.org/schema/tx http://www.springframework.org/schema/tx/spring-tx.xsd">


    <bean id="tracsactionManager" class="org.springframework.jdbc.datasource.DataSourceTransactionManager">
        <property name="dataSource" ref="dataSource"/>
    bean>


    <tx:annotation-driven transaction-manager="tracsactionManager"/>
beans>
修改业务层代码,添加@Transactional注解即可,如有需要,可在方法出局部微调
package com.bjsxt.service.impl;

import com.bjsxt.dao.UsersDao;
import com.bjsxt.pojo.Orders;
import com.bjsxt.pojo.Users;
import com.bjsxt.service.UsersService;
import org.springframework.transaction.annotation.Isolation;
import org.springframework.transaction.annotation.Propagation;
import org.springframework.transaction.annotation.Transactional;

@Transactional(propagation = Propagation.REQUIRED,isolation = Isolation.DEFAULT)
public class UsersServiceImpl implements UsersService {
    private UsersDao usersDao;

    public void setUsersDao(UsersDao usersDao) {
        this.usersDao = usersDao;
    }

    /**
     * 一般有需求的话会在某个方法,对事务管理器的属性做局部微调
     * @param users
     * @param orders
     */
    @Override
    public void addUsersAndOrders(Users users, Orders orders) {
        this.usersDao.insertUsers(users);
        this.usersDao.insertOrders(orders);
    }
}
Spring基于注解装配Bean对象
在Spring中,尽管使用XML配置文件可以实现 Bean的装配工作,但如果应用中Bean的数量较多,会导致XML配置文件过于臃肿,从而给维护和升级带来一定的困难。
在Spring框架中提供了一些用于装配 Bean对象的注解用于替换xml文件的中配置。
1、jar包依赖
Spring核心容器模块
- spring-beans-5.2.7.RELEASE.jar
- spring-context-5.2.7.RELEASE.jar
- spring-core-5.2.7.RELEASE.jar
- spring-expression-5.2.7.RELEASE.jar
Spring AOP模块
- spring-aop-5.2.7.RELEASE.jar
Commons-Loggin日志
- commons-logging-1.2.jar
2、在Spring的配置文件中开启注解扫描
<context : component-scan base-package="扫描注解的包名" />
3、注册Bean对象使用的注解
- @Component:泛化概念,可作用于任何层次
- @Service:用于业务层
- @Repository:用于持久层
- @Controller:用于控制层,如SpringMVC的Controller层
使用测试
在配置文件中开启注解扫描,给定扫描范围
<beans xmlns="http://www.springframework.org/schema/beans"
       xmlns:xsi="http://www.w3.org/2001/XMLSchema-instance"
       xmlns:context="http://www.springframework.org/schema/context"
       xsi:schemaLocation="http://www.springframework.org/schema/beans http://www.springframework.org/schema/beans/spring-beans.xsd
       http://www.springframework.org/schema/context http://www.springframework.org/schema/context/spring-context.xsd">


    <context:component-scan base-package="com.bjsxt"/>
beans>
添加注解
package com.bjsxt.dao.impl;

import com.bjsxt.dao.UsersDao;
import org.springframework.stereotype.Repository;

@Repository("usersDao")
public class UsersDaoImpl implements UsersDao {
}
package com.bjsxt.service.impl;

import com.bjsxt.service.UsersService;
import org.springframework.stereotype.Component;
import org.springframework.stereotype.Service;

/**
 * 如果在添加注册bean对象未指定id
 * springIOC容器会根据类名将首字母转为小写作为该bean对象的id
 * 我们可以通过@Component注解的value属性,自定义bean对象的id
 */
// @Component("suibian")
@Service("usersService")
public class UsersServiceImpl implements UsersService {
}
第二次出现的异常
Failed to read candidate component class: file [F:\Java_Codes\springMybatisdemo\out\production\springMybatisdemo\com\bjsxt\mapper\UsersMapper.class]; nested exception is org.springframework.core.NestedIOException: ASM ClassReader failed to parse class file - probably due to a new Java class file version that isn't supported yet: file [F:\Java_Codes\springMybatisdemo\out\production\springMybatisdemo\com\bjsxt\mapper\UsersMapper.class]; nested exception is java.lang.IllegalArgumentException: Unsupported class file major version 61
【解决】将JDK17换成JDK1.8,重新运行项目OK了!
4、依赖注入使用的注解
- @Autowired:可以添加到属性或方法,只能按照bean对象的类型注入
- @Resource:可以添加到属性或方法,如不给定先按照name查找,再查找bean对象的类型,如指定ID必须一致
- @Qualifier:与@Autowired配合使用,达到按实例名称装配的效果
- @Value:获取properties文件中key对应的value
使用测试
<beans xmlns="http://www.springframework.org/schema/beans"
       xmlns:xsi="http://www.w3.org/2001/XMLSchema-instance"
       xmlns:context="http://www.springframework.org/schema/context"
       xsi:schemaLocation="http://www.springframework.org/schema/beans http://www.springframework.org/schema/beans/spring-beans.xsd
       http://www.springframework.org/schema/context http://www.springframework.org/schema/context/spring-context.xsd">

    <context:property-placeholder location="db.properties"/>

    <context:component-scan base-package="com.bjsxt"/>
beans>
package com.bjsxt.dao;

public interface UsersDao {
    void insertUsers();
}
package com.bjsxt.dao.impl;

import com.bjsxt.dao.UsersDao;
import org.springframework.beans.factory.annotation.Value;
import org.springframework.stereotype.Repository;

@Repository("usersDao")
public class UsersDaoImpl implements UsersDao {
    @Value("${jdbc.username}")
    private String username;
    @Override
    public void insertUsers() {
        System.out.println("insertUsers..."+username);
    }
}
package com.bjsxt.service;

public interface UsersService {
    void addUsers();
}
package com.bjsxt.service.impl;

import com.bjsxt.dao.UsersDao;
import com.bjsxt.service.UsersService;
import org.springframework.beans.factory.annotation.Autowired;
import org.springframework.stereotype.Component;
import org.springframework.stereotype.Service;

/**
 * 如果在添加注册bean对象未指定id
 * springIOC容器会根据类名将首字母转为小写作为该bean对象的id
 * 我们可以通过@Component注解的value属性,自定义bean对象的id
 */
// @Component("suibian")
@Service("usersService")
public class UsersServiceImpl implements UsersService {
    @Autowired
    private UsersDao usersDao;

    @Override
    public void addUsers() {
        this.usersDao.insertUsers();
    }
}
package com.bjsxt.test;

import com.bjsxt.service.UsersService;
import org.springframework.context.ApplicationContext;
import org.springframework.context.support.ClassPathXmlApplicationContext;

public class Test {
    public static void main(String[] args) {
        ApplicationContext applicationContext = new ClassPathXmlApplicationContext("applicationContext.xml");
       /* String[] beanDefinitionNames = applicationContext.getBeanDefinitionNames();
        for(String str:beanDefinitionNames){
            System.out.println(str);
        }*/
        UsersService usersService = (UsersService)applicationContext.getBean("usersService");
        // System.out.println(usersService);

        //结果:insertUsers...root
        usersService.addUsers();
    }
}
5、Spring配置相关注解
-
@Configuration
声明当前类为配置类,相当于xml形式的Spring配置。该注解需要添加到类上。
-
@Bean
注解在方法上,声明当前方法的返回值为一个Bean对象,该对象会被添加Springloc容器中。和标签作用的相同。Bean 的实例名称由@Qualifier 注解的参数指定。
使用测试
package com.bjsxt.config;

import com.bjsxt.dao.UsersDao;
import com.bjsxt.dao.impl.UsersDaoImpl;
import org.springframework.beans.factory.annotation.Qualifier;
import org.springframework.context.annotation.Bean;
import org.springframework.context.annotation.Configuration;

@Configuration
public class SpringConfig {

    @Bean
    @Qualifier("usersDao_suibian")
    public UsersDao getBean_UsersDao(){
        return new UsersDaoImpl();
    }
}
package com.bjsxt.service.impl;

import com.bjsxt.dao.UsersDao;
import com.bjsxt.service.UsersService;
import org.springframework.beans.factory.annotation.Autowired;
import org.springframework.beans.factory.annotation.Qualifier;
import org.springframework.stereotype.Component;
import org.springframework.stereotype.Service;

@Service("usersService")
public class UsersServiceImpl implements UsersService {
    //这里的@Qualifier("usersDao_suibian")和SpringConfig类中给定的一致即可
    @Autowired
    @Qualifier("usersDao_suibian")
    private UsersDao usersDao;

    @Override
    public void addUsers() {
        this.usersDao.insertUsers();
    }
}
package com.bjsxt.test;

import com.bjsxt.service.UsersService;
import org.springframework.context.ApplicationContext;
import org.springframework.context.support.ClassPathXmlApplicationContext;

public class Test {
    public static void main(String[] args) {
        ApplicationContext applicationContext = new ClassPathXmlApplicationContext("applicationContext.xml");
        String[] beanDefinitionNames = applicationContext.getBeanDefinitionNames();

        /**
         * 在SpringConfig类中通过注解配置的UsersDao的bean对象,它的ID是首字母转为小写的方法名;
         * 可以通过@Bean @Qualifier指定bean对象的name属性,但是注意ID仍然是首字母转为小写的方法名。
         */
        for(String str:beanDefinitionNames){
            System.out.println(str);
        }
        UsersService usersService = (UsersService)applicationContext.getBean("usersService");
        // System.out.println(usersService);

        //结果:insertUsers...root
        // usersService.addUsers();
    }
}
注意事项:
在SpringConfig类中通过注解方式获得UsersDao的bean对象,该对象的ID是首字母小写的方法名;
可以通过@Bean @Qualifier指定bean对象的name属性,但是注意ID仍然是首字母小写的方法名。
Junit的使用
1、简介
Junit是Java编程语言的单元测试框架,用于编写和运行可重复的自动化测试。
单元测试(Unit Testing),是指对软件中的最小可测试单元进行检查和验证。对于单元测试中单元的含义,一般来说,要根据实际情况去判定其具体含义,如c语言中单元指一个函数,Java里单元指一个类,图形化的软件中可以指一个窗口或一个菜单等。总的来说,单元就是人为规定的最小的被测功能模块。单元测试是在软件开发过程中要进行的最低级别的测试活动,软件的独立单元将在与程序的其他部分相隔离的情况下进行测试。
Junit特点:
- Junit是一个开放的资源框架,用于编写和运行测试
- 提供注解来识别测试方法
- 提供断言来测试预期结果
- Junit测试允许你编写代码更快,并能提高质量
- Junit优雅简洁。没那么复杂,花费时间较少
- Junit测试可以被组织为测试套件,包含测试用例,甚至其他的测试套件
- Junit在一个条中显示进度。如果运行良好则是绿色;如果运行失败,则变成红色
2、Junit注解

3、Junit断言介绍
JUnit4.4引入了Hamcrest框架,它们用来帮助我们确定被测试的方法是否按照预期的效果正常工作,通常把这些辅助方法称为断言。

4、Junit的使用
依赖的jar包
- junit-4.13.jar
- hamcrest-core-1.3.jar
4.1 简单的使用
创建项目、导入jar包

测试类
package test.com.bjsxt.service;

import org.junit.*;
import org.junit.runner.RunWith;
import org.junit.runners.JUnit4;

@RunWith(JUnit4.class)
public class UsersServiceTest {

    @Test
    public void testAddUsers(){
        System.out.println("testAddUsers");
    }

    @Before
    public void testBefore(){
        System.out.println("testBefore");
    }

    @BeforeClass
    public static void testBeforeClass(){
        System.out.println("testBeforeClass");
    }

    @After
    public void testAfter(){
        System.out.println("testAfter");
    }

    @AfterClass
    public static void testAfterClass(){
        System.out.println("testAfterClass");
    }
}
4.2 Junit断言的使用
@Test
public void testAddUsers(){
    UsersServiceImpl usersService = new UsersServiceImpl();
    // UsersServiceImpl usersService1 = new UsersServiceImpl();
    UsersServiceImpl usersService2 = usersService;
    /*int i = usersService.addUsers();
        Assert.assertEquals(1,i);*/
    Assert.assertSame(usersService2,usersService);
}
Spring整合Junit
1、所依赖的jar包
Spring核心容器模块
- spring-beans-5.2.7.RELEASE.jar
- spring-core-5.2.7.RELEASE.jar
- spring-context-5.2.7.RELEASE.jar
- spring-expression-5.2.7.RELEASE.jar
- spring-aop-5.2.7.RELEASE.jar
- spring-test-5.2.7.RELEASE.jar
日志模块
- commons-logging-1.2.jar
测试模块
- hamcrest-core-1.3.jar
2、测试案例
一般步骤:
-
创建项目
-
导入jar包

-
添加spring配置文件,applicationContext.xml,开启注解扫描
<beans xmlns="http://www.springframework.org/schema/beans" xmlns:xsi="http://www.w3.org/2001/XMLSchema-instance" xmlns:context="http://www.springframework.org/schema/context" xsi:schemaLocation="http://www.springframework.org/schema/beans http://www.springframework.org/schema/beans/spring-beans.xsd http://www.springframework.org/schema/context http://www.springframework.org/schema/context/spring-context.xsd"> <context:component-scan base-package="com.bjsxt"/> beans> -
创建业务层
package com.bjsxt.service;

public interface UsersService {
    void addUsers();
}
package com.bjsxt.service.impl; import com.bjsxt.service.UsersService; import org.springframework.stereotype.Service; @Service public class UsersServiceImpl implements UsersService { @Override public void addUsers() { System.out.println("addUsers..."); } } -
创建测试包、测试类
package test.com.bjsxt.service;

import com.bjsxt.service.UsersService;
import org.junit.Test;
import org.junit.runner.RunWith;
import org.springframework.beans.factory.annotation.Autowired;
import org.springframework.test.context.ContextConfiguration;
import org.springframework.test.context.junit4.SpringJUnit4ClassRunner;

@RunWith(SpringJUnit4ClassRunner.class)
@ContextConfiguration(locations = {"classpath:applicationContext.xml"})
public class UsersServiceImplTest {

    /**
     * 如果仍然通过手动开启Spring获取ApplicationContext对象的方式来测试方法,那整合就没有意义!
     * 所以,现在可以通过注解注入依赖来调用方法测试,方便了许多。
     *
     * 在不更换测试引擎时,默认使用Junit测试框架,它不会启动Spring,通过注解注入依赖就无法实现;
     * 所以,先将测试引擎为spring-test.jar提供的SpringJUnit4ClassRunner。
     *
     * 启动Spring需要一个配置文件,通过@ContextConfiguration注解给定classpath的位置
     */
    @Autowired
    private UsersService usersService;
    @Test
    public void testAddUsers(){
        this.usersService.addUsers();
    }
}
异常信息,Unsupported class file major version 61
看着很熟悉啊,第三次了啊喂!再次更换为JDK1.8!
Spring整合Servlet
1、所依赖的jar包
Spring核心容器模块
- spring-beans-5.2.7.RELEASE.jar
- spring-core-5.2.7.RELEASE.jar
- spring-context-5.2.7.RELEASE.jar
- spring-expression-5.2.7.RELEASE.jar
Spring AOP模块
- spring-aop-5.2.7.RELEASE.jar
Spring Web模块
- spring-web-5.2.7.RELEASE.jar
Servlet
- servlet-api.jar
日志模块
- commons-logging-1.2.jar
使用注解就要用到AOP吗?那为什么没有开启命名空间呢?
2、测试案例
搭建环境

添加Spring配置文件
<beans xmlns="http://www.springframework.org/schema/beans"
       xmlns:xsi="http://www.w3.org/2001/XMLSchema-instance"
       xmlns:context="http://www.springframework.org/schema/context"
       xsi:schemaLocation="http://www.springframework.org/schema/beans http://www.springframework.org/schema/beans/spring-beans.xsd
       http://www.springframework.org/schema/context http://www.springframework.org/schema/context/spring-context.xsd">


    <context:component-scan base-package="com.bjsxt.service,com.bjsxt.dao"/>
beans>
在web项目中启动Spring框架
- Spring配置文件路径
- 监听器
在Web项目中需要在web.xml文件中配置启动Spring框架的监听器。用于启动Spring框架。
<web-app xmlns="http://xmlns.jcp.org/xml/ns/javaee"
         xmlns:xsi="http://www.w3.org/2001/XMLSchema-instance"
         xsi:schemaLocation="http://xmlns.jcp.org/xml/ns/javaee http://xmlns.jcp.org/xml/ns/javaee/web-app_4_0.xsd"
         version="4.0">


    <context-param>
        <param-name>contextConfigLocationparam-name>
        <param-value>classpath:applicationContext.xmlparam-value>
    context-param>


    <listener>
        <listener-class>org.springframework.web.context.ContextLoaderListenerlistener-class>
    listener>
web-app>
创建持久层、业务层
package com.bjsxt.dao;

public interface UsersDao {
    void insertUsers();
}
package com.bjsxt.dao.impl;

import com.bjsxt.dao.UsersDao;
import org.springframework.stereotype.Repository;

@Repository
public class UsersDaoImpl implements UsersDao {
    @Override
    public void insertUsers() {
        System.out.println("insertUsers...");
    }
}
package com.bjsxt.service;

public interface UsersService {
    void addUsers();
}
package com.bjsxt.service.impl;

import com.bjsxt.dao.UsersDao;
import com.bjsxt.service.UsersService;
import org.springframework.beans.factory.annotation.Autowired;
import org.springframework.stereotype.Service;

@Service
public class UsersServiceImpl implements UsersService {

    @Autowired
    private UsersDao usersDao;

    @Override
    public void addUsers() {
        this.usersDao.insertUsers();
    }
}
在Servlet中获取bean对象
package com.bjsxt.web.servlet;

import com.bjsxt.service.UsersService;
import org.springframework.context.ApplicationContext;
import org.springframework.web.context.WebApplicationContext;
import org.springframework.web.context.support.WebApplicationContextUtils;

import javax.servlet.ServletException;
import javax.servlet.annotation.WebServlet;
import javax.servlet.http.HttpServlet;
import javax.servlet.http.HttpServletRequest;
import javax.servlet.http.HttpServletResponse;
import java.io.IOException;

@WebServlet(urlPatterns = "/servlet.do")
public class UsersServlet extends HttpServlet {
    @Override
    protected void doGet(HttpServletRequest req, HttpServletResponse resp) throws ServletException, IOException {
        this.doPost(req,resp);
    }

    @Override
    protected void doPost(HttpServletRequest req, HttpServletResponse resp) throws ServletException, IOException {

        /*ApplicationContext applicationContext = (ApplicationContext)this.getServletContext().getAttribute(WebApplicationContext.ROOT_WEB_APPLICATION_CONTEXT_ATTRIBUTE);
        UsersService usersService = (UsersService)applicationContext.getBean("usersServiceImpl");
        usersService.addUsers();
        resp.getWriter().print("hello servlet");*/


        WebApplicationContext webApplicationContext = WebApplicationContextUtils.getWebApplicationContext(this.getServletContext());
        UsersService service = (UsersService)webApplicationContext.getBean("usersServiceImpl");
        service.addUsers();
        resp.getWriter().print("hello servlet");
    }
}
WebApplicationContext的继承关系

获得WebApplicationContext对象的两种方式
方式一:通过ServletContext对象的getAttribute()方法,根据WebApplicationContext.ROOT_WEB_APPLICATION_CONTEXT_ATTRIBUTE属性得到value;
方式二:通过WebApplicationContextUtils工具类的getWebApplicationContext()方法,传入参数为ServletContext对象;