Flutter开发之数据存储-2-文件存储(33)
数据存储部分在移动开发中是非常重要的部分,无论是一些
轻量级的数据(如用户信息、APP配置信息等)还是把需要长期存储的数据写入本地文件或者Sqlite3。都离不开数据存储,上一篇SharedPreferences的使用,今天就练习一下文件存储-写入本地文件。
文件存储
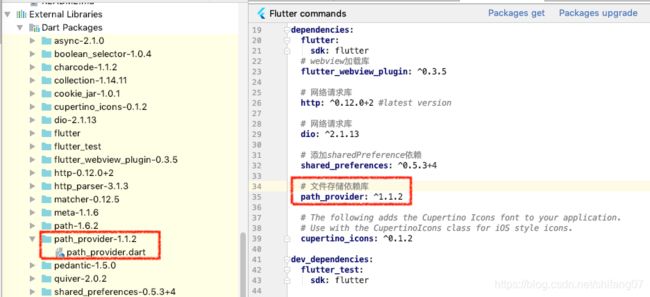
这三种存储方式Flutter本身都没有内置,不过好在官方提供了第三方库,操作文件同样我们也需要像SharedPreferences一样,需要在pubspec.yaml引入。在 Flutter 里实现文件读写,需要使用 path_provider 和 dart 的 io 模块。path_provider 负责查找 iOS/Android 的目录文件,IO 模块负责对文件进行读写。
官方文档:https://pub.dev/packages/path_provider#-installing-tab-
# 文件存储依赖库
path_provider: ^1.1.2
然后命令行执行flutter packages get 完成后如下:

数据存取示例
测试的地方导入
import 'package:path_provider/path_provider.dart';
import 'dart:io';
整个操作演示逻辑跟SharedPreferences一样,关于文件存储的三个获取文件路径的方法我这里说明一下。
在path_provider中有三个获取文件路径的方法:
getTemporaryDirectory()//获取应用缓存目录,等同IOS的NSTemporaryDirectory()和Android的getCacheDir() 方法
getApplicationDocumentsDirectory()获取应用文件目录类似于Ios的NSDocumentDirectory和Android上的 AppData目录
getExternalStorageDirectory()//这个是存储卡,仅仅在Android平台可以使用
来看下操作文件的效果图:
借用了SharedPreferences存储的逻辑,只是把存储的代码放在了file.text中,代码里有详尽的注释,我就不多做解释说明了,读者可自行尝试对比跟SharedPreferences的差别
样例代码
import 'package:flutter/material.dart';
import 'package:path_provider/path_provider.dart';
import 'dart:io';

class FileSaveTest extends StatefulWidget {
  FileSaveTest({Key key, this.title}) : super(key: key);
  final String title;
  @override
  createState() => new _FileSaveTestState();
}

class _FileSaveTestState extends State {
  var _textFieldController = new TextEditingController();
  var _storageString = '';
  final STORAGE_KEY_FILE = 'storage_key';

  /**
   * 利用文件存储数据
   */
  saveString() async {
    final file = await getFile('file.text');
    //写入字符串
    file.writeAsString(_textFieldController.value.text.toString());
  }

  /**
   * 获取存在文件中的数据
   */
  Future getString() async {
    final file = await getFile('file.text');
    var filePath  = file.path;
    setState(() {
      file.readAsString().then((String value) {
        _storageString = value +'\n文件存储路径:'+filePath;
      });
    });
  }

  /**
   * 初始化文件路径
   */
  Future getFile(String fileName) async {
    //获取应用文件目录类似于Ios的NSDocumentDirectory和Android上的 AppData目录
    final fileDirectory = await getApplicationDocumentsDirectory();

    //获取存储路径
    final filePath = fileDirectory.path;

    //或者file对象(操作文件记得导入import 'dart:io')
    return new File(filePath + "/"+fileName);
  }


  @override
  Widget build(BuildContext context) {
    return new Scaffold(
      appBar: new AppBar(
        title: new Text('文件存储'),
      ),

      body: new Column(
        children: [
          SizedBox(height: 5,),
          Text("文件存储", textAlign: TextAlign.center,style: TextStyle(fontSize: 24,color: Colors.deepOrange),),

          Container(
            padding: EdgeInsets.all(10),
            height: 58,
            child: TextField(
              controller: _textFieldController,
              style: TextStyle(fontSize: 28),
            ),
          ),


          MaterialButton(
            onPressed: saveString,
            child: new Text("存储",style: TextStyle(color: Colors.white,fontSize: 22),),
            color: Colors.lightBlueAccent,
          ),
          MaterialButton(
            onPressed: getString,
            child: new Text("获取",style: TextStyle(color: Colors.white,fontSize: 22),),
            color: Colors.lightGreen,
          ),

          SizedBox(height: 15,),
          Container(
            padding: EdgeInsets.all(8),
            height: 180,
            child: Text('存储的值为:$_storageString',style: TextStyle(fontSize: 22,color: Colors.deepOrange)
            ),
          ),

        ],
      ),

    );
  }
}
部分摘自
[Flutter入门进阶之旅(十二)Flutter 数据存储](https://blog.csdn.net/xieluoxixi/article/details/8665501