java爬虫
        <!-- 爬虫库依赖 -->
        <dependency>
            <groupId>org.seleniumhq.selenium</groupId>
            <artifactId>selenium-java</artifactId>
            <version>4.8.3</version>
        </dependency>

        <dependency>
            <groupId>org.seleniumhq.selenium</groupId>
            <artifactId>selenium-chromium-driver</artifactId>
            <version>4.8.3</version>
        </dependency>
        <dependency>
            <groupId>org.seleniumhq.selenium</groupId>
            <artifactId>selenium-api</artifactId>
            <version>4.8.3</version>
        </dependency>
        <dependency>
            <groupId>org.seleniumhq.selenium</groupId>
            <artifactId>selenium-chrome-driver</artifactId>
            <version>4.8.3</version>
        </dependency>
        <dependency>
            <groupId>org.seleniumhq.selenium</groupId>
            <artifactId>selenium-remote-driver</artifactId>
            <version>4.8.3</version>
        </dependency>
第一步.打开Chrome浏览器,这个是selenium框架内置的类,用于驱动相关的浏览器
WebDriver webDriver = new ChromeDriver();
ChromeDriver源码:
package org.openqa.selenium.chrome;

import com.google.common.collect.ImmutableMap;
import java.util.Map;
import org.openqa.selenium.Beta;
import org.openqa.selenium.Capabilities;
import org.openqa.selenium.chromium.ChromiumDriver;
import org.openqa.selenium.chromium.ChromiumDriverCommandExecutor;
import org.openqa.selenium.internal.Require;
import org.openqa.selenium.remote.CommandInfo;
import org.openqa.selenium.remote.RemoteWebDriver;
import org.openqa.selenium.remote.RemoteWebDriverBuilder;
import org.openqa.selenium.remote.http.ClientConfig;
import org.openqa.selenium.remote.service.DriverFinder;
import org.openqa.selenium.remote.service.DriverService;

public class ChromeDriver extends ChromiumDriver {
}
第二步.设置系统的Chrome浏览器驱动文件的位置
 // 设置 chromedirver 的存放位置
System.getProperties().setProperty("webdriver.chrome.driver", "E:/work/chromedriver/chromedriver-win64/chromedriver.exe");
当前的版本是113
https://registry.npmmirror.com/binary.html?path=chromedriver/
private static final String loginUrl = "http://baidu.com";
webDriver.get(loginUrl);
        driver.findElement(By.id("#kw"));

        driver.findElement(By.name("#kw"));

        driver.findElement(By.tagName("#kw"));

        driver.findElement(By.cssSelector("#kw"))

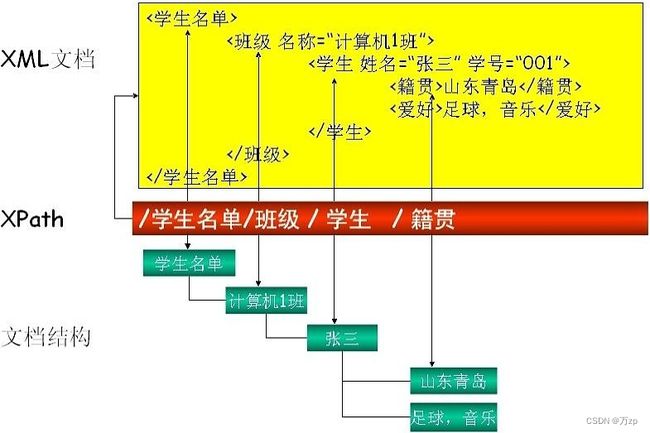
        webDriver.findElement(By.xpath("//*[@id=\"department\"]"));
06.控制元素的行为
07.因为页面刷新比较慢,所以要设置相应的等待时间
 // 需求: 代码的执行速度比较快,而前端页面渲染的速度相比慢一点,可能导致的结果是: 代码已经提交执行到下一步了,页面还没渲染出来,元素找不到.
    // 等待元素被渲染的三种方式:
    // 1. 强制等待
    //           让程序多等一会, 优点:语法简单 缺点:固定时间,测试时间较长.
    // 2. 隐式等待
    //           在规定的时间内,轮询等待元素出现之后就立即执行下一步,如果在规定时间内未能完成等待,则会抛出一个 NoSuchElemenExcetion 异常.
    //           优点: 节省了大量测试时间,执行效率高.  缺点: 需要等待所有的元素都展开才会执行下一步,仍然会有时间消耗.
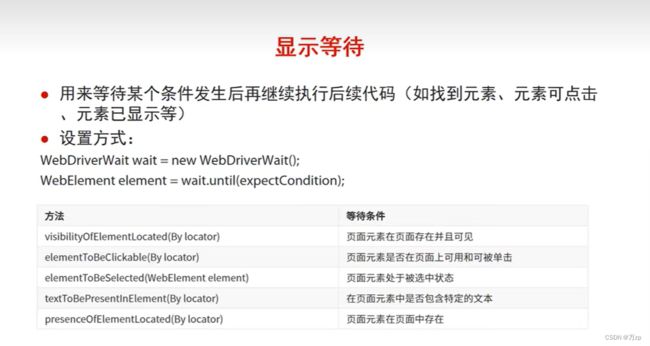
    // 3. 显示等待
    //            强制等待可以针对某一个元素来进行测试.
    //            优点: 针对一个元素来进行等待,极大降低自动化测试时间.
    //            缺点: 写法较为复杂.
    public void wait_test() throws InterruptedException {
        // 1. 强制等待
        Thread.sleep(3000);
        // 2. 隐式等待
        driver.manage().timeouts().implicitlyWait(Duration.ofSeconds(3));
        // 3. 显示等待
        WebDriverWait foo = new WebDriverWait(driver,Duration.ofSeconds(3));
        foo.until(ExpectedConditions.presenceOfElementLocated(By.cssSelector("#su")));
    }
WebDriverWait(driver,10).until(method,message="")
调用该方法提供的驱动程序作为参数,直到返回值为True

WebDriverWait(driver,10).until_not(method,message="")
调用该方法提供的驱动程序作为参数,直到返回值为False
在设置时间(10s)内,等待后面的条件发生。如果超过设置时间未发生,则抛出异常。在等待期间,每隔一定时间(默认0.5秒),调用until或until_not里的方法,直到它返回True或False.
例如:
 WebDriverWait wait1 = new WebDriverWait(webDriver, Duration.ofSeconds(5));
 WebElement webElements1 = wait1.until(ExpectedConditions.visibilityOfElementLocated(By.xpath("//*[@id=\"12345676\"]/li[8]/div/ul/li[0]")));
        if(webElements1.isDisplayed()) {
            webElements1.click();
        }
 WebDriverWait wait2 = new WebDriverWait(webDriver, Duration.ofSeconds(10));
 WebElement webElements2 = wait2.until(ExpectedConditions.presenceOfElementLocated(By.xpath("//*[@id=\"$123\"]/div/div")));
WebElement 源码:
package org.openqa.selenium;

import java.util.List;

public interface WebElement extends SearchContext, TakesScreenshot {
    void click();

    void submit();

    void sendKeys(CharSequence... keysToSend);

    void clear();

    String getTagName();
}
08.js脚本运行
转义字符\


