LLM微调(一)| 单GPU使用QLoRA微调Llama 2.0实战
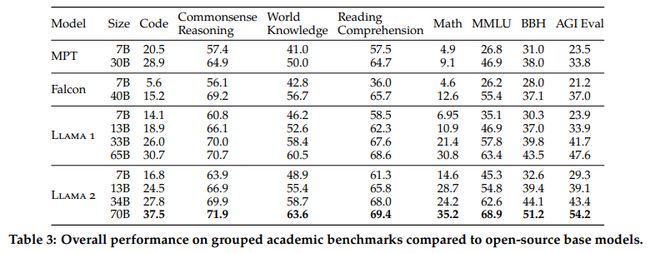
最近LLaMA 2在LLaMA1 的基础上做了很多优化,比如上下文从2048扩展到4096,使用了Grouped-Query Attention(GQA)共享多头注意力的key 和value矩阵,具体可以参考:
关于LLaMA 2 的细节,可以参考如下文章:
Meta发布升级大模型LLaMA 2:开源可商用
揭秘最领先的Llama2中文大模型!
使用QLoRA微调LLaMA 2
安装环境
pip install transformers datasets peft accelerate bitsandbytes safetensors导入库
import os, sysimport torchimport datasetsfrom transformers import (AutoTokenizer,AutoModelForCausalLM,BitsAndBytesConfig,DataCollatorForLanguageModeling,DataCollatorForSeq2Seq,Trainer,TrainingArguments,GenerationConfig)from peft import PeftModel, LoraConfig, prepare_model_for_kbit_training, get_peft_model
导入LLaMA 2模型
### config ###model_id = "NousResearch/Llama-2-7b-hf" # optional meta-llama/Llama-2–7b-chat-hfmax_length = 512device_map = "auto"batch_size = 128micro_batch_size = 32gradient_accumulation_steps = batch_size // micro_batch_size# nf4" use a symmetric quantization scheme with 4 bits precisionbnb_config = BitsAndBytesConfig(load_in_4bit=True,bnb_4bit_use_double_quant=True,bnb_4bit_quant_type="nf4",bnb_4bit_compute_dtype=torch.bfloat16)# load model from huggingfacemodel = AutoModelForCausalLM.from_pretrained(model_id,quantization_config=bnb_config,use_cache=False,device_map=device_map)# load tokenizer from huggingfacetokenizer = AutoTokenizer.from_pretrained(model_id)tokenizer.pad_token = tokenizer.eos_tokentokenizer.padding_side = "right"
输出模型的可训练参数量
def print_number_of_trainable_model_parameters(model):trainable_model_params = 0all_model_params = 0for _, param in model.named_parameters():all_model_params += param.numel()if param.requires_grad:trainable_model_params += param.numel()print(f"trainable model parameters: {trainable_model_params}. All model parameters: {all_model_params} ")return trainable_model_paramsori_p = print_number_of_trainable_model_parameters(model)# 输出# trainable model parameter: 262,410,240
配置LoRA参数
# LoRA configmodel = prepare_model_for_kbit_training(model)peft_config = LoraConfig(r=8,lora_alpha=32,lora_dropout=0.1,target_modules=["q_proj", "v_proj"],bias="none",task_type="CAUSAL_LM",)model = get_peft_model(model, peft_config)### compare trainable parameters #peft_p = print_number_of_trainable_model_parameters(model)print(f"# Trainable Parameter \nBefore: {ori_p} \nAfter: {peft_p} \nPercentage: {round(peft_p / ori_p * 100, 2)}")# 输出# trainable model parameter: 4,194,304
r:更新矩阵的秩,也称为Lora注意力维度。较低的秩导致具有较少可训练参数的较小更新矩阵。增加r(不超过32)将导致更健壮的模型,但同时会导致更高的内存消耗。
lora_lpha:控制lora比例因子
target_modules:是一个模块名称列表,如“q_proj”和“v_proj“,用作LoRA模型的目标。具体的模块名称可能因基础模型而异。
bias:指定是否应训练bias参数。可选参数为:“none”、“all”或“lora_only”。
输出LoRA Adapter的参数,发现只占原模型的不到2%。
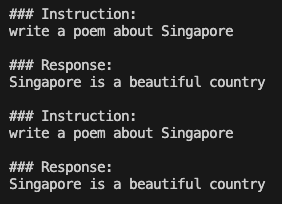
在微调LLaMA 2之前,我们看一下LLaMA 2的生成效果
### generate ###prompt = "Write me a poem about Singapore."inputs = tokenizer(prompt, return_tensors="pt")generate_ids = model.generate(inputs.input_ids, max_length=64)print('\nAnswer: ', tokenizer.decode(generate_ids[0]))res = tokenizer.batch_decode(generate_ids, skip_special_tokens=True, clean_up_tokenization_spaces=False)[0]print(res)
当要求模型写一首关于新加坡的诗时,产生的输出似乎相当模糊和重复,这表明模型很难提供连贯和有意义的回应。
微调数据加载
为了方便演示,我们使用开源的databricks/databricks-dolly-15k,数据格式如下:
{'instruction': 'Why can camels survive for long without water?','context': '','response': 'Camels use the fat in their humps to keep them filled with energy and hydration for long periods of time.','category': 'open_qa',}
要揭秘LLM能力,构建Prompt是至关重要,通常的Prompt形式有三个字段:Instruction、Input(optional)、Response。由于Input是可选的,因为这里设置了两种prompt_template,分别是有Input 的prompt_input和无Input 的prompt_no_input,代码如下:
max_length = 256dataset = datasets.load_dataset("databricks/databricks-dolly-15k", split='train')### generate prompt based on template ###prompt_template = {"prompt_input": \"Below is an instruction that describes a task, paired with an input that provides further context.\Write a response that appropriately completes the request.\\n\n### Instruction:\n{instruction}\n\n### Input:\n{input}\n\n### Response:\n","prompt_no_input": \"Below is an instruction that describes a task.\Write a response that appropriately completes the request.\\n\n### Instruction:\n{instruction}\n\n### Response:\n","response_split": "### Response:"}def generate_prompt(instruction, input=None, label=None, prompt_template=prompt_template):if input:res = prompt_template["prompt_input"].format(instruction=instruction, input=input)else:res = prompt_template["prompt_no_input"].format(instruction=instruction)if label:res = f"{res}{label}"return res
使用generate_prompt函数把instruction, context和response拼接起来;然后进行tokenize分词处理,转换为input_ids和attention_mask,为了让模型可以预测下一个token,设计了类似input_ids的labels便于右移操作;
def tokenize(tokenizer, prompt, max_length=max_length, add_eos_token=False):result = tokenizer(prompt,truncation=True,max_length=max_length,padding=False,return_tensors=None)result["labels"] = result["input_ids"].copy()return resultdef generate_and_tokenize_prompt(data_point):full_prompt = generate_prompt(data_point["instruction"],data_point["context"],data_point["response"],)tokenized_full_prompt = tokenize(tokenizer, full_prompt)user_prompt = generate_prompt(data_point["instruction"], data_point["context"])tokenized_user_prompt = tokenize(tokenizer, user_prompt)user_prompt_len = len(tokenized_user_prompt["input_ids"])mask_token = [-100] * user_prompt_lentokenized_full_prompt["labels"] = mask_token + tokenized_full_prompt["labels"][user_prompt_len:]return tokenized_full_promptdataset = dataset.train_test_split(test_size=1000, shuffle=True, seed=42)cols = ["instruction", "context", "response", "category"]train_data = dataset["train"].shuffle().map(generate_and_tokenize_prompt, remove_columns=cols)val_data = dataset["test"].shuffle().map(generate_and_tokenize_prompt, remove_columns=cols,)
模型训练
args = TrainingArguments(output_dir="./llama-7b-int4-dolly",num_train_epochs=20,max_steps=200,fp16=True,optim="paged_adamw_32bit",learning_rate=2e-4,lr_scheduler_type="constant",per_device_train_batch_size=micro_batch_size,gradient_accumulation_steps=gradient_accumulation_steps,gradient_checkpointing=True,group_by_length=False,logging_steps=10,save_strategy="epoch",save_total_limit=3,disable_tqdm=False,)trainer = Trainer(model=model,train_dataset=train_data,eval_dataset=val_data,args=args,data_collator=DataCollatorForSeq2Seq(tokenizer, pad_to_multiple_of=8, return_tensors="pt", padding=True),)# silence the warnings. re-enable for inference!model.config.use_cache = Falsetrainer.train()model.save_pretrained("llama-7b-int4-dolly")
模型测试
模型训练几个小时结束后,我们合并预训练模型Llama-2–7b-hf和LoRA参数,我们还是以“Write me a poem about Singapore”测试效果,代码如下:
# model path and weightmodel_id = "NousResearch/Llama-2-7b-hf"peft_path = "./llama-7b-int4-dolly"# loading modelmodel = AutoModelForCausalLM.from_pretrained(model_id,quantization_config=bnb_config,use_cache=False,device_map="auto")# loading peft weightmodel = PeftModel.from_pretrained(model,peft_path,torch_dtype=torch.float16,)model.eval()# generation configgeneration_config = GenerationConfig(temperature=0.1,top_p=0.75,top_k=40,num_beams=4, # beam search)# generating replywith torch.no_grad():prompt = "Write me a poem about Singapore."inputs = tokenizer(prompt, return_tensors="pt")generation_output = model.generate(input_ids=inputs.input_ids,generation_config=generation_config,return_dict_in_generate=True,output_scores=True,max_new_tokens=64,)print('\nAnswer: ', tokenizer.decode(generation_output.sequences[0]))
生成模型中参数temperature、top-k、top-p和num_beam含义可以参考:https://github.com/ArronAI007/Awesome-AGI/blob/main/LLM%E4%B9%8BGenerate%E4%B8%AD%E5%8F%82%E6%95%B0%E8%A7%A3%E8%AF%BB.ipynb
参考文献:
[1] https://ai.plainenglish.io/fine-tuning-llama2-0-with-qloras-single-gpu-magic-1b6a6679d436
[2] https://github.com/ChanCheeKean/DataScience/blob/main/13%20-%20NLP/E04%20-%20Parameter%20Efficient%20Fine%20Tuning%20(PEFT).ipynb


