MyBatis3学习笔记
目录
一、MyBatis简介
1.什么是Mybatis
2.MyBatis优点
3.MyBatis历史
二、MyBatis初运行
1.安装MyBatis
2.使用MyBatis示例
3.接口式编程
总结
三、全局配置文件
1.properties属性
2.settings设置
3.typeAliases别名处理器
4.typeHandlers类型处理器
5.plugins插件
6.environments环境
7.databaseIdProvider
8.mapper映射
四、SQL映射文件
1.insert、update、delete元素
2.主键生成方式
3.参数传递
1.单个参数
2.多个参数
3.命名参数
运行成功 4.POJO&Map&To:
4.参数处理
5.select元素
6.自动映射
7.自定义规则resultMap
8.resultMap关联查询
单个对象级联属性封装
association定义关联单个对象封装规则
association分步查询
多对象结果级联查询
多对象结果collection分布查询&延迟查询
discriminator鉴别器
五、动态SQL
1.if
2.trim
3.choose
4.set
5.for each
6.内置参数
7.bind绑定
8.抽取可重用sql片段
六、缓存机制
一级缓存
二级缓存
缓存原理图示
第三方缓存整合
七、MyBatis-Spring整合
八、MyBatis-逆向工程
MyBatis Generator
MBG使用
九、MyBatis工作原理
1、获取sqlSessionFactory对象:
2、获取sqlSession对象
3、获取接口的代理对象(MapperProxy)
4、执行增删改查方法
总结:
十、插件开发
插件原理
插件编写
本次课程的主要内容:MyBatis配置文件编写,MyBatis动态SQL,MyBatis缓存机制,MyBatis-Spring整合,MyBatis逆向工程,MyBatis高级内容(源码解析,单/多插件运行机制,四大对象工作原理,自定义TypeHandler、MyBatis存储过程&游标处理等)。
IDE:IDEA
数据库:mysql 5.7
核心技术:mybatis-3.5.7
一、MyBatis简介
1. MyBatis历史
• 原是Apache的一个开源项目iBatis, 2010年6月这个项目由Apache Software Foundation 迁移到了Google Code,随着开发团队转投Google Code旗下, iBatis3.x正式更名为MyBatis ,代码于2013年11月迁移到Github(下载地址见后)。
• iBatis一词来源于“internet”和“abatis”的组合,是一个基于Java的持久层框架。 iBatis提供的持久层框架包括SQL Maps和Data Access Objects(DAO)
2. 什么是Mybatis
• MyBatis是支持定制化SQL、存储过程以及高级映射的优秀的持久层框架。
• MyBatis避免了几乎所有的JDBC代码和手动设参数以及获取结果集的操作。
• MyBatis可以使用简单的XML或注解用于配置和原始映射,将接口和Java的POJO(Plain Old Java Objects,普通的Java对象)映射成数据库中的记录。
3. MyBatis优点
JDBC的问题

- SQL夹在Java代码块里,耦合度高导致硬编码内伤
- 维护不易且实际开发需求中sql是有变化,频繁修改的情况多见
Hibernate的问题
我们进一步采取框架的构想,如Hibernate。其把javabean自动映射成数据库中的一条记录。开发人员只需关心javabean映射成哪个数据记录,不关心实现的过程。

- 长难复杂SQL,对于Hibernate而言处理也不容易
- 内部自动生产的SQL,不容易做特殊优化。对发开人员而言,核心SQL还是需要自己优化。
- 基于全映射的全自动框架,大量字段的POJO进行部分映射时比较困难导致数据库性能下降。
mybatis优势
Mybatis开放了部分操作给开发者。将编写sql的部分提取出来写成一个配置文件,剩下的过程由mybatis封装完成。实现了SQL和java编码解耦,只需要掌握SQL语句。

- mybatis是半自动、轻量级的持久层框架。
- sql和java编码分开,功能边界清晰,一个专注业务、一个专注数据。
二、MyBatis初运行
1.安装MyBatis
不使用maven情况
要使用MyBatis,只需将mybatis-x.x.x.jar文件置于类路径(classpath)中即可。
访问地址https://github.com/mybatis/mybatis-3/,选择所需要的版本下载相应的jar包和源码包
mybatis的官方文档地址https://mybatis.org/mybatis-3/zh/index.html

解压后:

在IDEA中创建Java工程和相关目录,引入所需jar包,注意将conf文件夹转为配置文件夹(右键--mark Directory as --resources root)

使用maven情况
若使用maven构建项目的话可跳过上述下载导包操作,需将下面的依赖代码置于 pom.xml 文件中:
  org.mybatis
  mybatis
  x.x.x
2.使用MyBatis示例
1. 数据库中创建一张测试表

CREATE TABLE tbl_employee(
	id INT(11) PRIMARY KEY AUTO_INCREMENT,
	last_name VARCHAR(255),
	gender CHAR(1),
	email VARCHAR(255)
)
2.创建对应的javaBean
public class Employee {
    private Integer id;
    private String lastName;
    private String email;
    private String gender;
    ... ...
}
3. 导入相关jar包

其中log4j日志包要能运行,需要在配置文件夹中使用log4j.xml(官网下载直接用),代码如下
4. 创建mybatis配置文件
MyBatis的全局配置文件包含了影响MyBatis行为甚深的设置和属性信息、如数据库连接池信息以及决定事务作用域和控制方式的事务管理器等,后面会再探讨 XML 配置文件的详细内容。我们先参照官方文件的配置示例。
mybatis-config.xml
注意 XML 头部的声明,它用来验证 XML 文档的正确性。environment 元素体中包含了事务管理和连接池的配置。mappers 元素则包含了一组映射器(mapper),这些映射器的 XML 映射文件包含了 SQL 代码和映射定义信息。
5.根据配置文件创建SqlSessionFactory,从 SqlSessionFactory 中获取 SqlSession,使用sqlsession执行增删改查
MyBatis的应用都是以一个SqlSessionFactory的实例为核心的。SqlSessionFactory 的实例可以通过SqlSessionFactoryBuilder 获得。而 SqlSessionFactoryBuilder 则可以从 XML 配置文件或一个预先配置的 Configuration 实例来构建出 SqlSessionFactory 实例。
从 XML 文件中构建 SqlSessionFactory 的实例非常简单,建议使用类路径下的资源文件进行配置。MyBatis 包含一个名叫 Resources 的工具类,它包含一些实用方法,使得从类路径或其它位置加载资源文件更加容易。
public class MybatisText {
    /**
     * 1.根据xml配置文件(全局配置文件)创建一个SqlSessionFactory对象
     * 2.
     * @throws IOException
     */
    @Test
    public void test() throws IOException {
        //1.根据全局配置文件,利用SqlSessionFactoryBuilder创建SqlSessionFactory
        String resource = "mybatis-config.xml";
        InputStream inputStream = Resources.getResourceAsStream(resource);
        SqlSessionFactory sqlSessionFactory = new SqlSessionFactoryBuilder().build(inputStream);
        //2.使用SqlSessionFactory获取sqlSession对象,能直接执行已映射的sql语句。一个SqlSession对象代表和数据库的一次会话。
        SqlSession openSession = sqlSessionFactory.openSession();
                //3.使用SqlSession根据方法id进行操作
                try {
                    //1.sql的唯一标识,通常namespace+id的方式
                    //2.执行sql要用的参数
                    Employee employee = openSession.selectOne("com.atguigu.mybatis.EmployeeMapper.selectEmp",1);
                    System.out.println(employee);
                } finally {
                    openSession.close();
                }
    }
6. 创建SQL映射文件
映射文件的作用就相当于是定义Dao接口的实现类如何工作。这也是我们使用MyBatis时编写的最多的文件。
EmployeeMapper.xml
7.测试

步骤总结:
1.创建全局配置文件
2.根据全局配置文件创建SqlSessionFactory对象
3.创建sql映射文件(配置了每一个sql,以及sql的封装规则等)
4.将sql映射文件注册在全局配置文件中细节:
1.根据配置文件创建SqlSessionFactory,从 SqlSessionFactory 中获取 SqlSession,使用sqlsession执行增删改查。一个sqlSession就是代表和数据库的一次会话,用完关闭
2.使用sql的唯一标志来告诉MyBatis执行哪个sql(后面我们采用接口编程的方法取代)。sql都是保存在sql映射文件中的。
3.接口式编程
SqlSession可以直接调用方法的唯一标注(namespace+id)进行数据库操作,但是我们一般还是推荐使用SqlSession获取到Dao接口的代理类,执行代理对象的方法,可以更安全的进行类型检查操作。
1.创建一个Dao接口
public interface EmployeeMapper {
    public Employee getEmpById(Integer id);
}
2.修改Mapper文件
	public SqlSessionFactory getSqlSessionFactory() throws IOException {
		String resource = "mybatis-config.xml";
		InputStream inputStream = Resources.getResourceAsStream(resource);
		return new SqlSessionFactoryBuilder().build(inputStream);
	}

    @Test
	public void test01() throws IOException {
		// 1、获取sqlSessionFactory对象
		SqlSessionFactory sqlSessionFactory = getSqlSessionFactory();
		// 2、获取sqlSession对象
		SqlSession openSession = sqlSessionFactory.openSession();
		try {
			// 3、获取接口的实现类对象
			//会为接口自动的创建一个代理对象,代理对象去执行增删改查方法
			EmployeeMapper mapper = openSession.getMapper(EmployeeMapper.class);
			Employee employee = mapper.getEmpById(1);
			System.out.println(mapper.getClass());
			System.out.println(employee);
		} finally {
			openSession.close();
		}
	}
employeeMapper.xml

采用接口编程方法的好处:
拥有更强的类型检查,有明确的返回值,将dao层的规范和实现分离出来,方便开发扩展。
总结
1、接口式编程
未使用mybatis之前,一个dao接口对应一个实现类;使用mybatis后,dao接口以XXXMapper命名,有一个与之对应的sql映射文件
原生: Dao ====> DaoImpl
mybatis: Mapper ====> xxMapper.xml
2、SqlSession代表和数据库的一次会话,用完必须关闭;
3、SqlSession和connection一样都是非线程安全。每次使用都应该去获取新的对象。
4、mapper接口没有实现类,但是mybatis会为这个接口生成一个代理对象。(将接口和xml进行绑定)
EmployeeMapper empMapper = sqlSession.getMapper(EmployeeMapper.class);
5、两个重要的配置文件:
mybatis的全局配置文件:包含数据库连接池信息,事务管理器信息等...系统运行环境信息
sql映射文件:保存了每一个sql语句的映射信息:将sql抽取出来。
三、全局配置文件
MyBatis的配置文件包含了影响 MyBatis 行为甚深的设置(settings)和属性(properties)信息。文档的顶层结构如下:

1.properties属性
1、mybatis可以使用properties来引入外部properties配置文件的内容;
resource:引入类路径下的资源
url:引入网络路径或者磁盘路径下的资源
示例:类路径下有dbconfig.properties文件
jdbc.driver=com.mysql.jdbc.Driver
jdbc.url=jdbc:mysql://localhost:3306/mybatis
jdbc.username=root
jdbc.password=123456
mybatis-config.xml(此部分后续会和spring整合,此形式不常用了)
• 如果属性在不只一个地方进行了配置,那么 MyBatis 将按照下面的顺序来加载:
在 properties 元素体内指定的属性首先被读取。
然后根据 properties 元素中的 resource 属性读取类路径下属性文件或根据 url 属性指定的路径读取属性文件,并覆盖已读取的同名属性。
最后读取作为方法参数传递的属性,并覆盖已读取的同名属性。
2.settings设置
这是MyBatis中极为重要的调整设置,它们会改变MyBatis的运行时行为。(边用边学)
settings包含很多重要的设置项
setting:用来设置每一个设置项
name:设置项名
value:设置项取值

3.typeAliases别名处理器
别名处理器可以为我们的java类型起别名,别名不区分大小写。类型别名可以方便我们引用某个类。(一般为了好找写好的类,我们还是会使用全类名的方式)
1、typeAlias:为某个java类型起别名
type:指定要起别名的类型的类名,默认别名就是类名小写
alias:指定新的别名
类很多的情况下,可以批量设置别名。这个包下的每一个类创建一个默认的别名,就是简单类名小写。
2.package:为某个包下的所有类批量起别名
name:指定包名(为当前包以及下面所有的后代包的每一个类都起一个默认别名(类名小写))
3.为避免批量起别命名带来冲突(包和子包有同名类),使用@Alias注解为某个类型指定新的别名
@Alias("emp")
public class Employee {
    private Integer id;
    private String lastName;
    ......
}
值得注意的是,MyBatis已经为许多常见的 Java 类型内建了相应的类型别名。它们都是大小写不敏感的,我们在起别名的时候千万不要占用已有的别名。

4.typeHandlers类型处理器
无论是MyBatis在预处理语句(PreparedStatement)中设置一个参数时,还是从结果集中取出一个值时, 都会用类型处理器将获取的值以合适的方式转换成 Java 类型。
作用:架起java类型和数据库类型一一映射的桥梁

日期类型的处理
日期和时间的处理,JDK1.8以前一直是个头疼的问题。我们通常使用JSR310规范领导者Stephen Colebourne创建的Joda-Time来操作。1.8已经实现全部的JSR310规范了。
• 日期时间处理上,我们可以使用MyBatis基于JSR310(Date and Time API)编写的各种日时间类型处理器。
• MyBatis3.4以前的版本需要我们手动注册这些处理器,以后的版本都是自动注册
自定义类型处理器
我们可以重写类型处理器或创建自己的类型处理器来处理不支持的或非标准的类型。(放到后部分学习)
步骤:
• 1 实现org.apache.ibatis.type.TypeHandler接口或者继承org.apache.ibatis.type.BaseTypeHandler
• 2 指定其映射某个JDBC类型(可选操作)
• 3 在mybatis全局配置文件中注册
5.plugins插件
等后续讲完mybatis运行原理后细讲,先做简单介绍
插件是MyBatis提供的一个非常强大的机制,我们可以通过插件来修改MyBatis的一些核心行为。插件通过动态代理机制,可以介入四大对象的任何一个方法的执行。后面会有专门的章节我们来介绍mybatis运行原理以及插件
• Executor (update, query, flushStatements, commit, rollback, getTransaction, close, isClosed)
• ParameterHandler (getParameterObject, setParameters)
• ResultSetHandler (handleResultSets, handleOutputParameters)
• StatementHandler (prepare, parameterize, batch, update, query)
6.environments环境
environment-指定具体环境
• id:指定当前环境的唯一标识
• transactionManager、和dataSource子标签都必须有

transactionManager标签:事务管理器;(我们通常交给spring完成事务管理,了解即可)
type: JDBC | MANAGED | 自定义
– JDBC:使用了 JDBC 的提交和回滚设置,依赖于从数据源得到的连接来管理事务范围。
JdbcTransactionFactory的别名
– MANAGED:不提交或回滚一个连接、让容器来管理事务的整个生命周期(比如 JEE 应用服务器的上下文)。 ManagedTransactionFactory
– 自定义:实现TransactionFactory接口,type=全类名/别名
dataSource标签
• type: UNPOOLED | POOLED | JNDI | 自定义
– UNPOOLED:不使用连接池,UnpooledDataSourceFactory
– POOLED:使用连接池, PooledDataSourceFactory
– JNDI: 在EJB 或应用服务器这类容器中查找指定的数据源
– 自定义:实现DataSourceFactory接口,定义数据源的获取方式。
实际开发中我们使用Spring管理数据源,并进行事务控制的配置来覆盖上述配置别名
7.databaseIdProvider
MyBatis支持多数据库厂商,使用databaseIdProvider标签可以根据不同的数据库厂商执行不同的语句
Type: DB_VENDOR
– 使用MyBatis提供的VendorDatabaseIdProvider解析数据库厂商标识。也可以实现DatabaseIdProvider接口来自定义。
• Property-name:数据库厂商标识
• Property-value:为标识起一个别名,方便SQL语句使用databaseId属性引用
MyBatis匹配规则如下:
– 1、如果没有配置databaseIdProvider标签,那么databaseId=null
– 2、如果配置了databaseIdProvider标签,使用标签配置的name去匹配数据库信息,匹配上设置databaseId=配置指定的值,否则依旧为null
– 3、如果databaseId不为null,他只会找到配置databaseId的sql语句
– 4、MyBatis 会加载不带 databaseId 属性和带有匹配当前数据库 databaseId 属性的所有语句。如果同时找到带有 databaseId 和不带databaseId 的相同语句,则不带标识的会被舍弃。
8.mapper映射
将sql映射注册到全局配置中
public interface EmployeeMapperAnnotation {

	@Select("select * from tbl_employee where id=#{id}")
	public Employee getEmpById(Integer id);
}
四、SQL映射文件
映射文件指导着MyBatis如何进行数据库增删改查,有着非常重要的意义;
1.insert、update、delete元素
接口:
public interface EmployeeMapper {
    public Employee getEmpById(Integer id);

    public void addEmp(Employee employee);

    public void deleteEmp(Integer id);

    public void updateEmp(Employee employee);
}
映射文件EmployeeMapper.xml:
insert into tbl_employee(last_name,email,gener) value (#{lastName},#{email},#{gender})
delete from tbl_employee where id=#{id}
update tbl_employee set last_name = #{lastName},email=#{email},gender=#{gender}
功能测试:
 @Test
    public void test2() throws IOException {
        //根据全局配置文件,利用SqlSessionFactoryBuilder创建SqlSessionFactory
        String resource = "mybatis-config.xml";
        InputStream inputStream = Resources.getResourceAsStream(resource);
        SqlSessionFactory sqlSessionFactory = new SqlSessionFactoryBuilder().build(inputStream);
        //1.获取到的sqlSession不会自动提交数据
        SqlSession openSession = sqlSessionFactory.openSession();
        try {
            EmployeeMapper mapper = openSession.getMapper(EmployeeMapper.class);
            //测试添加
            //Employee employee = new Employee(null, "jerry", "jerry@email", "0");
            //mapper.addEmp(employee);
            //测试更新
            //Employee employee = new Employee(2, "jerry", "jerry@email", "0");
            //mapper.updateEmp(employee);
            //测试删除
            mapper.deleteEmp(2);
            //2.手动提交数据
            openSession.commit();
        }finally {
            openSession.close();
        }
    }
1.mybatis允许增删改直接定义以下类型返回值 Integer、Long、Boolean、void。(运行sql语句后返回的值)
public Integer addEmp(Employee employee);

 Integer integer = mapper.addEmp(employee);
2.我们需要手动提交数据
sqlSessionFactory.openSession();手动提交
sqlSessionFactory.openSession(true);自动提交
2.主键生成方式
• 获取自增主键的值:
mysql支持自增主键。自增主键值的获取,mybatis和原生JDBC一样也是利用statement.getGenreatedKeys()获取;
useGeneratedKeys="true" 使用自增主键获取主键值策略
keyProperty 指定对应的主键属性,也就是mybatis获取到主键值以后,将这个值封装给javaBean的哪个属性
		insert into tbl_employee(last_name,email,gender)
		values(#{lastName},#{email},#{gender})
 Employee employee = new Employee(null, "je", "jerry@email", "0");
 mapper.addEmp(employee);
 System.out.println(employee.getId());//能获取到非空的主键值
• 获取非自增主键的值:
Oracle不支持自增主键,Oracle使用序列来模拟自增;
每次插入的数据的主键是从序列中拿到的值,如何获取到这个值;
			select EMPLOYEES_SEQ.nextval from dual


		insert into employees(EMPLOYEE_ID,LAST_NAME,EMAIL)
		values(#{id},#{lastName},#{email})
3.参数传递
1.单个参数
mybatis不会做特殊处理,
#{参数名/任意名}:取出参数值。
2.多个参数
mybatis会做特殊处理。
示例:
测试
try{
    EmployeeMapper mapper = openSession.getMapper(EmployeeMapper.class);
    Employee employee = mapper.getEmpByIdAndLastName(1, "tom");
    System.out.println(employee);
}
运行结果:
异常报错:
org.apache.ibatis.binding.BindingException:
Parameter 'id' not found.
Available parameters are [1, 0, param1, param2]
操作:
方法:public Employee getEmpByIdAndLastName(Integer id,String lastName);
取值:#{id},#{lastName}
原因分析:
多个参数会被封装成一个map,key:param1...paramN,或者参数的索引也可以
value:传入的参数值
修正:
上述修正方法可以正常使用,但参数命名比较模糊,改进:
3.命名参数
【命名参数】:明确指定封装参数时map的key;@Param("id")
多个参数会被封装成 一个map,
key:使用@Param注解指定的值
value:参数值
#{指定的key}取出对应的参数值
改进后写法:
测试:
try{
    EmployeeMapper mapper = openSession.getMapper(EmployeeMapper.class);
    Employee employee = mapper.getEmpByIdAndLastName(1, "tom");
    System.out.println(employee);
}
运行成功
4.POJO&Map&To:
如果多个参数正好是我们业务逻辑的数据模型,我们就可以直接传入pojo;
#{属性名}:取出传入的pojo的属性值
如果多个参数不是业务模型中的数据,没有对应的pojo,不会经常使用到,为了方便,我们也可以传入map
#{key}:取出map中对应的值
try{
    EmployeeMapper mapper = openSession.getMapper(EmployeeMapper.class);
    Map map = new HashMap<>();
    map.put("id", 2);
    map.put("lastName", "Tom");
    Employee employee = mapper.getEmpByMap(map);
    System.out.println(employee);
}
如果多个参数不是业务模型中的数据,但是经常要使用,推荐来编写一个TO(Transfer Object)数据传输对象
Page{
int index;
int size;
}
思考:
public Employee getEmp(@Param("id")Integer id,String lastName);
取值:id==>#{id/param1} lastName==>#{param2}
public Employee getEmp(Integer id,@Param("e")Employee emp);
取值:id==>#{param1} lastName===>#{param2.lastName/e.lastName}
##特别注意:如果是Collection(List、Set)类型或者是数组,也会特殊处理。也是把传入的list或者数组封装在map中。
key:Collection(collection),如果是List还可以使用这个key(list),数组(array)
public Employee getEmpById(List
取值:取出第一个id的值: #{list[0]}
结合源码,mybatis怎么处理参数(了解内容)
总结:参数多时会封装map,为了不混乱,我们可以使用@Param来指定封装时使用的key;
#{key}就可以取出map中的值;
EmployeeMapper mapper = openSession.getMapper(EmployeeMapper.class);
Employee employee = mapper.getEmpByIdAndLastName(1, "tom");
mapper是代理对象。
paramNameResolver是解析参数封装map的源码
public Object getNamedParams(Object[] args) {
        int paramCount = this.names.size();
        if (args != null && paramCount != 0) {
            if (!this.hasParamAnnotation && paramCount == 1) {//只有一个元素并且没有注解
                Object value = args[(Integer)this.names.firstKey()];
                return wrapToMapIfCollection(value, this.useActualParamName ? (String)this.names.get(0) : null);
            } else {
                Map param = new ParamMap();
                int i = 0;

                for(Iterator var5 = this.names.entrySet().iterator(); var5.hasNext(); ++i) {
                    Entry entry = (Entry)var5.next();
                    param.put(entry.getValue(), args[(Integer)entry.getKey()]);
                    String genericParamName = "param" + (i + 1);
                    if (!this.names.containsValue(genericParamName)) {
                        param.put(genericParamName, args[(Integer)entry.getKey()]);
                    }
                }

                return param;
            }
        } else {
            return null;
        }
    }
(@Param("id")Integer id,@Param("lastName")String lastName);
//1、names:{0=id, 1=lastName};构造器的时候就确定好了
确定流程:
1.获取每个标了param注解的参数的@Param的值:id,lastName; 赋值给name;
2.每次解析一个参数给map中保存信息:(key:参数索引,value:name的值)
name的值:
标注了param注解:注解的值
没有标注:
1.全局配置:useActualParamName(jdk1.8):name=参数名
2.name=map.size();相当于当前元素的索引
{0=id, 1=lastName,2=2}
args【1,"Tom",'hello'】:
public Object getNamedParams(Object[] args) {
final int paramCount = names.size();
//1、参数为null直接返回
if (args == null || paramCount == 0) {
return null;
//2、如果只有一个元素,并且没有Param注解;args[0]:单个参数直接返回
} else if (!hasParamAnnotation && paramCount == 1) {
return args[names.firstKey()];
//3、多个元素或者有Param标注
} else {
final Map param = new ParamMap 4.参数处理
参数值的获取
#{}:可以获取map中的值或者pojo对象属性的值;
${}:可以获取map中的值或者pojo对象属性的值;
演示:select * from tbl_employee where id=${id} and last_name=#{lastName}
效果:Preparing: select * from tbl_employee where id=2 and last_name=?
区别:
#{}:是以预编译的形式,将参数设置到sql语句中;类似元素JDBC的PreparedStatement;防止sql注入
${}:取出的值直接拼装在sql语句中;会有SQL注入安全问题;大多情况下,我们取参数的值都应该去使用#{};
原生jdbc不支持占位符的地方我们就可以使用${}进行取值
比如分表、排序。。。;按照年份分表拆分
select * from ${year}_salary where xxx;//年份可变
select * from tbl_employee order by ${f_name} ${order}//排序按照的字段
try{
			EmployeeMapper mapper = openSession.getMapper(EmployeeMapper.class);
			//Employee employee = mapper.getEmpByIdAndLastName(1, "tom");
			Map map = new HashMap<>();
			map.put("id", 2);
			map.put("lastName", "Tom");
			map.put("tableName", "tbl_employee");
			Employee employee = mapper.getEmpByMap(map);
}
#{}:更丰富的用法:
参数位置支持的属性:
javaType、 jdbcType、 mode(存储过程)、 numericScale、resultMap、 typeHandler、 jdbcTypeName、 expression(未来准备支持的功能);
jdbcType通常需要在某种特定的条件下被设置:
在我们数据为null的时候,有些数据库可能不能识别mybatis对null的默认处理。比如Oracle(报错),如在oracle数据库中添加
EmployeeMapper mapper = openSession.getMapper(EmployeeMapper.class);
//测试添加,邮箱的字段为空
Employee employee = new Employee(null, "jerry4",null, "1");
报错:JdbcType OTHER:无效的类型;因为mybatis对所有的null都映射的是原生Jdbc的OTHER类型,oracle不能正确处理;
由于全局配置中:jdbcTypeForNull=OTHER;oracle不支持;两种办法
1、#{email,jdbcType=OTHER};
2、jdbcTypeForNull=NULL 改全局配置
5.select元素
• Select元素来定义查询操作。
• Id:唯一标识符。
– 用来引用这条语句,需要和接口的方法名一致
• parameterType:参数类型。
– 可以不传,MyBatis会根据TypeHandler自动推断
• resultType:返回值类型。
– 别名或者全类名,如果返回的是集合,定义集合中元素的类型。不能和resultMap同时使用

返回List
List like = mapper.getEmpsByLastNameLike("%e%");
for (Employee employee : like) {
    System.out.println(employee);
}
单条记录封装map
//返回一条记录的map集合,key就是列名,值就是对应的值
public Map getEmpByIdReturnMap(Integer id);
EmployeeMapper mapper = openSession.getMapper(EmployeeMapper.class);
Map map = mapper.getEmpByIdReturnMap(1);
System.out.println(map);
查询结果:
{gender=0, last_name=jerr, id=1, email=jerry@email}
多条记录封装map
//多条记录封装一个map:Map:键是这条记录的主键,值是记录封装后的javaBean
//@MapKey:告诉mybatis封装这个map的时候使用哪个属性作为map的key
@MapKey("lastName")
public Map getEmpByLastNameLikeReturnMap(String lastName);
Map map = mapper.getEmpByLastNameLikeReturnMap("%r%");
System.out.println(map);
6.自动映射
当自动映射查询结果时,MyBatis 会获取结果中返回的列名并在 Java 类中查找相同名字的属性(忽略大小写)。 这意味着如果发现了 ID 列和 id 属性,MyBatis 会将列 ID 的值赋给 id 属性。
• 1、全局setting设置
– autoMappingBehavior默认是PARTIAL,开启自动映射的功能。唯一的要求是列名和javaBean属性名一致
– 如果autoMappingBehavior设置为null则会取消自动映射
– 数据库字段命名规范,POJO属性符合驼峰命名法,如A_COLUMN---aColumn,我们可以开启自动驼峰命名规则映射功能,mapUnderscoreToCamelCase=true。
7.自定义规则resultMap
自定义resultMap,实现高级结果集映射。
示例
EmployeeMapperPlus.java
public interface EmployeeMapperPlus {

	public Employee getEmpById(Integer id);

	public Employee getEmpAndDept(Integer id);

	public Employee getEmpByIdStep(Integer id);

	public List getEmpsByDeptId(Integer deptId);

}
EmployeeMapperPlus.xml
test
EmployeeMapperPlus mapper = openSession.getMapper(EmployeeMapperPlus.class);
Employee empById = mapper.getEmpById(1);
System.out.println(empById);
8.resultMap关联查询
环境搭建
场景一:
查询Employee的同时查询员工对应的部门
一个员工有与之对应的部门信息
employee.java
public class Employee {

	private Integer id;
	private String lastName;
	private String email;
	private String gender;
	private Department dept;
    ......
}
department.java
public class Department {
private Integer id;
private String departmentName;
private List emps;
... ...
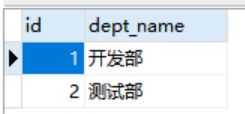
} tbl_dept
CREATE TABLE tbl_dept(
	id INT(11) PRIMARY KEY AUTO_INCREMENT,
	dept_name VARCHAR(255)
)
修改tbl_empolyee
ALTER TABLE tbl_employee ADD COLUMN d_id INT(11);
ALTER TABLE tbl_employee ADD CONSTRAINT fk_emp_dept FOREIGN KEY(d_id) REFERENCES tbl_dept(id);
有两个封装结果的方法:
单个对象级联属性封装
test:
EmployeeMapperPlus mapper = openSession.getMapper(EmployeeMapperPlus.class);
//Employee empById = mapper.getEmpById(1);
Employee empAndDept = mapper.getEmpAndDept(1);
System.out.println(empAndDept);
System.out.println(empAndDept.getDept());
association定义关联单个对象封装规则
association分步查询
1、先按照员工id查询员工信息
2、根据查询员工信息中的d_id值去部门表查出部门信息
3、部门设置到员工中
DepartmentMapper.java
import com.atguigu.mybatis.bean.Department;

public interface DepartmentMapper {

	public Department getDeptById(Integer id);

}
DepartmentMapper.xml
EmployeeMapper.xml
延迟加载:
上述操作,我们每次查询Employee对象的时候,部门信息都将一起查询出来。
部门信息在我们使用的时候再去查询;(按需加载)
方法:在分段查询的基础之上加上两个配置
在全局配置文件中:
collcetion定义关联集合封装规则
一个部门下有很多员工,查部门时显示该部门所有员工信息
场景二:
查询部门的时候将部门对应的所有员工信息也查询出来:
public class Department {

	private Integer id;
	private String departmentName;
	private List emps;
    ... ...
}
departmentMapper.java
import com.atguigu.mybatis.bean.Department;
public interface DepartmentMapper {
public Department getDeptById(Integer id);
public Department getDeptByIdPlus(Integer id);
public Department getDeptByIdStep(Integer id);
}多对象结果级联查询
DepartmentMapper.xml
test:
DepartmentMapper mapper = openSession.getMapper(DepartmentMapper.class);
Department department = mapper.getDeptByIdPlus(1);
System.out.println(department);
System.out.println(department.getEmployees());
多对象结果collection分布查询&延迟查询
1.先根据部门id查部门信息
2.根据部门id查员工信息
3.员工信息设置到查询得到的部门信息中
EmployeeMapperPlus.java
public interface EmployeeMapperPlus {
    ......
	public List getEmpsByDeptId(Integer deptId);
}
EmployeeMapperPlus.xml
DepartmentMapper.xml
test:
Department deptByIdStep = mapper.getDeptByIdStep(1);
System.out.println(deptByIdStep.getDepartmentName());
System.out.println(deptByIdStep.getEmples());
分布查询传递多列值:
将多列的值封装map传递;
column="{key1=column1,key2=column2}"

fetchType="lazy":表示使用延迟加载;(这样使用的话就不用改全局设置)
- lazy:延迟
- eager:立即
discriminator鉴别器
鉴别器:mybatis可以使用discriminator判断某列的值,然后根据某列的值改变封装行为
例子:封装Employee:
如果查出的是女生:就把部门信息查询出来,否则不查询;
如果是男生,把last_name这一列的值赋值给email;
五、动态SQL
动态SQL是MyBatis强大特性之一,极大的简化我们拼装SQL的操作。
动态SQL元素和使用 JSTL 或其他类似基于 XML 的文本处理器相似。
MyBatis 采用功能强大的基于 OGNL 的表达式来简化操作。
1.if
EmployeeMapperDynamicSQL.xml
查询的时候如果某些条件没带可能sql拼装会有问题
如id没有参数值,得到的sql语句为select * from tbl_employee where and last_name like ?
解决方法:1、给where后面加上1=1,以后的条件都and xxx.
2、mybatis使用where标签来将所有的查询条件包括在内。mybatis就会将where标签中拼装的sql,多出来的and或者or去掉
注意:where只会去掉开头多出来的and或者or。
test:
@Test
	public void testDynamicSql() throws IOException{
		SqlSessionFactory sqlSessionFactory = getSqlSessionFactory();
		SqlSession openSession = sqlSessionFactory.openSession();
		try{
			EmployeeMapperDynamicSQL mapper = openSession.getMapper(EmployeeMapperDynamicSQL.class);
			//select * from tbl_employee where id=? and last_name like ?
			//测试if\where
			Employee employee = new Employee(1, "Admin", null, null);
			List emps = mapper.getEmpsByConditionIf(employee );
			for (Employee emp : emps) {
				System.out.println(emp);
			}

        }finally{
			openSession.close();
		}
	}
2.trim
自定义字符串截取,
		 		 email=#{email} and


		 	 	gender=#{gender}
select * from tbl_employee where email = ? and
使用trim解决
3.choose
分支选择,只会进入一个条件查询。相当于带了break的swtich-case
4.set
where封装查询条件, set封装修改条件
更新对应列的值
	 	update tbl_employee
		set

				last_name=#{lastName},


				email=#{email},


				gender=#{gender}

				where id=#{id}
上述写法会出现多逗号的问题,如update tbl_employee set last_name=?, where id=?
通过set标签或trim改进,set标签会删掉额外的逗号
	 	update tbl_employee


				last_name=#{lastName},


				email=#{email},


				gender=#{gender}


		where id=#{id}
5.for each
MySQL下for each批量插入的两种方式
方式一:
insert into tbl_employee(
(#{emp.lastName},#{emp.email},#{emp.gender},#{emp.dept.id})
test
@Test
	public void testBatchSave() throws IOException{
		SqlSessionFactory sqlSessionFactory = getSqlSessionFactory();
		SqlSession openSession = sqlSessionFactory.openSession();
		try{
			EmployeeMapperDynamicSQL mapper = openSession.getMapper(EmployeeMapperDynamicSQL.class);
			List emps = new ArrayList<>();
			emps.add(new Employee(null, "smith0x1", "[email protected]", "1",new Department(1)));
			emps.add(new Employee(null, "allen0x1", "[email protected]", "0",new Department(1)));
			mapper.addEmps(emps);
			openSession.commit();
		}finally{
			openSession.close();
		}
	}
方式二:
这种分号分隔多个sql可以用于其他的批量操作(删除,修改) -->
oracle下批量插入的两种方式
方式一:
1、多个insert放在begin - end;里面
begin
    insert into employees(employee_id,last_name,email) values(employees_seq.nextval,'test_001','[email protected]');
    insert into employees(employee_id,last_name,email) values(employees_seq.nextval,'test_002','[email protected]');
end;


    insert into employees(employee_id,last_name,email) values(employees_seq.nextval,#{emp.lastName},#{emp.email});
方式二:
2、利用中间表:
			insert into employees(employee_id,last_name,email)
		       select employees_seq.nextval,lastName,email from(
		              select 'test_a_01' lastName,'test_a_e01' email from dual
		              union
		              select 'test_a_02' lastName,'test_a_e02' email from dual
		              union
		              select 'test_a_03' lastName,'test_a_e03' email from dual
		       )


	 	insert into employees(


	 	)

	 				select #{emp.lastName} lastName,#{emp.email} email from dual
6.内置参数
两个内置参数:
不只是方法传递过来的参数可以被用来判断,取值。。。
mybatis默认还有两个内置参数:
_parameter:代表整个参数
单个参数:_parameter就是这个参数
多个参数:参数会被封装为一个map,_parameter就是代表这个map
_databaseId:如果配置了databaseIdProvider标签,_databaseId就是代表当前数据库的别名,比如oracle
test
@Test
	public void testInnerParam() throws IOException{
		SqlSessionFactory sqlSessionFactory = getSqlSessionFactory();
		SqlSession openSession = sqlSessionFactory.openSession();
		try{
			EmployeeMapperDynamicSQL mapper = openSession.getMapper(EmployeeMapperDynamicSQL.class);
			List list = mapper.getEmpsTestInnerParameter(null);
			for (Employee employee : list) {
				System.out.println(employee);
			}
		}finally{
			openSession.close();
		}
7.bind绑定
bind:可以将OGNL表达式的值绑定到一个变量中,方便后来引用这个变量的值 (创建一个变量,并将其绑定到当前的上下文)
test中
@Test
	public void testInnerParam() throws IOException{
		SqlSessionFactory sqlSessionFactory = getSqlSessionFactory();
		SqlSession openSession = sqlSessionFactory.openSession();
		try{
			EmployeeMapperDynamicSQL mapper = openSession.getMapper(EmployeeMapperDynamicSQL.class);
			Employee employee2 = new Employee();
			employee2.setLastName("e");//我们建议在这里就写%e%
			List list = mapper.getEmpsTestInnerParameter(employee2);
			for (Employee employee : list) {
				System.out.println(employee);
			}
		}finally{
			openSession.close();
		}
8.抽取可重用sql片段
抽取可重用的sql片段。方便后面引用
1、sql抽取:经常将要查询的列名,或者插入用的列名抽取出来方便引用
2、include来引用已经抽取的sql:
3、include还可以自定义一些property,sql标签内部就能使用自定义的属性
include-property:取值的正确方式${prop},#{不能使用这种方式}
	  			employee_id,last_name,email


	  			last_name,email,gender,d_id


	 	insert into employees(


	 	)

	 				select #{emp.lastName} lastName,#{emp.email} email from dual
六、缓存机制
存在两级缓存:
一级缓存
一级缓存:(本地缓存):sqlSession级别的缓存。一级缓存是一直开启的,是SqlSession级别的一个Map,与数据库同一次会话期间查询到的数据会放在本地缓存中。以后如果需要获取相同的数据,直接从缓存中拿,没必要再去查询数据库;
一级缓存失效情况(没有使用到当前一级缓存的情况,即还需要再向数据库发出查询):
1、sqlSession不同。
2、sqlSession相同,查询条件不同.(当前一级缓存中还没有这个数据)
3、sqlSession相同,两次查询之间执行了增删改操作(这次增删改可能对当前数据有影响)
4、sqlSession相同,手动清除了一级缓存(缓存清空)
@Test
	public void testFirstLevelCache() throws IOException{
		SqlSessionFactory sqlSessionFactory = getSqlSessionFactory();
		SqlSession openSession = sqlSessionFactory.openSession();
		try{
			EmployeeMapper mapper = openSession.getMapper(EmployeeMapper.class);
			Employee emp01 = mapper.getEmpById(1);
			System.out.println(emp01);

			//xxxxx
			//1、sqlSession不同。
			//SqlSession openSession2 = sqlSessionFactory.openSession();
			//EmployeeMapper mapper2 = openSession2.getMapper(EmployeeMapper.class);

			//2、sqlSession相同,查询条件不同

			//3、sqlSession相同,两次查询之间执行了增删改操作(这次增删改可能对当前数据有影响)
			//mapper.addEmp(new Employee(null, "testCache", "cache", "1"));
			//System.out.println("数据添加成功");

			//4、sqlSession相同,手动清除了一级缓存(缓存清空)
			//openSession.clearCache();

			Employee emp02 = mapper.getEmpById(1);
			//Employee emp03 = mapper.getEmpById(3);
			System.out.println(emp02);
			//System.out.println(emp03);
			System.out.println(emp01==emp02);

			//openSession2.close();
		}finally{
			openSession.close();
		}
	}
二级缓存
二级缓存:(全局缓存):基于namespace级别的缓存:一个namespace对应一个二级缓存:
工作机制:
1、一个会话,查询一条数据,这个数据就会被放在当前会话的一级缓存中;
2、如果会话关闭;一级缓存中的数据会被保存到二级缓存中;新的会话查询信息,就可以参照二级缓存中的内容;
3、sqlSession=查找=EmployeeMapper==>Employee
DepartmentMapper===>Department
不同namespace查出的数据会放在自己对应的缓存中(map)
效果:数据会从二级缓存中获取
查出的数据都会被默认先放在一级缓存中。只有会话提交或者关闭以后,一级缓存中的数据才会转移到二级缓存中
使用:
1)、开启全局二级缓存配置:
2)、去mapper.xml中配置使用二级缓存:
3)、我们的POJO需要实现序列化接口
public class Employee implements Serializable{

	private static final long serialVersionUID = 1L;
	private Integer id;
	private String lastName;
    ... ...
}
测试:
@Test
	public void testSecondLevelCache() throws IOException{
		SqlSessionFactory sqlSessionFactory = getSqlSessionFactory();
		SqlSession openSession = sqlSessionFactory.openSession();
		SqlSession openSession2 = sqlSessionFactory.openSession();
		try{
			//1、两次会话查询同一个数据
			EmployeeMapper mapper = openSession.getMapper(EmployeeMapper.class);
			EmployeeMapper mapper2 = openSession2.getMapper(EmployeeMapper.class);

			//第一个会话查完后关闭
			Employee emp01 = mapper.getEmpById(1);
			System.out.println(emp01);
			openSession.close();

			//第二次查询是从二级缓存中拿到的数据,并没有发送新的sql

			//如果没有开启二级缓存,会发起两次查询
			Employee emp02 = mapper2.getEmpById(1);
			System.out.println(emp02);
			openSession2.close();

		}finally{

		}
	}
和缓存有关的设置/属性:
1)、cacheEnabled=true:(开启二级缓存)false:关闭缓存(二级缓存关闭)(一级缓存一直可用的)
2)、每个select标签都有useCache标签,useCache="true":(使用二级缓存)
false:不使用缓存(一级缓存依然使用,二级缓存不使用)
3)、【每个增删改标签的:flushCache="true":(一级二级都会清除)】,增删改执行完成后就会清除缓存;
测试:flushCache="true":一级缓存就清空了;二级也会被清除;
查询标签:flushCache="false":默认false,不清缓存
如果flushCache=true;每次查询之后都会清空缓存;缓存是没有被使用的;
4)、sqlSession.clearCache();只是清除当前session的一级缓存;
5)、localCacheScope:本地缓存作用域:(一级缓存SESSION);当前会话的所有数据保存在会话缓存中;
STATEMENT:数据不保存在缓存中,相当于可以禁用一级缓存;
缓存原理图示

第三方缓存整合
EhCache 是一个纯Java的进程内缓存框架,具有快速、精干等特点,是Hibernate中默认的CacheProvider。
MyBatis定义了Cache接口方便我们进行自定义扩展。
步骤:
– 1、导入ehcache包,以及整合包,日志包ehcache-core-2.6.8.jar、mybatis-ehcache-1.0.3.jar(ehcahce和mybatis的适配包) slf4j-api-1.6.1.jar、slf4j-log4j12-1.6.2.jar
– 2、编写ehcache.xml配置文件
– 3、配置cache标签
EmployeeMapper.xml中
ehcache.xml
参照缓存:若想在命名空间中共享相同的缓存配置和实例。可以使用 cache-ref 元素来引用另外一个缓存。
DepartmentMapper.xml
七、MyBatis-Spring整合
此部分使用IDEA进行SSM整合,会单独开辟专题。
八、MyBatis-逆向工程
MyBatis Generator
正常工程:根据数据表自己创建对应的Javabean,mapper接口等。
逆向:
MyBatis Generator:简称MBG,是一个专门为MyBatis框架使用者定制的代码生成器,可以快速的根据表生成对应的映射文件,接口,以及bean类。支持基本的增删改查,以及QBC风格的条件查询。但是表连接、存储过程等这些复杂sql的定义需要我们手工编写
• 官方文档地址
http://www.mybatis.org/generator/
• 官方工程地址
https://github.com/mybatis/generator/releases下载jar包mybatis-generator-core-1.3.2.jar
MBG使用
• 使用步骤:
– 1)编写MBG的配置文件(重要几处配置)
1)jdbcConnection配置数据库连接信息
2)javaModelGenerator配置javaBean的生成策略
3)sqlMapGenerator 配置sql映射文件生成策略
4)javaClientGenerator配置Mapper接口的生成策略
5)table 配置要逆向解析的数据表
tableName:表名
domainObjectName:对应的javaBean名
mbg.xml
– 2)运行代码生成器生成代码
• 注意:
Context标签
targetRuntime=“MyBatis3“可以生成带条件的增删改查
targetRuntime=“MyBatis3Simple“可以生成基本的增删改查
如果再次生成,建议将之前生成的数据删除,避免xml向后追加内容出现的问
题。
生成
@Test
	public void testMbg() throws Exception {
		List warnings = new ArrayList();
		boolean overwrite = true;
		File configFile = new File("mbg.xml");
		ConfigurationParser cp = new ConfigurationParser(warnings);
		Configuration config = cp.parseConfiguration(configFile);
		DefaultShellCallback callback = new DefaultShellCallback(overwrite);
		MyBatisGenerator myBatisGenerator = new MyBatisGenerator(config,
				callback, warnings);
		myBatisGenerator.generate(null);
	}
测试豪华版:
@Test
	public void testMyBatis3() throws IOException{
		SqlSessionFactory sqlSessionFactory = getSqlSessionFactory();
		SqlSession openSession = sqlSessionFactory.openSession();
		try{
			EmployeeMapper mapper = openSession.getMapper(EmployeeMapper.class);
			//xxxExample就是封装查询条件的
			//1、查询所有
			//List emps = mapper.selectByExample(null);

            //2、查询员工名字中有e字母并且员工性别是1的
			//封装员工查询条件的example
			EmployeeExample example = new EmployeeExample();
			//创建一个Criteria,这个Criteria就是拼装查询条件
			//select id, last_name, email, gender, d_id from tbl_employee
			//WHERE ( last_name like ? and gender = ? ) or email like "%e%"
			Criteria criteria = example.createCriteria();
			criteria.andLastNameLike("%e%");
			criteria.andGenderEqualTo("1");

			Criteria criteria2 = example.createCriteria();
			criteria2.andEmailLike("%e%");
			example.or(criteria2);

			List list = mapper.selectByExample(example);
			for (Employee employee : list) {
				System.out.println(employee.getId());
			}

		}finally{
			openSession.close();
		}
	}
九、MyBatis工作原理

1、获取sqlSessionFactory对象:

String resource = "mybatis-config.xml";
InputStream inputStream = Resources.getResourceAsStream(resource);
SqlSessionFactory sqlSessionFactory = new SqlSessionFactoryBuilder().build(inputStream);
// 1.我们最初调用的build
public SqlSessionFactory build(InputStream inputStream) {
//调用了重载方法
return build(inputStream, null, null);
}
// 2.调用的重载方法
public SqlSessionFactory build(InputStream inputStream, String environment, Properties properties) {
try {
// XMLConfigBuilder是专门解析mybatis的配置文件的类
XMLConfigBuilder parser = new XMLConfigBuilder(inputStream, environment, properties);
//这里又调用了一个重载方法。parser.parse()的返回值是Configuration对象
return build(parser.parse());
} catch (Exception e) {
throw ExceptionFactory.wrapException("Error building SqlSession.", e);
} //省略部分代码
}
下面进入对配置文件解析部分:
//在创建XMLConfigBuilder时,它的构造方法中解析器XPathParser已经读取了配置文件
//3. 进入XMLConfigBuilder 中的 parse()方法。
public Configuration parse() {
    if (parsed) {
      throw new BuilderException("Each XMLConfigBuilder can only be used once.");
    }
    parsed = true;
    //parser是XPathParser解析器对象,读取节点内数据,是MyBatis配置文件中的顶层标签
    parseConfiguration(parser.evalNode("/configuration"));
    //最后返回的是Configuration 对象
    return configuration;
}

//4. 进入parseConfiguration方法
//此方法中读取了各个标签内容并封装到Configuration中的属性中。
private void parseConfiguration(XNode root) {
    try {
      //issue #117 read properties first
      propertiesElement(root.evalNode("properties"));
      Properties settings = settingsAsProperties(root.evalNode("settings"));
      loadCustomVfs(settings);
      loadCustomLogImpl(settings);
      typeAliasesElement(root.evalNode("typeAliases"));
      pluginElement(root.evalNode("plugins"));
      objectFactoryElement(root.evalNode("objectFactory"));
      objectWrapperFactoryElement(root.evalNode("objectWrapperFactory"));
      reflectorFactoryElement(root.evalNode("reflectorFactory"));
      settingsElement(settings);
      // read it after objectFactory and objectWrapperFactory issue #631
      environmentsElement(root.evalNode("environments"));
      databaseIdProviderElement(root.evalNode("databaseIdProvider"));
      typeHandlerElement(root.evalNode("typeHandlers"));
      mapperElement(root.evalNode("mappers"));
    } catch (Exception e) {
      throw new BuilderException("Error parsing SQL Mapper Configuration. Cause: " + e, e);
    }
}
到此对xml配置文件的解析就结束了(下文会对部分解析做详细介绍),回到步骤 2. 中调用的重载build方法。
// 5. 调用的重载方法
public SqlSessionFactory build(Configuration config) {
	//创建了DefaultSqlSessionFactory对象,传入Configuration对象。
    return new DefaultSqlSessionFactory(config);
  }
SqlSessionFactoryBuilder.java
   public SqlSessionFactory build(InputStream inputStream, String environment, Properties properties) {
        SqlSessionFactory var5;
        try {
            XMLConfigBuilder parser = new XMLConfigBuilder(inputStream, environment, properties);
            var5 = this.build(parser.parse());
        } catch (Exception var14) {
            throw ExceptionFactory.wrapException("Error building SqlSession.", var14);
        } finally {
            ErrorContext.instance().reset();

            try {
                inputStream.close();
            } catch (IOException var13) {
            }

        }

        return var5;
    }

    public SqlSessionFactory build(Configuration config) {
        return new DefaultSqlSessionFactory(config);
    }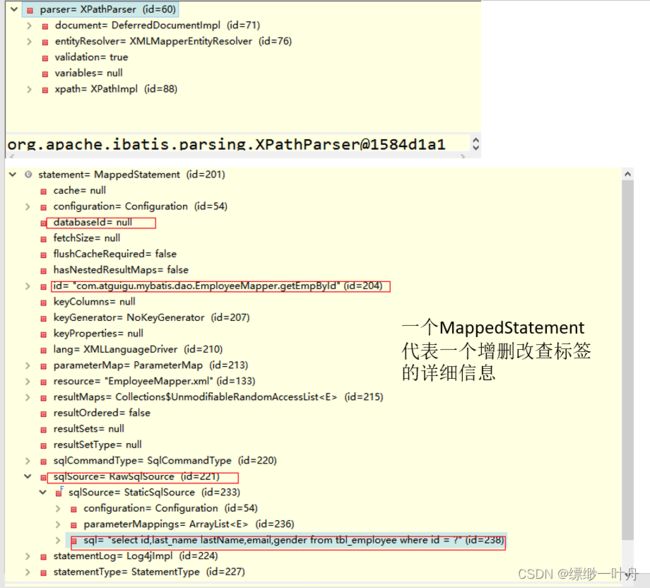

Configuration对象保存了所有配置文件的详细信息,包括全局配置文件和SQL映射文件。
 mappedstatement:每一个方法对应一个MapperStatement对象。每一个MapperStatement对象代表一个增删改查标签,标签id表示
knownMapper:保存了每一个接口对应的MapperProxyFactory
2、获取sqlSession对象
返回一个DefaultSQlSession对象,包含Executor和Configuration;这一步会创建Executor对象;
SqlSession openSession = sqlSessionFactory.openSession();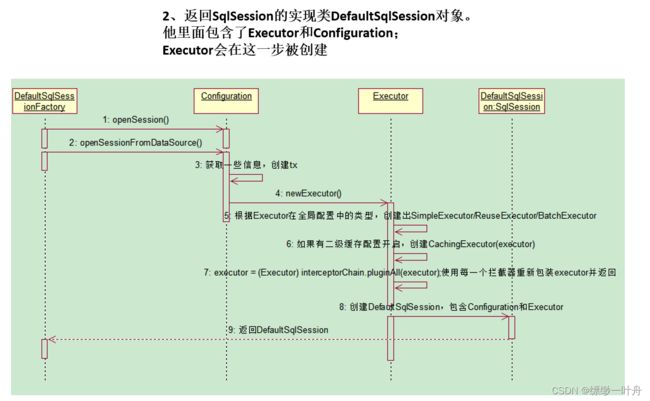
DefaultSqlSessionFactory.java

   public SqlSession openSession(ExecutorType execType, boolean autoCommit) {
        return this.openSessionFromDataSource(execType, (TransactionIsolationLevel)null, autoCommit);
    }

 private SqlSession openSessionFromDataSource(ExecutorType execType, TransactionIsolationLevel level, boolean autoCommit) {
        Transaction tx = null;

        DefaultSqlSession var8;
        try {
            Environment environment = this.configuration.getEnvironment();
            TransactionFactory transactionFactory = this.getTransactionFactoryFromEnvironment(environment);
            tx = transactionFactory.newTransaction(environment.getDataSource(), level, autoCommit);
            Executor executor = this.configuration.newExecutor(tx, execType);
            var8 = new DefaultSqlSession(this.configuration, executor, autoCommit);
        } catch (Exception var12) {
            this.closeTransaction(tx);
            throw ExceptionFactory.wrapException("Error opening session.  Cause: " + var12, var12);
        } finally {
            ErrorContext.instance().reset();
        }

        return var8;
    }
    public Executor newExecutor(Transaction transaction, ExecutorType executorType) {
        executorType = executorType == null ? this.defaultExecutorType : executorType;
        executorType = executorType == null ? ExecutorType.SIMPLE : executorType;
        Object executor;
        if (ExecutorType.BATCH == executorType) {
            executor = new BatchExecutor(this, transaction);
        } else if (ExecutorType.REUSE == executorType) {
            executor = new ReuseExecutor(this, transaction);
        } else {
            executor = new SimpleExecutor(this, transaction);
        }

        if (this.cacheEnabled) {
            executor = new CachingExecutor((Executor)executor);
        }

        Executor executor = (Executor)this.interceptorChain.pluginAll(executor);
        return executor;
    }
3、获取接口的代理对象(MapperProxy)
getMapper,使用MapperProxyFactory创建一个MapperProxy的代理对象
代理对象里面包含了,DefaultSqlSession(Executor)(能进行代理对象)
EmployeeMapper mapper = openSession.getMapper(xxxMapper.class);
public  T getMapper(Class type) {
        return this.configuration.getMapper(type, this);
    }
MapperRegistry.java
public  T getMapper(Class type, SqlSession sqlSession) {
        MapperProxyFactory mapperProxyFactory = (MapperProxyFactory)this.knownMappers.get(type);
        if (mapperProxyFactory == null) {
            throw new BindingException("Type " + type + " is not known to the MapperRegistry.");
        } else {
            try {
                return mapperProxyFactory.newInstance(sqlSession);
            } catch (Exception var5) {
                throw new BindingException("Error getting mapper instance. Cause: " + var5, var5);
            }
        }
    }
4、执行增删改查方法


总结:
1、根据配置文件(全局,sql映射)初始化出Configuration对象
2、创建一个DefaultSqlSession对象,里面包含Configuration以及Executor(根据全局配置文件中的defaultExecutorType创建出对应的Executor)
3、DefaultSqlSession.getMapper():拿到Mapper接口对应的MapperProxy;
4、MapperProxy里面有(DefaultSqlSession);
5、执行增删改查方法:
1)、调用DefaultSqlSession的增删改查(Executor);
2)、会创建一个StatementHandler对象。(同时也会创建出ParameterHandler和ResultSetHandler)
3)、调用StatementHandler预编译参数以及设置参数值;使用ParameterHandler来给sql设置参数
4)、调用StatementHandler的增删改查方法;
5)、ResultSetHandler封装结果
注意:
四大对象每个创建的时候都有一个interceptorChain.pluginAll(parameterHandler);
十、插件开发
插件原理
在四大对象创建的时候
1、每个创建出来的对象不是直接返回的,而是调用interceptorChain.pluginAll(parameterHandler)方法
2、获取到所有的Interceptor(拦截器)(插件需要实现的接口);
调用interceptor.plugin(target);返回target包装后的对象
3、插件机制,我们可以使用插件为目标对象创建一个代理对象;AOP(面向切面)
我们的插件可以为四大对象创建出代理对象;
代理对象就可以拦截到四大对象的每一个执行方法
blic Object pluginAll(Object target) {
	  for (Interceptor interceptor : interceptors) {
	    target = interceptor.plugin(target);
	  }
	  return target;
	}
插件编写
1、编写Interceptor的实现类
2、使用@Intercepts注解完成插件签名
3、将写好的插件注册到全局配置文件中
/**
 * 完成插件签名:
 *		告诉MyBatis当前插件用来拦截哪个对象的哪个方法
 */
@Intercepts(
		{
			@Signature(type=StatementHandler.class,method="parameterize",args=java.sql.Statement.class)
		})
public class MyFirstPlugin implements Interceptor{

	/**
	 * intercept:拦截:
	 * 		拦截目标对象的目标方法的执行;
	 */
	@Override
	public Object intercept(Invocation invocation) throws Throwable {
		// TODO Auto-generated method stub
		System.out.println("MyFirstPlugin...intercept:"+invocation.getMethod());
		//动态的改变一下sql运行的参数:以前1号员工,实际从数据库查询3号员工
		Object target = invocation.getTarget();
		System.out.println("当前拦截到的对象:"+target);
		//拿到:StatementHandler==>ParameterHandler===>parameterObject
		//拿到target的元数据
		MetaObject metaObject = SystemMetaObject.forObject(target);
		Object value = metaObject.getValue("parameterHandler.parameterObject");
		System.out.println("sql语句用的参数是:"+value);
		//修改完sql语句要用的参数
		metaObject.setValue("parameterHandler.parameterObject", 11);
		//执行目标方法
		Object proceed = invocation.proceed();
		//返回执行后的返回值
		return proceed;
	}

	/**
	 * plugin:
	 * 		包装目标对象的:包装:为目标对象创建一个代理对象
	 */
	@Override
	public Object plugin(Object target) {
		// TODO Auto-generated method stub
		//我们可以借助Plugin的wrap方法来使用当前Interceptor包装我们目标对象
		System.out.println("MyFirstPlugin...plugin:mybatis将要包装的对象"+target);
		Object wrap = Plugin.wrap(target, this);
		//返回为当前target创建的动态代理
		return wrap;
	}

	/**
	 * setProperties:
	 * 		将插件注册时 的property属性设置进来
	 */
	@Override
	public void setProperties(Properties properties) {
		// TODO Auto-generated method stub
		System.out.println("插件配置的信息:"+properties);
	}

}

使用步骤
@Test
public void test01() throws IOException {
// 1、获取sqlSessionFactory对象
SqlSessionFactory sqlSessionFactory = getSqlSessionFactory();
// 2、获取sqlSession对象
SqlSession openSession = sqlSessionFactory.openSession();
try {
EmployeeMapper mapper = openSession.getMapper(EmployeeMapper.class);
Page