Unity3D嵌入WPF
此文章旨在记录自己做的第一个将Unity3D嵌入到WPF的工控项目,由于实际需要,也搜寻过很多博主的文章进行学习,在进行项目开发后记录如下心得以便日后参考,亦希望大家能多多指教。
由于WPF在桌面应用程序开发且处理业务逻辑时的优点明显,但进行三维场景实时展示却捉襟见肘。相反Unity3D则具有三维场景展示与交互等优点,却在业务逻辑处理中存在一定的局限性。因此将Unity3D嵌入到WPF里并进行信息交互。
这里先放Unity的官方链接,可以参考此文档选择嵌入方式,我这边选用的是将Unity作为外部进程启动,并放到指定窗口,使用parentHWND对Unity进行初始化和呈现。https://docs.unity3d.com/Manual/UnityasaLibrary-Windows.html![]() https://docs.unity3d.com/Manual/UnityasaLibrary-Windows.html
https://docs.unity3d.com/Manual/UnityasaLibrary-Windows.html
这里做一个小demo,先看看实际效果:
一、WPF界面:
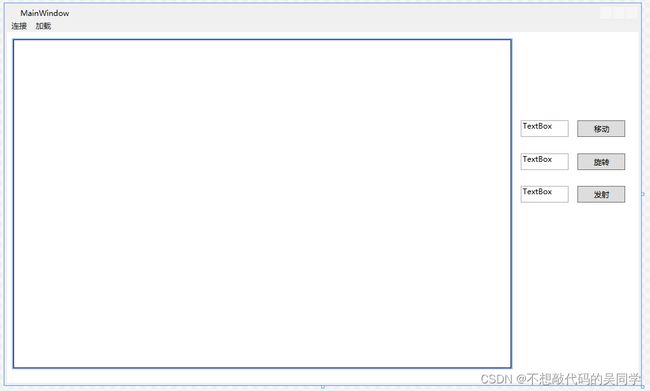
新建WPF项目,然后在主界面拖动Border控件到窗体中,在XAML中更改到合适的位置,以此为依托来加载Unity,然后编写MainWindow.xaml的交互逻辑。
二、MainWindow.xaml的编写:
由于展示的是一个小demo,故拿物体简单的移动和旋转举例,故主要添加移动和旋转两个Button,再加两个TextBox作为输入。
xmlns="http://schemas.microsoft.com/winfx/2006/xaml/presentation"
xmlns:x="http://schemas.microsoft.com/winfx/2006/xaml"
xmlns:d="http://schemas.microsoft.com/expression/blend/2008"
xmlns:mc="http://schemas.openxmlformats.org/markup-compatibility/2006"
xmlns:local="clr-namespace:示例1"
mc:Ignorable="d"
WindowStartupLocation="CenterScreen"
Title="MainWindow" Height="600" Width="1000"
Loaded="Window_Loaded"
SizeChanged="Window_SizeChanged"
Closed="Window_Closed"
Deactivated="Window_Deactivated"
Activated="Window_Activated">
三、MainWindow.xaml.cs的编写:
注意事项:
1.在LoadUnity()里,这里应该在该项目的bin/debug文件夹下创造一个Unity文件夹,把Unity项目导入其中。
process.StartInfo.FileName = appStartupPath + @"\Unity\example.exe";
2.由于此博文主要记录Unity嵌入到WPF中,展示嵌入及运动效果,故在定时器触发事件中,我给的运动指令是一个自动指令,无需在TextBox中输入指定值。关于想要物体在自己输入的情况下进行运动,将在下一篇博文中进行记录。
        private void timer_Elapsed(object sender, ElapsedEventArgs e)
        {
            count += 0.05f;
            string str = string.Format("{0} , {1} ", count, -6.5f * count + 1);
            byte[] buffer = System.Text.Encoding.UTF8.GetBytes(str);
            socketCommnication.Send(buffer);
        }
这里放下demo的.cs整块代码:
using System;
using System.Collections.Generic;
using System.Linq;
using System.Text;
using System.Threading.Tasks;
using System.Windows;
using System.Windows.Controls;
using System.Windows.Data;
using System.Windows.Documents;
using System.Windows.Input;
using System.Windows.Media;
using System.Windows.Media.Imaging;
using System.Windows.Navigation;
using System.Windows.Shapes;
using System.Runtime.InteropServices;
using System.Diagnostics;
using System.Windows.Threading;
using System.Timers;
using System.Net.Sockets;
using System.Threading;
using System.Windows.Interop;
using System.Net;

namespace 示例1
{
    ///
    /// MainWindow.xaml 的交互逻辑
    ///
    public partial class MainWindow : Window
    {
        [DllImport("User32.dll")]
        static extern bool MoveWindow(IntPtr handle, int x, int y, int width, int height, bool redraw);
        internal delegate int WindowEnumProc(IntPtr hwnd, IntPtr lparam);
//改变指定窗口的位置和尺寸,基于左上角(屏幕/父窗口)(指定窗口的句柄,窗口左位置,窗口顶位置,窗口新宽度,窗口新高度,指定是否重画窗口)

        [DllImport("user32.dll")]
        internal static extern bool EnumChildWindows(IntPtr hwnd, WindowEnumProc func, IntPtr lParam);
//枚举一个父窗口的所有子窗口(父窗口句柄,回调函数的地址,自定义的参数)

        [DllImport("user32.dll")]
        static extern int SendMessage(IntPtr hWnd, int msg, IntPtr wParam, IntPtr lParam);
//该函数将指定的消息发送到一个或多个窗口。此函数为指定的窗口调用窗口程序,直到窗口程序处理完消息再返回。(窗口句柄。窗口可以是任何类型的屏幕对象,用于区别其他消息的常量值,通常是一个与消息有关的常量值,也可能是窗口或控件的句柄,通常是一个指向内存中数据的指针)

        private Process process;
        private IntPtr unityHWND = IntPtr.Zero;
        private const int WM_ACTIVATE = 0x0006;
        private readonly IntPtr WA_ACTIVE = new IntPtr(1);
        private readonly IntPtr WA_INACTIVE = new IntPtr(0);

        private bool isU3DLoaded = false;
        private Point u3dLeftUpPos;

        private DispatcherTimer dispatcherTimer;

        System.Timers.Timer timer = new System.Timers.Timer();
        float count = 0;
        Socket socketCommnication;
        bool IsListening = true;
        Thread threadli;

        public MainWindow()
        {
            InitializeComponent();
            timer.Interval = 100;
            timer.Elapsed += new ElapsedEventHandler(timer_Elapsed);
            timer.AutoReset = true ;
        }
        private void timer_Elapsed(object sender, ElapsedEventArgs e)
        {
            count += 0.05f ;
            string str = string.Format("{0} , {1}  ", count, -5f * count + 1);
            byte[] buffer = System.Text.Encoding.UTF8.GetBytes(str);
            socketCommnication.Send(buffer);
        }

        //开始监听线程
        private void Listen(object obj)
        {
            Socket socketWatch = obj as Socket;
            while (IsListening)
            {
                socketCommnication = socketWatch.Accept();
                if (socketCommnication.Connected)
                {
                    System.Windows.MessageBox.Show(socketCommnication.RemoteEndPoint.ToString() + ":连接成功");
                    IsListening = false;
                }
            }
        }

        //窗体加载事件
        private void Window_Loaded(object sender, RoutedEventArgs e)
        {

        }

        //窗体关闭事件
        private void Window_Closed(object sender, EventArgs e)
        {
            try
            {
                process.CloseMainWindow();

                Thread.Sleep(1000);
                while (process.HasExited == false)
                    process.Kill();

                //Sever.QuitServer();

                timer.Stop();
                socketCommnication.Close();
                IsListening = false;
                threadli.Abort();
                System.Environment.Exit(0);
            }
            catch (Exception)
            {
            }
        }

        //窗体大小改变事件
        private void Window_SizeChanged(object sender, SizeChangedEventArgs e)
        {
            ResizeU3D();
        }

        //获得焦点事件,首次打开软件、由别的软件切换到当前软件
        private void Window_Deactivated(object sender, EventArgs e)
        {
            DeactivateUnityWindow();
        }

        //失去焦点事件
        private void Window_Activated(object sender, EventArgs e)
        {
            ActivateUnityWindow();
        }

        #region Unity操作
        private void LoadUnity()
        {
            try
            {
                IntPtr hwnd = ((HwndSource)PresentationSource.FromVisual(Panel1)).Handle;
                process = new Process();

                String appStartupPath = System.IO.Path.GetDirectoryName(Process.GetCurrentProcess().MainModule.FileName);
                process.StartInfo.FileName = appStartupPath + @"\Unity\example.exe";
                process.StartInfo.Arguments = "-parentHWND " + hwnd.ToInt32() + " " + Environment.CommandLine;
                process.StartInfo.UseShellExecute = true;
                process.StartInfo.CreateNoWindow = true;

                process.Start();
                process.WaitForInputIdle();
                isU3DLoaded = true;
                EnumChildWindows(hwnd, WindowEnum, IntPtr.Zero);

                dispatcherTimer = new DispatcherTimer();
                dispatcherTimer.Tick += new EventHandler(InitialResize);
                dispatcherTimer.Interval = new TimeSpan(0, 0, 0, 0, 200);
                dispatcherTimer.Start();
            }
            catch (Exception ex)
            {
                string error = ex.Message;
            }
        }
        private void InitialResize(object sender, EventArgs e)
        {
            ResizeU3D();
            dispatcherTimer.Stop();
        }
        private int WindowEnum(IntPtr hwnd, IntPtr lparam)
        {
            unityHWND = hwnd;
            ActivateUnityWindow();
            return 0;
        }
        private void ActivateUnityWindow()
        {
            SendMessage(unityHWND, WM_ACTIVATE, WA_ACTIVE, IntPtr.Zero);
        }

        private void DeactivateUnityWindow()
        {
            SendMessage(unityHWND, WM_ACTIVATE, WA_INACTIVE, IntPtr.Zero);
        }

        private void ResizeU3D()
        {
            if (isU3DLoaded)
            {
                Window window = Window.GetWindow(this);
                u3dLeftUpPos = Panel1.TransformToAncestor(window).Transform(new Point(0, 0));
                DPIUtils.Init(this);
                u3dLeftUpPos.X *= DPIUtils.DPIX;
                u3dLeftUpPos.Y *= DPIUtils.DPIY;
                MoveWindow(unityHWND, (int)u3dLeftUpPos.X, (int)u3dLeftUpPos.Y, (int)(Panel1.ActualWidth * DPIUtils.DPIX), (int)(Panel1.ActualHeight * DPIUtils.DPIY), true);
                ActivateUnityWindow();
            }
        }
        #endregion

        private void LoadUnity_Click(object sender, RoutedEventArgs e)
        {
            LoadUnity();
        }

        private void Connect(object sender, RoutedEventArgs e)
        {
            Socket socketWatch = new Socket(AddressFamily.InterNetwork, SocketType.Stream, ProtocolType.Tcp);
            IPAddress ip = IPAddress.Parse("127.0.0.1");
            IPEndPoint endPoint = new IPEndPoint(ip, Convert.ToInt32("9000"));
            socketWatch.Bind(endPoint);
            System.Windows.Forms.MessageBox.Show("监听成功");
            socketWatch.Listen(10);
            threadli = new Thread(new ParameterizedThreadStart(Listen));
            threadli.IsBackground = true;
            threadli.Start(socketWatch);
        }

        private void Send(object sender, RoutedEventArgs e)
        {
            timer.Start();
        }
    }
    #region 窗体位置坐标变换
    public class DPIUtils
    {
        private static double _dpiX = 1.0;
        private static double _dpiY = 1.0;
        public static double DPIX
        {
            get
            {
                return DPIUtils._dpiX;
            }
        }
        public static double DPIY
        {
            get
            {
                return DPIUtils._dpiY;
            }
        }
        public static void Init(System.Windows.Media.Visual visual)
        {
            Matrix transformToDevice = System.Windows.PresentationSource.FromVisual(visual).CompositionTarget.TransformToDevice;
            DPIUtils._dpiX = transformToDevice.M11;
            DPIUtils._dpiY = transformToDevice.M22;
        }
        public static Point DivideByDPI(Point p)
        {
            return new Point(p.X / DPIUtils.DPIX, p.Y / DPIUtils.DPIY);
        }
        public static Rect DivideByDPI(Rect r)
        {
            return new Rect(r.Left / DPIUtils.DPIX, r.Top / DPIUtils.DPIY, r.Width, r.Height);
        }
    }
    #endregion
}
四、TCP类的编写:
网上有很多资源,可以根据实际需要来选择适合的进行参考,主要有以下几点需注意。
1.开启服务端:
        public void StartServer()
        {
            IPAddress ip = IPAddress.Parse("127.0.0.1");
            serverSocket = new Socket(AddressFamily.InterNetwork, SocketType.Stream, ProtocolType.Tcp);
            serverSocket.Bind(new IPEndPoint(ip, myProt));
            serverSocket.Listen(10);
            myThread = new Thread(ListenClientConnect);
            myThread.IsBackground = true;
            myThread.Start();
        }
2.监听客户端的连接:
 private static void ListenClientConnect()
        {
            while (true)
            {
                try
                {
                    clientSocket = serverSocket.Accept();
                    string clientInfo = clientSocket.RemoteEndPoint.ToString();
                    receiveThread = new Thread(ReceiveMessage);
                    receiveThread.IsBackground = true;
                    receiveThread.Start(clientSocket);
                }
                catch (Exception)
                {

                }
            }
        }
3.读取数据线程及发送数据:
        private static void ReceiveMessage()
        {
            Socket myClientSocket = (Socket)clientSocket;
            while (true)
            {
                try
                {
                    //通过clientSocket接收数据
                    int receiveNumber = myClientSocket.Receive(result);
                }
                catch (Exception ex)
                {
                    try
                    {
                        myClientSocket.Shutdown(SocketShutdown.Both);
                        myClientSocket.Close();
                        break;
                    }
                    catch (Exception)
                    {
                    }
                }
            }
        }
        internal void SendMessage(string msg)
        {
            clientSocket.Send(Encoding.ASCII.GetBytes(msg));
        }
4.停止通信
        internal void QuitServer()
        {
            serverSocket.Close();
            clientSocket.Close();
            myThread.Abort();
            receiveThread.Abort();
        }
五、Unity的制作:
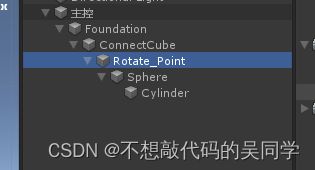
此 demo采用简单的基础三维体进行组合,形成一个小炮台,选用的是父子节点连接方式。下图中Rotate_Point是创建的一个空物体(仅一个点),目的是让炮管(青色圆柱体)绕该点进行旋转。
六、Unity中Main脚本的编写:
using System.Collections;
using System.Collections.Generic;
using UnityEngine;
using System.Net;
using System.Net.Sockets;
using System;
using System.Threading;
using System.Text;
using System.Timers;
using System.IO;

public class Main : MonoBehaviour
{
    Vector3 Foundation = new Vector3(0,0,0);
    Vector3 RotatePoint = new Vector3(0,0.676f,0);
    Vector3 Sphere = new Vector3(-0.015f,0.665f,0);

    public Transform foundation;
    public Transform sphere;

    Socket socketcommunication;
    Thread thread;
    Thread ConnectThread;
    void Start()
    {
        socketcommunication = new Socket(AddressFamily.InterNetwork, SocketType.Stream, ProtocolType.Tcp);
        ConnectThread = new Thread(ConnectServer);
        ConnectThread.IsBackground = true;
        ConnectThread.Start();
    }
    void Update()
    {
        foundation.transform.position = Foundation;
        sphere.transform.localEulerAngles = RotatePoint;
    }
    void Awake()
    {
        //设置帧率
        Application.targetFrameRate = 20;
    }
    private void ConnectServer(object obj)
    {
        IPAddress ip = IPAddress.Parse("127.0.0.1");
        IPEndPoint endpoint = new IPEndPoint(ip, Convert.ToInt32("9000"));

        while (!socketcommunication.Connected)
        {
            try
            {
                socketcommunication.Connect(endpoint);
                if (socketcommunication.Connected)
                {
                    thread = new Thread(new ParameterizedThreadStart(Receive));
                    thread.IsBackground = true;
                    thread.Start(socketcommunication);
                    ConnectThread.Join();
                    ConnectThread.Abort();
                }
            }
            catch
            {
            }
        }
    }
    void Receive(object obj)
    {
        Socket socketCommunication = obj as Socket;
        byte[] buffer = new byte[1024];
        while (true)
        {
            int r = socketCommunication.Receive(buffer);
            Debug.Log(r.ToString());
            if (r == 0)
            {
                socketcommunication.Shutdown(SocketShutdown.Both);
                socketcommunication.Close();
                return;
            }
            else
            {
                string str = Encoding.UTF8.GetString(buffer, 0, r);
                String[] strs = str.Split(',');
                float a = float.Parse(strs[0]);
                float b = float.Parse(strs[1]);
                Foundation = new Vector3(-a,0,0);
                RotatePoint = new Vector3(-b, 0.676f, 0);
            }
        }
    }
}
七、导出Unity到WPF:
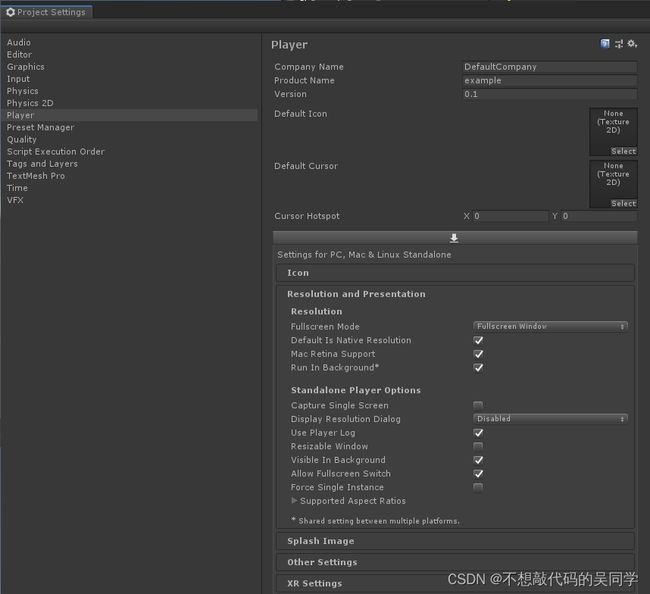
首先在Unity菜单栏Assets选项中选择Project Setting,将Display Resolution Dialog选项更改为Disabled,如下图所示:
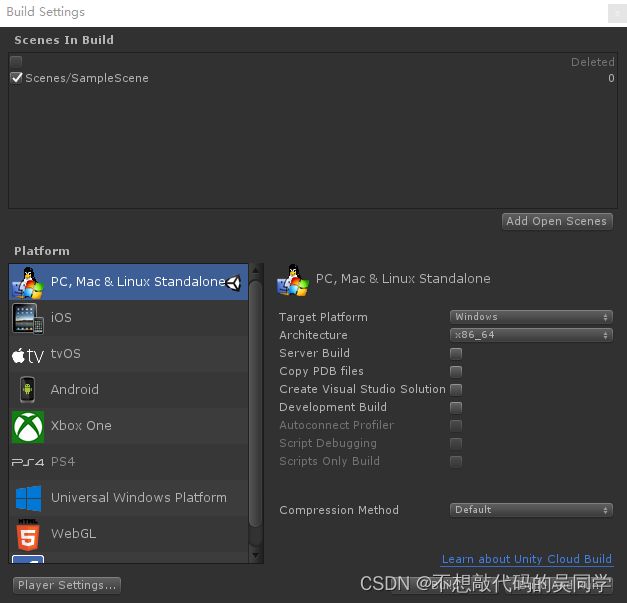
然后在菜单栏里File选择Build Settings,如下图所示,导出到目标文件夹下即可(此处是WPF的文件夹里bin/debug/Unity,可见注意事项1)
做到这一步,这个小demo就完成了,还有一些其他相关的细节及操作我会在有时间时记录下来,如物体结构较为复杂,实现多功能运动,运动指令的编码解码,鼠标控制相机视角的转换等等。当然作为新人博主,此demo也有很多可以改进的地方,希望各位不吝赐教,一起共同进步。


