NIO 学习笔记
NIO学习
NIO 三个重要组件 Buffer Channel Selector
1.Buffer
Buffer,底层数组,通过4个标志维护

- position表示当前指针位置/数组下标
- limit表示缓冲区当前最多处理的数据
- capacity容量
- mark标志位
重要的api
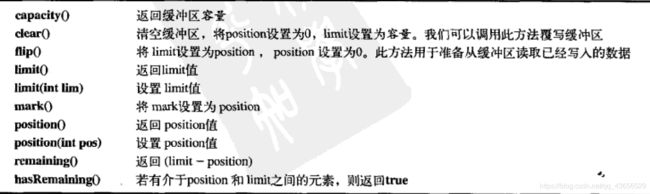
- get() 获取当前位置的数据,指针右移
- put(数据) 向当前位置填入数据
- allocate(int n)初识化,创建一个大小为n的缓冲区
//Buffer的使用
    public static void main(String[] args) {
        IntBuffer intBuffer = IntBuffer.allocate(5);

        for(int i = 0;i<intBuffer.capacity();i++){
            intBuffer.put(i*3);//position++
        }
        //Buffer是双向的,既可以读,也可以写
        //读写切换 "转向"
        //limit = position
        //position = 0
        intBuffer.flip();


        //检查下一个位置是否有数据
        while(intBuffer.hasRemaining()){
            //get()方法获取该位置的值,并且将向后移动指针
            System.out.println(intBuffer.get());//position++
        }
    }
filp()和clear()两者都会把position改为0,不过flip首先将limit=position,再将position置为0,clear将limit = capacity,position = 0
Buffer的聚合和分散
- 可以创建一个Buffer数组进行数据的读取写入,这样会更灵活。
- read() write()接受Buffer[]参数
/*简单的聚合和分散展示*/
public static void main(String[] args) throws Exception{
        ByteBuffer [] byteBuffers = new ByteBuffer[2];
        byteBuffers[0]=ByteBuffer.allocate(5);
        byteBuffers[1]=ByteBuffer.allocate(5);
	//建立Socket步骤
	//1.打开一个ServerSocketChannel用来创建SocketChannel
        ServerSocketChannel serverSocketChannel = ServerSocketChannel.open();

        InetSocketAddress inetSocketAddress = new InetSocketAddress(30000);
	//2.绑定监听端口号
        serverSocketChannel.socket().bind(inetSocketAddress);
	//3.等待客户端连接(类似于ServerSocket的accept方法)  阻塞
        SocketChannel accept = serverSocketChannel.accept();

        int msgLength = 10;//最大输入长度

        while(true){
        //记录输入长度
            long byteRead = 0;

            while(byteRead < msgLength){
            	//阻塞
                long read = accept.read(byteBuffers);
                byteRead+=read;
                System.out.println("byteRead="+byteRead);
				//打印必要信息
                Arrays.asList(byteBuffers).stream().map(byteBuffer ->"position="+byteBuffer.position()+" ,limit="+byteBuffer.limit()).forEach(System.out::println);

            }
            Arrays.asList(byteBuffers).forEach(byteBuffer -> {byteBuffer.flip();});

            long byteWrite = 0;

            while (byteWrite<msgLength){

                long write = accept.write(byteBuffers);

                byteWrite+=write;

            }

            Arrays.asList(byteBuffers).forEach(byteBuffer -> byteBuffer.clear());

            System.out.println("byteread="+byteRead+" bytewrite="+byteWrite+" msg length="+msgLength);


        }
    }
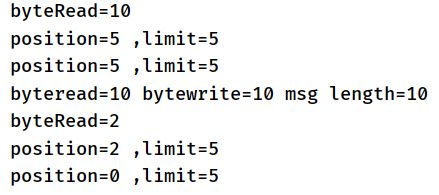
发送至少10个才调用write
使用telnet进行测试:
- 发送4个

- 发送6个

- 发送10个,执行一次read,一次write

发送12个
读两次,一次10个,一次2个,同时执行一次write
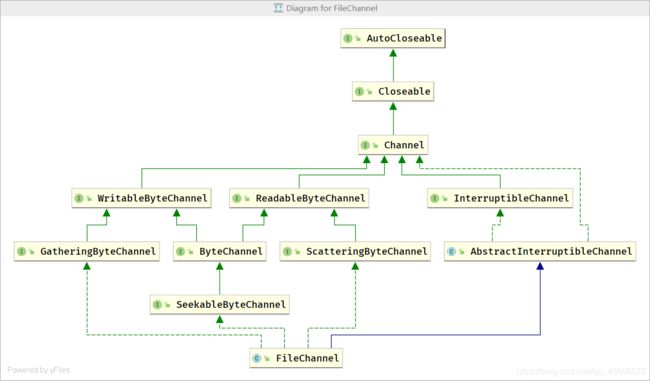
2.Channel
FileChannel
是FileOutputStream/FileInPutStream的成员变量,即被包裹在io类中
api:
FileChannel写入文件
 public static void main(String[] args) {
        String str = "hello world!";

        try(FileOutputStream out = new FileOutputStream("myText.txt")){
			//获取Channel
            FileChannel channel = out.getChannel();

            ByteBuffer buffer = ByteBuffer.allocate(1024);

            buffer.put(str.getBytes("UTF-8"));
			//filp()将指针position置0,修改limit
            buffer.flip();//此方法不要忘记
			//将buffer的数据写入到myText.txt文件中
            channel.write(buffer);

        }catch (IOException e){
            e.printStackTrace();
        }
    }
channel.write()方法将从position所指向的位置进行写入,如果不执行flip()方法,可以想象write会写入错误的数据
FileChannel读取文件
 public static void main(String[] args) {
        File f = new File("myText.txt");
        try(FileInputStream input = new FileInputStream(f)){
            FileChannel fileChannel = input.getChannel();

            ByteBuffer byteBuffer = ByteBuffer.allocate((int)f.length());

            fileChannel.read(byteBuffer);

            System.out.println(new String(byteBuffer.array(),"UTF-8"));
        }catch (IOException ie){
            ie.printStackTrace();
        }
    }
byteBuffer.array()方法返回对应类型Buffer的数组,ByteBuffer就返回 byte[]
FileChannel读取并写入文件 (文件拷贝)
public static void main(String[] args) {
        try(FileInputStream input = new FileInputStream("text.txt");FileOutputStream output = new FileOutputStream("copy.txt")){
            FileChannel channel = input.getChannel();
            ByteBuffer byteBuffer = ByteBuffer.allocate(1024);
            FileChannel channel1 = output.getChannel();

            while(true){
            //clear()方法不能忘记写!!!
                byteBuffer.clear();
                if(channel.read(byteBuffer)==-1){
                    break;
                }
                byteBuffer.flip();
                channel1.write(byteBuffer);
            }

        }catch (IOException ie){
            ie.printStackTrace();
        }
    }
channel.read(byteBuffer);
方法调用将会返回读取的数据数量,有个神奇的地方就是当position==limit时,会返回0,永远不会返回-1。
也就是说,忘记写clear()或者自作聪明把clear()用flip()代替(比如我),该程序会陷入死循环。
未写clear,无限循环写入buffer的数据;把clear()写成flip(),无限循环,但是因为第一次执行就把position=limit=0,不会写入任何数据。
FileChannel提供了文件拷贝的函数
public static void main(String[] args) {
        try(FileInputStream in = new FileInputStream("1.jpeg"); FileOutputStream out = new FileOutputStream("2.jpeg")){
        //来源Channel
            FileChannel inChannel = in.getChannel();
        //写入Channel
            FileChannel outChannel = out.getChannel();
		//第一个参数是来源Channel,第二个参数是位置,第三个参数是大小
            outChannel.transferFrom(inChannel,0,inChannel.size());
        }catch (IOException e){
            e.printStackTrace();
        }
    }
Selector 多路复用器
-
Selector可以检测多个注册的通道上是否有事件发生
-
事件驱动,有事件的时候才会执行连接/读写
-
避免线程频繁切换
-
1个SelectionKey 对应 1个Channel,可以通过SelectionKey得到监听的管道。
NIO写法
NIO服务端基本步骤:
- 创建ServerSocketChannel,设置为非阻塞
- 将ServerSocketChannel注册到Selector中监听事件
- 每隔1s调用select()方法监听有没有连接事件/读写事件
- 如果有select()!=0,有事件发生,进行判断,如果是连接事件,就把这个Channel注册,并且开始监听数据写入
- 当有读写事件时获取SelectionKey并且得到对应Channel,读取Channel的数据
服务端代码
//创建ServerSocketChannel
        ServerSocketChannel socketChannel = ServerSocketChannel.open();

        //获取Selector对象
        Selector selector = Selector.open();

        //绑定端口
        InetSocketAddress i  = new InetSocketAddress(30000);
        socketChannel.bind(i);

        //设置为非阻塞
        socketChannel.configureBlocking(false);

        //把ServerSocketChannel 注册到 Selector
        socketChannel.register(selector, SelectionKey.OP_ACCEPT);

        //循环等待客户端连接

        while(true){
            //select监听哪个注册的Channel有新的事件 Read/Write/Accept
            if(selector.select(1000)==0){
                //没有事件发生
                System.out.println("无连接");
                continue;
            }

            //获取到相关的Selection集合
            Set<SelectionKey> selectionKeys = selector.selectedKeys();
            Iterator<SelectionKey> iterator = selectionKeys.iterator();

            while (iterator.hasNext()){
                SelectionKey next = iterator.next();
                if(next.isAcceptable()){
                    //已经有连接,accept()是阻塞方法,但是此时一定有连接,不会阻塞
                    SocketChannel accept = socketChannel.accept();
                    accept.configureBlocking(false);
                    System.out.println("一个连接,"+accept.hashCode());
                    //将新加入的连接设置为Read,注册到selector
                    accept.register(selector,SelectionKey.OP_READ, ByteBuffer.allocate(1024));


                }
                if(next.isReadable()){
                    SocketChannel channel = (SocketChannel)next.channel();
                    ByteBuffer attachment = (ByteBuffer)next.attachment();

                    channel.read(attachment);

                    System.out.println("from 客户端 "+ new String(attachment.array()));
                }
                //防止多线程重复访问
                iterator.remove();
            }

        }
所有的Channel都要进行注册,因为要监听读写事件
ServerSocketChannel主要用来获取SocketChannel,用于获取连接,SocketChannel主要用于处理读写事件(是吗?)
客户端代码
// 连接后发送一条hello world!
    public static void main(String[] args) throws Exception{
        SocketChannel socketChannel = SocketChannel.open();
        //socketChannel.configureBlocking(false);

        //服务器 ip 和 port
        InetSocketAddress inetSocketAddress = new InetSocketAddress("127.0.0.1",30000);

        //连接服务器
        if (!socketChannel.connect(inetSocketAddress)) {
            while (!socketChannel.finishConnect()){
                System.out.println("等待...");
            }
        }
        //连接成功
        String str = "hello world!";
        //Warps a byte array into a buffer
        ByteBuffer buffer = ByteBuffer.wrap(str.getBytes());
        //发送数据
        socketChannel.write(buffer);
        System.in.read();
    }
(未完待续)