一、概念
Retrofit 是 Square 公司出品的默认基于 OkHttp 封装的一套 RESTful 网络请求框架,不了解 RESTful 概念的不妨去搜索学习下,RESTful 可以说是目前流行的一套 api 设计的风格,并不是标准。Retrofit 的封装可以说是很强大,里面涉及到一堆的设计模式,你可以通过注解直接配置请求,你可以使用不同的 http 客户端,虽然默认是用 http ,可以使用不同 Json Converter 来序列化数据,同时提供对 RxJava 的支持,使用** Retrofit + OkHttp + RxJava + Dagger2 **可以说是目前比较潮的一套框架,但是需要有比较高的门槛。
Retrofit与picasso一样都是在okhttp基础之上做的封装,项目中可以直接用了。Retrofit因为也是Square出的,所以大家可能对它更崇拜些。Retrofit跟Volley是一个套路,但解耦的更彻底:比方说通过注解来配置请求参数,通过工厂来生成CallAdapter,Converter,你可以使用不同的请求适配器(CallAdapter), 比方说RxJava,Java8, Guava。你可以使用不同的反序列化工具(Converter),比方说json, protobuff, xml, moshi等等。炒鸡解耦,里面涉及到超多设计模式,个人觉得是很经典的学习案例。虽然支持Java8, Guava你可能也不需要用到。xml,protobuff等数据格式你也可能不需要解析。but,万一遇到鬼了呢。至于性能上,个人觉得这完全取决于请求client,也就是okhttp的性能,跟这些封装工具没太大关系。
Retrofit 是一个 RESTful 的 HTTP 网络请求框架的封装。注意这里并没有说它是网络请求框架,主要原因在于网络请求的工作并不是 Retrofit 来完成的。Retrofit 2.0 开始内置 OkHttp,前者专注于接口的封装,后者专注于网络请求的高效,二者分工协作,宛如古人的『你耕地来我织布』,小日子别提多幸福了。
我们的应用程序通过 Retrofit 请求网络,实际上是使用 Retrofit 接口层封装请求参数、Header、Url 等信息,之后由 OkHttp 完成后续的请求操作,在服务端返回数据之后,OkHttp 将原始的结果交给 Retrofit,后者根据用户的需求对结果进行解析的过程。讲到这里,你就会发现所谓 Retrofit,其实就是 Retrofitting OkHttp 了。
二、例一
参考野生西瓜--[Android] Retrofit 初步使用
1.定义接口
public interface APIInterface {
@GET("/users/{user}")
Call repo(@Path("user") String user);
}
GET 的意思是 发送一个 GET请求,请求的地址为:baseUrl + "/users/{user}"。{user} 类似于占位符的作用,具体类型由 repo(@Path("user") String user) 指定,这里表示 {user} 将是一段字符串。
Call 是一个请求对象,表示返回结果是一个 TestModel 类型的实例。
public class TestModel {
private String login;
public String getLogin() {
return login;
}
public void setLogin(String login) {
this.login = login;
}
}
2.构造一个 Retrofit 对象:
Retrofit retrofit= new Retrofit.Builder()
.baseUrl("https://api.github.com")
.addConverterFactory(GsonConverterFactory.create())
.build();
注意这里添加的 baseUrl 和 GsonConverter,前者表示要访问的网站,后者是添加了一个JSON转换器。
3.创建API 接口对象
APIInterface service = retrofit.create(APIInterface.class);
Call model = service.repo("Guolei1130");
注意这里的 .repo("Guolei1130") 取代了前面的 {user}。到这里,我们要访问的地址就成了:
https://api.github.com/users/Guolei1130
可以看出这样的方式有利于我们使用不同参数访问同一个 Web API 接口,比如你可以随便改成 .repo("ligoudan")
4.最后,就可以发送请求了!
model.enqueue(new Callback() {
@Override
public void onResponse(Call call, Response response) {
// Log.e("Test", response.body().getLogin());
System.out.print(response.body().getLogin());
}
@Override
public void onFailure(Call call, Throwable t) {
System.out.print(t.getMessage());
}
});
5.另外,说说POST 请求参数设置
POST 的请求与 GET 请求不同,POST 请求的参数是放在请求体内的。所以当我们要为 POST 请求配置一个参数时,需要用到 @Body 注解:
Call post(@Body User user);
//这里的 User 类型是需要我们去自定义的:
public class User {
public String username;
public String password;
public User(String username,String password){
this.username = username;
this.password = password;
}
//最后在获取请求对象时:
User user = new User("lgd","123456");
Call model = service.post(user);
三、例二
参考Retrofit使用教程(一)
使用的是百度的API Store提供的API,地址在此:手机号码归属地__API服务_API服务_API Store.
1.设置model
访问该API返回的数据格式如下:
{
"errNum": 0,
"retMsg": "success",
"retData": {
"phone": "15210011578",
"prefix": "1521001",
"supplier": "移动",
"province": "北京",
"city": "北京",
"suit": "152卡"
}
}
根据返回结果我们创建数据对象PhoneResult,如下:
public class PhoneResult {
/**
* errNum : 0
* retMsg : success
* retData : {"phone":"15210011578","prefix":"1521001","supplier":"移动","province":"北京","city":"北京","suit":"152卡"}
*/
private int errNum;
private String retMsg;
/**
* phone : 15210011578
* prefix : 1521001
* supplier : 移动
* province : 北京
* city : 北京
* suit : 152卡
*/
private RetDataEntity retData;
public void setErrNum(int errNum) {
this.errNum = errNum;
}
public void setRetMsg(String retMsg) {
this.retMsg = retMsg;
}
public void setRetData(RetDataEntity retData) {
this.retData = retData;
}
public int getErrNum() {
return errNum;
}
public String getRetMsg() {
return retMsg;
}
public RetDataEntity getRetData() {
return retData;
}
public static class RetDataEntity {
private String phone;
private String prefix;
private String supplier;
private String province;
private String city;
private String suit;
public void setPhone(String phone) {
this.phone = phone;
}
public void setPrefix(String prefix) {
this.prefix = prefix;
}
public void setSupplier(String supplier) {
this.supplier = supplier;
}
public void setProvince(String province) {
this.province = province;
}
public void setCity(String city) {
this.city = city;
}
public void setSuit(String suit) {
this.suit = suit;
}
public String getPhone() {
return phone;
}
public String getPrefix() {
return prefix;
}
public String getSupplier() {
return supplier;
}
public String getProvince() {
return province;
}
public String getCity() {
return city;
}
public String getSuit() {
return suit;
}
}
}
2.构造接口
public interface PhoneService {
@GET("/apistore/mobilenumber/mobilenumber")
Call getResult(@Header("apikey") String apikey, @Query("phone") String phone);
}
3.使用
private static final String BASE_URL = "http://apis.baidu.com";
private static final String API_KEY = "8e13586b86e4b7f3758ba3bd6c9c9135";
private void query(){
//1.创建Retrofit对象
Retrofit retrofit = new Retrofit.Builder()
.addConverterFactory(GsonConverterFactory.create())//解析方法
.baseUrl(BASE_URL)//主机地址
.build();
//2.创建访问API的请求
PhoneService service = retrofit.create(PhoneService.class);
Call call = service.getResult(API_KEY, phoneView.getText().toString());
//3.发送请求
call.enqueue(new Callback() {
@Override
public void onResponse(Call call, Response response) {
//4.处理结果
if (response.isSuccess()){
PhoneResult result = response.body();
if (result != null){
PhoneResult.RetDataEntity entity = result.getRetData();
}
}
}
@Override
public void onFailure(Call call, Throwable t) {
}
});
}
四、query,head
参考Retrofit使用教程(二)
1.query
//如12306的查询接口https://kyfw.12306.cn/otn/lcxxcx/query?
//purpose_codes=ADULT&queryDate=2016-03-18&from_station=BJP&to_station=CDW,写法如下:
@GET("/otn/lcxxcx/query")
Call query(@Query("purpose_codes") String codes, @Query("queryDate") String date,
@Query("from_station") String from, @Query("to_station") String to)
2.head
//比如要更新某个账户信息,其接口地址为/info,需要带的Header有设备信息device,
//系统版本version,还要带请求参数要更新账户的id,代码如下:
@POST("/info")
Call updateInfo(@Header("device") String device, @Header("version") int version,
@Field("id") String id);
五、Retrofit中使用RxJava
参考Retrofit使用教程(三):Retrofit与RxJava初相逢
//使用RxJava我们则返回一个可被观测的PhoneResult:Observable,如下:
@GET("/apistore/mobilenumber/mobilenumber")
Observable getPhoneResult(@Header("apikey") String apikey,
@Query("phone") String phone);
//为了能返回此对象,我们需要在创建Retrofit对象时添加一个RxJava对象的Adapter来自动完成:
Retrofit retrofit = new Retrofit.Builder()
.baseUrl(BASE_URL)
.addCallAdapterFactory(RxJavaCallAdapterFactory.create())
.addConverterFactory(GsonConverterFactory.create())
.build();
//获取手机的归属地
phoneService.getPhoneResult(PhoneApi.API_KEY, number)
.subscribeOn(Schedulers.newThread()) //子线程访问网络
.observeOn(AndroidSchedulers.mainThread()) //回调到主线程
.subscribe(new Observer() {
@Override
public void onCompleted() {}
@Override
public void onError(Throwable e) {}
@Override
public void onNext(PhoneResult result) {
if (result != null && result.getErrNum() == 0) {
PhoneResult.RetDataEntity entity = result.getRetData();
resultView.append("地址:" + entity.getCity());
}
}
});
}
源码地址
[https://github.com/WuXiaolong/AndroidMVPSample]
关于MVP、Retrofit、RxJava,之前已经分别做了分享,如果您还没有阅读过,可以猛戳:
1、Android MVP 实例
2、Android Retrofit 2.0使用
3、RxJava
4、RxBus
假设,您对MVP、Retrofit、RxJava已经有了一点了解,那么我们开始本文:
Android MVP优化
1、MVP绑定Activity(Fragment)生命周期按照之前的文章,每个Presenter都得初始化和销毁,我新加MvpActivity(MvpFragment),加了抽象方法protected abstract P createPresenter();
这样做的目的在需要使用MVP的地方,可以继承MvpActivity(MvpFragment),然后初始化和销毁就不用手动一个个去加了。
2、接口请求等还是放到MVP的P中
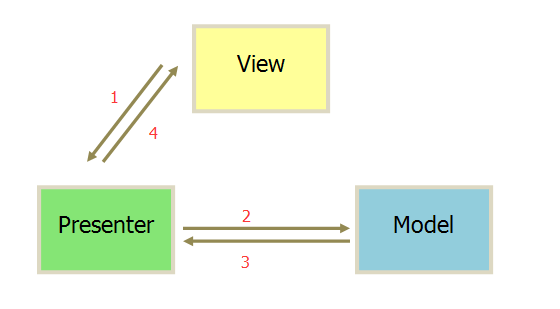
这个图片,在当时写MVP文章时给出的,实际开发中,我发现每个都这样写,实在是增加了不少代码,然接口请求放到P中,还有个好处,就是MVP绑定Activity(Fragment)生命周期,当onDestroy时取消RXJava注册,以避免内存泄露。
代码
目录结构
如图,有个大致了解:

Paste_Image.png
mvp:所有的mvp都放在这个包下retrofit:Retrofit接口和配置文件rxjava:RxJava一些回调设置ui:Activity或fragment,建议按功能再细分包
核心代码
还是就贴出核心代码吧,源码在我的github上(https://github.com/WuXiaolong/AndroidMVPSample)。
MainActivity入口,还是演示的之前的MVP的天气的接口,接口请求方法放在Presenter。
MvpActivity
Presenter绑定Activity(Fragment)生命周期
public abstract class MvpActivity
extends BaseActivity { protected P mvpPresenter; @Override protected void onCreate(Bundle savedInstanceState) { mvpPresenter = createPresenter(); super.onCreate(savedInstanceState); } protected abstract P createPresenter(); @Override protected void onDestroy() { super.onDestroy(); if (mvpPresenter != null) { mvpPresenter.detachView(); } }}
MainPresenter
apiStores.loadData方法是Retrofit做的网络请求,回调是RxJava完成的。
public class MainPresenter extends BasePresenter { public MainPresenter(MainView view) { attachView(view); } public void loadData(String cityId) { mvpView.showLoading(); addSubscription(apiStores.loadData(cityId), new SubscriberCallBack<>(new ApiCallback() { @Override public void onSuccess(MainModel model) { mvpView.getDataSuccess(model); } @Override public void onFailure(int code, String msg) { mvpView.getDataFail(msg); } @Override public void onCompleted() { mvpView.hideLoading(); } })); }}
apiStores.loadData
是不是很简单,关于Retrofit配置,详见源码AppClient。
public interface ApiStores { //baseUrl String API_SERVER_URL = "http://www.weather.com.cn/"; //加载天气 @GET("adat/sk/{cityId}.html") Observable loadData(@Path("cityId") String cityId);}
RxJava回调方法
这里onError,写了如果网络请求用httpcode来判断。当然可以不要。\
private ApiCallback apiCallback; public SubscriberCallBack(ApiCallback apiCallback) { this.apiCallback = apiCallback; } @Override public void onCompleted() { apiCallback.onCompleted(); } @Override public void onError(Throwable e) { e.printStackTrace(); if (e instanceof HttpException) { HttpException httpException = (HttpException) e; //httpException.response().errorBody().string() int code = httpException.code(); String msg = httpException.getMessage(); if (code == 504) { msg = "网络不给力"; } apiCallback.onFailure(code, msg); } else { apiCallback.onFailure(0, e.getMessage()); } apiCallback.onCompleted(); } @Override public void onNext(T t) { apiCallback.onSuccess(t); }}
BasePresenter
再来看看BasePresenter,这里做了Presenter初始化和销毁(包括RXjava取消注册),调用在MvpActivity。
public class BasePresenter implements Presenter { public V mvpView; public ApiStores apiStores = AppClient.retrofit().create(ApiStores.class); private CompositeSubscription mCompositeSubscription; @Override public void attachView(V mvpView) { this.mvpView = mvpView; } @Override public void detachView() { this.mvpView = null; onUnsubscribe(); } //RXjava取消注册,以避免内存泄露 public void onUnsubscribe() { if (mCompositeSubscription != null && mCompositeSubscription.hasSubscriptions()) { mCompositeSubscription.unsubscribe(); } } public void addSubscription(Observable observable, Subscriber subscriber) { if (mCompositeSubscription == null) { mCompositeSubscription = new CompositeSubscription(); } mCompositeSubscription.add(observable .subscribeOn(Schedulers.io()) .observeOn(AndroidSchedulers.mainThread()) .subscribe(subscriber)); }}
总结
三者结合使用,重点还是对MVP的优化,Retrofit只贴出最简单的(后续会写Retrofit详情使用),Rxjava可能我是对它认识尚浅,实际运用最多还是RxBus。
作者:Android_lml
链接:https://www.jianshu.com/p/9a01b8807818
來源:
著作权归作者所有。商业转载请联系作者获得授权,非商业转载请注明出处。