LaTex排版系统:TeX Live+Visual Studio Code的配置
配置Tex排版系统需要安装编译器+编辑器,编译器通常安装TeX Live,编辑器主要有TeXworks、TexStudio、WinEdt、Visual Studio Code等,目前VS Code普遍评价不错。下面介绍Windows平台安装LaTex的详细步骤。
1 安装TeX Live
1.1 下载地址选择国内镜像站,官网较慢,点击“texlive.iso”【下载地址:https://mirrors.huaweicloud.com/CTAN/systems/texlive/Images/】。
2. 下载好后,不需要解压,直接“右键-打开方式-文件资源管理器”即可。然后你就会跳转到一个虚拟光驱里面,点击“install-tl-windows.bat”
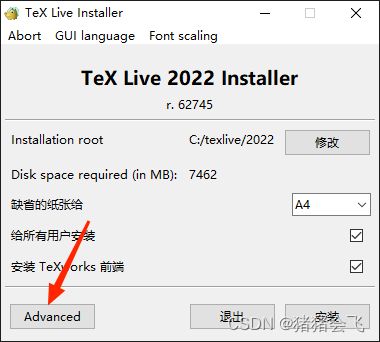
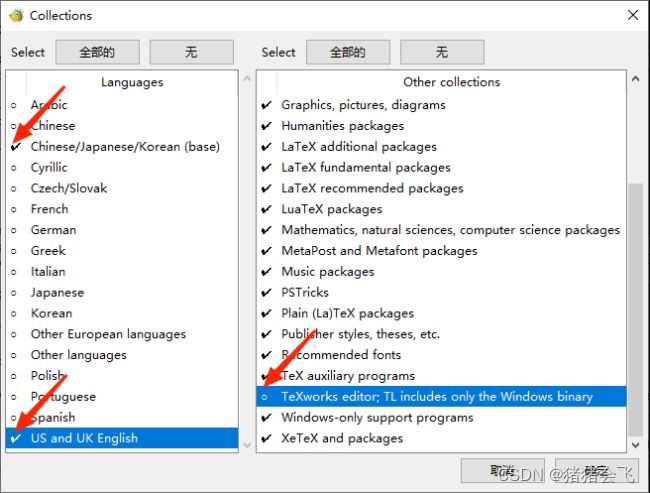
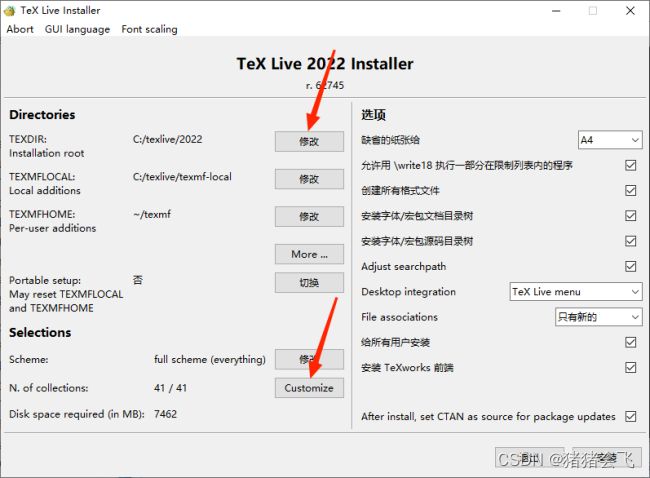
3. 安装配置。点击“Advance”,然后可以修改安装目录“Installation root”。点击“Customize”,左边语言包先点击“无”,然后只勾选“Chinese”和“US and UK English”,右边工程包不勾选“TeXworks editor; TL includes only the Windows binary”,即不勾选配置主菜单的“安装TeXworks前端”(工程包和配置主菜单其他项均勾选)。最后点击“确定”,再点击“安装”,耐心等待安装完成,安装时间将持续30分钟甚至更长。
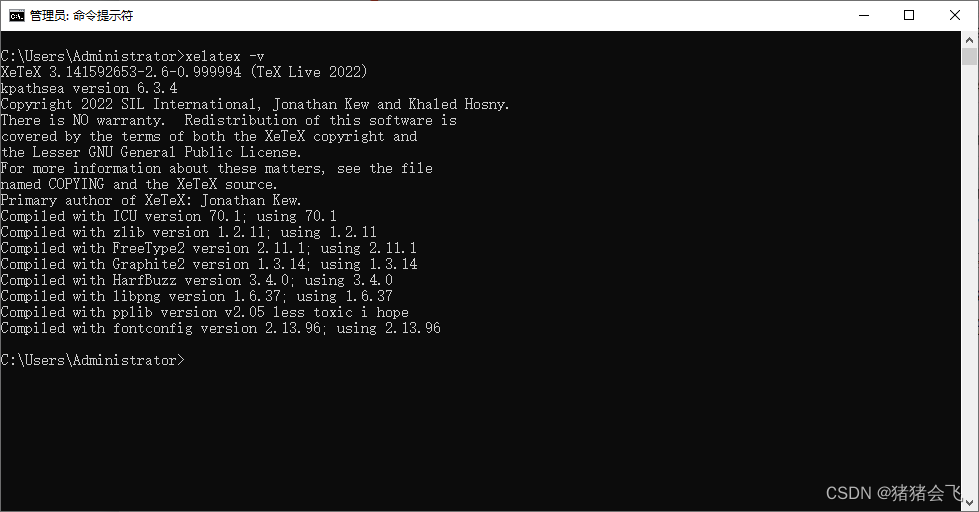
4. 完成后,灰色“关闭”按钮可以点击。点击“关闭”即完成TeX Live的安装。接着,不要忘记在“此电脑”中右键弹出虚拟光驱。最后(一般不需要),按win+R打开“运行”,输入cmd,或者搜索框搜索“cmd”,打开命令行窗口。输入命令“xelatex -v”,验证安装。
2 安装Visual Studio Code
使用官方下载,点击“Download for Windows”,自行安装即可。
https://code.visualstudio.com/
3 配置IDE
1. 先点击“扩展”图标,再搜索“Chinese”,再点击Install,点击右下角弹出窗口的“Restart now”,安装中文语言包。
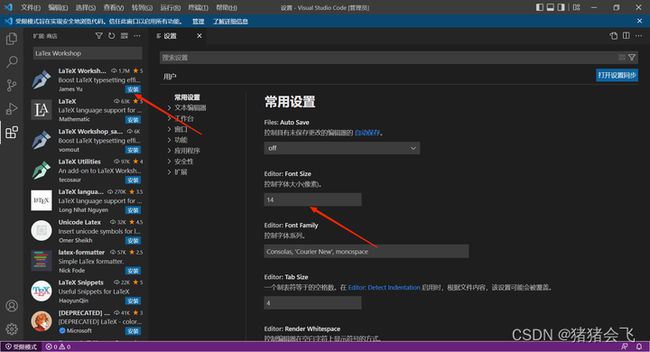
2. 接着“Tex”,再点击Install,点击弹出的“信任工作区并安装”按钮,安装Tex扩展包。此外,这个时候你可以适当调整合适的界面字体大小。
3. 打开LaTeX环境设置页面。点击设置图标,点击菜单中的“设置”,再点击右上角设置按钮,打开json配置文件。实际上,GUI设置页面和json设置页面作用相同。不同的是,GUI设置页面更直观,但项目需要去寻找,比较麻烦,且不能快速导入配置,而json设置页面以代码形式可以很快的导入配置。最后,删除“setting.json”配置文件默认的代码,复制粘贴以下标准配置代码,然后点击左上角“文件-保存”,再关闭“setting.json”。
{
    // 设置是否自动编译
    "latex-workshop.latex.autoBuild.run":"never",
    //右键菜单
    "latex-workshop.showContextMenu":true,
    //从使用的包中自动补全命令和环境
    "latex-workshop.intellisense.package.enabled": true,
    //编译出错时设置是否弹出气泡设置
    "latex-workshop.message.error.show": false,
    "latex-workshop.message.warning.show": false,
    // 编译工具和命令
    "latex-workshop.latex.tools": [
        {
            "name": "xelatex",
            "command": "xelatex",
            "args": [
                "-synctex=1",
                "-interaction=nonstopmode",
                "-file-line-error",
                "%DOCFILE%"
            ]
        },
        {
            "name": "pdflatex",
            "command": "pdflatex",
            "args": [
                "-synctex=1",
                "-interaction=nonstopmode",
                "-file-line-error",
                "%DOCFILE%"
            ]
        },
        {
            "name": "latexmk",
            "command": "latexmk",
            "args": [
                "-synctex=1",
                "-interaction=nonstopmode",
                "-file-line-error",
                "-pdf",
                "-outdir=%OUTDIR%",
                "%DOCFILE%"
            ]
        },
        {
            "name": "bibtex",
            "command": "bibtex",
            "args": [
                "%DOCFILE%"
            ]
        }
    ],
    // 用于配置编译链
    "latex-workshop.latex.recipes": [
        {
            "name": "XeLaTeX",
            "tools": [
                "xelatex"
            ]
        },
        {
            "name": "PDFLaTeX",
            "tools": [
                "pdflatex"
            ]
        },
        {
            "name": "BibTeX",
            "tools": [
                "bibtex"
            ]
        },
        {
            "name": "LaTeXmk",
            "tools": [
                "latexmk"
            ]
        },
        {
            "name": "xelatex -> bibtex -> xelatex*2",
            "tools": [
                "xelatex",
                "bibtex",
                "xelatex",
                "xelatex"
            ]
        },
        {
            "name": "pdflatex -> bibtex -> pdflatex*2",
            "tools": [
                "pdflatex",
                "bibtex",
                "pdflatex",
                "pdflatex"
            ]
        }
    ],
    //文件清理。此属性必须是字符串数组
    "latex-workshop.latex.clean.fileTypes": [
        "*.aux",
        "*.bbl",
        "*.blg",
        "*.idx",
        "*.ind",
        "*.lof",
        "*.lot",
        "*.out",
        "*.toc",
        "*.acn",
        "*.acr",
        "*.alg",
        "*.glg",
        "*.glo",
        "*.gls",
        "*.ist",
        "*.fls",
        "*.log",
        "*.fdb_latexmk"
    ],
    //设置为onFaild 在构建失败后清除辅助文件
    "latex-workshop.latex.autoClean.run": "onFailed",
    // 使用上次的recipe编译组合
    "latex-workshop.latex.recipe.default": "lastUsed",
    // 用于反向同步的内部查看器的键绑定。ctrl/cmd +点击(默认)或双击
    "latex-workshop.view.pdf.internal.synctex.keybinding": "double-click"
}
此外还可以使用SumatraPDF作为外部查看器,以及更多配置代码,因为不常用,这里不再列出。
4. 编译测试。正常情况下,新建一个文本文件,选择Latex语言,复制粘贴以下代码,右上角点击编译按钮或ctrl+alt+B进行编译,点击内部查看器或ctrl+alt+V,在右边进行预览,鼠标双击pdf可以定位相应代码位置。
\documentclass[a4paper]{article}
\usepackage[left=1.91cm,right=1.91cm,top=2.54cm,bottom=2.54cm]{geometry}  %设置页边距
\usepackage{ctex}
\usepackage{fontspec}
\setmainfont{Times New Roman}
\CJKfamily{zhsong}

\begin{document}
\title{This is a test for vscode}
\author{Tex\ Live}
\date{2022.06.01}
\maketitle

\begin{abstract}
这里是摘要.

关键词:\ 这里是关键词\ 这里是关键词.
\end{abstract}

\tableofcontents
\section{This is a section}
Hello world! 你好,世界!
\subsection{This is a subsection}

\begin{thebibliography}{99}
    \bibitem{a}作者. \emph{文献}[M]. 地点:出版社,年份.
    \bibitem{b}作者. \emph{文献}[M]. 地点:出版社,年份.
\end{thebibliography}

\end{document}
注:代码模板经常存在不兼容的情况,请按最新标准规范编写代码。
参考链接:
【1】https://zhuanlan.zhihu.com/p/491581833
【2】Index of CTAN-local/systems/texlive/Images

