单层感知机
什么是感知机
感知机由Rosenblatt在1957年提出,是一种二类线性分类模型。输入一个实数值的n维向量(特征向量),经过线性组合,如果结果大于某个数,则输出1,否则输出-1.具体地:
其中的w0,w1,....wn权重,W向量称为权向量(本文中粗体代表向量)。权重决定每个输入分类对最终输出的贡献率。为了更简洁地表示,我们加入一个x0=1,则可以将上面的式子写成符号函数(输入大于零的时候为1,其他为-1):
这就是感知机的数学表达,其中W*X为内积,即向量对应元素相乘,然后求和。
感知机原理
e感知n机是二分类的线性模型,其输入是实例的的特征向量,输出的是实例的类别,分别是+1和-1,属于判别模型。假设训练数据集是线性可分的,感知机学习的目标是求得一个能够将训练数据集正实例点和负实例点完全正确分开的分离超平面。如果是非线性的数据,则最后无法获取超平面。
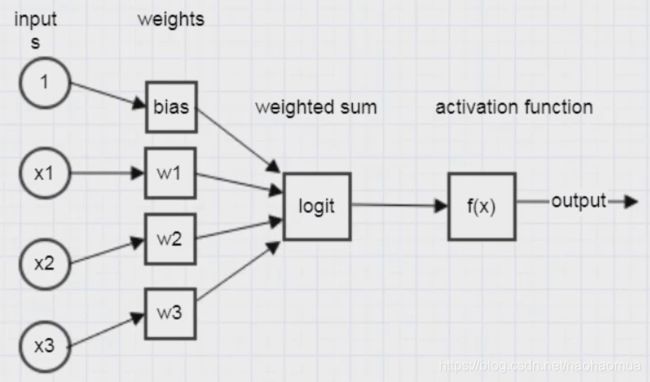
一个简单的单层感知机如下图所示
Python实现单层感知机
step1: 数据生成
在一条直线附近利用np.random.normal产生高斯白噪声,然后生成分布点。这里使用y=k*x+b的形式。然后根据点的分布,给点打上标签是+1还是-1。
'''
利用高斯白噪声生成基于某个直线附近的若干点
y = wb + b
weight 直线权值
bias 直线偏置
size 点的个数
'''
import numpy as np
def random_point_nearby_line(weight,bias,size=10):
    x_point = np.linspace(-1,1,size)[:,np.newaxis]
    noise = np.random.normal(0,0.5,x_point.shape)
    y_point = weight * x_point + bias + noise
    input_arr = np.hstack((x_point, y_point))
    return input_arr

# 直线的真正参数
real_weight = 1
real_bias = 3
size = 100

# 输入数据和标签
# 生成输入的数据
input_point = random_point_nearb_line(real_weight, real_bias, size)
# 给数据打标签,在直线上方还是下方, above = 1, below = -1
label = np.sign(input_point[:,1] - (input_point[:,0] * real_weight + real_bias)).reshape((size,1))
step2: 拆分训练集测试集
from sklearn.model_selection import train_test_split
testSize = 15
x_train, x_test, y_train, y_test = train_test_split(input_point, label, test_size=testSize)
trainSize = size - testSize
step3: 绘制初始点与直线
import matplotlib.pyplot as plt
# 将输入点绘图
fig = plt.figure() # 生成一个图片框
ax = fig.add_subplot(111) # 编号
for i in range(y_train.size):
    if y_train[i] == 1:
        ax.scatter(x_train[i,0], x_train[i,1], color='r') # 输入真实值,红色在线上方
    else:
        ax.scatter(x_train[i,0], x_train[i,1], color='b') #输入真实值, 蓝色在线下方

plt.show()
step4: 随机梯度下降法进行训练
#初始化w,b
Weight = np.random.rand(2,1) #随机生成-1到1的一个数据
Bias = 0 #初始化为0
def trainBySGD(input, output, x_test, y_test, test_size,input_num,train_num = 10000, learning_rate=1):
    global Weight, Bias
    x = input
    y = output
    for rounds in range(train_num):
        for i in range(input_num):
            x1, x2 = x[i]
            prediction = np.sign(Weight[0] * x1 + Weight[1] * x2 + Bias)
            #print('prediaction', prediction)
            if y[i] * prediction <= 0: # 判断误分类点
                # Weight = Weight + np.reshape(learning_rate*y[i]*x[i],(2,1))
                Weight[0] = Weight[0] + learning_rate * y[i] * x1
                Weight[1] = Weight[1] + learning_rate * y[i] * x2
        if rounds % 10 == 0:
            learning_rate *= 0.9
            accuracy = compute_accuracy(x_test, y_test, test_size, Weight, Bias)
            print('rounds {}, accuracy {}'.format(rounds,accuracy))

def compute_accuracy(x_test, y_test, test_size, weight, bias):
    x1, x2 = np.reshape(x_test[:,0], (test_size,1)), np.reshape(x_test[:,1],(test_size,1))
    prediction = np.sign(y_test * (x1 * weight[0] + x2 * weight[1] + bias))
    count = 0
    #print('prediaction', prediction)
    for i in range(prediction.size):
        if prediction[i] > 0:
            count = count + 1
    return (count+0.0) / test_size
trainBySGD(x_train, y_train, x_test, y_test, testSize, 85, train_num = 100, learning_rate = 1)
参考链接:
https://blog.csdn.net/bingduanlbd/article/details/24468885
https://www.bilibili.com/video/BV1JE411Y7gB?from=search&seid=10392081171445846990


