入门TypeScript编写React
使用 create-react-app 开启 TypeScript
Create React App 是一个官方支持的创建 React 单页应用程序的CLI,它提供了一个零配置的现代构建设置。当你使用 Create React App 来创建一个新的 TypeScript React 工程时,你可以运行:
$ npx create-react-app my-app --typescript
$ # 或者
$ yarn create react-app my-app --typescript
如果在已有的工程中添加,也非常简单:
$ npm install --save typescript @types/node @types/react @types/react-dom @types/jest
$ # 或者
$ yarn add typescript @types/node @types/react @types/react-dom @types/jest
从零配置
创建 index.html 文件,以及src 目录,在 src目录中创建 index.tsx。
TypeScript 的文件格式是 tsx
接下来安装必要的包和配置 package.json 文件:
"scripts": {
  "dev": "MODE=development webpack -w --mode=development",
  "build": "MODE=production webpack --mode=production"
},
"dependencies": {
  "@types/react": "^16.8.13",
  "@types/react-dom": "^16.8.3",
  "react": "^16.8.6",
  "react-dom": "^16.8.6"
},
"devDependencies": {
  "awesome-typescript-loader": "^5.2.1",
  "source-map-loader": "^0.2.4",
  "typescript": "^3.4.3",
  "webpack": "^4.29.6",
  "webpack-cli": "^3.3.0"
}
创建 tsconfig.json 和 webpack.config.js 文件:
{
  "compilerOptions": {
    "target": "es5",
    "module": "commonjs",
    "lib": ["dom","es2015"],
    "jsx": "react",
    "sourceMap": true,
    "strict": true,
    "noImplicitAny": true,
    "baseUrl": "src",
    "paths": {
      "@/*": ["./*"],
    },
    "esModuleInterop": true,
    "experimentalDecorators": true,
  },
  "include": [
    "./src/**/*"
  ]
}- jsx 选择
react - lib 开启
dom和es2015 - include 选择我们创建的
src目录
var fs = require('fs')
var path = require('path')
var webpack = require('webpack')
const { CheckerPlugin } = require('awesome-typescript-loader');
var ROOT = path.resolve(__dirname);

var entry = './src/index.tsx';
const MODE = process.env.MODE;
const plugins = [];
const config = {
  entry: entry,
  output: {
    path: ROOT + '/dist',
    filename: '[name].bundle.js'
  },
  module: {
    rules: [
      {
        test: /\.ts[x]?$/,
        loader: [
          'awesome-typescript-loader'
        ]
      },
      {
        enforce: 'pre',
        test: /\.ts[x]$/,
        loader: 'source-map-loader'
      }
    ]
  },
  resolve: {
    extensions: ['.ts', '.tsx', '.js', '.json'],
    alias: {
      '@': ROOT + '/src'
    }
  },
}

if (MODE === 'production') {
  config.plugins = [
    new CheckerPlugin(),
    ...plugins
  ];
}

if (MODE === 'development') {
  config.devtool = 'inline-source-map';
  config.plugins = [
    new CheckerPlugin(),
    ...plugins
  ];
}

module.exports = config;
类组件的使用
类组件是目前来说使用的最频繁的一种,因此我们需要了解到它。
Props 和 State
首先创建 Props 和 State 接口,Props 接口接收一个 name 参数,State 接口接收 color:
interface IProps {
name: string;
}
interface IState {
color: "red" | "blueviolet"
}
class Home extends React.Component {
constructor(props: IProps){
super(props);
this.state = {
color: "red"
}
}
public onClickColor = () => {
const { color } = this.state;
if (color === "red") {
this.setState({
color: "blueviolet"
});
}
if (color === "blueviolet") {
this.setState({
color: "red"
});
}
}
public render(){
const { name } = this.props;
const { color } = this.state;
return (
{ name }
);
}
}
export default Home;
如图:
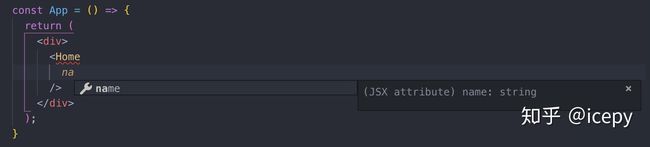
在 App 中使用 Home 组件时我们可以得到明确的传递参数类型。
处理 Event 对象
有时候我们需要处理一下 Event 对象,一般 change 事件我们可以使用 React.ChangeEvent,click 事件可以使用 React.MouseEvent ,它们都接收一个 Element,如:
onClickColor = (ev: React.MouseEvent) => {
  //
}
PureComponent
我们都知道 , nextState: ReadonlyReact 的刷新机制,因此如果每一次的变动都要刷新一下界面,这对于应用程序的性能来说是一个非常不科学的事情,因此在没有 PureComponent 之前,我们都需要手动使用 shouldComponentUpdate?(nextProps: Readonly 来确认到底要不要刷新界面,如:, nextContext: any): boolean;
import * as React from "react";
import Typography from "@material-ui/core/Typography";

interface IMyComparisonProps {
  text: string;
}

class MyComparison extends React.Component {
  constructor(props: IMyComparisonProps) {
    super(props);
  }

  public shouldComponentUpdate(nextProps: IMyComparisonProps) {
    if (this.props.text === nextProps.text) {
      return false;
    }
    return true;
  }

  public render() {
    const { text } = this.props;
    return (

        Component 值:{ text }

    );
  }
}

export default MyComparison;
如果返回的是 false 那么将不调用 render,如果是 true 则调用 render。
但是如果我们使用 PureComponent 那么就省略了这一步,我们可以不用关心组件是否要刷新,而是 React.PureComponent 来帮我们决定。在使用之前,我们还有一些注意事项要了解,React.PureComponent 是一个和 React.Component 几乎相同,唯一不同的是 React.PureComponent 帮助我们完成了 shouldComponentUpdate 的一些交浅的比较,因此在我们真实的组件设计中,我们一般会用于最后一个关键点的组件上。
Portals
ReactDOM 中提供了一个方法 createPortal,可以将节点渲染在父组件之外,但是你可以依然使用父组件上下文中的属性。这个特性在我所讲的全局对话框或者提示框中非常有用,它脱离了父节点的容器,插在最外层,在样式上就能通过 position: fixed 来覆盖整个文档树。
我们在 state 中定义了一个 open,它只接收一个布尔值,用于打开提示框或关闭提示框架,如:
export interface IPortalsProps {}

export interface IPortalsState {
  open: boolean;
}
然后我们定义两个方法用于设置 open:
public clickHandler = () => {
  this.setState({
    open: true,
  });
}

public clickHandlerClose = () => {
  this.setState({
    open: false,
  });
}
最后在 render 方法中使用 ReactDOM.createPortal 来创建一个全局的 Alert,如:
import * as React from "react";
import * as ReactDOM from "react-dom";
import Button from "@material-ui/core/Button";
import Alert from "../Alert";
import {
IPortalsProps,
IPortalsState,
} from "./types";
class MyPortals extends React.Component {
constructor(props: IPortalsProps) {
super(props);
this.state = {
open: false,
};
}
public clickHandler = () => {
this.setState({
open: true,
});
}
public clickHandlerClose = () => {
this.setState({
open: false,
});
}
public render() {
const { open } = this.state;
return (
{
ReactDOM.createPortal(
Fragments
Fragments 可以让我们减少生成过多有副作用的节点,以往 render 必须返回单一节点,因此很多组件常常会产生过多无用的 div,React 根据这样的情况给予了一个组件来解决这个问题,它就是 Fragment。
public render(){
  return (


  )
}

//or

public render(){
  return (
    <>


  )
}
函数组件以及 Hooks
Hooks 自去年10月发布以来,函数组件就派上了用场,React 的函数组件主要引用 SFC 返回(React.FunctionComponent),当然你也可以不引用 SFC 类型只不过返回的是(JSX.Element),这就是区别。
useState
以前:
interface IFuncComp {
  name: string;
}
const FuncComp: React.SFC = ({ name }) => {
  return (
    { name }
  )
}
现在:
interface IFuncComp2 {
name: string;
}
const FuncComp2: React.SFC = ({ name }) => {
const [ num, setNum ] = React.useState(0);
return (
{ name } { num }
)
}
function useState(initialState: S | (() => S)): [S, Dispatch>];
由于 useState 被定义为一个泛型函数,因此类型可以由我们自己来指定。
useEffect
当你使用 useEffect 时,我们可以传入第三个参数来决定是否执行这个 callback ,这对于优化你的应用至关重要。
React.useEffect(() => {

}, [num]);
useContext
对于 useContext 当你需要共享数据时可用:
interface IContext {
  name: string;
}
const initContext: IContext = {
  name: "",
};
const context = React.createContext(initContext);

const FuncMainContext = () => {
  return (
    <>


  )
}

const FuncContext = () => {
  const va = React.useContext(context);
  return (
    { va.name }
  )
}
useReducer
如果你已经习惯 redux 不妨来看看 useReducer,假设我们需要通过按钮来更改文本颜色:
interface IState {
color: "red" | "blueviolet"
}
interface IAction {
type: string;
payload: any;
}
const reducer = (prevState: IState, action: IAction) => {
const { type, payload } = action;
switch(type){
case "COLOR_CHANGE" : {
return { ...prevState, color: payload };
}
default: {
return prevState;
}
}
}
const App = () => {
const initialState: IState = {
color: "red"
}
const [state, dispatch ] = React.useReducer(reducer, initialState);
return (
icepy
);
}
useRef
当我们需要来引用原生DOM来处理某件事情时,useRef 可以辅助我们完成这项工作:
const App = () => {
const inputEl = React.useRef(null);
const onButtonClick = () => {
if (inputEl && inputEl.current) {
inputEl.current.focus();
}
}
return (
<>
);
}
useMemo
接下来我们可以说一说 useMemo ,这只能当作一次性能优化的选择,通常情况下假设我们的 state 有两个属性,它的场景可能如下:
const App = () => {
const [ index, setIndex ] = React.useState(0);
const [ str, setStr ] = React.useState("");
const add = () => {
return index * 100;
}
return (
<>
{index}-{str}-{add()}
) => {
setStr(ev.target.value);
}}/>
);
}
无论如何修改 index 或 str 都会引发 add() 的执行,这对于性能来说是很难接受的,因为 add() 只依赖于 index ,因此我们可以使用 useMemo 来优化此项。
const App = () => {
const [ index, setIndex ] = React.useState(0);
const [ str, setStr ] = React.useState("");
const add = React.useMemo(() => {
return index * 100;
}, [index]);
return (
<>
{index}-{str}-{add}
) => {
setStr(ev.target.value);
}}/>
);
}
useMemo 的类型依赖于 factory 的返回值,我们可以观察一下它的描述文件:
function useMemo(factory: () => T, deps: DependencyList | undefined): T;
useCallback
那么 useCallback 的使用和 useMemo 比较类似,但它返回的是缓存函数。 通常情况下,我们可以使用 useCallback 来处理父组件更新但不想子组件更新的问题,如:
interface IAppChildProps {
callback: () => number;
}
const AppChild = ({ callback }: IAppChildProps) => {
const [ index, setIndex ] = React.useState(() => callback());
React.useEffect(() => {
setIndex(callback());
}, [callback])
return (
{ index }
);
}
const App = () => {
const [ index, setIndex ] = React.useState(0);
const [ str, setStr ] = React.useState("");
const callback = React.useCallback(() => {
return index * 100;
}, [index]);
return (
<>
{ str }
useImperativeHandle
useImperativeHandle 可以让你使用 ref 将自定义的函数暴露给父组件,这种场景一般情况可以用于在父组件中操作子组件的DOM元素,需要和 forwardRef 配合使用:
interface IFancyInput {
name: string;
}
interface IFancyInputRef {
focus: () => void;
}
const fancyInput = (props: IFancyInput, ref: React.Ref) => {
const inputEl = React.useRef(null);
React.useImperativeHandle(ref, () => ({
focus: () => {
if (inputEl && inputEl.current) {
inputEl.current.focus();
}
}
}));
return (
);
}
const FancyInput = React.forwardRef(fancyInput);
const App = () => {
const fancyRef = React.useRef(null);
return (
在组件树之间传递数据的 Context
在一个典型的 React 应用中,数据都是通过 Props 属性自上而下进行传递的,但某些情况下这些属性有多个组件需要共享,那么 Context 就提供了这样一种共享的方式。
当你使用 createContext 创建一个 Context 时它会返回一个 React.Context 类型。
每一个 Context 对象都会返回一个 Provider 组件,它允许消费组件订阅 context 的变化,当 Provider 的value 发生变化时,它内部的所有消费组件都将重新渲染。
interface IContext {
name: string;
}
const initContext:IContext = {
name: "",
};
const Context = React.createContext(initContext);
const AppChild = () => {
const context = React.useContext(Context);
return (
{context.name}
)
}
const AppChild1 = () => {
const context = React.useContext(Context);
return (
{context.name}
)
}
const App = () => {
const [ name, setName ] = React.useState("");
return (
)
}
我们也可以看一个类组件的例子:
interface IContext {
name: string;
}
const initContext:IContext = {
name: "",
};
const Context = React.createContext(initContext);
class AppChild extends React.Component {
static contextType = Context;
public render(){
const { name } = this.context;
return (
{ name }
)
}
}
const App = () => {
const [ name, setName ] = React.useState("");
return (
)
}
在 TypeScript 中 Context 支持的并不算太好,如:
static contextType?: Context;
/**
 * If using the new style context, re-declare this in your class to be the
 * `React.ContextType` of your `static contextType`.
 *
 * ```ts
 * static contextType = MyContext
 * context!: React.ContextType
 * ```
 *
 * @deprecated if used without a type annotation, or without static contextType
 * @see https://reactjs.org/docs/legacy-context.html
 */
// TODO (TypeScript 3.0): unknown
context: any;
Ref 和 DOM
Refs 提供了一种方式,允许我们访问 DOM 节点或在 render 方法中创建的 React 元素。
const App = () => {
const but = React.createRef();
return (
)
}
获取 React 对象:
class AppChild extends React.Component {
public onButtonClick = (target: EventTarget) => {
console.dir(target);
}
public render(){
return (
1234
)
}
}
const App = () => {
const appChild = React.createRef();
return (
<>
)
}
ref 也可以传递函数:
const App = () => {
  const inputCallback = (el: HTMLInputElement) => {
    console.log(el);
  }
  return (


  )
}
对应的 useRef() 也非常类似,它可以很方便的保存任何可变值,这是因为它创建的是一个普通 JavaScript 对象。
const App = () => {
const inputEl = React.useRef(null);
return (
)
}
React 顶层其他 APIs
React 是整个 React 库的入口,顶层 APIs 中除了我们比较熟悉的如 Component 之外还有一些比较有用的,这里会介绍几种我们不常用但非常重要的顶层 APIs。
isValidElement
验证对象是否为 React 对象,返回值是 true 或 false:
React.isValidElement(object);
cloneElement
有时我们会遇到这样一个场景,就是 tabs 选项卡,对于它的设计我们可能会有一个预期,做一个简单版,比如:
 {
  setIndex(value);
}}>
  Tab 1
  Tab 2
  Tab 3

1
2
3
点击 Tab 的时候需要把它的 onClick 事件替换成 Tabs 的 onChange,因此这里会使用到 cloneElement 方法来处理。
interface ITabsProps {
  value: number;
  onChange: (value: number) => void;
  children?: React.ReactNode;
}

const tabsStyles: React.CSSProperties = {
  width: "100%",
  display: "flex",
  flexDirection: "row",
}

const Tabs = (props: ITabsProps) => {
  const onChange = (value: number) => {
    props.onChange(value);
  }
  const renderTab = () => {
    const { children } = props;
    if (children && Array.isArray(children)) {
      const arrayChilds = children.map((v, i) => {
        if (React.isValidElement(v)) {
          const childrenProps = {
            onChange,
            key: `Tab-${i}`,
          };
          return React.cloneElement(v, childrenProps);
        }
      });
      return arrayChilds;
    }
    if (children && !Array.isArray(children)) {
      const childrenProps = {
        onChange,
        key: "Tab",
      };
      if (React.isValidElement(children)) {
        return React.cloneElement(children, childrenProps);
      }
    }
  }

  return (

      {renderTab()}

  );
}
由于我们把 childrenProps 替换了,因此子元素的 Tab 就可以如此:
interface ITabProps {
  value: number;
  onChange?: (value: number) => void;
  children?: React.ReactNode;
}

const tabStyles: React.CSSProperties = {
  width: "50px",
  marginRight: "10px",
  border: "1px solid red",
  textAlign: "center",
  cursor: "pointer"
}

const Tab = (props: ITabProps) => {
  const changeHandler = () => {
    const { onChange, value } = props;
    if (onChange) {
      onChange(value);
    }
  }
  return (

      { props.children }

  );
}
memo
React.memo 为高阶组件。它与 React.PureComponent 非常相似,但它适用于函数组件,但不适用于 class 组件。
此方法仅作为性能优化的方式而存在。
interface IProps {
value: number;
}
const AppChild = (props: IProps) => {
return (
props.value: { props.value}
)
}
const MemoAppChild = React.memo(AppChild);
interface IState {
date: Date;
value: number;
}
class App extends React.Component<{}, IState> {
constructor(props: {}){
super(props);
this.state = {
value: 0,
date: new Date(),
}
}
public componentDidMount(){
setInterval(()=>{
this.setState({
date:new Date()
})
},1000)
}
public render(){
return (
如果你想更细节的控制,可以传入第二个参数,它是一个函数:
interface IProps {
value: number;
}
const AppChild = (props: IProps) => {
return (
props.value: { props.value}
)
}
type Equal = (prevProps: IProps, nextProps: IProps) => boolean;
const areEqual: Equal = (prevProps, nextProps) => {
if (prevProps.value === nextProps.value) {
return true;
} else {
return false;
}
}
const MemoAppChild = React.memo(AppChild, areEqual);
interface IState {
date: Date;
value: number;
}
class App extends React.Component<{}, IState> {
constructor(props: {}){
super(props);
this.state = {
value: 0,
date: new Date(),
}
}
public componentDidMount(){
setInterval(()=>{
this.setState({
date:new Date()
})
},1000)
}
public render(){
return (
原文https://zhuanlan.zhihu.com/p/69802663