KonvaJS 原理解析
前言
用过 Canvas 的都知道它的 API 比较多,使用起来也很麻烦,比如我想绘制一个圆形就要调一堆 API,对开发算不上友好。
const canvas = document.querySelector('canvas');
const context = canvas.getContext('2d');
// 设置字体样式
context.font = '24px SimSun, Songti SC';
context.fillText('24px的宋体呈现', 20, 50);
// 绘制完整圆
context.fillStyle = 'RGB(255, 0, 0)';
context.beginPath();
context.arc(150, 75, 50, 0, Math.PI * 2);
context.stroke();
为了解决这个痛点,诞生了例如 PIXI、ZRender、Fabric 等 Canvas 库。今天要讲的 Konva 也是一个很优秀的 Canvas 框架,API 封装简洁易懂,基于 TypeScript 实现,有 React 和 Vue 版本。
      const stage = new Konva.Stage({

        container: 'root',
        width: 1000,
        height: 1000,
      });
      const layer = new Konva.Layer();
      const group = new Konva.Group();

      const text = new Konva.Text({

        text: 'Hello, this is some good text',
        fontSize: 30,
      });

      const circle = new Konva.Circle({

        x: stage.width() / 2,
        y: stage.height() / 2,
        radius: 70,
        fill: 'red',
        stroke: 'black',
        strokeWidth: 4
      });
      group.add(text);
      group.add(circle);
      layer.add(group);
      stage.add(layer);
架构设计
Konva Tree
从前言里面给的那段代码可以看出来,Konva 有一定的嵌套结构,有些类似 DOM 结构。通过 add 和 remove 就能实现子节点的添加和删除。

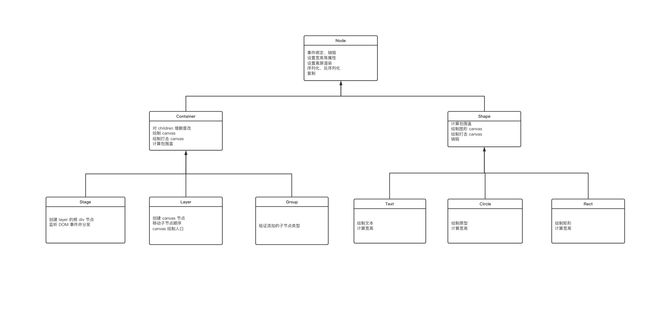
Konva Tree 主要包括这么几部分:
- Stage 根节点:这是应用的根节点,会创建一个 div 节点,作为事件的接收层,根据事件触发时的坐标来分发出去。一个 Stage 节点可以包含多个 Layer 图层。
- Layer 图层:Layer 里面会创建一个 Canvas 节点,主要作用就是绘制 Canvas 里面的元素。一个 Layer 可以包含多个 Group 和 Shape。
- Group 组:Group 包含多个 Shape,如果对其进行变换和滤镜,里面所有的 Shape 都会生效。
- Shape:指 Text、Rect、Circle 等图形,这些是 Konva 封装好的类。
build dom
Stage 创建的时候会去创建两个 Canvas 节点以及 content 容器节点,这两个 Canvas 节点是用于 perfectDrawEnabled 的,后面会讲到。
这里需要注意的就是这个 content 节点,作为整个 Konva 画布的容器,之后的 Layer 都会被 append 进去。
  _buildDOM() {

    this.bufferCanvas = new SceneCanvas({

      width: this.width(),
      height: this.height(),
    });
    this.bufferHitCanvas = new HitCanvas({

      pixelRatio: 1,
      width: this.width(),
      height: this.height(),
    });

    if (!Konva.isBrowser) {

      return;
    }
    var container = this.container();
    if (!container) {

      throw 'Stage has no container. A container is required.';
    }
    // clear content inside container
    container.innerHTML = '';

    // content
    this.content = document.createElement('div');
    this.content.style.position = 'relative';
    this.content.style.userSelect = 'none';
    this.content.className = 'konvajs-content';

    this.content.setAttribute('role', 'presentation');

    container.appendChild(this.content);

    this._resizeDOM();
  }
在调用 Stage.add 的时候,不仅会调用 Layer 的绘制方法,还会把 Layer 的 Canvas 节点 append 进去。
  add(layer: Layer, ...rest) {

    if (arguments.length > 1) {

      for (var i = 0; i < arguments.length; i++) {

        this.add(arguments[i]);
      }
      return this;
    }
    super.add(layer);

    var length = this.children.length;
    if (length > MAX_LAYERS_NUMBER) {

      Util.warn(
        'The stage has ' +
          length +
          ' layers. Recommended maximum number of layers is 3-5. Adding more layers into the stage may drop the performance. Rethink your tree structure, you can use Konva.Group.'
      );
    }
    layer.setSize({
    width: this.width(), height: this.height() });

    // draw layer and append canvas to container
    layer.draw();

    if (Konva.isBrowser) {

      this.content.appendChild(layer.canvas._canvas);
    }

    // chainable
    return this;
  }
渲染
批量渲染
从前面的代码中可以看到,没有手动调用绘制方法,但依然会进行绘制,说明会在一定的时机进行渲染。
这个时机就在 add 方法里面,不管 Group、Layer、Stage 哪个先 add,最终都会触发渲染。
他们三个都继承了 Container 类,在 Container 类里面有一个 add 方法,我们来一探究竟。
  add(...children: ChildType[]) {

    if (arguments.length > 1) {

      for (var i = 0; i < arguments.length; i++) {

        this.add(arguments[i]);
      }
      return this;
    }
    var child = children[0];
    // 如果要添加的子节点已经有个父节点,那就先将其从父节点移除,再插入到当前节点里面