Faster R-CNN网络架构详解和TensorFlow Hub实现(附源码)
文章目录
- 一、RPN网络
-
- 1. RPN网络简介
- 2. backbone网络简介
- 二、Faster R-CNN网络架构
-
- 1. Faster R-CNN网络简介
- 2. 基于TensorFlow Hub实现Faster R-CNN
前言:Faster R-CNN的简介见 上一篇文章
一、RPN网络
1. RPN网络简介
RPN网络全称Region Proposal Network,顾名思义,这是一种生成候选区域的网络。该网络主要用于Faster R-CNN的候选区域生成部分。
在R-CNN和Fast R-CNN中,候选区域一般采用滑动窗口算法(Selective Search)生成,耗费大量的时间,而Faster R-CNN的一个重要改进就是使用RPN网络生成候选区域,而RPN是通过全卷积网络来实现,故而极大缩短了候选区生成时间。
Faster R-CNN可以看做是RPN + Fast R-CNN的组合。
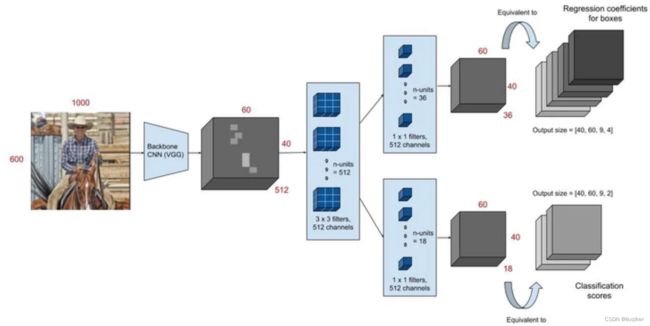
下图是RPN网络架构图,共有如下几个步骤:

Step 1:输入图片经过backbone网络,生成特征图矩阵(Feature Map)。
Step 2:特征图矩阵经过3×3卷积核做特征的提取和转换,此时转换后的特征图shape为[H, W, D],取D以外的维度[H,W]来表示一个特征点,命名为anchor。由于原图经过了backbone和3×3的卷积的缩放转换处理,故此时的一个anchor对应的不是原图中的一个点,而是一个区域A。我们以A的中心点为原点,在原图上取大小长宽比不同且固定的k个矩形,命名为anchors。anchors样式如下图:

注意,特征图上的每个点[H,W]生成一个anchors,anchors可以理解成k个不同的框(框的属性是长宽,和四个点的坐标)。这个框的数据(四个坐标)都是对应于原图的。
Step 3:对Step 2中每一个D维度之外的点[H,W]做1×1卷积,首先需要经过一个1×1(2×k个unit)的卷积核,以预测是否包含待检测物体;同时需要经过另一个1×1(4×k个unit)的卷积核,以预测坐标位置。
Step 4:上一步的预测值与真实值比较计算,不断修正其准确度。
2. backbone网络简介
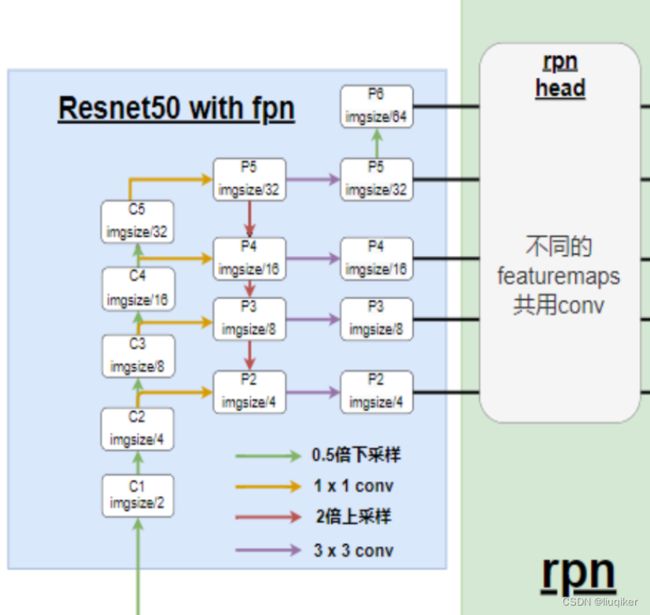
对于backbone的选择,现在常用的有VGG,ResNet,ResNet50 FPN,ReXNets等,目前效果较好的是ResNet50 FPN。
若选择VGG,作为backbone,输入shape为[3,800,992],得到输出shape为[1280,25,31],一张特征图;
若选择ResNet50 FPN,作为backbone,输入shape为[3,1600,1300],输出为shape为[256,200,248],[256,100,124],[256,50,62],[256,25,31],[256,13,16],5张特征图,不同大小的特征图适合检测不同大小的目标,[256,200,248]更容易检测到小目标,[256,13,16]更容易检测到大目标,故ResNet50是更好的选择,网络结构如下图。

二、Faster R-CNN网络架构
1. Faster R-CNN网络简介
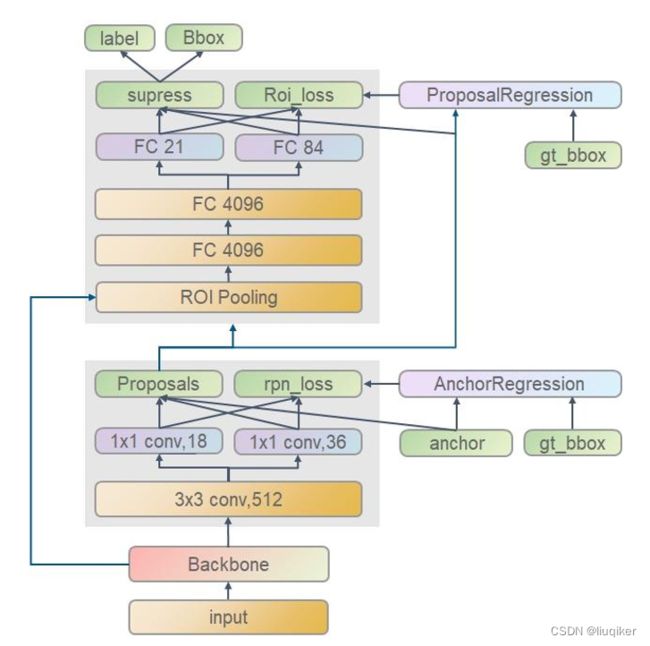
Faster R-CNN的典型网络架构如下图:

Step 1:输入的图片经过backbone网络,生成候选区域图。
Step 2:将RPN网络生成的候选图(proposals)输入到ROI Pooling,其作用是将不同尺寸的特征图(由于检测框大小不同,所以截图的特征图大小也不同)转换成同一尺寸。
Step 3:ROI Pooling的输出[512,256,7,7],经过展平得到[512,12544],再经过两个全连接层得到[512,1024]。
Step 4: Step 3的输出[512,1024]作为输入,经过一个全连接层(FC21)Linear(1024,num_classes),num_classes表示要分类的类别。得到每一个类别的预测分数,与真实boxes的类别标签labels计算损失;同时该输入还要经过一个另全连接层(FC48)Linear(1024,num_classes×4),num_classes×4表示每一个分类类别对应的边界框回归参数,并与真实参数值计算损失。
至此,Faster R-CNN的基本原理大致学习完毕,还有大量的细节需要靠阅读源码了解。
2. 基于TensorFlow Hub实现Faster R-CNN
Step 0:关键包导入
import tensorflow as tf
import tensorflow_hub as jub
Step 1:用于下载图像和可视化的工具函数
def display_image(image):
  fig = plt.figure(figsize=(20, 15))
  plt.grid(False)
  plt.imshow(image)

def download_and_resize_image(url, new_width=256, new_height=256,
                              display=False):
  _, filename = tempfile.mkstemp(suffix=".jpg")
  response = urlopen(url)
  image_data = response.read()
  image_data = BytesIO(image_data)
  pil_image = Image.open(image_data)
  pil_image = ImageOps.fit(pil_image, (new_width, new_height), Image.ANTIALIAS)
  pil_image_rgb = pil_image.convert("RGB")
  pil_image_rgb.save(filename, format="JPEG", quality=90)
  print("Image downloaded to %s." % filename)
  if display:
    display_image(pil_image)
  return filename

def draw_bounding_box_on_image(image,
                               ymin,
                               xmin,
                               ymax,
                               xmax,
                               color,
                               font,
                               thickness=4,
                               display_str_list=()):
  """Adds a bounding box to an image."""
  draw = ImageDraw.Draw(image)
  im_width, im_height = image.size
  (left, right, top, bottom) = (xmin * im_width, xmax * im_width,
                                ymin * im_height, ymax * im_height)
  draw.line([(left, top), (left, bottom), (right, bottom), (right, top),
             (left, top)],
            width=thickness,
            fill=color)

  # If the total height of the display strings added to the top of the bounding
  # box exceeds the top of the image, stack the strings below the bounding box
  # instead of above.
  display_str_heights = [font.getsize(ds)[1] for ds in display_str_list]
  # Each display_str has a top and bottom margin of 0.05x.
  total_display_str_height = (1 + 2 * 0.05) * sum(display_str_heights)

  if top > total_display_str_height:
    text_bottom = top
  else:
    text_bottom = top + total_display_str_height
  # Reverse list and print from bottom to top.
  for display_str in display_str_list[::-1]:
    text_width, text_height = font.getsize(display_str)
    margin = np.ceil(0.05 * text_height)
    draw.rectangle([(left, text_bottom - text_height - 2 * margin),
                    (left + text_width, text_bottom)],
                   fill=color)
    draw.text((left + margin, text_bottom - text_height - margin),
              display_str,
              fill="black",
              font=font)
    text_bottom -= text_height - 2 * margin


def draw_boxes(image, boxes, class_names, scores, max_boxes=10, min_score=0.1):
  """Overlay labeled boxes on an image with formatted scores and label names."""
  colors = list(ImageColor.colormap.values())

  try:
    font = ImageFont.truetype("/usr/share/fonts/truetype/liberation/LiberationSansNarrow-Regular.ttf",
                              25)
  except IOError:
    print("Font not found, using default font.")
    font = ImageFont.load_default()

  for i in range(min(boxes.shape[0], max_boxes)):
    if scores[i] >= min_score:
      ymin, xmin, ymax, xmax = tuple(boxes[i])
      display_str = "{}: {}%".format(class_names[i].decode("ascii"),
                                     int(100 * scores[i]))
      color = colors[hash(class_names[i]) % len(colors)]
      image_pil = Image.fromarray(np.uint8(image)).convert("RGB")
      draw_bounding_box_on_image(
          image_pil,
          ymin,
          xmin,
          ymax,
          xmax,
          color,
          font,
          display_str_list=[display_str])
      np.copyto(image, np.array(image_pil))
  return image
Step 2:下载图像并保存
image_url = "https://upload.wikimedia.org/wikipedia/commons/6/60/Naxos_Taverna.jpg"
downloaded_image_path = download_and_resize_image(image_url, 1280, 856, True)
Step 3:基于TensorFlow Hub加载Faster R-CNN模型
module_handle = "https://tfhub.dev/google/faster_rcnn/openimages_v4/inception_resnet_v2/1"
detector = hub.load(module_handle).signatures['default']

def load_img(path):
  img = tf.io.read_file(path)
  img = tf.image.decode_jpeg(img, channels=3)
  return img

def run_detector(detector, path):
  img = load_img(path)

  converted_img  = tf.image.convert_image_dtype(img, tf.float32)[tf.newaxis, ...]
  start_time = time.time()
  result = detector(converted_img)
  end_time = time.time()

  result = {key:value.numpy() for key,value in result.items()}

  print("Found %d objects." % len(result["detection_scores"]))
  print("Inference time: ", end_time-start_time)

  image_with_boxes = draw_boxes(
      img.numpy(), result["detection_boxes"],
      result["detection_class_entities"], result["detection_scores"])

  display_image(image_with_boxes)
Step 4:检测图片中的物体
run_detector(detector, downloaded_image_path)