Ubuntu安装CUDA cuDNN TensorRT
CUDA cuDNN TensorRT安装
0.前言
CUDA:用于 GPU 的一组驱动程序,它让 GPU 能够运行底层编程语言来进行并行计算。
cuDNN:用于深度学习的高度优化的原语库。使用 cuDNN 并在 GPU 上运行时,通常可以将模型的训练速度提高 50% 到 100%。
1.安装包下载
windows、ubuntu均采用离线安装包安装,Windows离线安装包为“.exe”后缀格式,Ubuntu离线安装包为“.run”后缀格式,请注意不要下载错误。
注意各个版本之间的对应关系,本安装实例以CUDA11.0, cuDNN8.0,TensorRT7.2为例配置CUDA生态环境。
1.1 CUDA安装包下载
CUDA下载链接为:cuda-toolkit-archive,选择CUDA11.0
Windows如下选择,注意选择离线安装包,即可下载,推荐使用IDM全速下载

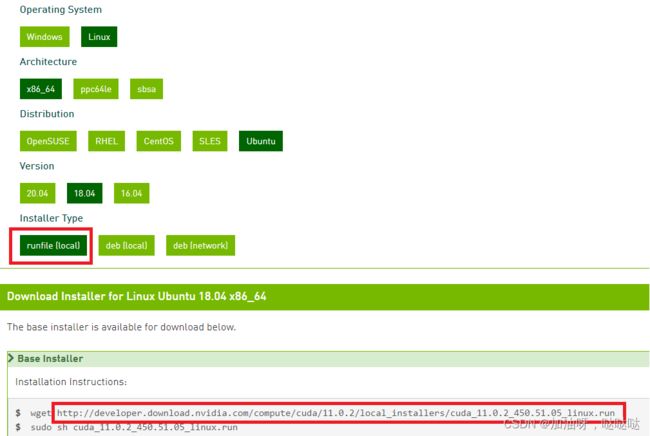
Ubuntu如下选择,注意选择离线安装包,即可下载
1.2 cuDNN安装包下载
cuDNN下载链接为:cudnn-archive。
注意CUDA版本选择cudnn,此处选择Download cuDNN v8.0.4 (September 28th, 2020), for CUDA 11.0,对应CUDA11.0。
分别下载Windows和Linux cuDNN安装包。

1.3 TensorRT安装包下载
TensorRT下载链接为:TensorRT,
注意下载版本和CUDA11.0, cuDNN版本对应,区分Windows和Ubuntu版本。

2.安装
2.0 NVIDIA驱动安装
- 更新软件源及安装部分依赖
sudo apt-get update   #更新软件列表
sudo apt-get install g++ gcc make
- 查看GPU型号
lspci | grep -i nvidia
-
官网下载驱动
-
卸载原有驱动
sudo apt-get remove --purge nvidia*
- 禁用通用驱动程序(nouveau)
# 1.打开文件
sudo gedit /etc/modprobe.d/blacklist.conf
# 2.末尾添加:
blacklist nouveau
options nouveau modeset=0
# 3.更新配置文件,建议重启
sudo update-initramfs –u
# 4.重启之后查看是否禁用成功
lsmod | grep nouveau
-
终端模式与图形模式切换:在ubuntu下按
ctrl+alt+f1进入命令行界面(电脑都是黑屏哦),输入帐号密码登录(把自己的账号,密码记住),通过 Ctrl + Alt + F7可返回图形化模式 -
停止图形界面(可以先试试不关闭能不能安装)
# 这个是关闭图形界面
sudo service lightdm stop
- 安装run file
sudo chmod  a+x NVIDIA-Linux-x86_64-396.18.run
sudo ./NVIDIA-Linux-x86_64-396.18.run -no-x-check -no-nouveau-check -no-opengl-files
# 只有禁用opengl这样安装才不会出现循环登陆的问题
# -no-x-check:安装驱动时关闭X服务
# -no-nouveau-check:安装驱动时禁用nouveau
# -no-opengl-files:只安装驱动文件,不安装OpenGL文件
# 重要选项
1. There appears to already be a driver installed on your system (version:
  390.42).  As part of installing this driver (version: 390.42), the existing
  driver will be uninstalled.  Are you sure you want to continue?
  Continue installation      Abort installation
(选择 Coninue,如果是重装的话)
2. The distribution-provided pre-install script failed!  Are you sure you want
  to continue?
 Continue installation      Abort installation
(选择 Cotinue)
3. Would you like to register the kernel module sources with DKMS? This will
  allow DKMS to automatically build a new module, if you install a different
  kernel later.
Yes                       No
(这里选 No)
4. Install NVIDIA's 32-bit compatibility libraries?
    Yes                       No
(这里选 No)
5. Installation of the kernel module for the NVIDIA Accelerated Graphics Driver
  for Linux-x86_64 (version 390.42) is now complete.
  OK
6.Would you like to run the nvidia-xconfigutility to automatically update your x configuration so that the NVIDIA x driver will be used when you restart x? Any pre-existing x confile will be backed up.
    Yes                       No
(这里选 Yes)
- 重启图形界面
sudo service lightdm start
sudo reboot
- 查看是否安装成功
nvidia-smi
(1)可能会出现的问题
由于显卡驱动在使用过程中也会有挂掉的情况,笔者安装过很多次,遇到了很多情况,在此先总结一下,可能遇到的问题,希望给大家带来一定的帮助,遇到此类问题的朋友也好直接找到办法去解决!
如果有没有提及的错误,也希望大家在评论区指出,一起交流
成功进入安装程序不代表一帆风顺,会遇到各种报错
-
Error: the distribution-provided pre-install script failed.
-
Error: Unable to find the development tool ‘cc’ in your path.
-
Error: Unable to find the development tool ‘make’ in your path.
-
Error: The kernel module failed to load. Secure boot is enabled on this system.
-
The signed kernel module failed to load.
-
Error: Unable to load the kernel module ‘nvidia.ko’.
-
Error: An NVIDIA kernel ‘nvidia-drm’ appears to already be loaded in your kernel.
-
Error: An NVIDIA kernel module ‘nvidia-modeset’ appears to already be loaded in your kernel.
-
WARNING: Unable to find a suitable destination to install 32-bit compatibility libraries.
-
WARNING: Unable to determine the path to install the libglvnd EGL vendor library config files.
遇到了报错不要担心,正常情况,让我们逐一解决
(2)解决方法
第一个错误,继续安装即可,这个错误只是确认你是否要安装这个驱动
第二个、第三个错误产生的原因是Ubuntu环境缺少所需要的依赖
解决:
sudo apt-get install gcc
sudo apt-get install make
第四个错误与第五个错误产生的原因是BIOS没有关闭 Secure boot
解决:
-
重启电脑在主板信息界面,按
F2或Del进入BIOS界面 -
按
F7进入高级设置菜单 -
在菜单栏中点击进入
启动分页 -
将快速启动设置为
Disabled -
点击 安全启动菜单
-
操作系统类型如果是双系统依旧保持UEFI模式,如果不是双系统,设置为其他操作系统
-
点击 密钥管理
-
点击 清除安全启动密钥,再点击确认清除
-
保存设置并退出
第六个错误,证明准备工作没有做好
-
输入命令
reboot重启电脑 -
在用户登录界面,按
Alt+Ctrl+F2进入命令行 -
输入命令:
sudo systemctl isolate multi-user.target进入无窗口界面 -
输入用户名与密码进行登录
-
输入命令:
sudo modprobe -r nvidia_drm、sudo modprobe -r nvidia_modeset -
重新进入驱动安装
-
退出无窗口界面:
sudo systemctl start graphical.target
第七个错误和第八个错误,首先要确保关闭了Secure Boot,然后删除已经安装的显卡驱动:
sudo apt-get purge nvidia*
sudo apt-get autoremove
sudo reboot
再到第六个错误的部分解决准备工作的问题
最后两个警告,不影响安装,如果有需要,可以自己安装需要的依赖
2.1 安装CUDA
由于下载CUDA版本为离线版本,直接点击安装,点击下一步即可。
注意:可修改安装路径。
2.2 cuDNN安装
下载完成cuDNN安装包后,将其解压,复制到CUDA的安装目录即可。
注意:可能需要管理员权限
cudnn               cuda
include/*   -->    include
lib/*.dll   -->    bin
lib/*lib    -->    lib/x64/*    lib64/*
2.3 TensorRT安装
下载完成TensorRT安装包后,将其解压,复制到CUDA的安装目录即可。
注意:可能需要管理员权限
TensorRT            CUDA
include/*   -->    include
lib/*.dll   -->    bin
lib/*lib    -->    lib/x64/*    lib64/*
2.4 添加环境变量
由于cuDNN、TensorRT都安装在CUDA目录下,只需添加其动态库目录到系统环境变量中即可。
注意:Windows在安装CUDA时会默认将环境变量添加;Ubuntu需要手动添加环境变量,如下为Ubuntu添加环境变量:
$ vim ~/.bashrc

export LD_LIBRARY_PATH=$LD_LIBRARY_PATH:/usr/local/cuda-11.0/lib64
export PATH=$PATH:/usr/local/cuda-11.0/bin
export CUDA_HOME=$CUDA_HOME:/usr/local/cuda-11.0
3.测试是否安装成功
3.1 CUDA测试
打开终端,输入以下命令,显示CUDA版本即可安装成功
$ nvcc -V
nvcc: NVIDIA (R) Cuda compiler driver
Copyright (c) 2005-2020 NVIDIA Corporation
Built on Thu_Jun_11_22:26:48_Pacific_Daylight_Time_20
Cuda compilation tools, release 11.0, V11.0.194
Build cuda_11.0_bu.relgpu_drvr445TC445_37.28540450_0
3.2 cuDNN测试
Ubuntu打开终端,输入以下命令,即可看到cuDNN版本。
$ cat /usr/local/cuda/include/cudnn.h | grep CUDNN_MAJOR -A 2

#define CUDNN_MAJOR 8
#define CUDNN_MINOR 0
#define CUDNN_PATCHLEVEL 5

#define CUDNN_VERSION (CUDNN_MAJOR * 1000 + CUDNN_MINOR * 100 + CUDNN_PATCHLEVEL)
3.3 TensorRT测试
$ cd <TensorRT root directory>/samples/sampleMNIST
$ make
$ cd ../../bin
$ ./sample_mnist
[I] Building and running a GPU inference engine for MNIST
[I] Input:
@@@@@@@@@@@@@@@@@@@@@@@@@@@@
@@@@@@@@@@@@@@@@@@@@@@@@@@@@
@@@@@@@@@@@@@@@@@@@@@@@@@@@@
@@@@@@@@@@@@@@@@@@@@@@@@@@@@
@@@@@@@@#-:.-=@@@@@@@@@@@@@@
@@@@@%=     . *@@@@@@@@@@@@@
@@@@% .:+%%%  *@@@@@@@@@@@@@
@@@@+=#@@@@@# @@@@@@@@@@@@@@
@@@@@@@@@@@%  @@@@@@@@@@@@@@
@@@@@@@@@@@: *@@@@@@@@@@@@@@
@@@@@@@@@@- .@@@@@@@@@@@@@@@
@@@@@@@@@:  #@@@@@@@@@@@@@@@
@@@@@@@@:   +*%#@@@@@@@@@@@@
@@@@@@@%         :+*@@@@@@@@
@@@@@@@@#*+--.::     +@@@@@@
@@@@@@@@@@@@@@@@#=:.  +@@@@@
@@@@@@@@@@@@@@@@@@@@  .@@@@@
@@@@@@@@@@@@@@@@@@@@#. #@@@@
@@@@@@@@@@@@@@@@@@@@#  @@@@@
@@@@@@@@@%@@@@@@@@@@- +@@@@@
@@@@@@@@#-@@@@@@@@*. =@@@@@@
@@@@@@@@ .+%%%%+=.  =@@@@@@@
@@@@@@@@           =@@@@@@@@
@@@@@@@@*=:   :--*@@@@@@@@@@
@@@@@@@@@@@@@@@@@@@@@@@@@@@@
@@@@@@@@@@@@@@@@@@@@@@@@@@@@
@@@@@@@@@@@@@@@@@@@@@@@@@@@@
@@@@@@@@@@@@@@@@@@@@@@@@@@@@

[I] Output:
0:
1:
2:
3: **********
4:
5:
6:
7:
8:
9:

&&&& PASSED TensorRT.sample_mnist # ./sample_mnist