maven项目整合SSM框架实现crud案例
- 创建一个maven工程
- 引入项目依赖的jar包:spring、springmvc、mybatis、数据库连接池驱动包、其他(jstl、servlet-api、junit)
- 引入bootstrap前端框架
- 编写ssm整合关键配置文件:web.xml、spring、springmvc、mybatis,使用mybatis逆向工程生成对应的bean和mapper
- 测试mapper
/**
 * 1.PageHelper的使用:
 *      引入依赖
 *      在mybatis配置文件中注册该插件
 * 2.每个方法中注解的具体含义
 * 3.Model/Map 请求域
 * 4.注意@Controller
 * 5.添加员工,模态框中的信息,使用js的serialize()方法,将表单中的内容序列为字符串,用于ajax请求
 * 6.查询员工信息从url取id,使用@PathVariable
 * 7.ajax发送put请求:
 *      Tomcat会将请求体中的数据封装成一个map对象。
 *      但Tomcat一看是PUT请求,就不会把请求体中的数据封装成map,只有POST会
 *      在web.xml中配置一个HttpPutFormContentFilter
 */
1.创建一个maven项目
新创建的maven项目如果没有web.xml,可以右击项目——>properties——>Project Facets,把Dynamic Web Module的勾去掉,然后再勾中来创建
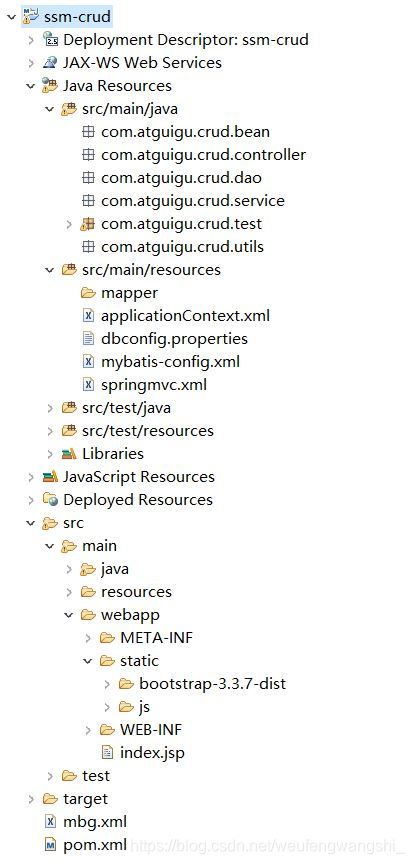
项目结构如上,src/main/java中放主要代码,src/main/resources中放配置文件,mapper中放mapper映射文件,webapp中的static放页面需要的一些素材等
2.引入项目依赖的jar包
在pom.xml中导入依赖,相关依赖可从maven repository中查
  4.0.0
  com.atguigu
  ssm-crud
  0.0.1-SNAPSHOT
  war


		    org.springframework
		    spring-webmvc
		    4.3.7.RELEASE


		    com.fasterxml.jackson.core
		    jackson-databind
		    2.8.8


		    org.hibernate
		    hibernate-validator
		    5.4.1.Final


		    org.springframework
		    spring-test
		    4.3.7.RELEASE
		    test


		    org.springframework
		    spring-jdbc
		    4.3.7.RELEASE


		    org.springframework
		    spring-aspects
		    4.3.7.RELEASE


		    org.mybatis
		    mybatis
		    3.4.2


		    org.mybatis
		    mybatis-spring
		    1.3.1


		    c3p0
		    c3p0
		    0.9.1


		    mysql
		    mysql-connector-java
		    8.0.11


		    jstl
		    jstl
		    1.2


		    javax.servlet
		    javax.servlet-api
		    3.0.1

		    provided


		    junit
		    junit
		    4.12
		    test


		    org.mybatis.generator
		    mybatis-generator-core
		    1.3.7


		    com.github.pagehelper
		    pagehelper
		    5.0.0
3.引入bootstrap前端框架
使用bootstrap,导入所需文件并在相应页面中引入
4.编写ssm整合的配置文件
web.xml
		contextConfigLocation
		classpath:applicationContext.xml


		org.springframework.web.context.ContextLoaderListener


		dispatcherServlet
		org.springframework.web.servlet.DispatcherServlet


			contextConfigLocation
			classpath:springmvc.xml

		1


  		dispatcherServlet
  		/


  		CharacterEncodingFilter
  		org.springframework.web.filter.CharacterEncodingFilter

  			encoding
  			utf-8


  			forceRequestEncoding
  			true


  			forceResponseEncoding
  			true


  		CharacterEncodingFilter
  		/*


  		HiddenHttpMethodFilter
  		org.springframework.web.filter.HiddenHttpMethodFilter


  		HiddenHttpMethodFilter
  		/*
spring的applicationContext.xml
springmvc.xml
mybatis-config.xml
5.使用逆向工程生成bean和mapper映射文件
mbg.xml
运行代码执行逆向工程
public class MBGTest {
	public static void main(String[] args) throws Exception {
		List warnings = new ArrayList();
		boolean overwrite = true;
		File configFile = new File("mbg.xml");
		ConfigurationParser cp = new ConfigurationParser(warnings);
		Configuration config = cp.parseConfiguration(configFile);
		DefaultShellCallback callback = new DefaultShellCallback(overwrite);
		MyBatisGenerator myBatisGenerator = new MyBatisGenerator(config, callback, warnings);
		myBatisGenerator.generate(null);
	}
}
6.测试自动生成的mapper
在test包里创建一个测试类
/**
 * Spring项目可以使用Spring的单元测试
 * 1.导入spring-test jar
 * 2.@ContextConfiguration指定spring配置文件
 * 3.@RunWith指定使用Spring单元测试模块
 */
@RunWith(SpringJUnit4ClassRunner.class)
@ContextConfiguration(locations={"classpath:applicationContext.xml"})
public class MapperTest {
	@Autowired
	DepartmentMapper departmentMapper;

	@Autowired
	EmployeeMapper employMapper;

	@Autowired
	SqlSession sqlSession;

	@Test
	public void testCRUD(){
		//1.创建容器
		//ApplicationContext ioc = new ClassPathXmlApplicationContext("applicationContext.xml");
		//2.获取mapper
		//DepartmentMapper departmentMapper = ioc.getBean(DepartmentMapper.class);
		//departmentMapper.insertSelective(new Department(null, "公关部"));
		//插入部门数据
		//departmentMapper.insertSelective(new Department(null, "开发部"));
		//departmentMapper.insertSelective(new Department(null, "测试部"));
		//插入员工数据
		//employMapper.insertSelective(new Employee(null, "BZZB", "M", "[email protected]", 1));
		//批量插入员工
		EmployeeMapper employeeMapper = sqlSession.getMapper(EmployeeMapper.class);
		for (int i = 0; i < 100; i++) {
			String uuid = UUID.randomUUID().toString().substring(0, 5);
			employeeMapper.insertSelective(new Employee(null, uuid, "M", uuid+"@xx.com", 1));
		}
	}
}
批量生成测试数据需要在spring的配置文件中配置一个sqlSession
完成CRUD
一、数据显示
- 访问index.jsp页面
- index.jsp页面发送出查询员工列表请求
- EmployeeController接收请求,查出员工数据
- 来到list.jsp页面进行展示
使用PageHelper,需要在pom.xml中导入依赖
    com.github.pagehelper
	pagehelper
	5.0.0
在mybatis-config.xml中引入插件
1.index.jsp中
2.EmployeeController.java
@Controller
public class EmployeeController {

	@Autowired
	EmployeeService employeeService;

	@RequestMapping("/emps")
	public String getAllEmp(@RequestParam(value="pn",defaultValue="1")Integer pn, Model model){
		//调用分页查询插件,传入页码和每页数据条数
		PageHelper.startPage(pn, 5);
		//分页查询
		List emps = employeeService.getAllEmp();
		//封装分页信息并传递给页面
		PageInfo page = new PageInfo(emps,5);
		model.addAttribute("pageInfo",page);
		return "list";
	}
}
3.EmployeeService.java
@Service
public class EmployeeService {
	//逆向工程生成的Mapper
	@Autowired
	EmployeeMapper employeeMapper;

	public List getAllEmp() {
		return employeeMapper.selectByExampleWithDept(null);
	}

}
4.list.jsp
<%@ page language="java" contentType="text/html; charset=UTF-8" pageEncoding="UTF-8"%>
<%@ taglib uri="http://java.sun.com/jsp/jstl/core" prefix="c"%>
员工列表
<%
pageContext.setAttribute("APP_PATH",request.getContextPath());
%>
SSM-CRUD
#
empName
gender
email
deptName
操作
${emp.empId }
${emp.empName }
${emp.gender=='M'?"男":"女" }
${emp.email }
${emp.department.deptName }
当前${pageInfo.pageNum }页,共${pageInfo.pages }页,共${pageInfo.total }条记录
以上的查询是有index.jsp转发到emps请求,改造成ajax实现
1.index.jsp页面直接发送ajax请求
2.服务器将查出的数据以json字符串的形式返回给浏览器
3.浏览器使用js对json字符串进行解析,显示数据
创建一个Msg类,封装服务器返回给浏览器的信息
public class Msg {
	//状态码
	private int code;
	//提示信息
	private String msg;
	//用户要返回给浏览器的数据
	private Map extend = new HashMap();
	public int getCode() {
		return code;
	}
	public void setCode(int code) {
		this.code = code;
	}
	public String getMsg() {
		return msg;
	}
	public void setMsg(String msg) {
		this.msg = msg;
	}
	public Map getExtend() {
		return extend;
	}
	public void setExtend(Map extend) {
		this.extend = extend;
	}
	//成功时的返回内容
	public static Msg success(){
		Msg result = new Msg();
		result.setCode(100);
		result.setMsg("处理成功");
		return result;
	}
	//失败时的返回内容
	public static Msg failure(){
		Msg result = new Msg();
		result.setCode(200);
		result.setMsg("处理失败");
		return result;
	}
	//控制器中处理请求的方法返回一个Msg对象,这个对象通过下面方法添加内容
	public Msg add(String key, Object value){
		this.getExtend().put(key, value);
		return this;
	}
}
控制器方法
	/*
	 * json版
	 */
	@RequestMapping("/emps")
	@ResponseBody
	public Msg getEmpsWithJson(@RequestParam(value="pn",defaultValue="1")Integer pn){
		PageHelper.startPage(pn, 5);
		List emps = employeeService.getAllEmp();
		PageInfo page = new PageInfo(emps,5);
		return Msg.success().add("pageInfo", page);
	}
index.jsp
<%@ page language="java" contentType="text/html; charset=UTF-8" pageEncoding="UTF-8"%>
<%@ taglib uri="http://java.sun.com/jsp/jstl/core" prefix="c"%>
员工列表
<%
pageContext.setAttribute("APP_PATH",request.getContextPath());
%>
SSM-CRUD
#
empName
gender
email
deptName
操作
二、新增员工
1.在index.jsp点击新增
2.弹出新增对话框
3.去数据库查询部门列表,显示在对话框中
4.输入员工信息,校验信息是否正确(格式、用户名重复(给员工姓名控件绑定一个change事件,一旦改变,发送ajax请求查询数据库是否已有同名))jquery前端校验、ajax用户名重复校验、重要数据后端校验(针对绕过前端校验,比如直接发送添加员工请求,而不是通过点击保存按钮)(springmvc的jsr303)
使用JSR303方法:
(1).在pom.xml中引入依赖
		    org.hibernate
		    hibernate-validator
		    5.4.1.Final
(2).在实体类需要校验的属性上面加注解

(3).在控制器的方法上给形参加上注解,并把校验可能出现的错误返回给浏览器
    /**
	 * 员工保存
	 * 添加后端校验
	 */
	@RequestMapping(value="/emp",method=RequestMethod.POST)
	@ResponseBody
	public Msg saveEmp(@Valid Employee employee,BindingResult result){
		if(result.hasErrors()){
			Map map = new HashMap();
			List fieldErrors = result.getFieldErrors();
			for (FieldError fieldError : fieldErrors) {
				//错误字段名与错误信息
				map.put(fieldError.getField(), fieldError.getDefaultMessage());
			}
			return Msg.failure().add("errorFields", map);
		}else{
			employeeService.saveEmp(employee);
			return Msg.success();
		}
	}
5.保存
1.员工修改id绑定;ajax使用put请求需要使用HttpPutFormContentFilter过滤器;
<%@ page language="java" contentType="text/html; charset=UTF-8" pageEncoding="UTF-8"%>
<%@ taglib uri="http://java.sun.com/jsp/jstl/core" prefix="c"%>
员工列表
<%
pageContext.setAttribute("APP_PATH",request.getContextPath());
%>
SSM-CRUD
#
empName
gender
email
deptName
操作