C++部署yolov5s.onnx并使用GPU进行加速
#include
#include
#include
#include
#include
#include
#include
#include
using namespace cv;

Mat resize_image(Mat srcimg, int* newh, int* neww, int* top, int* left)
{
    int srch = srcimg.rows, srcw = srcimg.cols;
    int inpHeight = 640;
    int inpWidth = 640;
    *newh = inpHeight;
    *neww = inpWidth;
    bool keep_ratio = true;
    Mat dstimg;
    if (keep_ratio && srch != srcw) {
        float hw_scale = (float)srch / srcw;
        if (hw_scale > 1) {
            *newh = inpHeight;
            *neww = int(inpWidth / hw_scale);
            resize(srcimg, dstimg, Size(*neww, *newh), INTER_AREA);
            *left = int((inpWidth - *neww) * 0.5);
            copyMakeBorder(dstimg, dstimg, 0, 0, *left, inpWidth - *neww - *left, BORDER_CONSTANT, 0);
        }
        else {
            *newh = (int)inpHeight * hw_scale;
            *neww = inpWidth;
            resize(srcimg, dstimg, Size(*neww, *newh), INTER_AREA);
            *top = (int)(inpHeight - *newh) * 0.5;
            copyMakeBorder(dstimg, dstimg, *top, inpHeight - *newh - *top, 0, 0, BORDER_CONSTANT, 0);
        }
    }
    else {
        resize(srcimg, dstimg, Size(*neww, *newh), INTER_AREA);
    }
    return dstimg;
}

int main(int argc, char* argv[])
{
    std::string imgpath = "zidane.jpg";
    utils::logging::setLogLevel(utils::logging::LOG_LEVEL_ERROR);//设置OpenCV只输出错误日志
    Ort::Env env(ORT_LOGGING_LEVEL_WARNING, "yolov5s");
    Ort::SessionOptions session_options;
    session_options.SetIntraOpNumThreads(1);//设置线程数
    session_options.SetGraphOptimizationLevel(GraphOptimizationLevel::ORT_ENABLE_EXTENDED);//启用模型优化策略

    //CUDA option set
    OrtCUDAProviderOptions cuda_option;
    cuda_option.device_id = 0;
    cuda_option.arena_extend_strategy = 0;
    cuda_option.cudnn_conv_algo_search = OrtCudnnConvAlgoSearchExhaustive;
    cuda_option.gpu_mem_limit = SIZE_MAX;
    cuda_option.do_copy_in_default_stream = 1;
	//CUDA 加速
    //session_options.SetGraphOptimizationLevel() 函数用于设置在使用 ORT 库执行模型时应用的图优化级别。
    //ORT_ENABLE_ALL 选项启用所有可用的优化,这可以导致更快速和更高效的执行。
    session_options.SetGraphOptimizationLevel(GraphOptimizationLevel::ORT_ENABLE_ALL);
    //OrtSessionOptionsAppendExecutionProvider_CUDA(session_options, 0);
    session_options.AppendExecutionProvider_CUDA(cuda_option);

#ifdef _WIN32//预处理器指令,用于在编译源代码时判断当前编译环境是否是WIndows环境
    /*
    wchar_t和普通的char之间的区别比较大。主要有以下几个方面:

    1.存储大小:wchar_t类型通常占用两个字节,而char类型通常占用一个字节。这是因为wchar_t类型用于表示Unicode字符集中的字符,
    每个字符需要占用更多的存储空间。

    2.字符集:wchar_t类型用于表示Unicode字符集中的字符,而char类型则用于表示ASCII字符集中的字符。
    Unicode字符集可以表示更广泛的字符集,包括中文、日文、韩文等,而ASCII字符集只能表示英文字母、数字和少量的符号。

    3.字符串表示方式:由于wchar_t类型占用更多的存储空间,
    因此在表示字符串时通常需要使用特殊的字符串类型,如const wchar_t*表示一个指向宽字符字符串的常量指针,
    而普通的char*则表示一个指向普通字符串的指针。

    4.字符串处理函数:由于wchar_t类型和普通的char类型在存储大小和字符集上有所不同,
    因此在处理字符串时通常需要使用不同的字符串处理函数。例如,wcslen()函数用于计算宽字符字符串的长度,
    而strlen()函数用于计算普通字符串的长度。
    */
    const wchar_t* model_path = L"yolov5s.onnx"; //表示一个指向常量宽字符字符串L"yolov5s.onnx"的指针
#else
    const char* model_path = "yolov5s.onnx";
#endif

    std::vector class_names;
    //std::string classesFile = "class.names";
    std::string classesFile = "coco.txt";//加载label
    std::ifstream ifs(classesFile.c_str());//用了classesFile.c_str()函数将字符串classesFile转换为C风格的字符串(即以null结尾的字符数组),并将其作为参数传递给std::ifstream类的构造函数。
    std::string line;
    while (getline(ifs, line)) class_names.push_back(line);
    //第一个参数env是一个ORT环境对象,用于管理ORT会话的资源和配置。
    //第二个参数model_path是一个指向ONNX模型文件的路径的常量指针,用于指定ORT会话要加载的模型。
   // 第三个参数session_options是一个ORT会话选项对象,用于配置ORT会话的选项和优化策略。
    Ort::Session session(env, model_path, session_options);
    // print model input layer (node names, types, shape etc.)
    Ort::AllocatorWithDefaultOptions allocator;//通过使用Ort::AllocatorWithDefaultOptions类,可以方便地进行内存分配和管理,而无需手动实现内存分配和释放的细节。

    // print number of model input nodes
    size_t num_input_nodes = session.GetInputCount();
     //const char* input_name = session.GetInputName(0, allocator);
     // const char* output_name = session.GetOutputName(0, allocator);
    std::vector input_node_names = { "images" };
    std::vector output_node_names = { "output" };

    const size_t input_tensor_size = 3 * 640 * 640;

    std::vector input_tensor_values(input_tensor_size);
    //读取图像
    cv::Mat srcimg = cv::imread(imgpath);
    int newh = 0, neww = 0, padh = 0, padw = 0;
    //将图像的大小调整为指定的尺寸并在调整过程中保持图像的完整性和比例
    Mat dstimg = resize_image(srcimg, &newh, &neww, &padh, &padw);//Padded resize
      //  cv::Mat dstimg;
     Create a blob from the input image
     //第一个问题
    //cv::resize(srcimg, dstimg, cv::Size(640, 640));
    //std::cout << dstimg.type() << std::endl;//图像中的数据类型是CV_8UC3
    //Mat dstimg = dnn::blobFromImage(srcimg, 1.0 / 255, Size(640, 640), Scalar(0, 0, 0), true, false);

    //dstimg.convertTo(dstimg, CV_32FC3, 1 / 2
    for (int c = 0; c < 3; c++)
    {
        for (int i = 0; i < 640; i++)
        {
            for (int j = 0; j < 640; j++)
            {
                float pix = dstimg.ptr(i)[j * 3 + 2 - c];//转换通道,输入onnx模型的图片通道顺序是RGB,但是opencv存储默认是BGR
                input_tensor_values[c * 640 * 640 + i * 640 + size_t(j)] = pix / 255.0;//归一化
            }
        }
    }
    // create input tensor object from data values
    std::vector input_node_dims = { 1, 3, 640, 640 };
    auto memory_info = Ort::MemoryInfo::CreateCpu(OrtArenaAllocator, OrtMemTypeDefault);
    //auto memory_info = Ort::MemoryInfo::CreateGpu(OrtDeviceAllocator, OrtMemTypeDefault);
    Ort::Value input_tensor = Ort::Value::CreateTensor(memory_info, input_tensor_values.data(), input_tensor_size, input_node_dims.data(), input_node_dims.size());

    std::vector ort_inputs;
    ort_inputs.push_back(std::move(input_tensor));//右值引用,避免不必要的拷贝和内存分配操作
    // score model & input tensor, get back output tensor
    //开始时间
    std::vector output_tensors;
    for (int i = 0; i < 10; i++)
    {
        clock_t start_time = clock();
        output_tensors = session.Run(Ort::RunOptions{ nullptr }, input_node_names.data(), ort_inputs.data(), input_node_names.size(), output_node_names.data(), output_node_names.size());
        // auto output_tensors = session.Run(Ort::RunOptions{ nullptr }, input_node_names.data(), &input_tensor, 1, output_node_names.data(), 1);
        //结束时间
        clock_t end_time = clock();
        // 计算执行时间
        double exec_time = static_cast(end_time - start_time) / CLOCKS_PER_SEC;
        // 输出执行时间
        std::cout << "Execution time: " << exec_time << " seconds" << std::endl;
    }
    // std::cout << output_tensors.size() << std::endl;
    // Get pointer to output tensor float values
    const float* rawOutput = output_tensors[0].GetTensorData();
    //generate proposals
    std::vector outputShape = output_tensors[0].GetTensorTypeAndShapeInfo().GetShape();
   // std::cout << outputShape[0] << outputShape[1] << std::endl;
    size_t count = output_tensors[0].GetTensorTypeAndShapeInfo().GetElementCount();
    std::vector output(rawOutput, rawOutput + count);

    std::vector boxes;
    std::vector confs;
    std::vector classIds;
    int numClasses = (int)outputShape[2] - 5;
    int elementsInBatch = (int)(outputShape[1] * outputShape[2]);

    float confThreshold = 0.5;//设定阈值
    for (auto it = output.begin(); it != output.begin() + elementsInBatch; it += outputShape[2])
    {
        float clsConf = *(it + 4);//object scores
        if (clsConf > confThreshold)
        {
            int centerX = (int)(*it);
            int centerY = (int)(*(it + 1));
            int width = (int)(*(it + 2));
            int height = (int)(*(it + 3));
            int x1 = centerX - width / 2;
            int y1 = centerY - height / 2;
            boxes.emplace_back(cv::Rect(x1, y1, width, height));

            // first 5 element are x y w h and obj confidence
            int bestClassId = -1;
            float bestConf = 0.0;

            for (int i = 5; i < numClasses + 5; i++)
            {
                if ((*(it + i)) > bestConf)
                {
                    bestConf = it[i];
                    bestClassId = i - 5;
                }
            }

            //confs.emplace_back(bestConf * clsConf);
            confs.emplace_back(clsConf);
            classIds.emplace_back(bestClassId);
        }
    }

    float iouThreshold = 0.5;
    std::vector indices;
    // Perform non maximum suppression to eliminate redundant overlapping boxes with
    // lower confidences极大值抑制
    cv::dnn::NMSBoxes(boxes, confs, confThreshold, iouThreshold, indices);

    //随机数种子
    RNG rng((unsigned)time(NULL));
    for (size_t i = 0; i < indices.size(); ++i)
    {
        int index = indices[i];
        int colorR = rng.uniform(0, 255);
        int colorG = rng.uniform(0, 255);
        int colorB = rng.uniform(0, 255);

        //保留两位小数
        float scores = round(confs[index] * 100) / 100;
        std::ostringstream oss;
        oss << scores;
        rectangle(dstimg, Point(boxes[index].tl().x, boxes[index].tl().y), Point(boxes[index].br().x, boxes[index].br().y), Scalar(colorR, colorG, colorB), 1.5);
        putText(dstimg, class_names[classIds[index]] + " " + oss.str(), Point(boxes[index].tl().x, boxes[index].tl().y - 5), FONT_HERSHEY_SIMPLEX, 0.5, Scalar(colorR, colorG, colorB), 2);
    }
    imshow("检测结果", dstimg);
    cv::waitKey();
}
onnxruntime下载链接:Releases · microsoft/onnxruntime (github.com)
我下载的是1.13.1GPU版本,VS2022,cuda11.6,cudnn8.6.0,仅供参考
下面是一些环境配置问题:
其他关于opencv的配置属性可以查阅其他资料
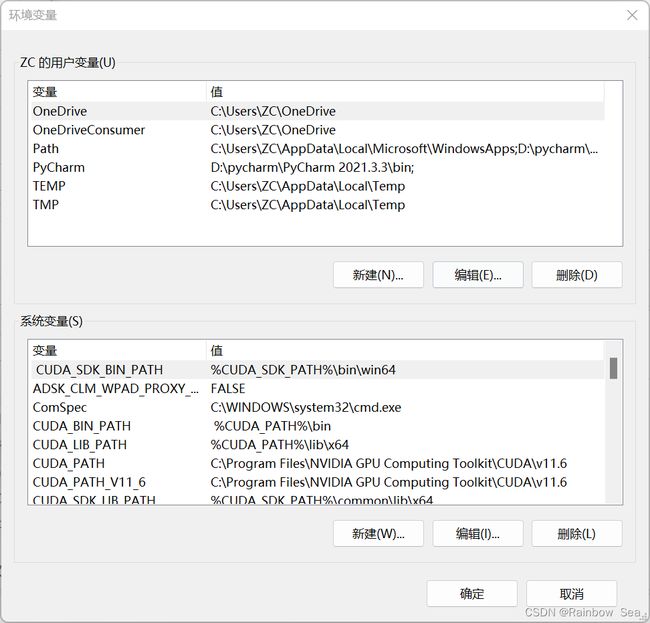
除此之外关于cuda也要注意添加一些路径保证cuda能正常启用
有可能提示缺少
Could not locate zlibwapi.dll. Please make sure it is in your library path!
参考解决方案:(83条消息) 解决“Could not locate zlibwapi.dll. Please make sure it is in your library path!”问题_xp_fangfei的博客-CSDN博客


