Node.js入门笔记(三)——跨域、简单爬虫实现
Node.js入门笔记(三)
-
-
- 1.Node.js模块包
- 2.commonJS规范
- 3.内置模块url
- 4.log4js工具的使用
- 5.内置模块——http模块
- 6.node.js解决跨域的几种方式
- 7.node.js实现爬虫
-
1.Node.js模块包
node.js中一共有三种不同的模块包,分为:内置模块包(又称为核心模块,比如path模块)、第三方模块(比如我们使用的lodash和gulp等)以及自定义模块(也就是前面提及的自己发布到npmjs.org上面的依赖包)。
2.commonJS规范
commonJS在操作模块时有如下四步:定义模块、暴露模块、引入模块、使用模块。使用举例如下:

注意使用引用将无法暴露接口:

上述写法可以改为为如下写法:
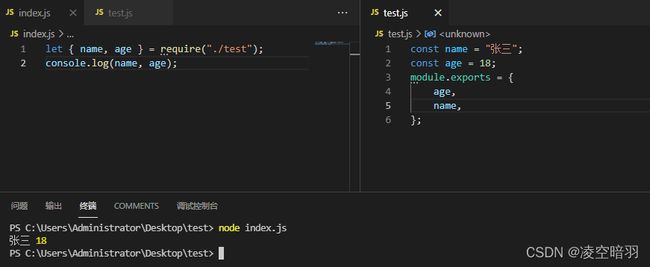
除了暴露模块外还可以暴露方法。
3.内置模块url
首先node.js内置的url能够通过parse方法对url进行分析,方便我们拿到具体的信息进行后续处理:

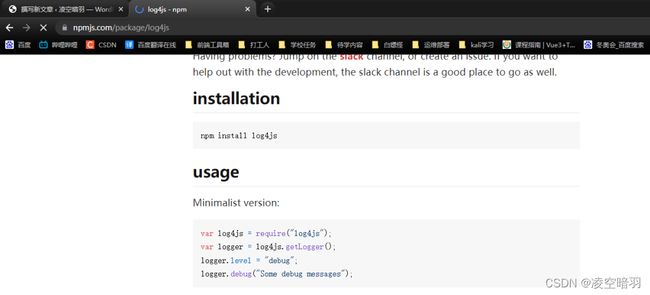
4.log4js工具的使用
log4js也就是log for js的意思,用于记录js日志的npm第三方依赖包,使用方法可以直接参照官网的usage:
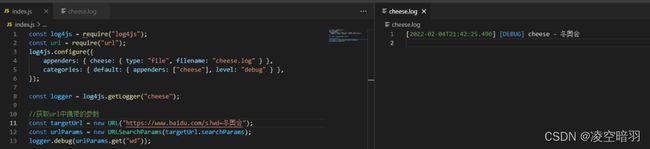
用法如下,log4js同样具有分析Url的功能:

url相关的其他用法如下:
(1)url.format能够将转换完成之后的parse对象重新转换成string对象:

(2)url.resolve()能够智能的将url进行拼接(能够智能处理“/”):

(3)URLSearchParams能够获取Url中的参数(需要创建URL对象),使用parse方法的话效果相对会差很多,还需要使用字符串手动处理,
(4)内置的querystring也能够操作url:(但是现在处于弃用状态,低版本依然能够正常使用)。

5.内置模块——http模块
//基本http内置模块的使用
const http = require("http");
const server = http.createServer((request, response) => {
    response.writeHead(200, {
        "content-type": "",
    });
    response.write("<div><h1>hello world</h1></div>");
    response.end();
});
server.listen(8080, () => {
    console.log("localhost:8080端口被使用!");
});
说明:request用来接收请求,response用来回复请求。注意写法上,server监听后面的回调函数前需要指定监听的端口,response在书写回复的时候需要指定返回的状态码,当然这里指定为404但是正常返回也可以,但是通常不会这么处理。这里的content-type用来指定返回的数据类型(默认是后浏览器自己判断)。如果指定content-type为text/plain,那么返回的将是未被浏览器解析的字符串。常用的有:text/html、application/json(注意传输时使用string类型)、image/webp等,还可以在后面加上charset=utf-8来限制编码集。
另外,使用http模块不能够实现热重载(自己重启服务,以便我们更加方便的查看程序执行效果)。可以使用npm进程管理工具来解决这个问题,比如:supervisor、nodemon(一般用于客户端)、forever、pm2(一般用于服务端),使用nodemon方式为:install i nodemon -g全局安装nodemon,然后使用nodemon来启动之前直接使用node启动的服务端。
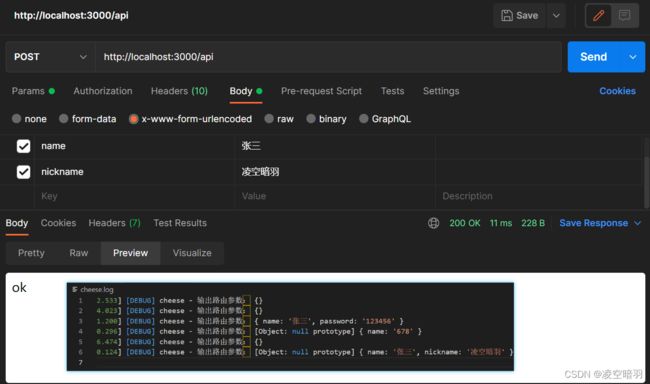
对于参数的使用,需要留意这种写法: url: ${request.url}。对于post请求需要使用到express框架封装的路由规则,具体用法举例如下:
(1)当前的express版本为4.*,express 和express 生成工具被分离开来,因此需要安装express 和express-generator:npm install express -S npm install express-gennerator -S,为了方便之后使用推荐直接全局安装。然后使用express -v来测试一下,如果没有报express 不是内部指令说明安装成功。
(2)然后使用express -e 来安装express 框架;
(3)安装完成后,其实项目结构比较清晰,可以直接在routes/index.js文件中定义post方法对应的路由规则
//自定义post路由
router.post("/api", function(req, res, next) {
    logger.debug("输出路由参数:", req.body);
    res.send("ok");
});
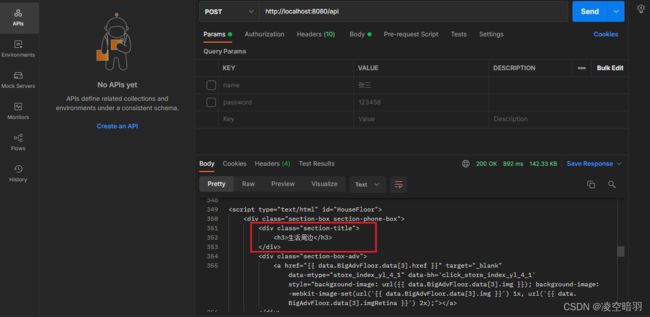
注意,这里在发送测试post请求的时候需要选择x-www-form-urlencoded,举例如下:
6.node.js解决跨域的几种方式
(1)jsonp,说白了jsonp就是巧妙利用js能够跨域的特点,将后端的函数发送给前端,一般只能处理get请求,其次需要较高程度的前后端合作,因为函数名都需要统一。思路比较简单实用性不太高,举例如下:
//后端
const http = require("http");
const server = http.createServer((request, response) => {
    const url = request.url;
    console.log("输出路径:", url);
    switch (url) {
        case "/data":
            response.write("getData('hello world!')");
            break;
        default:
            response.end("Page not found.");
    }
    response.end();
});
server.listen(8080, function() {
    console.log("localhost:8080");
});
//前端
<!DOCTYPE html>
<html lang="en">
<head>
    <title>jsonp跨域测试</title>
    <script>
        function getData(index) {
            console.log("你传入的数据为", index);
            alert(index);
        }
    </script>
    <script src="http://localhost:8080/data"></script>
</head>
</html>
(2)直接使用允许跨域头,如果没有添加允许跨域头:

添加允许跨域头:
const http = require("http");
const server = http.createServer((request, response) => {
    const url = request.url;
    console.log("输出路径:", url);
    switch (url) {
        case "/data":
            let userInfo = {
                name: "张三",
                age: 22,
            };
            response.writeHead(200, {
                "Access-Control-Allow-Origin": "*",
            });
            response.write(JSON.stringify(userInfo));
            break;
        default:
            response.end("Page not found.");
    }
    response.end();
});
server.listen(8080, function() {
    console.log("localhost:8080");
});
测试代码:
 <script>
	   fetch("http://localhost:8080/data")
	        .then(response => response.json())
	        .then(res => {
	            console.log("输出最终结果:", res);
	        })
</script>
成功解决:

注意这里的测试方案为:先用phpstudy搭建一个网站,然后利用该网站里面的index.html请求node Server端形成跨域,解决思路就是在服务端的响应头上面加上"Access-Control-Allow-Origin": "*"(当然也可以更加精确到域(域名+端口))。eg:"Access-Control-Allow-Origin": "http://localhost:83"。
(3)代理跨域(http-proxy-middleware依赖),首先npm i http-proxy-middleware -S安装一下proxy依赖,然后可以直接去官网查看用法了,给出使用案例:
const http = require("http");
const { createProxyMiddleware } = require("http-proxy-middleware");
const server = http.createServer((res, req) => {
    const url = res.url;
    if (/\/api/.test(url)) {
        const proxy = createProxyMiddleware("/api", {
            target: "https://nightowl.top/index/getSwiperList",
            changeOrigin: true,
        });
        proxy(res, req);
    } else {
        console.log("error");
        req.write("url not found.");
        req.end();
    }
});
server.listen(8080, () => {
    console.log("localhost:8080");
});
7.node.js实现爬虫
虽然python在数据爬取领域比较有名,但是node.js也能够实现爬虫,这里主要介绍数据爬取的思路。和网络安全一样,首先是搜索切入点,就魅族吧,这个鲜为人知的品牌(如今用的是华为的硬件技术,营销没做好)。主要是因为里面有盒子模型:

但是离不开必要的dom搜查,因此需要使用到一个将页面信息重新恢复为虚拟dom的依赖cheerio。使用思路也比较简单,首先npm i cheerio -S,然后搭建基本数据请求思路:
const http = require("http");
const https = require("https");
const server = http.createServer((req, res) => {
    const url = req.url;
    if (/\/api/.test(url)) {
        let data = "";
        https.get("https://www.meizu.com", (result) => {
            result.on("data", (chunk) => {
                data += chunk;
            });
            result.on("end", () => {
                res.write(data);
                res.end();
            });
        });
    } else {
        res.write("当前url无效");
        res.end();
    }
});
server.listen(8080, () => {
    console.log("localhost:8080");
});
测试:
实际测试了一下,发现魅族官网爬不了,可能是里面嵌入的js太多了,于是换了个思路去爬emoji官网(主要是之前看某位大佬教过,看了下思路一直没有实践过)。给出如下爬虫使用案例:
const http = require("http");
const https = require("https");
const cheerio = require("cheerio");
const server = http.createServer((req, res) => {
    const url = req.url;
    if (/\/api/.test(url)) {
        let data = "";
        https.get("https://emojipedia.org/softbank/", (result) => {
            result.on("data", (chunk) => {
                data += chunk;
            });
            result.on("end", () => {
                const $ = cheerio.load(data);
                console.log("输出数据长度:", $(".lazyparent img").length);
                $(".lazyparent img").each((index, item) => {
                    console.log(index + ":", $(item).attr("data-src"));
                });
                res.write(data);
                res.end();
            });
        });
    } else {
        res.write("当前url无效");
        res.end();
    }
});
server.listen(8080, () => {
    console.log("localhost:8080");
});
实际上这个就是模仿网页控制台操作页面中的dom元素:

只是在使用node.js来实现的话能加方便我们处理数据,然后形成用户访问的接口,说高级点就是从面向开发者到面向用户。