python控制手机
文章目录
-
- 1.首先安装依赖环境,uiautomator2和其他依赖包
- 2.需要安装Adb环境
- 3.需要设备安装ATX
- 编写Python代码进行控制手机
- 4.ui的一些操作命令如下:
-
-
-
- 1.链接设备
- 2.打开调试开关
- 3.获取设备信息
- 4.获取应用信息:
- 5.启动应用:
- 6.停止应用:
- 7.推拉文件:
- 8.关键事件:
- 9.解锁屏幕
- 10.手势与设备的交互:
- 11.XPath
- 12.UI对象有五种定位方式:
- 13.常见用法:
- 14.元素定位
- 15.元素控制
-
- 15.1单击控件
- 15.2双击控件
- 15.3长按控件
- 16.文本操作
- 17.手势控制
- 18.常见adb的一些命令
- 19常用如下:
-
-
1.首先安装依赖环境,uiautomator2和其他依赖包
# GitHub地址:
# https://github.com/openatx/uiautomator2

pip install uiautomator2  # 这个包是用于控制手机
pip install pillow  # 这个包用于截图
pip install -U weditor  # 这个包是可以调试,在浏览器页面上直观的获取某个控件名称
2.需要安装Adb环境
adb devices
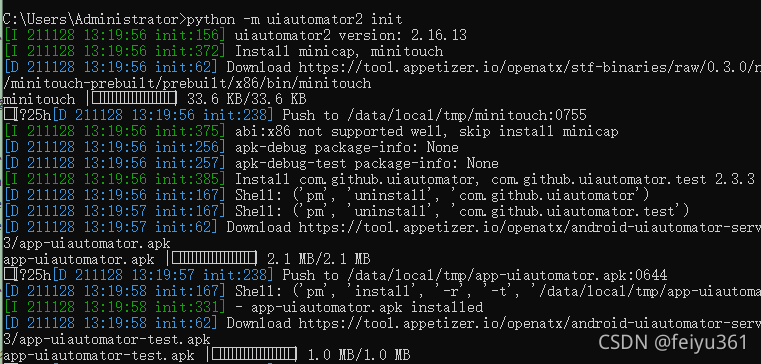
3.需要设备安装ATX
python -m uiautomator2 init
编写Python代码进行控制手机
# 引用uiautomator2包
import uiautomator2 as u2

# 使用设备唯一标志码链接设备,其中9phqaetw是通过adb获取的设备标志码
d = u2.connect('9phqaetw')
# d = u2.connect()  # 当前只有一个设备时可以用这个

d.unlock()  # 解锁屏幕

x,y = 100,100
d.click(x,y)  # 点击屏幕坐标为 x,y 的点

# 双击屏幕
d.double_click(x,y)

# 长按
d.long_click(x,y)

# 单机屏幕上字符为9的控件
d(text="9").click()
weditor调试工具
python -m weditor
# 第二种方式是在桌面创建快捷方式,在桌面会自动创建一个名为WEditor的图标,双击即可。
weditor --shortcut
4.ui的一些操作命令如下:
1.链接设备
import uiautomator2 as u2
d = u2.connect('123456789F') # USB链接设备。或者u2.connect_usb('123456f')
#d = u2.connect_usb() 或者 d = u2.connect() ,当前只有一个设备时可以用这个
2.打开调试开关
d.debug = True
d.info
3.获取设备信息
# 获取基本信息
print(d.info)

# 获取窗口大小
print(d.window_size())
# 设备垂直输出示例: (1080, 1920)
# 设备水平输出示例: (1920, 1080)

# 获取当前应用程序信息。对于某些android设备,输出可以为空
print(d.current_app())

#获取设备序列号
print(d.serial)

#获取WIFI IP
print(d.wlan_ip)

#获取详细的设备信息
print(d.device_info)
4.获取应用信息:
d.app_info("com.eg.android.AlipayGphone")
# 会输出
----
{
 "packageName": "com.eg.android.AlipayGphone",
 "mainActivity": "com.eg.android.AlipayGphone.AlipayLogin",
 "label": "支付寶",
 "versionName": "10.2.13.9020",
 "versionCode": 360,
 "size": 108306104
}
---
# 保存应用程序图标
img = d.app_icon("com.eg.android.AlipayGphone")
img.save("icon.png")
5.启动应用:
d.app_start('com.eg.android.AlipayGphone') #引号内为包名称,这里为支付宝
6.停止应用:
#相当于'am force-stop'强制停止应用
d.app_stop('com.eg.android.AlipayGphone')

#相当于'pm clear' 清空App数据
d.app_clear('com.eg.android.AlipayGphone')
# 停止所有
d.app_stop_all()

# 停止所有应用程序,除了com.examples.demo
d.app_stop_all(excludes=['com.examples.demo'])
7.推拉文件:
# push文件夹
d.push("foo.txt", "/sdcard/")
# push和重命名
d.push("foo.txt", "/sdcard/bar.txt")
# push fileobj
with open("foo.txt", 'rb') as f:
 d.push(f, "/sdcard/")
# 推动和更改文件访问模式
d.push("foo.sh", "/data/local/tmp/", mode=0o755)
# 从 设备中拉出一个文件
d.pull("/sdcard/tmp.txt", "tmp.txt")

# 如果在设备上找不到文件,FileNotFoundError将引发
d.pull("/sdcard/some-file-not-exists.txt", "tmp.txt")
8.关键事件:
d.screen_on()#打开屏幕
d.screen_off() #关闭屏幕
2)获取当前屏幕状态
d.info.get('screenOn') # 需要 Android> = 4.4
3)硬键盘和软键盘操作
d.press("home") # 点击home键
d.press("back") # 点击back键
d.press("left") # 点击左键
d.press("right") # 点击右键
d.press("up") # 点击上键
d.press("down") # 点击下键
d.press("center") # 点击选中
d.press("menu") # 点击menu按键
d.press("search") # 点击搜索按键
d.press("enter") # 点击enter键
d.press("delete") # 点击删除按键
d.press("recent") # 点击近期活动按键
d.press("volume_up") # 音量+
d.press("volume_down") # 音量-
d.press("volume_mute") # 静音
d.press("camera") # 相机
d.press("power") #电源键
9.解锁屏幕
d.unlock()
# 相当于
# 1. 发射活动:com.github.uiautomator.ACTION_IDENTIFY
# 2. 按home键
10.手势与设备的交互:
# 单击屏幕
d.click(x,y) # x,y为点击坐标

# 双击屏幕
d.double_click(x,y)
d.double_click(x,y,0.1) # 默认两个单击之间间隔时间为0.1秒

# 长按
d.long_click(x,y)
d.long_click(x,y,0.5) # 长按0.5秒(默认)

# 滑动
d.swipe(sx, sy, ex, ey)
d.swipe(sx, sy, ex, ey, 0.5) #滑动0.5s(default)

#拖动
d.drag(sx, sy, ex, ey)
d.drag(sx, sy, ex, ey, 0.5)#拖动0.5s(default)
# 滑动点 多用于九宫格解锁,提前获取到每个点的相对坐标(这里支持百分比)

# 从点(x0, y0)滑到点(x1, y1)再滑到点(x2, y2)
# 两点之间的滑动速度是0.2秒
d.swipe((x0, y0), (x1, y1), (x2, y2), 0.2)
# 注意:单击,滑动,拖动操作支持百分比位置值。例:
d.long_click(0.5, 0.5) 表示长按屏幕中心
11.XPath
# 检索方向
d.orientation
# 检索方向。输出可以是 "natural" or "left" or "right" or "upsidedown"

# 设置方向
d.set_orientation("l") # or "left"
d.set_orientation("r") # or "right"
d.set_orientation("n") # or "natural"

#冻结/ 开启旋转
d.freeze_rotation() # 冻结旋转
d.freeze_rotation(False) # 开启旋转

########## 截图 ############
# 截图并保存到电脑上的一个文件中,需要Android>=4.2。
d.screenshot("home.jpg")

# 得到PIL.Image格式的图像. 但你必须先安装pillow
image = d.screenshot() # default format="pillow"
image.save("home.jpg") # 或'home.png',目前只支持png 和 jpg格式的图像

# 得到OpenCV的格式图像。当然,你需要numpy和cv2安装第一个
import cv2
image = d.screenshot(format='opencv')
cv2.imwrite('home.jpg', image)

# 获取原始JPEG数据
imagebin = d.screenshot(format='raw')
open("some.jpg", "wb").write(imagebin)

#############################

# 转储UI层次结构
# get the UI hierarchy dump content (unicoded).(获取UI层次结构转储内容)
d.dump_hierarchy()


# 打开通知或快速设置
d.open_notification() #下拉打开通知栏
d.open_quick_settings() #下拉打开快速设置栏

# 检查特定的UI对象是否存在
d(text="Settings").exists # 返回布尔值,如果存在则为True,否则为False
d.exists(text="Settings") # 另一种写法
# 高级用法
d(text="Settings").exists(timeout=3) # 等待'Settings'在3秒钟出现

# 获取特定UI对象的信息
d(text="Settings").info

# 获取/设置/清除可编辑字段的文本(例如EditText小部件)
d(text="Settings").get_text() #得到文本小部件
d(text="Settings").set_text("My text...") #设置文本
d(text="Settings").clear_text() #清除文本

# 获取Widget中心点
d(text="Settings").center()
#d(text="Settings").center(offset=(0, 0)) # 基准位置左前
12.UI对象有五种定位方式:
# text、resourceId、description、className、xpath、坐标

# 执行单击UI对象
#text定位单击
d(text="Settings").click()
d(text="Settings", className="android.widget.TextView").click()

#resourceId定位单击
d(resourceId="com.ruguoapp.jike:id/tv_title", className="android.widget.TextView").click()

#description定位单击
d(description="设置").click()
d(description="设置", className="android.widget.TextView").click()

#className定位单击
d(className="android.widget.TextView").click()

#xpath定位单击
d.xpath("//android.widget.FrameLayout[@index='0']/android.widget.LinearLayout[@index='0']").click()

#坐标单击
d.click(182, 1264)

# 等待元素出现(最多10秒),出现后单击
d(text="Settings").click(timeout=10)
# 在10秒时点击,默认的超时0
d(text='Skip').click_exists(timeout=10.0)
# 单击直到元素消失,返回布尔
d(text="Skip").click_gone(maxretry=10, interval=1.0) # maxretry默认值10,interval默认值1.0
# 点击基准位置偏移
d(text="Settings").click(offset=(0.5, 0.5)) # 点击中心位置,同d(text="Settings").click()
d(text="Settings").click(offset=(0, 0)) # 点击左前位置
d(text="Settings").click(offset=(1, 1)) # 点击右下

# 执行双击UI对象
d(text="设置").double_click() # 双击特定ui对象的中心
d.double_click(x, y, 0.1) # 两次单击之间的默认持续时间为0.1秒

#执行长按UI对象
# 长按特定UI对象的中心
d(text="Settings").long_click()
d.long_click(x, y, 0.5) # 长按坐标位置0.5s默认

# 将UI对象拖向另一个点或另一个UI对象
# Android<4.3不能使用drag.
# 在0.5秒内将UI对象拖到屏幕点(x, y)
d(text="Settings").drag_to(x, y, duration=0.5)

# 将UI对象拖到另一个UI对象的中心位置,时间为0.25秒
d(text="Settings").drag_to(text="Clock", duration=0.25)
13.常见用法:
# 等待10s
d.xpath("//android.widget.TextView").wait(10.0)

# 找到并单击
d.xpath("//*[@content-desc='分享']").click()

# 检查是否存在
if d.xpath("//android.widget.TextView[contains(@text, 'Se')]").exists:
 print("exists")

# 获取所有文本视图文本、属性和中心点
for elem in d.xpath("//android.widget.TextView").all():
 print("Text:", elem.text)

#获取视图文本
for elem in d.xpath("//android.widget.TextView").all():
 print("Attrib:", elem.attrib)

#获取属性和中心点
#返回: (100, 200)
for elem in d.xpath("//android.widget.TextView").all():
 print("Position:", elem.center())

# xpath常见用法:
# 所有元素
//*
# resource-id包含login字符
//*[contains(@resource-id, 'login')]

# 按钮包含账号或帐号
//android.widget.Button[contains(@text, '账号') or contains(@text, '帐号')]

# 所有ImageView中的第二个
(//android.widget.ImageView)[2]

# 所有ImageView中的最后一个
(//android.widget.ImageView)[last()]

# className包含ImageView
//*[contains(name(), "ImageView")]
14.元素定位
element = d(resourceId=value) #控件 id
element = d(text=value) #控件上显示的文本
element = d(description=value) #控件描述
element = d(className=value) #控件所属的类
#判断是否存在
element.exists  # 属性值唯一
element[index].exists  # 属性值不唯一
15.元素控制
15.1单击控件
element[index].click()  # 定位的控件有多个,通过 index 指定某一个
element.click()  # 定位的控件只有一个,等价于 element[0].click()
d.click(x, y)  # 点击具体坐标
15.2双击控件
element[index].double_click()  # 定位的控件有多个,通过 index 指定某一个
element.double_click()  # 定位的控件只有一个,等价于 element[0].double_click()
d.double_click(x, y)  # 双击具体坐标
15.3长按控件
element[index].long_click()  # 定位的控件有多个,通过 index 指定某一个
element.long_click()  # 定位的控件只有一个,等价于 element[0].long_click()
d.long_click(x, y, duration=0.5)  # 长按具体坐标
16.文本操作
element[index].set_text(text)  # 定位的控件有多个,通过 index 指定某一个
element.set_text(text)  # 定位的控件只有一个,等价于 element[0].set_text(text)
#当页面中有且仅有一个编辑框时,可以使用以下代码
d.set_fastinput_ime(True)  # 打开输入法
d.send_keys(text)  # 输入文本
d.set_fastinput_ime(False)  # 关闭输入法
##   清除文本:

element[index].clear_text()  # 定位的控件有多个,通过 index 指定某一个
element.clear_text()  # 定位的控件只有一个,等价于 element[0].clear_text()
##   获取文本:

element[index].get_text()  # 定位的控件有多个,通过 index 指定某一个
element.get_text()  # 定位的控件只有一个,等价于 element[0].get_text()
17.手势控制
# 滑动
d.swipe(sx, sy, ex, ey, duration=0.5)
# 拖拽
d.drag(sx, sy, ex, ey, duration=0.5)
18.常见adb的一些命令
import os

# 返回桌面
os.system("adb shell input keyevent 3")
19常用如下:
3    HOME 键
4    返回键
5    打开拨号应用
6    挂断电话
24   增加音量
25   降低音量
26   电源键
27   拍照(需要在相机应用里)
64   打开浏览器
82   菜单键
85   播放/暂停
86   停止播放
87   播放下一首
88   播放上一首
122  移动光标到行首或列表顶部
123  移动光标到行末或列表底部
126  恢复播放
127  暂停播放
164  静音
176  打开系统设置
187  切换应用
207  打开联系人
208  打开日历
209  打开音乐
210  打开计算器
220  降低屏幕亮度
221  提高屏幕亮度
223  系统休眠
224  点亮屏幕
231  打开语音助手
276  如果没有 wakelock 则让系统休眠
未完待续…

