【前端基础】函数式排列


坐标系变换
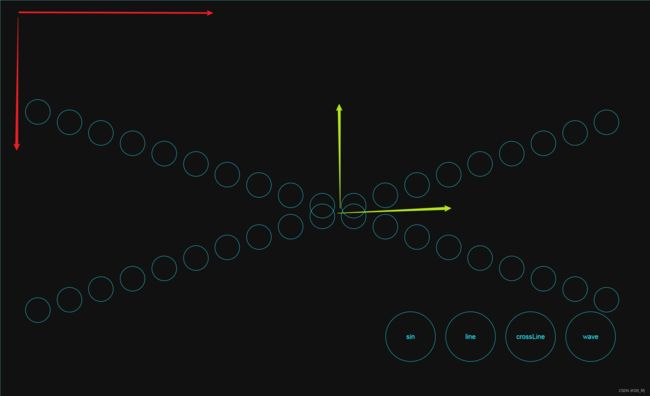
浏览器默认的坐标系,是以左上角为原点,向右为x轴,向下为y轴。
这个坐标系与数学中使用的坐标系不符,为了更方便使用函数来描述页面的布局,需要使用css来对浏览器的坐标系进行变换。
下面的css自定义了--x和--y两个自定义属性,通过clac动态计算的方式,实现了以正中心为原点,向右为x轴,向上为y轴的坐标系。通过--x和--y两个属性来指定坐标。
li {
  --dx: 0px;
  --dy: 0px;
  position: absolute;
  top: calc(50% - var(--dy));
  left: calc(50% + var(--dx));
}
曲线类
下面定义了一个曲线类,它接收一个三个参数来进行初始化,分别为:
- 描述曲线的函数
- x轴取值范围
- y轴取值范围
还提供了一个getY函数,根据x的值返回对应的y值,如果超出范围则做出一定的处理。
class Curve {
  constructor(curveFunc, xRange, yRange) {
    this.curveFunc = curveFunc;
    this.xRange = xRange;
    this.yRange = yRange;
  }

  getY(x) {
    let y = this.curveFunc(x);
    if(x < this.xRange[0]) {
      y = this.curveFunc(this.xRange[0]);
    } else if (x > this.xRange[1]) {
      y = this.curveFunc(this.xRange[1]);
    }

    if(y < this.yRange[0]) {
      y = this.yRange[0];
    } else if(y > this.yRange[1]) {
      y = this.yRange[1];
    }

    return y;
  }
}
layout函数
函数说明
layout函数根据上面定义的曲线类,对DOM元素进行布局。
这个函数接收4个参数。
- 曲线对象
- 要布局的元素数组
- 布局占据的宽度
- 布局占据的高度
实现思路
- 函数首先根据曲线获取函数的定义域和值域的边界点。
- 针具边界点计算出中心点的位置。
- 再根据布局占据的宽高计算出缩放比例。
- 根据定义域范围和布局元素个数计算出步长(元素之间的间隔)。
- 遍历每个元素,设置根据步长和缩放比例计算出每个元素的坐标。
function layout(curve, doms, width, height) {
  const [xmin, xmax] = curve.xRange;
  const [ymin, ymax] = curve.yRange;

  const cx = (xmin + xmax) / 2;
  const cy = (ymin + ymax) / 2;

  const scaleX = width / (xmax - xmin);
  const scaleY = height / (ymin - ymax);

  const step = (xmax - xmin) / doms.length;
  for(let i = 0; i < doms.length; i++) {
    const dom = doms[i];
    const x = xmin + i * step;
    const y = curve.getY(x);

    const dx = (x - cx) * scaleX;
    const dy = (y - cy) * scaleY;

    dom.style.setProperty('--dx', dx + 'px');
    dom.style.setProperty('--dy', dy + 'px');
  }
}
layouts映射
根据布局的需求创建不同的曲线对象,并使用layout函数对其进行布局。
const layouts = {
  wave() {
    const wave = new Curve(x => Math.sin(x), [0, Math.PI * 3], [-1, 1]);
    layout(wave, doms, container.clientWidth - 100, container.clientHeight / 2);
  },
  line() {
    const line = new Curve(x => 1, [0, 1], [0, 2]);
    layout(line, doms, container.clientWidth - 100, container.clientHeight / 2);
  },
  corssLine() {
    const curve1 = new Curve(x => x, [-1,1], [-1,1]);
    const curve2 = new Curve(x => -x, [-1, 1], [-1, 1]);
    const midIndex = Math.floor(doms.length / 2);
    const doms1 = Array.from(doms).slice(0, midIndex);
    const doms2 = Array.from(doms).slice(midIndex);
    layout(curve1, doms1, container.clientWidth - 100, container.clientHeight / 2);
    layout(curve2, doms2, container.clientWidth - 100, container.clientHeight / 2);
  },
  corssWave() {
    const curve1 = new Curve(x => Math.sin(x), [0, Math.PI * 3], [-1,1]);
    const curve2 = new Curve(x => -Math.sin(x), [0, Math.PI * 3], [-1, 1]);
    const midIndex = Math.floor(doms.length / 2);
    const doms1 = Array.from(doms).slice(0, midIndex);
    const doms2 = Array.from(doms).slice(midIndex);
    layout(curve1, doms1, container.clientWidth - 100, container.clientHeight / 3);
    layout(curve2, doms2, container.clientWidth - 100, container.clientHeight / 3);
  }
}
最后遍历按钮实现事件的绑定,不同的按钮对应不同的布局。
const btns = document.querySelectorAll('button');

const events = Object.values(layouts);
btns.forEach((item, index) => {
  item.addEventListener('click', events[index]);
})