加速attention计算的工业标准:flash attention 1和2算法的原理及实现
transformers目前大火,但是对于长序列来说,计算很慢,而且很耗费显存。对于transformer中的self attention计算来说,在时间复杂度上,对于每个位置,模型需要计算它与所有其他位置的相关性,这样的计算次数会随着序列长度的增加而呈二次增长。在空间复杂度上,self attention需要存储一个矩阵来保存所有位置的相关性分数,这个矩阵的大小也会随着序列长度的增加而呈二次增长。因此,对于非常长的序列,这种二次复杂度会导致计算和内存消耗急剧增加,使得模型在处理这样的输入时会变得相对缓慢且需要大量内存。这也是为什么对于超长序列,可能需要采取一些策略,如切分成短序列进行处理,或者使用其他模型架构来替代传统的Transformer模型。
在pytorch、huggingface transformers library、微软的DeepSpeed、nvidia的Megatron-LM、Mosaic ML的Composer library、GPT-Neox、paddlepaddle中,都已经集成了flash attention。在MLPerf 2.1的open division中,在train BERT的任务上,flash attention也实现了2.7x的速度提升。
flash attention 1
flash attention 1从attention计算的GPU memory的read和write方面入手来提高attention计算的效率。其主要思想是通过切块(tiling)技术,来减少GPU HBM和GPU SRAM之间的数据读写操作。通过切块,flash attention1实现了在BERT-large(seq. length 512)上端到端15%的提速,在GPT-2(seq. length 1k)上3x的提速。具体数据可看flash attention 1的paper。
首先我们看一下NVIDIA GPU的显存架构,上图左图是以NVIDIA A100 40G显卡为例,我们常说的40G显存是其HBM memory(high bandwidth memory),其带宽是1.5~2.0TB/s,A100上还有一块192KB每108 SM (streaming multiprocessors) 的on-chip SRAM memory,其带宽是19TB/s。因此,如果能把涉及到显存的读写操作放在SRAM上,那将会极大的提升速度。
上图中间部分的图描述的就是flash attention 1算法的原理。对于常规的attention计算来说,首先会把Q、K和V完整的读进HBM中,然后执行计算。flash attention 1通过将Q、K和V切块成很多小块,然后将这些小块的Q、K和V放进SRAM中执行计算,最后再写回HBM中。
上图最右侧图片展示的是通过一些算子融合技术以及flash attention 1的IO优化技术,再GPT-2的计算上,flash attention IO优化+算子融合,相比pytorch的实现,有大约7.6x的性能提升。
上图的算法流程是标准的attention计算的实现。首先从HBM中加载 Q , K Q,K Q,K矩阵,然后执行 S = Q K T S=QK^T S=QKT的计算,将结果 S S S写回HBM;然后将 S S S再从HBM中读取出来,执行 P = s o f t m a x ( S ) P=softmax(S) P=softmax(S)的计算,再将 P P P写回HBM;然后将 P P P和 V V V从HBM中读取出来,执行 O = P V O=PV O=PV的计算,最后把结果写回HBM中。
这个过程中,有多次与HBM的IO操作,速度相对较慢。
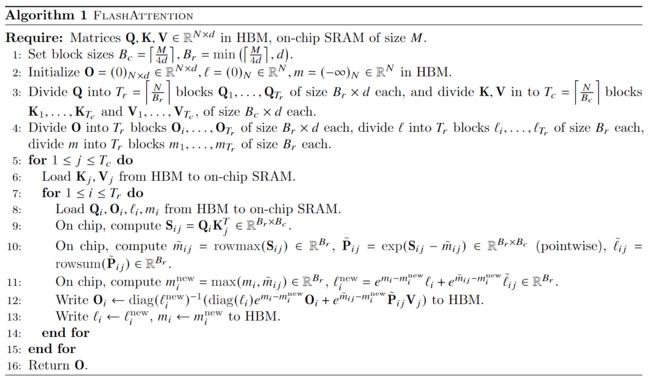
上图算法流程是flash attention1的forward实现。我们逐步的看一下计算过程。
- 首先根据SRAM的大小,计算出合适的分块block大小;
- 将 O , l , m O,l,m O,l,m在HBM中初始化为对应shape的全0的矩阵或向量, l , m l,m l,m的具体作用后面算法流程会说明;
- 将 Q , K , V Q,K,V Q,K,V按照分块block的大小切分成许多个blocks;
- 将 O , l , m O,l,m O,l,m也切分成对应数量的blocks;
- 执行outer loop,在outer loop中,做的IO操作是将分块的 K j , V j K_j,V_j Kj,Vj从HBM中加载到SRAM中;
- 执行inner loop,将 Q i , O i , l i , m i Q_i,O_i,l_i,m_i Qi,Oi,li,mi从HBM中load到SRAM中,然后分块计算上面流程的中间值,在每个inner loop里面,都将 O i , l i , m i O_i,l_i,m_i Oi,li,mi写回到HBM中,因此与HBM的IO操作还是相对较多的。
由于我们将 Q , K , V Q,K,V Q,K,V都进行了分块计算,而 s o f t m a x softmax softmax却是针对整个vector执行计算的,因此在上图flash attention的计算流程的第10、11、12步中,其使用了safe online softmax技术。
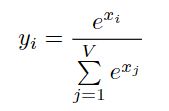
y = s o f t m a x ( x ) y=softmax(x) y=softmax(x)的定义为
上图是naive softmax的实现过程,首先需要迭代计算分母的和,然后再迭代计算vector中每一个值对应的softmax值。这个过程需要两次从内存读取和一次写回内存操作。
但是naive softmax在实际的硬件上计算是有问题的,在naive softmax的实现过程的第3步,由于有指数操作,会有数值溢出的情况,因此在实际使用时,softmax都是使用safe softmax算法
上图是safe softmax的计算过程,其主要修改是在指数部分,减去了要计算vector的最大值,保证了指数部分的最大值是0,避免了数值溢出。在几乎所有的深度学习框架中,都是使用safe softmax来执行softmax算法的。但是safe softmax相比naive softmax,多了一次数据的读取过程,总共是从内存中有三次读取,一次写入操作。
但是不管是naive softmax还是safe softmax,都需要传入一整个vector进行计算,但是flash attention 1算法执行了分块(tiling)策略,导致不能一次得到整个vector,因此需要使用online safe softmax算法。
上面的算法流程是online safe softmax的计算过程。在safe softmax中,vector的最大值 m m m的计算是在一个单独的for循环中,在online safe softmax中, m m m的计算是迭代进行的,因此得到的 m m m不是一个vector中最大的值,而是迭代过程中的局部极大值,相应的对softmax的分母 d d d的计算也要加一个补偿项 e m j − 1 − m j e^{m_{j-1}-m_j} emj−1−mj。
这样得出的结果与直接使用safe softmax是一致的,具体的证明过程可以参考论文Online normalizer calculation for softmax。在flash attention 1的算法中,其也使用了online safe softmax,并对其算法进行了相应的扩展。
我们用一个简单的例子看一下safe softmax与pytorch标准的softmax的计算结果。online safe softmax在后面的flash attention的实现中会有体现。
import torch

torch.manual_seed(456)

N, d = 16, 8

Q_mat = torch.rand((N, d))
K_mat = torch.rand((N, d))
V_mat = torch.rand((N, d))

# 执行标准的pytorch softmax和attention计算
expected_softmax = torch.softmax(Q_mat @ K_mat.T, dim=1)
expected_attention = expected_softmax @ V_mat

## 执行safe softmax和attention计算
# 1st read
S_mat = Q_mat @ K_mat.T
row_max = torch.max(S_mat, dim=1).values[:, None]
# 2nd read
input_safe = S_mat - row_max
softmax_numerator = torch.exp(input_safe)
# 3rd read
softmax_denominator = torch.sum(softmax_numerator, dim=1)[:, None]
# 4th read
safe_softmax = softmax_numerator / softmax_denominator
# final matmul (another read / write)
matmul_result = safe_softmax @ V_mat

assert torch.allclose(safe_softmax, expected_softmax)
assert torch.allclose(matmul_result, expected_attention)
经过代码最终的assert,safe_softmax与pytorch标准的softmax的计算结果是一致的。
下面我们用python代码实现flash attention 1的forward算法流程:
import torch

torch.manual_seed(456)

N, d = 16, 8

Q_mat = torch.rand((N, d))
K_mat = torch.rand((N, d))
V_mat = torch.rand((N, d))

# 执行标准的pytorch softmax和attention计算
expected_softmax = torch.softmax(Q_mat @ K_mat.T, dim=1)
expected_attention = expected_softmax @ V_mat


# 分块(tiling)尺寸,以SRAM的大小计算得到
Br = 4
Bc = d

# flash attention算法流程的第2步,首先在HBM中创建用于存储输出结果的O,全部初始化为0
O = torch.zeros((N, d))
# flash attention算法流程的第2步,用来存储softmax的分母值,在HBM中创建
l = torch.zeros((N, 1))
# flash attention算法流程的第2步,用来存储每个block的最大值,在HBM中创建
m = torch.full((N, 1), -torch.inf)

# 算法流程的第5步,执行外循环
for block_start_Bc in range(0, N, Bc):
    block_end_Bc = block_start_Bc + Bc
    # line 6, load a block from matmul input tensor
    # 算法流程第6步,从HBM中load Kj, Vj的一个block到SRAM
    Kj = K_mat[block_start_Bc:block_end_Bc, :]  # shape Bc x d
    Vj = V_mat[block_start_Bc:block_end_Bc, :]  # shape Bc x d
    # 算法流程第7步,执行内循环
    for block_start_Br in range(0, N, Br):
        block_end_Br = block_start_Br + Br
		# 算法流程第8行,从HBM中分别load以下几项到SRAM中
        mi = m[block_start_Br:block_end_Br, :]  # shape Br x 1
        li = l[block_start_Br:block_end_Br, :]  # shape Br x 1
        Oi = O[block_start_Br:block_end_Br, :]  # shape Br x d
        Qi = Q_mat[block_start_Br:block_end_Br, :]  # shape Br x d

        # 算法流程第9行
        Sij = Qi @ Kj.T  # shape Br x Bc

        # 算法流程第10行,计算当前block每行的最大值
        mij_hat = torch.max(Sij, dim=1).values[:, None]

        # 算法流程第10行,计算softmax的分母
        pij_hat = torch.exp(Sij - mij_hat)
        lij_hat = torch.sum(pij_hat, dim=1)[:, None]

        # 算法流程第11行,找到当前block的每行最大值以及之前的最大值
        mi_new = torch.max(torch.column_stack([mi, mij_hat]), dim=1).values[:, None]

        # 算法流程第11行,计算softmax的分母,但是带了online计算的校正,此公式与前面说的online safe softmax不一致,但是是同样的数学表达式,只是从针对标量的逐个计算扩展到了针对逐个向量的计算
        li_new = torch.exp(mi - mi_new) * li + torch.exp(mij_hat - mi_new) * lij_hat

        # 算法流程第12行,计算每个block的输出值
        Oi = (li * torch.exp(mi - mi_new) * Oi / li_new) + (torch.exp(mij_hat - mi_new) * pij_hat / li_new) @ Vj

		# 算法流程第13行
        m[block_start_Br:block_end_Br, :] = mi_new  # row max
        l[block_start_Br:block_end_Br, :] = li_new  # softmax denominator
        # 算法流程第12行,将Oi再写回到HBM
        O[block_start_Br:block_end_Br, :] = Oi

assert torch.allclose(O, expected_attention)
运行代码,经过最后的assert操作,没有raise错误,说明通过flash attention计算的O值与pytorch标准的O值是一致的。
flash attention2
flash attention1已经实现了较为显著的性能提升,但是也仅达到了25%~40%的GEMM(General Matrix Multiply)的理论最大FLOPs/s。flash attention的作者通过分析,发现是由于在GPU的不同线程块和warps上的任务切分还不够优化,造成了一些低利用率或者不必要的共享内存的读写操作。进而作者又提出了flash attention2算法,对任务的切分进行了优化,具体来说主要有:(1)调整算法,减少了非矩阵乘法的FLOPs。在深度学习中,通常会使用矩阵乘法运算来进行前向传播和反向传播。这是因为矩阵乘法是一种高效的数值运算,可以在现代硬件上被高效地实现。然而,并不是所有的运算都可以被表示成矩阵乘法的形式。有些运算可能需要使用其他的数值计算方法,这些方法可能会涉及到更多的浮点运算。(2)更大程度的提高了attention计算的并行度,甚至对于单个头的计算,也会将其分发到多个不同的线程块中执行计算,此举相比flash attention1,大约有2x的性能提升。
关于flash attention2对GPU warps的优化调整,flash attention2的论文中有一处说明,如下图所示。
flash attention1的forward计算中,对于每一个block,是将 K , V K,V K,V切分到4个不同的warps(warps 是NVIDIA GPU并行计算的基本单元。一个Warp通常包含32个线程,它们同时执行相同的指令,但对不同的数据进行操作。在GPU执行指令时,通常以Warps为单位进行调度,这可以充分利用GPU的并行处理能力)上,但是将 Q Q Q保持为对所有的warps是可见的。关于这样修改为什么会减少shared memory的读写以提高性能,paper的原文是这么说的:
在这里我就不做过多的解释(因为我也不懂,涉及到GPU更底层的实现相关。flash attention是使用cutlass实现的,cutlass相对偏底层,从下图可以看出,cutlass比直接写CUDA会更高级一些,但是相比triton,是偏底层)。
下面我们重点放在flash attention2算法的forward计算的实现上。
flash attention2算法的计算流程如下图所示:
flash attention2与flash attention1在算法层面大部分都是相同的,只是少部分地方做了修改,因此我们不做过多的解释,直接通过代码来逐行编程实现。
import torch

torch.manual_seed(456)

N, d = 16, 8
Q_mat = torch.rand((N, d))
K_mat = torch.rand((N, d))
V_mat = torch.rand((N, d))

expected_softmax = torch.softmax(Q_mat @ K_mat.T, dim=1)
expected_attention = expected_softmax @ V_mat

# 分块(tiling)尺寸,以SRAM的大小计算得到
Br = 4
Bc = d

O = torch.zeros((N, d))

# 算法流程第3步,执行外循环
for block_start_Br in range(0, N, Br):
    block_end_Br = block_start_Br + Br
    # 算法流程第4步,从HBM中load Qi 的一个block到SRAM
    Qi = Q_mat[block_start_Br:block_end_Br, :]
    # 算法流程第5步,初始化每个block的值
    Oi = torch.zeros((Br, d))  # shape Br x d
    li = torch.zeros((Br, 1))  # shape Br x 1
    mi = torch.full((Br, 1), -torch.inf)  # shape Br x 1

    # 算法流程第6步,执行内循环
    for block_start_Bc in range(0, N, Bc):
        block_end_Bc = block_start_Bc + Bc

        # 算法流程第7步,load Kj, Vj到SRAM
        Kj = K_mat[block_start_Bc:block_end_Bc, :]
        Vj = V_mat[block_start_Bc:block_end_Bc, :]

        # 算法流程第8步
        Sij = Qi @ Kj.T
        # 算法流程第9步
        mi_new = torch.max(torch.column_stack([mi, torch.max(Sij, dim=1).values[:, None]]), dim=1).values[:, None]
        Pij_hat = torch.exp(Sij - mi_new)
        li = torch.exp(mi - mi_new) * li + torch.sum(Pij_hat, dim=1)[:, None]
        # 算法流程第10步
        Oi = Oi * torch.exp(mi - mi_new) + Pij_hat @ Vj

        mi = mi_new

    # 第12步
    Oi = Oi / li

    # 第14步
    O[block_start_Br:block_end_Br, :] = Oi
assert torch.allclose(O, expected_attention)
上面的实现只是将算法的计算流程进行了编程实现。但是在实际使用中,会结合GPU的能力进行大规模并行计算。目前大众开发者GPU的编程主要会使用CUDA和triton两种语言。cuda语言大家比较熟悉,triton在这里略作介绍。
triton是一种类似 Python 的开源编程语言,它能让没有 CUDA 经验的研究人员编写高效的 GPU 代码–在大多数情况下与专家编写的cuda代码不相上下。即我们使用 python语言和triton的接口编写完相关计算后,triton编译器会生成高效的cuda代码。triton是openai发布的一项技术,目前国内很多公司也在使用triton生成的cuda代码作为参考。具体的benchmark等信息可以参考openai triton。
下面是flash attention2的triton代码实现。
"""
Fused Attention
===============

This is a Triton implementation of the Flash Attention v2 algorithm from Tri Dao (https://tridao.me/publications/flash2/flash2.pdf)
Credits: OpenAI kernel team

Extra Credits:
- Original flash attention paper (https://arxiv.org/abs/2205.14135)
- Rabe and Staats (https://arxiv.org/pdf/2112.05682v2.pdf)

"""

import pytest
import torch

import triton
import triton.language as tl


@triton.jit
def _attn_fwd_inner(
    acc, l_i, m_i, q,
    K_block_ptr, V_block_ptr,
    start_m, qk_scale,
    BLOCK_M: tl.constexpr,
    BLOCK_DMODEL: tl.constexpr,
    BLOCK_N: tl.constexpr,
    STAGE: tl.constexpr,
    offs_m: tl.constexpr,
    offs_n: tl.constexpr,
):
    # range of values handled by this stage
    if STAGE == 1:
        lo, hi = 0, start_m * BLOCK_M
    else:
        lo, hi = start_m * BLOCK_M, (start_m + 1) * BLOCK_M
        lo = tl.multiple_of(lo, BLOCK_M)
    K_block_ptr = tl.advance(K_block_ptr, (0, lo))
    V_block_ptr = tl.advance(V_block_ptr, (lo, 0))
    # loop over k, v and update accumulator
    for start_n in range(lo, hi, BLOCK_N):
        start_n = tl.multiple_of(start_n, BLOCK_N)
        # -- compute qk ----
        k = tl.load(K_block_ptr)
        qk = tl.zeros([BLOCK_M, BLOCK_N], dtype=tl.float32)
        qk += tl.dot(q, k)
        if STAGE == 2:
            mask = offs_m[:, None] >= (start_n + offs_n[None, :])
            qk = qk * qk_scale + tl.where(mask, 0, -1.0e6)
            m_ij = tl.maximum(m_i, tl.max(qk, 1))
            qk -= m_ij[:, None]
        else:
            m_ij = tl.maximum(m_i, tl.max(qk, 1) * qk_scale)
            qk = qk * qk_scale - m_ij[:, None]
        p = tl.math.exp2(qk)
        l_ij = tl.sum(p, 1)
        # -- update m_i and l_i
        alpha = tl.math.exp2(m_i - m_ij)
        l_i = l_i * alpha + l_ij
        # -- update output accumulator --
        acc = acc * alpha[:, None]
        # update acc
        v = tl.load(V_block_ptr)
        acc += tl.dot(p.to(tl.float16), v)
        # update m_i and l_i
        m_i = m_ij
        V_block_ptr = tl.advance(V_block_ptr, (BLOCK_N, 0))
        K_block_ptr = tl.advance(K_block_ptr, (0, BLOCK_N))
    return acc, l_i, m_i


@triton.jit
def _attn_fwd(
    Q, K, V, sm_scale, M, Out,
    stride_qz, stride_qh, stride_qm, stride_qk,
    stride_kz, stride_kh, stride_kn, stride_kk,
    stride_vz, stride_vh, stride_vk, stride_vn,
    stride_oz, stride_oh, stride_om, stride_on,
    Z, H,
    N_CTX: tl.constexpr,
    BLOCK_M: tl.constexpr,
    BLOCK_DMODEL: tl.constexpr,
    BLOCK_N: tl.constexpr,
    STAGE: tl.constexpr,
):
    start_m = tl.program_id(0)
    off_hz = tl.program_id(1)
    off_z = off_hz // H
    off_h = off_hz % H
    qvk_offset = off_z.to(tl.int64) * stride_qz + off_h.to(tl.int64) * stride_qh

    # block pointers
    Q_block_ptr = tl.make_block_ptr(
        base=Q + qvk_offset,
        shape=(N_CTX, BLOCK_DMODEL),
        strides=(stride_qm, stride_qk),
        offsets=(start_m * BLOCK_M, 0),
        block_shape=(BLOCK_M, BLOCK_DMODEL),
        order=(1, 0),
    )
    V_block_ptr = tl.make_block_ptr(
        base=V + qvk_offset,
        shape=(N_CTX, BLOCK_DMODEL),
        strides=(stride_vk, stride_vn),
        offsets=(0, 0),
        block_shape=(BLOCK_N, BLOCK_DMODEL),
        order=(1, 0),
    )
    K_block_ptr = tl.make_block_ptr(
        base=K + qvk_offset,
        shape=(BLOCK_DMODEL, N_CTX),
        strides=(stride_kk, stride_kn),
        offsets=(0, 0),
        block_shape=(BLOCK_DMODEL, BLOCK_N),
        order=(0, 1),
    )
    O_block_ptr = tl.make_block_ptr(
        base=Out + qvk_offset,
        shape=(N_CTX, BLOCK_DMODEL),
        strides=(stride_om, stride_on),
        offsets=(start_m * BLOCK_M, 0),
        block_shape=(BLOCK_M, BLOCK_DMODEL),
        order=(1, 0),
    )
    # initialize offsets
    offs_m = start_m * BLOCK_M + tl.arange(0, BLOCK_M)
    offs_n = tl.arange(0, BLOCK_N)
    # initialize pointer to m and l
    m_i = tl.zeros([BLOCK_M], dtype=tl.float32) - float("inf")
    l_i = tl.zeros([BLOCK_M], dtype=tl.float32) + 1.0
    acc = tl.zeros([BLOCK_M, BLOCK_DMODEL], dtype=tl.float32)
    # load scales
    qk_scale = sm_scale
    qk_scale *= 1.44269504  # 1/log(2)
    # load q: it will stay in SRAM throughout
    q = tl.load(Q_block_ptr)
    # stage 1: off-band
    if STAGE & 1:
        acc, l_i, m_i = _attn_fwd_inner(
            acc, l_i, m_i, q, K_block_ptr, V_block_ptr,
            start_m, qk_scale,
            BLOCK_M, BLOCK_DMODEL, BLOCK_N,
            1, offs_m, offs_n,
        )
    # barrier makes it easier for compielr to schedule the
    # two loops independently
    tl.debug_barrier()
    # stage 2: on-band
    if STAGE & 2:
        acc, l_i, m_i = _attn_fwd_inner(
            acc, l_i, m_i, q, K_block_ptr, V_block_ptr,
            start_m, qk_scale,
            BLOCK_M, BLOCK_DMODEL, BLOCK_N,
            2, offs_m, offs_n,
        )
    # epilogue
    m_i += tl.math.log2(l_i)
    acc = acc / l_i[:, None]
    m_ptrs = M + off_hz * N_CTX + offs_m
    tl.store(m_ptrs, m_i)
    tl.store(O_block_ptr, acc.to(Out.type.element_ty))


empty = torch.empty(128, device="cuda")

class _attention(torch.autograd.Function):
    @staticmethod
    def forward(ctx, q, k, v, causal, sm_scale):
        # shape constraints
        Lq, Lk, Lv = q.shape[-1], k.shape[-1], v.shape[-1]
        assert Lq == Lk and Lk == Lv
        assert Lk in {16, 32, 64, 128}
        o = torch.empty_like(q)
        BLOCK_M = 128
        BLOCK_N = 64 if Lk <= 64 else 32
        num_stages = 4 if Lk <= 64 else 3
        num_warps = 4
        # Tuning for H100
        if torch.cuda.get_device_capability()[0] == 9:
            num_warps = 8
            num_stages = 7 if Lk >= 64 else 3
        grid = (triton.cdiv(q.shape[2], BLOCK_M), q.shape[0] * q.shape[1], 1)
        M = torch.empty((q.shape[0], q.shape[1], q.shape[2]), device=q.device, dtype=torch.float32)
        _attn_fwd[grid](
            q, k, v, sm_scale, M, o,
            q.stride(0), q.stride(1), q.stride(2), q.stride(3),
            k.stride(0), k.stride(1), k.stride(2), k.stride(3),
            v.stride(0), v.stride(1), v.stride(2), v.stride(3),
            o.stride(0), o.stride(1), o.stride(2), o.stride(3),
            q.shape[0], q.shape[1],
            N_CTX=q.shape[2],
            BLOCK_M=BLOCK_M,
            BLOCK_N=BLOCK_N,
            BLOCK_DMODEL=Lk,
            STAGE=3,
            num_warps=num_warps,
            num_stages=num_stages,
        )

        ctx.save_for_backward(q, k, v, o, M)
        ctx.grid = grid
        ctx.sm_scale = sm_scale
        ctx.BLOCK_DMODEL = Lk
        ctx.causal = causal
        return o

attention = _attention.apply
我们看上面代码的这部分
p = tl.math.exp2(qk)
l_ij = tl.sum(p, 1)
# -- update m_i and l_i
alpha = tl.math.exp2(m_i - m_ij)
l_i = l_i * alpha + l_ij
# -- update output accumulator --
acc = acc * alpha[:, None]
# update acc
v = tl.load(V_block_ptr)
acc += tl.dot(p.to(tl.float16), v)
# update m_i and l_i
m_i = m_ij
就是算法流程图的按步计算,与我们用纯python实现的过程基本一致。我在实现python版的时,也借鉴了triton版本的相关计算过程。因此也可以发现,triton可以让我们用相对抽象的语言写出高性能cuda代码。下面我们会对triton的实现进行性能benchmark。
然后我们将cutlass实现的flash attention2(flash attention2的默认实现方式)与triton实现的flash attention2进行性能对比。
try:
    # flash attention的标准使用接口
    from flash_attn.flash_attn_interface import \
        flash_attn_qkvpacked_func as flash_attn_func
    HAS_FLASH = True
except BaseException:
    HAS_FLASH = False

BATCH, N_HEADS, N_CTX, D_HEAD = 4, 48, 4096, 64
# vary seq length for fixed head and batch=4
configs = [
    triton.testing.Benchmark(
        x_names=["N_CTX"],
        x_vals=[2**i for i in range(10, 15)],
        line_arg="provider",
        line_vals=["triton"] + (["flash"] if HAS_FLASH else []),
        line_names=["Triton"] + (["Flash-2"] if HAS_FLASH else []),
        styles=[("red", "-"), ("blue", "-")],
        ylabel="ms",
        plot_name=f"fused-attention-batch{BATCH}-head{N_HEADS}-d{D_HEAD}-{mode}",
        args={
            "H": N_HEADS,
            "BATCH": BATCH,
            "D_HEAD": D_HEAD,
            "dtype": torch.float16,
            "mode": mode,
            "causal": causal,
        },
    )
    for mode in ["fwd"]
    for causal in [True]
]


@triton.testing.perf_report(configs)
def bench_flash_attention(
    BATCH, H, N_CTX, D_HEAD, causal, mode, provider, dtype=torch.float16, device="cuda"
):
    assert mode in ["fwd"]
    warmup = 25
    rep = 100
    if provider == "triton":
        q = torch.randn((BATCH, H, N_CTX, D_HEAD), dtype=dtype, device="cuda", requires_grad=True)
        k = torch.randn((BATCH, H, N_CTX, D_HEAD), dtype=dtype, device="cuda", requires_grad=True)
        if mode == "fwd":
            q = q.to(torch.float8_e5m2)
            k = k.to(torch.float8_e5m2)
        v = torch.randn((BATCH, H, N_CTX, D_HEAD), dtype=dtype, device="cuda", requires_grad=True)
        sm_scale = 1.3
        fn = lambda: attention(q, k, v, causal, sm_scale)
        if mode == "bwd":
            o = fn()
            do = torch.randn_like(o)
            fn = lambda: o.backward(do, retain_graph=True)
        ms = triton.testing.do_bench(fn, warmup=warmup, rep=rep)
    if provider == "flash":
        qkv = torch.randn(
            (BATCH, N_CTX, 3, H, D_HEAD), dtype=dtype, device=device, requires_grad=True
        )
        fn = lambda: flash_attn_func(qkv, causal=causal)
        if mode == "bwd":
            o = fn()
            do = torch.randn_like(o)
            fn = lambda: o.backward(do, retain_graph=True)
        ms = triton.testing.do_bench(fn, warmup=warmup, rep=rep)
    flops_per_matmul = 2.0 * BATCH * H * N_CTX * N_CTX * D_HEAD
    total_flops = 2 * flops_per_matmul
    if causal:
        total_flops *= 0.5
    if mode == "bwd":
        total_flops *= 2.5  # 2.0(bwd) + 0.5(recompute)
    return total_flops / ms * 1e-9


# only works on post-Ampere GPUs right now
bench_flash_attention.run(save_path=".", print_data=True)
在A100上测试,结果如下:
batch4-head48-d64 forward,单位FLOPs/s
| N_CTX(context length) | triton | flash attention2(cutlass) |
|---|---|---|
| 1024 | 123 | 137 |
| 2048 | 159 | 162 |
| 4096 | 163 | 159 |
| 8192 | 167 | 157 |
| 16384 | 167 | 165 |
从前向计算的结果来看,triton的性能在context length较长的情况下,甚至好于cutlass实现的flash attention2。
但是triton实现的flash attention2相比默认使用cutlass实现的,backward计算时,triton的性能大约是cutlass的3/4。后续有机会会补充backward的实现。


