springboot - vue-element-admin 整合,修改原有的登录退出
说明
- 本次使用的到的数据均为假数据,并未使用数据库。
- vue文件中的方法调用注意看文件的引入。
- 其中有些使用伪代码的方式。
前期准备
- 创建一个spring boot项目,
项目结构如下:

说明:
config:
GlobalCORSConfig:配置vue-element-admin与springboot之间的跨域请求
model:
vo: 返回给前端的实体对象。
po:service 与dao之前传递的对象。
service:接口层
impl:service接口的实现层,其下的类需要实现service中的接口。且顶部加入注解 @Service。
controller:控制器层,接收前端数据和响应数据到前端。
跨域请求解决:
GlobalCORSConfig代码如下:
package com.example.demo.config;

import org.springframework.stereotype.Component;
import org.springframework.web.servlet.config.annotation.CorsRegistry;
import org.springframework.web.servlet.config.annotation.WebMvcConfigurer;

@Component
public class  GlobalCORSConfig implements WebMvcConfigurer {
    @Override
    public void addCorsMappings(CorsRegistry registry) {
        registry.addMapping("/**")
                .allowedOrigins("*")
                .allowedMethods("POST","GET")
                .allowCredentials(false)
                .maxAge(30);
    }
}
或者在控制器的方法上加入注解 @CrossOrigin,如下:
	@CrossOrigin
    @PostMapping(value = "/doLogin")
    public String doLogin(
            @RequestParam(value = "username") String username,
            @RequestParam(value = "password") String password
    ){
        if (StringUtils.isEmpty(username)) return ResponseUtil.error("用户名不能为空");
        if (StringUtils.isEmpty(password)) return ResponseUtil.error("密码不能为空");
        String resStr = "";
        return resStr;
    }
导入下面的依赖。
<dependencies>
        <dependency>
            <groupId>org.springframework.bootgroupId>
            <artifactId>spring-boot-starter-webartifactId>
        dependency>

        <dependency>
            <groupId>org.springframework.bootgroupId>
            <artifactId>spring-boot-devtoolsartifactId>
            <scope>runtimescope>
            <optional>trueoptional>
        dependency>
        <dependency>
            <groupId>org.springframework.bootgroupId>
            <artifactId>spring-boot-configuration-processorartifactId>
            <optional>trueoptional>
        dependency>
        <dependency>
            <groupId>com.alibabagroupId>
            <artifactId>fastjsonartifactId>
            <version>1.2.57version>
        dependency>
        <dependency>
            <groupId>org.springframework.bootgroupId>
            <artifactId>spring-boot-starter-testartifactId>
            <scope>testscope>
            <exclusions>
                <exclusion>
                    <groupId>org.junit.vintagegroupId>
                    <artifactId>junit-vintage-engineartifactId>
                exclusion>
            exclusions>
        dependency>
    dependencies>
准备返回数据的工具类ResponseUtil:
package com.example.demo.utils;

import com.alibaba.fastjson.JSON;
import com.alibaba.fastjson.serializer.SerializerFeature;

import java.util.HashMap;
import java.util.Map;

public class ResponseUtil {
    private static Map map = new HashMap();
    private final static Integer successCode = 20000;//成功
    private final static Integer failCode = 50000;//失败

    /**
     * 成功时返回
     * @param dataObj Object 成功返回的数据对象
     * @return json字符串
     * */
    public static String success(Object dataObj){
        map.put("code",successCode);
        map.put("message","成功");
        map.put("data",dataObj);
        return jsonString(map);
    }
    /**
     * 失败时返回
     * @param message String 失败返回的提示信息
     * @return json字符串
     * */
    public static String error(String message){
        map.put("code",failCode);
        map.put("message",message);
        map.put("data",null);
        return jsonString(map);
    }

    /**
     * 自定义返回数据
     * @param code Integer 返回码
     * @param message String 返回的提示信息
     * @param dataObj Object 返回的提示信息
     * @return json字符串
     * */
    public static String customResult(Integer code,String message,Object dataObj){
        map.put("code",code);
        map.put("message",message);
        map.put("data",dataObj);
        return jsonString(map);
    }


    private static String jsonString(Object object){
        return JSON.toJSONString(object, SerializerFeature.WriteMapNullValue, SerializerFeature.DisableCircularReferenceDetect, SerializerFeature.WriteDateUseDateFormat);
    }
}
- 在github中clone 下vue-element-admin,地址:
英文版地址:
https://github.com/PanJiaChen/vue-element-admin
中文版地址:
https://github.com/PanJiaChen/vue-element-admin/tree/i18n
克隆后 使用淘宝的镜像 install
npm install --registry=https://registry.npm.taobao.org
运行vue 项目,且启动成功。
开始
登录
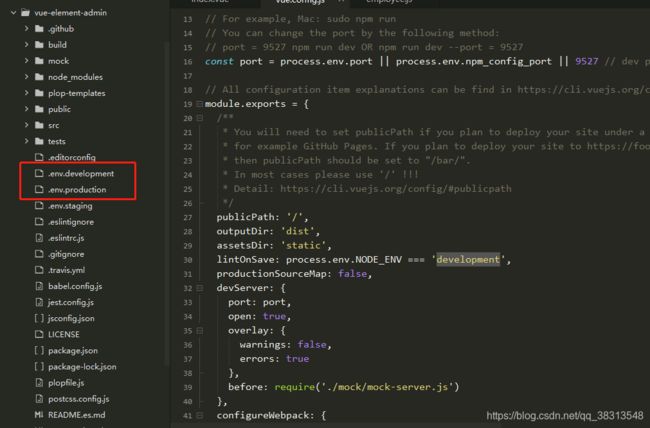
在vue-element-admin的目录结构中,.env.development 和 .env.production两个文件分别为开发环境下的访问地址配置和生产环境下的地址配置

将成产环境下的配置进行修改,VUE_APP_BASE_API 的值为访问springboot项目的地址。修改结果如下:
# just a flag
ENV = 'development'

# base api
# VUE_APP_BASE_API = '/dev-api'
VUE_APP_BASE_API = 'http://localhost:8080'
在vue-element-admin的项目结构中,src/view/login/index.vue文件为登录界面的文件,在 js部分的methods方法中的handleLogin方法为执行登录的方法。

在 $store中会调用src/store/modules/user.js中的actions对象下的login方法。此方法会调用src/api/user.js下的login方法。如下:

此时,我们修改src/api/user.js下的login方法,将url属性填写为登录所请求的控制器和方法名称,如下;

在springboot项目中创建Login控制器。用于处理登录,退出等相关处理。

@CrossOrigin
    @PostMapping(value = "/doLogin")
    public String doLogin(
            @RequestParam(value = "username") String username,
            @RequestParam(value = "password") String password
    ){
        if (StringUtils.isEmpty(username)) return ResponseUtil.error("用户名不能为空");
        if (StringUtils.isEmpty(password)) return ResponseUtil.error("密码不能为空");
        String resStr = "";
        try{
            User voUser = loginService.doLogin(username,password);
            if (voUser == null) return ResponseUtil.error("账号或密码不正确");
            JSONObject jsonObject = new JSONObject();
            jsonObject.put("token","a123456789"); //token在此先暂时随便定义
            resStr = ResponseUtil.success(jsonObject);
        }catch (Exception e){
            resStr = ResponseUtil.error("失败:"+e.getMessage());
            e.printStackTrace();
        }
        return resStr;
    }
在 **LoginServiceImpl **中代码:(目前实验指定固定的账号和密码)
@Service
public class LoginServiceImpl implements LoginService {
    //private UserDao userDao;
    @Override
    public User doLogin(String username, String password) throws Exception {
        if ("admin".equals(username) && "12345678".equals(password)) {
            return new User(1L,username,password);
        }else{
            return null;
        }
    }
}
到此登录逻辑完成,但是由于vue-element-admin的登录中发起了2次请求,分别是:login、info,如下:

且分别传递的参数和响应的数据格式如下:
login
传递参数:

响应参数:
{"code":20000,"data":{"token":"admin-token"}}
响应参数:
{
	"code":20000,
	"data":{
		"roles":["admin"],
		"introduction":"I am a super administrator",
		"avatar":"https://wpimg.wallstcn.com/f778738c-e4f8-4870-b634-56703b4acafe.gif",
		"name":"Super Admin"
	}
}

/*
avatar:用户头像url
code:成功状态码
roles:角色
introduction:简介
name:用户名称
*/
在后台接口中添加新方法:
    @GetMapping("/info")
    public String getInfo(
            @RequestParam(value = "token") String token
    ){
        if (StringUtils.isEmpty(token)) return ResponseUtil.error("token不能为空");
        String resStr = "";
        try{
            //验证token 有效合法
            if("a123456789".equals(token)){ //List<String> role, String introduction, String avatar, String name
                VoUserInfo voUserInfo = new VoUserInfo();
                ArrayList<String> roleList = new ArrayList<>();
                roleList.add("admin");
                voUserInfo.setRoles(roleList);
                voUserInfo.setName("admin");
                voUserInfo.setIntroduction("testAdmin");
                voUserInfo.setAvatar("https://himg.bdimg.com/sys/portraitn/item/2377d3f9bda1bdadbafeb36e");
                resStr = ResponseUtil.success(voUserInfo);
            }else{
                resStr = ResponseUtil.error("token无效");
            }
        }catch (Exception e){
            resStr = ResponseUtil.error("失败:"+e.getMessage());
            e.printStackTrace();
        }
        return resStr;
    }
在vue-element-admin中,修改src/api/user.js下的getInfo方法,将url属性填写为info所请求的控制器和方法名称,如下;

修改完成后重启项目。输入正确的账号密码,即可登录成功。
退出登录
点击退出登陆时,发起请求如下:

由此可知,退出登录中将token值存放在请求头中。源码如下:

从源码中得知,请求过滤器中会将token带入请求头里。
则从后台中获取数据时,从请求头中获取token。

修改vue-element-admin中的src/api/user,js文件中的login方法,如下:

此时,运行即可退出登录。
