【Springboot项目开发】:基本的项目开发流程(采用了狂神的项目做基础,如不知道请翻阅前面的文章)
项目流程
一:基础准备
1:创建项目
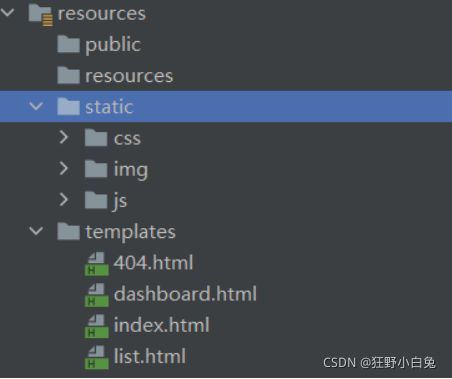
2:导入静态资源
二:先写mybatis层
3:创建pojo实体类
员工和部门表
4:根据实体类创建sql
sql模板:
DROP TABLE IF EXISTS `department`;

CREATE TABLE `department` (
`id` int(20) NOT NULL AUTO_INCREMENT,
`department_name` varchar(30) DEFAULT NULL,
PRIMARY KEY (`id`)
) ENGINE=InnoDB DEFAULT CHARSET=utf8;
DROP TABLE IF EXISTS `employee`;
CREATE TABLE `employee`  (
  `id` int(20) NOT NULL AUTO_INCREMENT,
  `last_name` varchar(100) DEFAULT NULL,
  `email` varchar(100) DEFAULT NULL,
  `gender` int(2) NULL DEFAULT NULL,
  `department` int(3) NULL DEFAULT NULL,
  `birth` datetime(0) NULL DEFAULT NULL,
  PRIMARY KEY (`id`)
) ENGINE=InnoDB DEFAULT CHARSET=utf8;
5:将mybatis整合进来【导包】
<dependency>
    <groupId>org.mybatis.spring.bootgroupId>
    <artifactId>mybatis-spring-boot-starterartifactId>
    <version>2.1.4version>
dependency>
6:yaml配置文件中的数据源的JDBC和整合mybatis
注意点:要在resources目录下创建springboot.mapper文件夹
mybatis:
  # 整合mybatis
  type-aliases-package: com.kami.pojo
  # 整合别名
  mapper-locations: classpath:springboot/mapper/*.xml
7:解决maven中资源过滤问题
<resources>
    <resource>
        <directory>src/main/javadirectory>
        <includes>
            <include>**/*.xmlinclude>
        includes>
        <filtering>truefiltering>
    resource>
resources>
8:IDEA链接数据库
9:创建与编写mapper接口
10:编写DepartmentMapper.xml与EmployeeMapper.xml
EmployeeMapper.xml中的注意点:

这是通用
DOCTYPE mapper
        PUBLIC "-//mybatis.org//DTD Mapper 3.0//EN"
        "http://mybatis.org/dtd/mybatis-3-mapper.dtd">
三:Controller层
11:编写页面跳转
现在用扩展SpringMVC的方式:在config中创建MyMvcConfig
package com.zsr.config;

import org.springframework.context.annotation.Configuration;
import org.springframework.web.servlet.config.annotation.ViewControllerRegistry;
import org.springframework.web.servlet.config.annotation.WebMvcConfigurer;

@Configuration
public class MyMvcConfig implements WebMvcConfigurer {
    @Override
    public void addViewControllers(ViewControllerRegistry registry) {
        registry.addViewController("/").setViewName("index");
        registry.addViewController("/index.html").setViewName("index");
    }
}
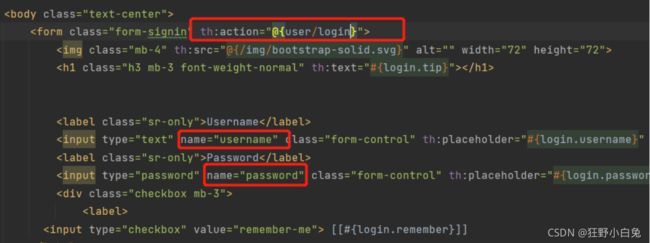
四:写到这里已经可以访问了,就是页面css样式没有【引入Thymeleaf】
上述测试可以看到页面有图片没有加载出来,且没有css和js的样式,这就是因为我们html页面中静态资源引入的语法出了问题,在SpringBoot中,推荐使用Thymeleaf作为模板引擎,我们将其中的语法改为Thymeleaf,所有页面的静态资源都需要使用其接管
引入thymeleaf
xmlns:th="http://www.thymeleaf.org"
然后修改所有页面静态资源的引入,使用@{...} 链接表达式
例如index.html中:
注意:第一个/代表项目的classpath,也就是这里的resources目录
五:业务一>页面国际化
1. 统一properties编码
首先在IDEA中统一设置properties的编码为UTF-8
2. 编写i18n国际化资源文件
在resources下创建i18n文件夹

3.修改页面中要转换的位置
利用#{...} 消息表达式,去首页index.html获取国际化的值

4.配置到yaml中
spring:
  #关闭模板引擎的缓存(作用:就是让一些页面的更改生效)
  thymeleaf:
    cache: false
  # 配置识别国际化(我们配置文件的真实位置)
  messages:
    basename: i18n.login
5.编写MyLocaleResolver配置类
public class MyLocaleResolver implements LocaleResolver {

    //解析请求
    @Override
    public Locale resolveLocale(HttpServletRequest request) {
        //获取请求中的语言参数
        String language = request.getParameter("l");
        Locale locale = Locale.getDefault();    //如果没有就使用默认的

        //如果请求的参数携带了国际化的参数
        if(StringUtils.hasLength(language)){
            //zh_CN的字符串分割,分割成zh和CN
            String[] split = language.split("_");
            //返回一个自己的对象:国际,地区
            locale = new Locale(split[0], split[1]);
        }

        return locale;
    }

    @Override
    public void setLocale(HttpServletRequest request, HttpServletResponse response, Locale locale) {

    }
}
6.将写好的配置类放到Bean里面
MyMvcConfig类中

//往容器中注入一个组件(MyLocaleResolver)
//自定义的国际化组件就生效了
@Bean
public LocaleResolver localeResolver(){
    return new MyLocaleResolver();
}
六:业务二>登录功能的实现
1.首先在index.html中的表单编写一个提交地址/user/login,并给名称和密码输入框添加name属性为了后面的传参
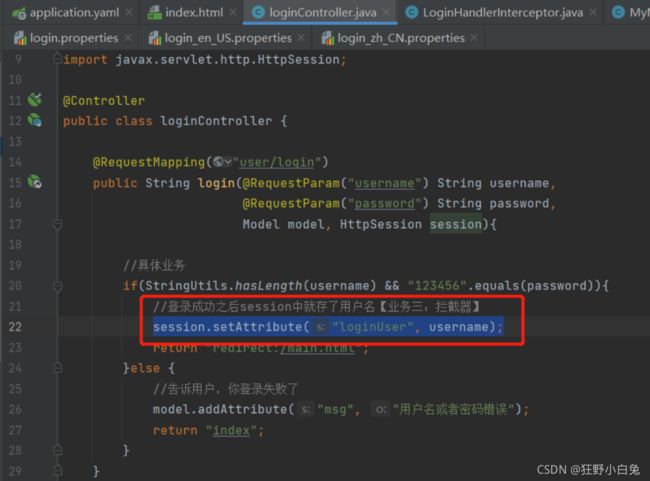
2.然后编写对应的controller
新建类loginController,处理登录请求
3.然后我们在index.html首页中加一个标签用来显示controller返回的错误信息
4.到此我们的登录功能实现完毕,但是有一个很大的问题,浏览器的url暴露了用户的用户名和密码,这在实际开发中可是重大的漏洞,泄露了用户信息,因此我们需要编写一个映射
【引入的问题】但是这又出现了新的问题,无论登不登陆,我们访问localhost/main.html都会跳转到dashboard的页面,这就引入了接下来的拦截器
七:业务三>登录拦截器
1.自定义一个拦截器
config目录下,新建一个登录拦截器类LoginHandlerInterceptor
用户登录成功后,后台会得到用户信息;如果没有登录,则不会有任何的用户信息;
我们就可以利用这一点通过拦截器进行拦截:
- 当用户登录时将用户信息存入session中,访问页面时首先判断session中有没有用户的信息
- 如果没有,拦截器进行拦截;
- 如果有,拦截器放行
2.首先在LoginController中当用户登录成功后,存入用户信息到session中
3.然后再在实现自定义的登录拦截器,继承HandlerInterceptor接口
- 其中获取存入的session进行判断,如果不为空,则放行;
- 如果为空,则返回错误消息,并且返回到首页,不放行。
alt + insert来找要重写的方法
    @Override
    public boolean preHandle(HttpServletRequest request, HttpServletResponse response, Object handler) throws Exception {

        //登录成功之后,应该有用户的session
        Object loginUser = request.getSession().getAttribute("loginUser");
        if(loginUser == null){  //没有登录成功
            request.setAttribute("msg", "没有权限,请先登录");
            //重定向回去
            request.getRequestDispatcher("/index.html").forward(request, response);
            return false;
        }else {
            return true;
        }
    }
4.然后配置到bean中注册,在MyMvcConfig配置类中,重写关于拦截器的方法,添加我们自定义的拦截器,注意屏蔽静态资源及主页以及相关请求的拦截
//业务三:拦截器
//往容器中注入一个组件(LoginHandlerInterceptor)
//重写拦截器组件
@Override
public void addInterceptors(InterceptorRegistry registry) {
    /**
     * addPathPatterns("/**"):拦截所有请求
     * excludePathPatterns("/index.html"):除了....
     */
    registry.addInterceptor(new LoginHandlerInterceptor())
            .addPathPatterns("/**")
            .excludePathPatterns("/index.html", "/", "/user/login", "/css/**", "/js/**", "/img/**");
}
八:根据Mybatis来编写Spring(Service)
1.创建service包,并创建两个接口【注,先创建分表并实现】
DepartmentService
package com.kami.service;

import com.kami.pojo.Department;

import java.util.List;

public interface DepartmentService {

    //Service层获取所有部门信息
    List<Department> getDepartments();

    //Service层通过id获得部门
    Department getDepartmentById(Integer id);
}
2.创建impl包,创建impl实现类,实现DepartmentService
package com.kami.service.impl;

import com.kami.mapper.DepartmentMapper;
import com.kami.pojo.Department;
import com.kami.service.DepartmentService;
import org.springframework.beans.factory.annotation.Autowired;
import org.springframework.stereotype.Service;

import java.util.List;

//写个这个注解相当于:把这个类交给IOC的容器进行了管理
@Service("departmentService")
public class DepartmentServiceImpl implements DepartmentService {

    @Autowired
    private DepartmentMapper departmentMapper;

    @Override
    public List<Department> getDepartments() {
        return departmentMapper.getDepartments();
    }

    @Override
    public Department getDepartmentById(Integer id) {
        return departmentMapper.getDepartmentById(id);
    }
}
3.创建service包,并创建两个接口【注,再创建主表并实现——因为主表中涉及到分表,所以要后创建】
@Autowired要给departmentMapper和departmentMapper
package com.kami.service;

import com.kami.pojo.Employee;

import java.util.List;

public interface EmployeeService {

    //Service层获取所有员工信息
    List<Employee> getEmployees();

    //Service层通过id获取员工信息
    Employee getEmployeeById(Integer id);

    //Service层增加一个员工
    void saveEmployee(Employee employee);

    //Service层删除一个员工
    int deleteEmployee(Integer id);

    //Service层修改一个员工
    int updateEmployee(Employee employee);
}
4.创建impl包,创建impl实现类,实现EmployeeService
注:主键自增长问题:
//主键自增
private static Integer initId = 1006;
package com.kami.service.impl;

import com.kami.mapper.DepartmentMapper;
import com.kami.mapper.EmployeeMapper;
import com.kami.pojo.Employee;
import com.kami.service.EmployeeService;
import org.springframework.beans.factory.annotation.Autowired;

import java.util.List;

public class EmployeeServiceImpl implements EmployeeService {

    @Autowired
    private DepartmentMapper departmentMapper;

    @Autowired
    private EmployeeMapper employeeMapper;

    //主键自增
    private static Integer initId = 1006;

    @Override
    public List<Employee> getEmployees() {
        return employeeMapper.getEmployees();
    }

    @Override
    public Employee getEmployeeById(Integer id) {
        return employeeMapper.getEmployeeById(id);
    }

    @Override
    public void saveEmployee(Employee employee) {
        if(employee.getId() == null){
            employee.setId(initId);
        }
        //先存储Department
        employee.setDepartment(departmentMapper.getDepartmentById(employee.getDepartment().getId()));
        //在存储到Employee
        employeeMapper.saveEmployee(employee);
    }

    @Override
    public int deleteEmployee(Integer id) {
        return employeeMapper.deleteEmployee(id);
    }

    @Override
    public int updateEmployee(Employee employee) {
        return employeeMapper.updateEmployee(employee);
    }
}
九:展示员工信息——查
【1】. 实现Customers视图跳转
目标:点击dashboard.html页面中的Customers展示跳转到list.html页面显示所有员工信息
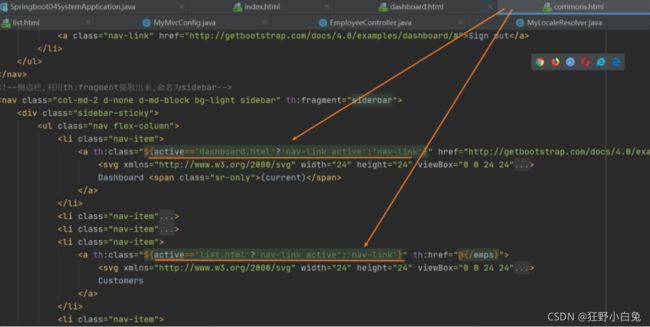
2.首先给dashboard.html页面中Customers部分标签添加href属性
实现点击该标签请求/emps路径跳转到list.html展示所有的员工信息
<li class="nav-item">
    <a class="nav-link" th:href="@{/emps}">
        <svg xmlns="http://www.w3.org/2000/svg" width="24" height="24" viewBox="0 0 24 24"
             fill="none" stroke="currentColor" stroke-width="2" stroke-linecap="round"
             stroke-linejoin="round" class="feather feather-users">
            <path d="M17 21v-2a4 4 0 0 0-4-4H5a4 4 0 0 0-4 4v2"></path>
            <circle cx="9" cy="7" r="4"></circle>
            <path d="M23 21v-2a4 4 0 0 0-3-3.87"></path>
            <path d="M16 3.13a4 4 0 0 1 0 7.75"></path>
        </svg>
        Customers
    </a>
</li>
3.同样修改list.html对应该的代码为上述代码

4.在templates目录下新建一个包emp,用来放所有关于员工信息的页面
我们将list.html页面移入该包中
5.然后编写请求对应的controller,处理/emps请求,在controller包下,新建一个EmployeeController类
6.然后我们重启主程序进行测试,登录到dashboard页面,再点击Customers,成功跳转到/emps
此时出现有些问题:
- 我们点击了
Customers后,它应该处于高亮状态,但是这里点击后还是普通的样子,高亮还是在Dashboard上 list.html和dashboard.html页面的侧边栏和顶部栏是相同的,可以抽取出来
【2】. 提取页面公共部分
1.在templates目录下新建一个commons包,其中新建commons.html用来放置公共页面代码
利用th:fragment标签抽取公共部分(顶部导航栏和侧边栏)
2.然后删除dashboard.html和list.html中顶部导航栏和侧边栏的代码
3.我们分别在dashboard.html和list.html删除的部分插入提取出来的公共部分topbar和sidebar
<div th:replace="~{commons/commons::topbar}" }>div>


<div th:replace="~{commons/commons::siderbar}">div>
【3】. 点击高亮处理
1.在页面中,使高亮的代码是class="nav-link active"属性
我们可以传递参数判断点击了哪个标签实现相应的高亮
2.首先在dashboard.html的侧边栏标签传递参数active为dashboard.html
同样在list.html的侧边栏标签传递参数active为list.html
3.然后我们在公共页面commons.html相应标签部分利用thymeleaf接收参数active,利用三元运算符判断决定是否高亮
【4】. 显示员工信息
1.修改list.html页面,显示我们自己的数据值
修改一下性别的显示和date的显示
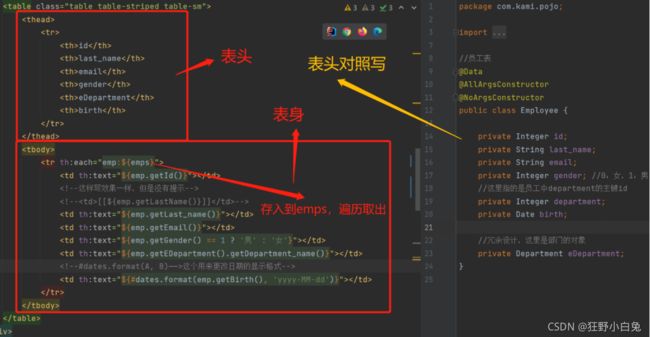
2.接下来添加编辑和删除两个标签,为后续做准备
<td>
   <a class="btn btn-sm btn-primary" >编辑a>
   <a class="btn btn-sm btn-danger" >删除a>
td>
十:增加员工实现——增
【1】. list页面增加添加员工按钮
1.首先在list.html页面增添一个增加员工按钮,点击该按钮时发起一个请求/add

2.然后编写对应的controller,处理点击添加员工的请求
这里通过get方式提交请求,在EmployeeController中添加一个方法add用来处理list页面点击提交按钮的操作,返回到add.html添加员工页面,我们即将创建
【2】. 创建添加员工页面add
在templates/emp下新建一个add.html
我们复制list.html中的内容,修改其中表格为
注:下拉框中的内容不应该是1、2、3、4、5;应该是所有的部门名,我们遍历得到
<form>
    <div class="form-group">
        <label>last_namelabel>
        <input type="text" name="last_name" class="form-control" placeholder="last_name:zsr">
    div>
    <div class="form-group">
        <label>Emaillabel>
        <input type="email" name="email" class="form-control" placeholder="email:[email protected]">
    div>
    <div class="form-group">
        <label>Genderlabel><br/>
        <div class="form-check form-check-inline">
            <input class="form-check-input" type="radio" name="gender" value="1">
            <label class="form-check-label">男label>
        div>
        <div class="form-check form-check-inline">
            <input class="form-check-input" type="radio" name="gender" value="0">
            <label class="form-check-label">女label>
        div>
    div>
    <div class="form-group">
        <label>departmentlabel>


        <select class="form-control" name="department.id">

            <option th:each="dept:${departments}" th:text="${dept.getDepartment_name()}" th:value="${dept.getId()}">option>
        select>
    div>
    <div class="form-group">
        <label>Birthlabel>

        <input type="text" name="birth" class="form-control" placeholder="birth:yyyy/MM/dd">
    div>
    <button type="submit" class="btn btn-primary">添加button>
form>
【3】. add页面添加员工请求
1.在add.html页面,当我们填写完信息,点击添加按钮,应该完成添加返回到list页面,展示新的员工信息;因此在add.html点击添加按钮的一瞬间,我们同样发起一个请求/add,与上述提交按钮发出的请求路径一样,但这里发出的是post请求
th:action="@{/emp}" method="post"
2.然后编写对应的controller,同样在EmployeeController中添加一个方法addEmp用来处理点击添加按钮的操作
//用来处理点击添加按钮的操作
//这里是PostMapping:用来提交表单
@RequestMapping("/add")
public String toEmp(Employee employee){
    //添加员工的操作
    //调用底层业务方法保存员工信息
    employeeService.saveEmployee(employee);
    //添加成功后,会重定向到emps
    return "redirect:/emps";
}
十一.修改员工信息——改
【1】. list页面编辑按钮增添请求
1.当我们点击编辑标签时,应该跳转到编辑页面edit.html(我们即将创建)进行编辑
因此首先将list.html页面的编辑标签添加href属性,实现点击请求/edit/id号到编辑页面
<a class="btn btn-sm btn-primary" th:href="@{/edit/} + ${emp.getId()}">编辑a>
2.然后编写对应的controller,在EmployeeController中添加一个方法edit用来处理list页面点击编辑按钮的操作,返回到edit.html编辑员工页面,我们即将创建
//restful风格接收参数
@RequestMapping("/edit/{id}")
public String edit(@PathVariable("id")Integer id, Model model){ //不加这个注解,前端传入的数值将接收不到,Model用来给前端返回数据
    //查出原来的数据
    Employee employeeById = employeeService.getEmployeeById(id);
    model.addAttribute("empById", employeeById);

    //也要查询部门信息
    Collection<Department> departments = departmentService.getDepartments();
    //返回到前端
    model.addAttribute("departments", departments);

    return "redirect:/emp/edit";
}
【2】. 创建编辑员工页面edit
在templates/emp下新建一个edit.html
复制add.html中的代码,稍作修改
<form th:action="@{/edit}" method="post">

    <div class="form-group">
        <label>last_namelabel>
        <input th:value="${empById.getLast_name()}" type="text" name="last_name" class="form-control" placeholder="last_name:zsr">
    div>
    <div class="form-group">
        <label>Emaillabel>
        <input th:value="${empById.getEmail()}" type="email" name="email" class="form-control" placeholder="email:[email protected]">
    div>
    <div class="form-group">
        <label>Genderlabel><br/>
        <div class="form-check form-check-inline">
            <input th:checked="${empById.getGender()==1}" class="form-check-input" type="radio" name="gender" value="1">
            <label class="form-check-label">男label>
        div>
        <div class="form-check form-check-inline">
            <input th:checked="${empById.getGender()==0}" class="form-check-input" type="radio" name="gender" value="0">
            <label class="form-check-label">女label>
        div>
    div>
    <div class="form-group">
        <label>departmentlabel>


        <select class="form-control" name="department.id">

            <option th:selected="${dept.getId() == empById.getDepartment()}" th:each="dept:${departments}" th:text="${dept.getDepartment_name()}" th:value="${dept.getId()}">option>
        select>
    div>
    <div class="form-group">
        <label>Birthlabel>

        <input th:value="${#dates.format(empById.getBirth(), 'yyyy-MM-dd')}" type="text" name="birth" class="form-control" placeholder="birth:yyyy/MM/dd">
    div>
    <button type="submit" class="btn btn-primary">修改button>
form>
【3】. edit页面编辑完成提交请求
在edit.html点击修改按钮的一瞬间,我们需要返回到list页面,更新员工信息,因此我们需要添加href属性,实现点击按钮时发起一个请求/edit

然后编写对应的controller,处理点击修改按钮的请求
同样在EmployeeController中添加一个方法EditEmp用来处理edit页面点击添加的操作
//员工信息的修改
@RequestMapping("/edit")
public String EditEmp(Employee employee){
    //添加一个员工
    employeeService.saveEmployee(employee);
    return "redirect:/emps";
}
然后指定修改人的id

十二.删除员工信息——删
当我们点击删除标签时,应该发起一个请求,删除指定的用户,然后重新返回到list页面显示员工数据
<a class="btn btn-sm btn-danger" th:href="@{/deleteEmp/} + ${emp.getId()}">删除a>
然后编写对应的controller,处理点击删除按钮的请求,删除指定员工,重定向到/emps请求,更新员工信息
//删除员工
@RequestMapping("/deleteEmp/{id}")
public String deleteEmp(@PathVariable("id")Integer id){//不加这个注解,前端传入的数值将接收不到,Model用来给前端返回数据
    employeeService.deleteEmployee(id);
    return "redirect:/emps";
}
重启测试,点击删除按钮即可删除指定员工
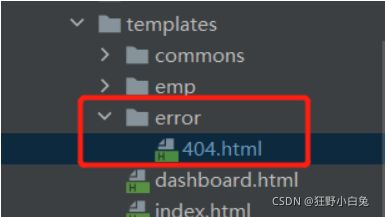
十三.404页面定制
只需要在templates目录下新建一个error包,然后将404.html放入其中,报错SpringBoot就会自动找到这个页面
十四.注销操作
1.在我们提取出来的公共commons页面,顶部导航栏处中的标签添加href属性,实现点击发起请求/user/logout
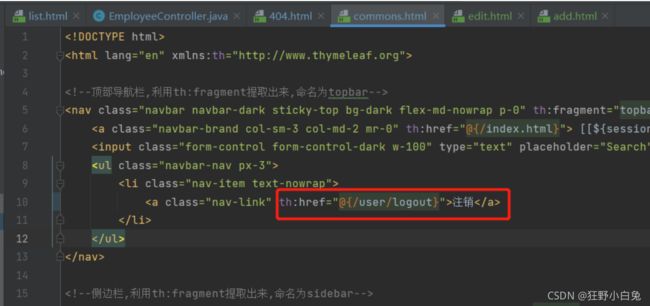
2.然后编写对应的controller,处理点击注销标签的请求,在LoginController中编写对应的方法,清除session,并重定向到首页
@RequestMapping("user/logout")
public String logout(HttpSession session){
    session.invalidate();   //清除session,使无效
    return "redirect:/index.html";
}