SpringBoot+Vue图片上传到阿里云OSS
1.配置阿里云OSS
https://oss.console.aliyun.com/overview

点击工作台,左边菜单栏Bucket列表,创建Bucket
点击右上角账户

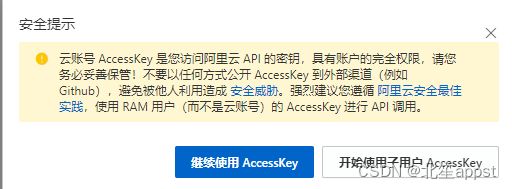
点击AccessKey管理

选择开始使用子用户,创建用户
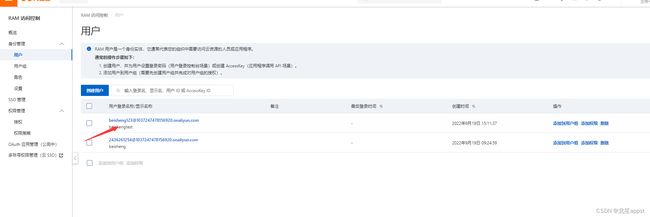
创建成功后会显示你的AccessKey ID 和 AccessKey Secret,复制这两个自己保存一下,
可以看到刚才创建的用户,点击添加权限,进行设置权限
选择AliyunOSSFullAccess,即可赋予当前子用户OSS操作的所有权限
然后配置一下阿里云OSS跨域设置(这个是当前端访问阿里oss上传图片接口的时候,会出现跨域,这里没用到,用的是后端,但是也配一下)
https://blog.csdn.net/omage/article/details/122059938
最后就配置完了
2.导入OSS依赖
<!--阿里云OSS-->
 <dependency>
     <groupId>com.aliyun.oss</groupId>
     <artifactId>aliyun-sdk-oss</artifactId>
     <version>3.10.2</version>
 </dependency>
3.配置配置文件
# 设置最大支持文件大小
spring.servlet.multipart.max-file-size=100MB
spring.servlet.multipart.max-request-size=1000MB
# endPoint
aliyun.endPoint=这里填写你的endPoint
# Bucket
aliyun.urlPrefix=这里填写你的urlPrefix
# accessKey Id
aliyun.accessKeyId=这里填写你的accessKeyId
# accessKey Secret
aliyun.accessKeySecret=这里填写你的accessKeySecret
# BucketName
aliyun.bucketName=这里填写你的BucketName
# 设置上传文件后的前缀,也可以忽略
aliyun.fileHost=D:/image
4.后端代码(这里的R是统一返回值)
R
package cn.bgs.utils;

import io.swagger.annotations.ApiModelProperty;
import lombok.Data;

import java.util.HashMap;
import java.util.Map;

@Data
public class R {
    @ApiModelProperty(value = "是否成功")
    private Boolean success;
    @ApiModelProperty(value = "返回码")
    private Integer code;
    @ApiModelProperty(value = "返回消息")
    private String message;
    @ApiModelProperty(value = "返回数据")
    private Map<String, Object> data = new HashMap<String, Object>();
    private R(){}
    public static R ok(){
        R r = new R();
        r.setSuccess(true);
        r.setCode(ResultCode.SUCCESS);
        r.setMessage("成功");
        return r;
    }
    public static R error(){
        R r = new R();
        r.setSuccess(false);
        r.setCode(ResultCode.ERROR);
        r.setMessage("失败");
        return r;
    }
    public R success(Boolean success){
        this.setSuccess(success);
        return this;
    }
    public R message(String message){
        this.setMessage(message);
        return this;
    }
    public R code(Integer code){
        this.setCode(code);
        return this;
    }
    public R data(String key, Object value){
        this.data.put(key, value);
        return this;
    }
    public R data(Map<String, Object> map){
        this.setData(map);
        return this;
    }
}
config
/**
 * @Auther: csp1999
 * @Date: 2020/10/31/13:33
 * @Description: 阿里云 OSS 基本配置
 */
// 声明配置类,放入Spring容器
@Configuration
// 指定配置文件位置
@PropertySource(value = {"classpath:application.properties"})
// 指定配置文件中自定义属性前缀
@ConfigurationProperties(prefix = "aliyun")
@Data// lombok
@Accessors(chain = true)// 开启链式调用
public class AliyunOssConfig {
    private String endPoint;// 地域节点
    private String accessKeyId;
    private String accessKeySecret;
    private String bucketName;// OSS的Bucket名称
    private String urlPrefix;// Bucket 域名
    private String fileHost;// 目标文件夹

    // 将OSS 客户端交给Spring容器托管
    @Bean
    public OSS OSSClient() {
        return new OSSClient(endPoint, accessKeyId, accessKeySecret);
    }
}
controller
/**
 * @Auther: beisheng
 * @Date: 2020/10/31/16:40
 * @Description: OSS 文件上传controller
 */
@Api(description = "阿里云OSS文件上传、下载、删除API")
@CrossOrigin
@RequestMapping("api/pri/file")
@RestController
public class OssFileController {
    @Autowired
    private FileUploadService fileUploadService;

    /*
     * 文件上传api
     * @param: file
     * @return: com.alibaba.fastjson.JSONObject
     * @create: 2020/10/31 17:35
     * @author: beisheng
     */
    @ApiOperation(value = "文件上传")
    @PostMapping("upload")
    public R upload(@RequestParam("file") MultipartFile file) {
        if (file != null) {
            oss returnFileUrl = fileUploadService.upload(file);
            if (returnFileUrl.equals("error")) {
              return R.error("图片类型不符合");
            }
            return R.ok("图片上传成功").data("fileUrl",returnFileUrl);
        } else {
            return R.error("图片上传失败");
        }
    }

    /*
     * 文件下载api
     * @param: fileName
     * @param: response
     * @return: com.alibaba.fastjson.JSONObject
     * @create: 2020/10/31 17:35
     * @author: beisheng
     */
    @ApiOperation(value = "文件下载")
    @GetMapping(value = "download/{fileName}")
    public R download(@PathVariable("fileName") String fileName, HttpServletResponse response) throws Exception {

        String status = String.valueOf(fileUploadService.download(fileName, response));
        if (status.equals("error")) {
            return R.error("文件下载失败");
        } else {
            return R.ok("文件下载成功");
        }
    }

    /*
     * 文件删除api
     * @param: fileName
     * @return: com.alibaba.fastjson.JSONObject
     * @create: 2020/10/31 17:35
     * @author: beisheng
     */
    @ApiOperation(value = "文件删除")
    @GetMapping("/delete/{fileName}")
    public R DeleteFile(@PathVariable("fileName") String fileName) {

        String status = String.valueOf(fileUploadService.delete(fileName));
        if (status.equals("error")) {
            return R.error("文件删除失败");
        } else {
            return R.ok("文件删除成功");
        }
    }
service实现类
/**
 * @Auther: beisheng
 * @Date: 2020/10/31/14:30
 * @Description: 文件上传Service (为节省文章中的代码篇幅,不再做接口实现类处理)
 */
@Service("fileUploadService")
public class FileUploadServiceImpl implements FileUploadService {
    // 允许上传文件(图片)的格式
    private static final String[] IMAGE_TYPE = new String[]{".bmp", ".jpg",
            ".jpeg", ".gif", ".png"};
    @Autowired
    private OSS ossClient;// 注入阿里云oss文件服务器客户端
    @Autowired
    private AliyunOssConfig aliyunOssConfig;// 注入阿里云OSS基本配置类

    /*
     * 文件上传
     * 注:阿里云OSS文件上传官方文档链接:https://help.aliyun.com/document_detail/84781.html?spm=a2c4g.11186623.6.749.11987a7dRYVSzn
     * @param: uploadFile
     * @return: string
     * @create: 2020/10/31 14:36
     * @author: beisheng
     */
    @Override
    public oss upload(MultipartFile uploadFile) {
        // 获取oss的Bucket名称
        String bucketName = aliyunOssConfig.getBucketName();
        // 获取oss的地域节点
        String endpoint = aliyunOssConfig.getEndPoint();
        // 获取oss的AccessKeySecret
        String accessKeySecret = aliyunOssConfig.getAccessKeySecret();
        // 获取oss的AccessKeyId
        String accessKeyId = aliyunOssConfig.getAccessKeyId();
        // 获取oss目标文件夹
        String filehost = aliyunOssConfig.getFileHost();
        // 返回图片上传后返回的url
        String returnImgeUrl = "";

        oss oss = new oss();

        // 校验图片格式
        boolean isLegal = false;
        for (String type : IMAGE_TYPE) {
            if (StringUtils.endsWithIgnoreCase(uploadFile.getOriginalFilename(), type)) {
                isLegal = true;
                break;
            }
        }
        if (!isLegal) {// 如果图片格式不合法
            return null;
        }
        // 获取文件原名称
        String originalFilename = uploadFile.getOriginalFilename();
        // 获取文件类型
        String fileType = originalFilename.substring(originalFilename.lastIndexOf("."));
        // 新文件名称
        String newFileName = UUID.randomUUID().toString() + fileType;
        // 构建日期路径, 例如:OSS目标文件夹/2020/10/31/文件名
        String filePath = new SimpleDateFormat("yyyy/MM/dd").format(new Date());
        // 文件上传的路径地址
        String uploadImgeUrl = filehost + "/" + filePath + "/" + newFileName;

        oss.setNewFileName(newFileName);

        // 获取文件输入流
        InputStream inputStream = null;
        try {
            inputStream = uploadFile.getInputStream();
        } catch (IOException e) {
            e.printStackTrace();
        }
        /**
         * 下面两行代码是重点坑:
         * 现在阿里云OSS 默认图片上传ContentType是image/jpeg
         * 也就是说,获取图片链接后,图片是下载链接,而并非在线浏览链接,
         * 因此,这里在上传的时候要解决ContentType的问题,将其改为image/jpg
         */
        ObjectMetadata meta = new ObjectMetadata();
        meta.setContentType("image/jpg");

        //文件上传至阿里云OSS
        ossClient.putObject(bucketName, uploadImgeUrl, inputStream, meta);
        /**
         * 注意:在实际项目中,文件上传成功后,数据库中存储文件地址
         */
        // 获取文件上传后的图片返回地址
        returnImgeUrl = "http://" + bucketName + "." + endpoint + "/" + uploadImgeUrl;

        oss.setUploadImgeUrl(uploadImgeUrl);

        oss.setReturnImgeUrl(returnImgeUrl);

        return oss;
    }

    /*
     * 文件下载
     * @param: fileName
     * @param: outputStream
     * @return: void
     * @create: 2020/10/31 16:19
     * @author: beisheng
     */
    @Override
    public R download(String fileName, HttpServletResponse response) throws UnsupportedEncodingException {
//        // 设置响应头为下载
//        response.setContentType("application/x-download");
//        // 设置下载的文件名
//        response.addHeader("Content-Disposition", "attachment;fileName=" + fileName);
//        response.setCharacterEncoding("UTF-8");
        // 文件名以附件的形式下载
        response.setHeader("Content-Disposition", "attachment;filename=" + URLEncoder.encode(fileName, "UTF-8"));

        // 获取oss的Bucket名称
        String bucketName = aliyunOssConfig.getBucketName();
        // 获取oss目标文件夹
        String filehost = aliyunOssConfig.getFileHost();
        // 日期目录
        // 注意,这里虽然写成这种固定获取日期目录的形式,逻辑上确实存在问题,但是实际上,filePath的日期目录应该是从数据库查询的
        String filePath = new DateTime().toString("yyyy/MM/dd");

        String fileKey = filehost + "/" + filePath + "/" + fileName;
        // ossObject包含文件所在的存储空间名称、文件名称、文件元信息以及一个输入流。
        OSSObject ossObject = ossClient.getObject(bucketName, fileKey);
        try {
            // 读取文件内容。
            InputStream inputStream = ossObject.getObjectContent();
            BufferedInputStream in = new BufferedInputStream(inputStream);// 把输入流放入缓存流
            ServletOutputStream outputStream = response.getOutputStream();
            BufferedOutputStream out = new BufferedOutputStream(outputStream);// 把输出流放入缓存流
            byte[] buffer = new byte[1024];
            int len = 0;
            while ((len = in.read(buffer)) != -1) {
                out.write(buffer, 0, len);
            }
            if (out != null) {
                out.flush();
                out.close();
            }
            if (in != null) {
                in.close();
            }
            return R.ok("成功");
        } catch (Exception e) {
            return R.error("失败");
        }
    }

    /*
     * 文件删除
     * @param: objectName
     * @return: java.lang.String
     * @create: 2020/10/31 16:50
     * @author: beisheng
     */
    @Override
    public R delete(String fileName) {
        // 获取oss的Bucket名称
        String bucketName = aliyunOssConfig.getBucketName();
        // 获取oss的地域节点
        String endpoint = aliyunOssConfig.getEndPoint();
        // 获取oss的AccessKeySecret
        String accessKeySecret = aliyunOssConfig.getAccessKeySecret();
        // 获取oss的AccessKeyId
        String accessKeyId = aliyunOssConfig.getAccessKeyId();
        // 获取oss目标文件夹
        String filehost = aliyunOssConfig.getFileHost();
        // 日期目录
        // 注意,这里虽然写成这种固定获取日期目录的形式,逻辑上确实存在问题,但是实际上,filePath的日期目录应该是从数据库查询的
        String filePath = new DateTime().toString("yyyy/MM/dd");

        try {
            /**
             * 注意:在实际项目中,不需要删除OSS文件服务器中的文件,
             * 只需要删除数据库存储的文件路径即可!
             */
            // 建议在方法中创建OSSClient 而不是使用@Bean注入,不然容易出现Connection pool shut down
            OSSClient ossClient = new OSSClient(endpoint,
                    accessKeyId, accessKeySecret);
            // 根据BucketName,filetName删除文件
            // 删除目录中的文件,如果是最后一个文件fileoath目录会被删除。
            String fileKey = filehost + "/" + filePath + "/" + fileName;
            ossClient.deleteObject(bucketName, fileKey);

            try {
            } finally {
                ossClient.shutdown();
            }
            System.out.println("文件删除!");
            return R.ok();
        } catch (Exception e) {
            e.printStackTrace();
            return R.error();
        }
    }
}
pojo
@Data
public class oss {
    //带文件夹的文件名 D:/image/2022/09/19/d174a539-c9a8-4c86-94c4-660bd6693cf3.jpg
    private String uploadImgeUrl;
    //文件名称 d174a539-c9a8-4c86-94c4-660bd6693cf3.jpg
    private String newFileName;
    // 文件访问地址 http://edu-2004-0926.oss-cn-beijing.aliyuncs.com/D:/image/2022/09/19/da8da243-3095-4ef2-8a9a-2be232a482ef.jpg
    private String returnImgeUrl;
}
5.前端代码
<template>
  <div>
    <el-upload
      class="avatar-uploader"
      action="http://localhost:8080/renren-fast/api/pri/file/upload"
      :show-file-list="false"
      :on-success="handleAvatarSuccess"
      :before-upload="beforeAvatarUpload">
      <img v-if="tableData.avator" :src="tableData.avator" class="avatar" style="width: 200px;height: 200px">
      <i v-else class="el-icon-plus avatar-uploader-icon"></i>
    </el-upload>
    <i class="el-icon-delete" @click="deleteImg"></i>
    <i class="el-icon-download" @click="insertImg"></i>
  </div>
</template>
<script>
  export default {
    data() {
      return {
        tableData:{
          //图片访问地址
          avator:'',
          //图片名称
          delImg:'',
        }
      };
    },

    methods: {
      //删除图片
      deleteImg(){
        this.$http({
          url: this.$http.adornUrl(`/api/pri/file/delete/${this.tableData.delImg}`),
          method: 'get',
          params: this.$http.adornParams()
        }).then(res=>{
          this.$message.success("图片删除成功!")
        })
      },
      //下载图片
      insertImg(){
        this.$http({
          url: this.$http.adornUrl(`/api/pri/file/download/${this.tableData.delImg}`),
          method: 'get',
          params: this.$http.adornParams()
        }).then(res=>{
          this.$message.success("图片下下载成功!")
        })
      },
      //文件上传成功
      handleAvatarSuccess(res) {
        this.$message.success("图片上传成功!")
        this.tableData.avator = res.fileUrl.returnImgeUrl;
        this.tableData.delImg= res.fileUrl.newFileName;
        alert(this.tableData.delImg)
      },
      //限制用户上传的图片格式和大小
      beforeAvatarUpload(file) {
        const isLt2M = file.size / 1024 / 1024 < 10;

        if (!isLt2M) {
          this.$message.error('上传图片大小不能超过 10MB!');
        }
        return isLt2M;
      }

    }
  };
</script>
<style lang="scss">
  .flex {
    display: flex;
  }
  .flex-1 {
    flex: 1;
  }
  .upload-img {
    flex-direction: column;
    justify-content: center;
    align-items: center;
    .el-upload__tip {
      text-align: center;
    }
  }
</style>

