SpringSecurity 源码解析 | 加JWT 实战 之 授权流程源码分析
前两篇分析了SpringSecurity 认证源码和自定义认证流程,本片主要讲下另一个核心授权。
简单理解: 登录认证是用来确认用户是否能访问系统。 授权就是:你认证通过之后,还要检查是你是否满足资源所要求的权限。
我们用之前的源码继续分析。
首选思考下,要是你来实现这个框架,你怎么去处理授权这个流程?
正常来说,基于RBAC思想(基于角色的权限控制),权限控制的源头是资源,比如 API_1,要想根据用户来控制是否能访问API_1,我们判断该用户是否有访问API_1的角色。
那么简单流程就是: 当用户方位API_1时,我们判断用户信息里面是否有访问API_1的角色,如果有就可以访问,没有就不能访问,其实SpringSecurity也是如此
所以我们要在分析源码之前要有个起码的思路:
1. 怎么授权?
猜测SpringSecurity会提供授权方式,但是我们暂时还不知道,只有知道了它怎么验证的,因为验证过程中肯定要获取授权的权限信息。这时我们才能底层了解怎么授权。
2. 怎么验证?
SpringSecurity授权验证的核心。流程思想猜测如上。
3. 验证之后处理?
验证有成功有失败要怎么处理。按照正常来说,对于验证不通过的,肯定要进行提示,类似于认证环节的FailureHander,通过了应该就直接访问api了。
SpringSecurity授权验证源码分析
根据第一篇介绍的内容,发现授权验证的过滤器为FilterSecurityInterceptor,那好说直接上。
// 核心是doFilter 方法,和调用的invoke方法 其他的内容,我删除省略了
public class FilterSecurityInterceptor extends AbstractSecurityInterceptor implements
		Filter {
	// ~ Static fields/initializers
	// =====================================================================================

	public void doFilter(ServletRequest request, ServletResponse response,
			FilterChain chain) throws IOException, ServletException {

        // 获取到了当前请求的地址url:/system/user/list
		FilterInvocation fi = new FilterInvocation(request, response, chain);
        // 调用
		invoke(fi);
	}

    // fi 是当前请求的地址url:/system/user/list
	public void invoke(FilterInvocation fi) throws IOException, ServletException {

        // 判断是否已经认证过了,避免重复认证
		if ((fi.getRequest() != null)
				&& (fi.getRequest().getAttribute(FILTER_APPLIED) != null)
				&& observeOncePerRequest) {
			// filter already applied to this request and user wants us to observe
			// once-per-request handling, so don't re-do security checking
			fi.getChain().doFilter(fi.getRequest(), fi.getResponse());
		}
		else {

			// 第一次调用这个请求,所以执行安全检查
			if (fi.getRequest() != null && observeOncePerRequest) {
                // 设置标记FILTER_APPLIED 为true ,上面一进来就会判断,只处理一次
				fi.getRequest().setAttribute(FILTER_APPLIED, Boolean.TRUE);
			}

            // 核心验证流程
			InterceptorStatusToken token = super.beforeInvocation(fi);

			try {
				fi.getChain().doFilter(fi.getRequest(), fi.getResponse());
			}
			finally {
				super.finallyInvocation(token);
			}

			super.afterInvocation(token, null);
		}
	}

	serveOncePerRequest = observeOncePerRequest;
	}
}
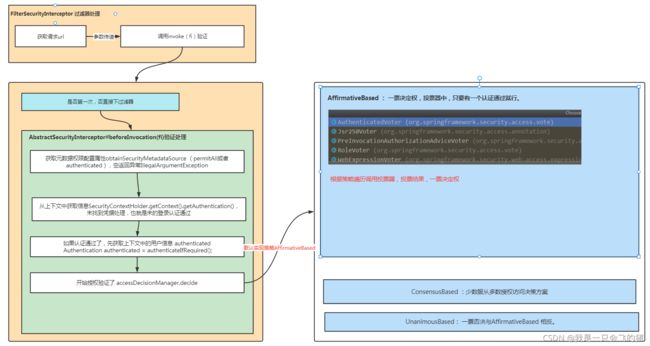
FilterSecurityInterceptor核心先判断是否已经验证过了,如果是第一次验证,就走验证流程,核心方法 beforeInvocation(fi)该参数是请求地址。那我们直接看beforeInvocation方法:
该方法是 AbstractSecurityInterceptor实现的:
protected InterceptorStatusToken beforeInvocation(Object object) {
		Assert.notNull(object, "Object was null");
		final boolean debug = logger.isDebugEnabled();

	......

        // 获取元数据权限配置属性,其实就是httpSecurity中 你对该资源配置的限制是permitAll,还是authenticated
		Collection attributes = this.obtainSecurityMetadataSource()
				.getAttributes(object);
        // 如果获取到是null 异常 IllegalArgumentException
		if (attributes == null || attributes.isEmpty()) {
			if (rejectPublicInvocations) {
				throw new IllegalArgumentException(
						"Secure object invocation "
								+ object
								+ " was denied as public invocations are not allowed via this interceptor. "
								+ "This indicates a configuration error because the "
								+ "rejectPublicInvocations property is set to 'true'");
			}

			if (debug) {
				logger.debug("Public object - authentication not attempted");
			}

			publishEvent(new PublicInvocationEvent(object));

			return null; // no further work post-invocation
		}
         ......
        // 从上下文中获取信息(还记得吧这是认证环节加进去的,所以没登录是没有的),所以未null就代表你都没认证通过,还来授权验证?
		if (SecurityContextHolder.getContext().getAuthentication() == null) {
			credentialsNotFound(messages.getMessage(
					"AbstractSecurityInterceptor.authenticationNotFound",
					"An Authentication object was not found in the SecurityContext"),
					object, attributes);
		}

        // 以下核心重点 : 如果认证通过了,先获取上下文中的用户信息 authenticated
		Authentication authenticated = authenticateIfRequired();


		try {
            // 开始授权验证了 decide
			this.accessDecisionManager.decide(authenticated, object, attributes);
		}
		catch (AccessDeniedException accessDeniedException) {
            // 认证失败处理 : 这里是发布的时间,具体的异常是抛给了上一个过滤器,处理的
			publishEvent(new AuthorizationFailureEvent(object, attributes, authenticated,
					accessDeniedException));

			throw accessDeniedException;
		}

		if (debug) {
			logger.debug("Authorization successful");
		}
         // 认证通过处理
		if (publishAuthorizationSuccess) {
			publishEvent(new AuthorizedEvent(object, attributes, authenticated));
		}

		// Attempt to run as a different user
		Authentication runAs = this.runAsManager.buildRunAs(authenticated, object,
				attributes);

		if (runAs == null) {
			if (debug) {
				logger.debug("RunAsManager did not change Authentication object");
			}

			// no further work post-invocation
			return new InterceptorStatusToken(SecurityContextHolder.getContext(), false,
					attributes, object);
		}
		else {
			if (debug) {
				logger.debug("Switching to RunAs Authentication: " + runAs);
			}

			SecurityContext origCtx = SecurityContextHolder.getContext();
			SecurityContextHolder.setContext(SecurityContextHolder.createEmptyContext());
			SecurityContextHolder.getContext().setAuthentication(runAs);

			// need to revert to token.Authenticated post-invocation
			return new InterceptorStatusToken(origCtx, true, attributes, object);
		}
	}
这个 beforeInvocation分析是不是很像是分析 ProviderManager,确实后面更像。
这个主要就是从元数据资源中获取到配置属性,就是我们设置的httpSecurity:permitAll | authenticated
之后判断是否能从上下文中获取到用户信息 authenticated,如果能获取到进行验证环节,如果不能就代表你还没有登录认证,就抛出异常。
然后调用验证方法:
this.accessDecisionManager.decide(authenticated - 用户信息 ,
                                   object -- 请求路径url ,
                                    attributes -- 设置的属性) ;
进入decide发现是接口 AccessDecisionManager的方法。哇喔是不是太像 ProviderManager。
看下实现类吧

这三个实现类,可以解决为3中策略实现,而每种策略都会执行多个voter投票器,每个投票器都会产生一个result结果也就是
int ACCESS_GRANTED = 1;
int ACCESS_ABSTAIN = 0;
int ACCESS_DENIED = -1;
说的比较概念,一会看源码就懂了。
AffirmativeBased : 一票决定权,投票器中,只要有一个认证通过就行。
ConsensusBased :少数服从多数授权访问决策方案
UnanimousBased: 一票否决与AffirmativeBased 相反。
我们常用的是AffirmativeBased这种也是框架默认的策略。
说到着是不是很蒙蔽,别急继续看:我们重点看AffirmativeBased
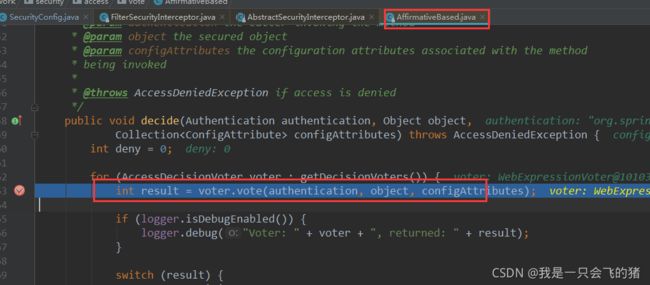
进入AffirmativeBased实现类看 decide实现:
public void decide(Authentication authentication, Object object,
			Collection configAttributes) throws AccessDeniedException {
		int deny = 0;

// 我怀疑你是跟写认证的是一个人。遍历一个投票器,但是这里不是选择投票器,而是每个都执行
		for (AccessDecisionVoter voter : getDecisionVoters()) {

            // 代码层面理解,就是AccessDecisionVoter接口的实现类该方法每个都执行下。
			int result = voter.vote(authentication, object, configAttributes);

			if (logger.isDebugEnabled()) {
				logger.debug("Voter: " + voter + ", returned: " + result);
			}

            // 如果有1的直接return :一票决定,直接停止后面voter执行
			switch (result) {
			case AccessDecisionVoter.ACCESS_GRANTED:
				return;
            // 如果是-1拒绝 就存起来++
			case AccessDecisionVoter.ACCESS_DENIED:
				deny++;

				break;
            // 如果放弃,直接停止后面voter执行,当为放弃的时候,就意味着没有配置权限,就不走验证流程。
			default:
				break;
			}
		}

		if (deny > 0) {
			throw new AccessDeniedException(messages.getMessage(
					"AbstractAccessDecisionManager.accessDenied", "Access is denied"));
		}

		// To get this far, every AccessDecisionVoter abstained
		checkAllowIfAllAbstainDecisions();
	}
上面源码其实非常简单,大致就是遍历所有的投票器(实现类),每个实现类的该方法都执行,然后根据返回的结果基于一票决定处理。
为什么这样做呢?
AccessDecisionVoter简介 网上找的AccessDecisionVoter介绍,可以看下。
我再解释下:
就是说对于权限授权方式和认证策略有很多种(5个):
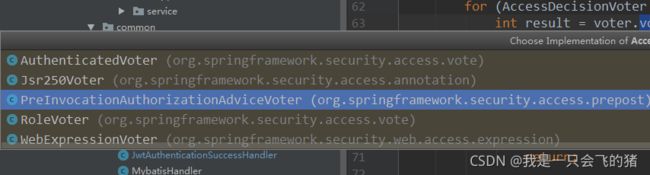
比如 WebExpressionVoter 投票器:就是用来处理 http.authorizeRequests() 配置, 基于 Spring-EL进行控制权限的的授权决策类。(springSecurity的常用的,就是在httpsecurity那玩意)
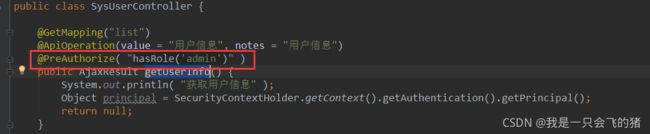
再比如: PreInvocationAuthorizationAdviceVoter投票器 : 用于处理基于注解 @PreFilter 和 @PreAuthorize 生成的 PreInvocationAuthorizationAdvice,来处理授权决策的实现。
所以基于不同的决策,使用的研发者不同也会不一样,比如:我使用了httpsecurity进行授权配置,在遍历时WebExpressionVoter 投票器就会拿到授权信息,进行授权,成功返回1。在没有配置其他的情况下PreInvocationAuthorizationAdviceVoter等投票器返回0,所以又是基于AffirmativeBased一票决定策略,所以验证通过。所以这种形式可以混合使用。
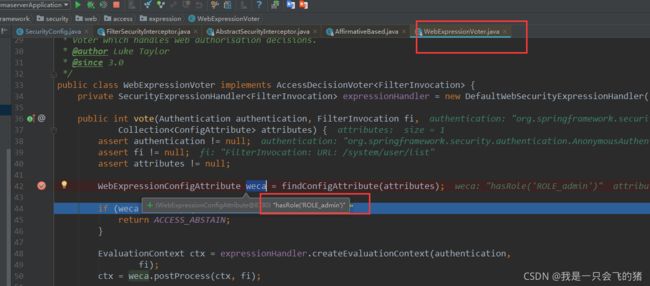
是不是这样的呢? 我们再看下 WebExpressionVoter中的vote实现。流程给我们猜想的一直,
详细的评估处理,这里就不详细跟踪了,因为这里用是表达式不好操作,大致就是根据用户的权限列表和要求的设置的权限比较。
public int vote(Authentication authentication, FilterInvocation fi,
			Collection attributes) {
		assert authentication != null;
		assert fi != null;
		assert attributes != null;

        // 获取httpsecutiy配置的权限内容
		WebExpressionConfigAttribute weca = findConfigAttribute(attributes);
        // 但获取到的为空时,意味着没有配置内容,则默认不验证。返回 放弃:停止后续验证。
		if (weca == null) {
			return ACCESS_ABSTAIN;
		}
        // 将用户信息和地址 创建评估上下文
		EvaluationContext ctx = expressionHandler.createEvaluationContext(authentication,
				fi);

        // 评估处理,这里就不详细跟踪了,因为这里用是表达式不好操作,大致就是根据用户的权限列表和要求的设置的权限比较
		ctx = weca.postProcess(ctx, fi);
		return ExpressionUtils.evaluateAsBoolean(weca.getAuthorizeExpression(), ctx) ? ACCESS_GRANTED
				: ACCESS_DENIED;
	}
其他几种投票器处理也比较简单。可以自行查看下。然我们实验下,是不是所说的不同的配置方式,会由不同的决策处理。
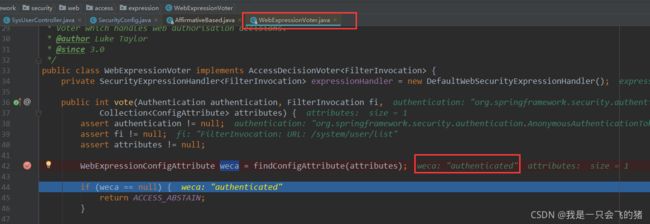
1. 我们httpSecurity配置授权,查看WebExpressionVoter 和 PreInvocationAuthorizationAdviceVoter 是否都能获取到授权信息,按照理论分析,应该只有WebExpressionVoter 能获取到,PreInvocationAuthorizationAdviceVoter 获取到是空。

走断点:进入了AffirmativeBased (一票决定测量)
下一步:进入到了 WebExpressionVoter 投票器,并且获取到了配置权限
在看看PreInvocationAuthorizationAdviceVoter :
额 没进来!! 当然不是分析错误,还记得 源码吧 AffirmativeBased,回去看下,因为WebExpressionVoter 已经投票1了认证通过了,所以后面的都不执行了。
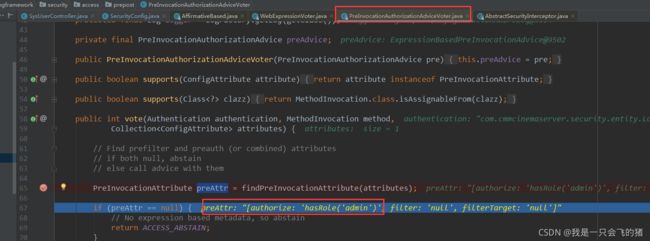
这次我们采用注解形式配置,这样肯定会进去WebExpressionVoter 和 PreInvocationAuthorizationAdviceVoter 的。
断点:先进 AffirmativeBased

下一步:
看到没,进入了 WebExpressionVoter 获取到的 weca只是标记需要验证,并没有获取到我们授权的信息。
继续下一步:调用了PreInvocationAuthorizationAdviceVoter 也获取到了数据。分析正确
以上就是授权验证的过程,通过分析,我们大致可以找到怎么去授权了,个人用的比较多额是httpsecurity和注解。后面可以讲解自定义授权和认证。
然后怎么授权验证的,上面分析了,现在总结下:
最后还有个异常处理的过程,在springsecurity链中ExceptionTranslationFilter用来处理授权认证结果的。后面自定义授权再详细时候下吧。